Christmas Peppermint Trifle Festive and Creamy Delight

Are you ready to make a festive treat that dazzles? This Christmas Peppermint Trifle is both creamy and delightful! I’ll share every step to build this beautiful dessert, perfect for your holiday table. Learn about the best ingredients, techniques, and tips to avoid common mistakes. Let’s dive into a festive world of layers and flavors that will impress your guests and fill your home with joy.
Why I Love This Recipe
- Festive Flavor: This trifle combines delightful peppermint with creamy layers, making it a perfect dessert for the holiday season.
- Layered Beauty: The visually appealing layers of cake, yogurt, and whipped cream create an irresistible presentation that impresses guests.
- Make Ahead: With a chilling time of just 2 hours, this dessert can be prepared in advance, freeing up your time on busy holiday days.
- Customizable: Feel free to adjust the layers or substitute ingredients to suit your taste, making it a versatile dessert for any occasion.
Ingredients
Complete Ingredient List
To make the Christmas Peppermint Trifle, you will need:
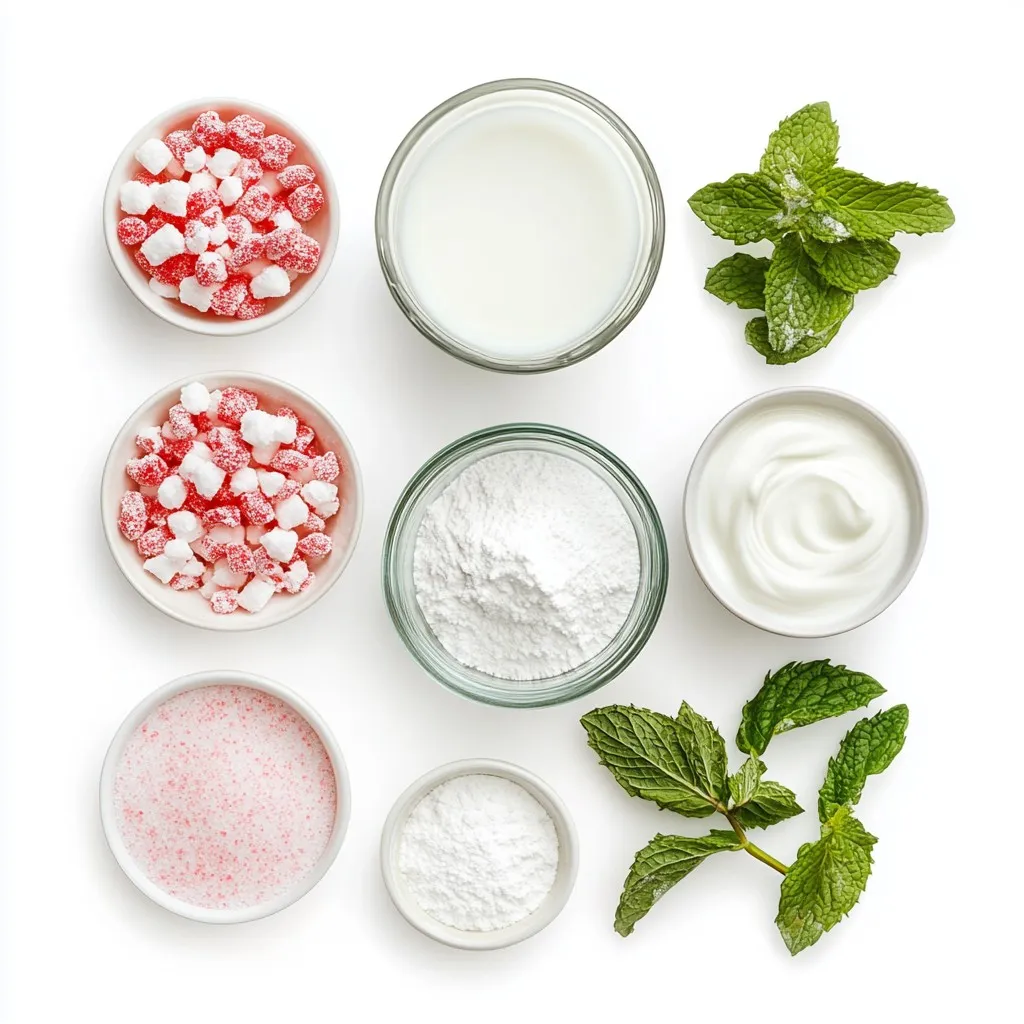
– 1 package (16 oz) peppermint-flavored cake mix
– 1 cup peppermint candy, crushed
– 1 cup whole milk
– 1 package (3.4 oz) vanilla instant pudding mix
– 2 cups heavy cream
– 1/2 cup powdered sugar
– 1 teaspoon vanilla extract
– 1 cup peppermint yogurt (or vanilla yogurt as a substitute)
– Fresh mint leaves for garnish
Ingredient Substitutions
Not everyone may find peppermint yogurt. You can use vanilla yogurt instead. It works well and gives a nice taste. If you want a lighter option, consider using whipped topping instead of heavy cream. The trifle will still be creamy and delicious. For a gluten-free alternative, look for gluten-free cake mix. It keeps the fun alive for everyone!
Essential Tools and Equipment
To create your trifle, gather these tools:
– Mixing bowls for combining ingredients
– Electric mixer for whipping cream
– Baking pan for the cake
– Trifle dish or clear glass bowl for layering
– Whisk for mixing pudding
These tools make the process easier and more enjoyable. Enjoy the festive fun of making your trifle!

Step-by-Step Instructions
Baking the Peppermint Cake
First, preheat your oven. Follow the instructions on the peppermint cake mix package. This step ensures the cake rises and bakes evenly. Once baked, let the cake cool completely on a wire rack. Cooling prevents the trifle from getting soggy later on.
Preparing the Vanilla Pudding
Grab a mixing bowl for this part. Pour in one cup of whole milk and the vanilla pudding mix. Whisk them together until smooth and creamy. This step only takes a few minutes. Place your bowl in the fridge for about five minutes. This helps the pudding thicken up nicely.
Whipping the Cream
Next, use a clean bowl to whip the heavy cream. An electric mixer works best for this task. Start whipping until the cream begins to thicken. Slowly add in the powdered sugar and vanilla extract. Keep whipping until you see soft peaks form. This creamy goodness gives our dessert its light texture.
Assembling the Trifle
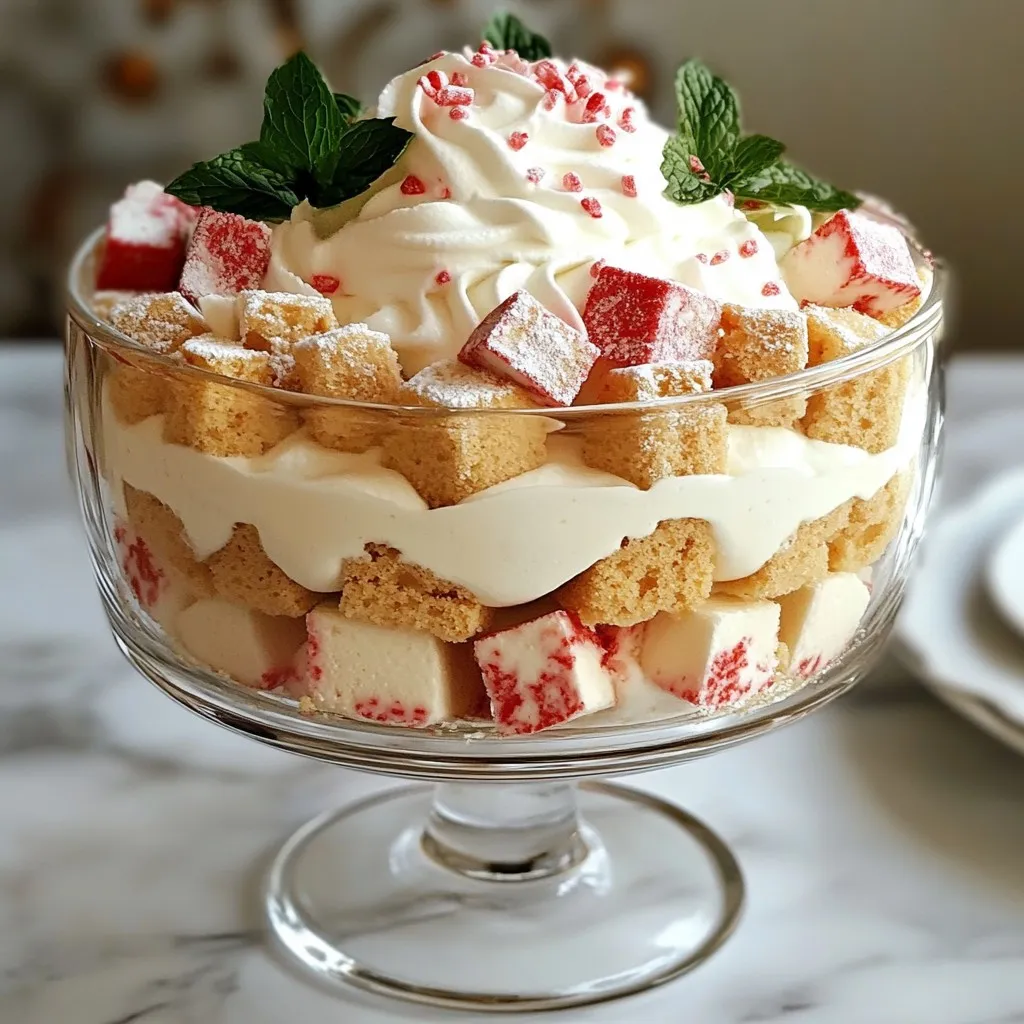
Now, it’s time to layer everything! Cut your cooled cake into bite-sized cubes. Start with a layer of cake cubes at the bottom of a large trifle dish. Sprinkle a generous amount of crushed peppermint over the cake. Then, spoon a layer of peppermint yogurt on top. Follow this with a layer of vanilla pudding. Repeat these layers until you fill the dish. Finish with a fluffy layer of whipped cream on top.
Chilling Time Recommendations
Cover the trifle dish with plastic wrap. Place it in the fridge for at least two hours. This chilling time allows the layers to blend and flavors to meld. The longer it chills, the better it tastes. Enjoy the festive treat!
Tips & Tricks
Presentation Ideas
For a beautiful trifle, use clear glass bowls or cups. This lets everyone see the lovely layers. You can add a sprig of fresh mint on top for color. Crushed peppermint also makes a great garnish. It adds a fun crunch and festive cheer. Try using different sizes of bowls for variety. This makes serving more fun!
Ensuring the Best Texture
The key to a great trifle is texture. Make sure your cake is cool before you cut it. This helps it hold its shape. When whipping the cream, stop when you see soft peaks. Don’t over-whip, or it may turn grainy. Layering is crucial, too. Alternate between the cake, yogurt, and pudding. This creates a nice balance of flavors and textures.
Common Mistakes to Avoid
One mistake is skipping the chilling time. Always let the trifle chill for at least 2 hours. This helps the flavors mix well. Another common error is not cutting the cake properly. Slice it into small, bite-sized cubes. This makes layering easy and keeps everything neat. Lastly, avoid using stale candy. Fresh peppermint adds the best taste and crunch.
Pro Tips
- Use Fresh Ingredients: Always opt for fresh mint leaves and high-quality peppermint candies to enhance the flavor and presentation of your trifle.
- Layer Strategically: Ensure each layer is evenly distributed for a balanced taste and visually appealing presentation. Use a spatula to smooth out each layer as you build.
- Chill Time is Key: Allowing the trifle to chill for at least 2 hours helps the flavors meld and the structure to set, resulting in a more enjoyable dessert.
- Garnish Wisely: When garnishing, consider adding a dusting of cocoa powder or chocolate shavings along with the mint for an extra layer of flavor and a festive look.

Variations
Alternative Flavors
You can switch up the flavor of your trifle. Instead of peppermint cake, try chocolate or vanilla cake. These choices give a new twist to the classic. For a fruity touch, use lemon or raspberry cake. Each flavor pairs well with creamy layers, making it a fun treat.
Different Layering Techniques
Layering can add style to your trifle. You can make it a single-layer trifle for a simple look. Or, go for a tall and elegant version with multiple layers. Use clear glasses for individual servings. This lets everyone see the beautiful layers inside.
Holiday-Themed Additions
Add some festive fun with holiday-themed toppings. Consider crushed gingerbread cookies for a warm spice. You can also use festive sprinkles or colored candies. Fresh berries or pomegranate seeds can add a pop of color. Each addition brings joy and cheer to your Christmas Peppermint Trifle.
Storage Info
How to Properly Store Leftovers
After making your Christmas Peppermint Trifle, you may have some leftovers. To keep it fresh, cover the trifle dish tightly with plastic wrap. This helps prevent the trifle from drying out or absorbing other smells from your fridge. Store it in the refrigerator for up to three days. If you use yogurt, the trifle is best eaten within two days.
Best Practices for Freezing
Freezing this trifle is not recommended. The layers may separate and become watery when thawed. The cream and pudding might lose their smooth texture. If you want to prepare ahead, consider freezing the cake separately. Once cooled, wrap it tightly in plastic wrap and foil. Use it within three months for best taste.
Reheating Tips
You do not need to reheat the trifle. It is best served cold. If you prefer a warm dessert, serve the cake warm and layer it with chilled cream and pudding. This way, you get a nice mix of temperatures without losing the texture of the trifle. Enjoy each bite as it was meant to be!
FAQs
Can I use store-bought cake instead?
Yes, you can use store-bought cake. It saves time and effort. Look for a peppermint-flavored cake to keep the festive taste. If you can’t find that flavor, a vanilla cake works too. Just make sure it’s fresh for the best results.
How long can I store the trifle?
You can store the trifle for up to three days in the fridge. Cover it with plastic wrap to keep it fresh. However, the layers may start to blend together after a day. For the best taste, enjoy it within two days.
What can I use instead of peppermint yogurt?
If you can’t find peppermint yogurt, vanilla yogurt is a great choice. It still adds creaminess and flavor. You can also mix in a little peppermint extract for a similar taste. Just be careful to not add too much.
Is this recipe suitable for gluten-free diets?
This recipe is not gluten-free as it uses cake mix. However, you can use gluten-free cake mix instead. Always check the labels to ensure it meets your dietary needs. This way, everyone can enjoy the trifle!
This blog post covered all you need for a delicious trifle. We explored essential ingredients and possible swaps. You learned step-by-step instructions for baking and assembling. Plus, I shared tips to avoid common mistakes and enhance presentation.
Finally, remember that you can get creative with flavors and storage. Use these insights to make a dessert that impresses and delights. Enjoy your baking journe

Christmas Peppermint Trifle
Ingredients
- 1 package (16 oz) peppermint-flavored cake mix
- 1 cup peppermint candy, crushed
- 1 cup whole milk
- 1 package (3.4 oz) vanilla instant pudding mix
- 2 cups heavy cream
- 1/2 cup powdered sugar
- 1 teaspoon vanilla extract
- 1 cup peppermint yogurt (or vanilla yogurt as a substitute)
- to taste fresh mint leaves for garnish
Instructions
- Prepare the Cake: Begin by preheating your oven and baking the peppermint-flavored cake according to the package instructions. Once it's beautifully baked, remove it from the oven and allow it to cool completely on a wire rack.
- Make the Pudding: In a mixing bowl, combine the whole milk and vanilla pudding mix. Whisk them together vigorously until the mixture is smooth. Place the bowl in the refrigerator for about 5 minutes to allow it to thicken slightly.
- Whip the Cream: In a separate clean bowl, pour in the heavy cream. Using an electric mixer, whip the cream until it starts to thicken. Gradually sift in the powdered sugar and drizzle in the vanilla extract, continuing to whip until you achieve soft peaks.
- Cut the Cake: Once the cake has cooled down completely, slice it into small, bite-sized cubes to make layering easy.
- Layer the Trifle: In a large glass trifle dish, begin the layering process by placing a layer of the cake cubes at the bottom. Follow this with a generous drizzle of crushed peppermint over the cake layer.
- Add Yogurt: Spoon a layer of peppermint yogurt over the crushed peppermint layer, allowing it to blend slightly with the candy. Next, add a layer of the prepared vanilla pudding on top of the yogurt layer.
- Repeat Layers: Continue the layering process until you reach the top of your trifle dish. Alternate the layers in this order: cake cubes, crushed peppermint, yogurt, and pudding, ending with a fluffy layer of whipped cream.
- Garnish: For the finishing touch, sprinkle any remaining crushed peppermint on top of the whipped cream and adorn it with fresh mint leaves for an extra festive flair.
- Chill: Carefully cover the trifle dish with plastic wrap and place it in the refrigerator. Allow it to chill for a minimum of 2 hours before serving to let all the delightful flavors meld together.


![- Smooth natural peanut butter - Pure maple syrup or honey - Coconut oil (melted) - Rolled oats - Dark or semi-sweet chocolate chips - Unsweetened cocoa powder - Pure vanilla extract - Fine sea salt To make delicious chocolate peanut butter bars, you need these key ingredients. First, smooth natural peanut butter gives a creamy base. I love using peanut butter that has no added sugar or oils. It keeps the bars rich and healthy. Next, pure maple syrup or honey sweetens the bars. Both options work well, but maple syrup has a unique flavor. Coconut oil adds a silky texture. Make sure it’s melted for easy mixing. Rolled oats provide fiber and a chewy texture. They help hold everything together. Choose certified gluten-free oats if needed. Dark or semi-sweet chocolate chips add a sweet touch. They melt beautifully into the mixture. Unsweetened cocoa powder brings a rich chocolate flavor. I recommend high-quality cocoa for the best taste. Pure vanilla extract enhances the overall flavor, while fine sea salt balances the sweetness. When making these bars, accurate measurements are key. If you measure wrong, the texture may change. I suggest using a kitchen scale for best results. A scale gives exact amounts, which is very helpful. Use measuring cups for dry ingredients and liquid measuring cups for liquids. Make sure to level off dry ingredients for accuracy. This helps achieve the perfect consistency in your bars. You can customize these bars easily. For sweeteners, try agave syrup or brown rice syrup. Both options work well if you want to change things up. If you prefer a different nut butter, almond or cashew butter are great choices. Just remember that these may alter the taste a bit. For gluten-free options, use certified gluten-free oats. This way, everyone can enjoy these tasty treats without worry. You can find many useful substitutions to fit your needs. Check out the Full Recipe for detailed steps to create your own chocolate peanut butter bars! Start by lining an 8x8 inch baking dish with parchment paper. This helps with easy removal later. Leave some paper overhang on two sides. It makes lifting the bars out simple. Next, grab a large mixing bowl. Combine 1 cup of smooth peanut butter, 1/2 cup of pure maple syrup, and 1/4 cup of melted coconut oil. Use a whisk or spatula to mix until you see a smooth blend. Now it's time to add the dry ingredients. Toss in 1 cup of rolled oats, 1/2 cup of unsweetened cocoa powder, 1 teaspoon of pure vanilla extract, and 1/4 teaspoon of fine sea salt. Mix everything well until you get a thick batter. Now, gently fold in 1/2 cup of dark or semi-sweet chocolate chips. Make sure they spread evenly through the mix. Transfer this mixture into your lined baking dish. Use a spatula or your hands to press it down firmly. You want a compact, even layer. Once done, place the dish in the fridge. Chill it for at least 1 to 2 hours until the mixture feels firm. For the complete recipe, check the Full Recipe section. To make the best chocolate peanut butter bars, focus on texture. You want a smooth, firm bar that holds together well. Use natural peanut butter for creaminess. If your bars turn out dry or crumbly, it often means too many dry ingredients. Stick to the recipe and measure carefully. Mixing well helps combine all the ingredients and avoids clumps. You can boost flavor with simple add-ins. A splash of pure vanilla extract adds depth. A sprinkle of fine sea salt can enhance sweetness too. Consider adding a bit of cinnamon for warmth or even a few tablespoons of crushed nuts for crunch. Each small change can make your bars even better. Presentation matters when serving these bars. Cut them into neat squares or rectangles. Arrange them on a colorful plate for a pop. Drizzling melted chocolate over the top makes them look fancy. You can also sprinkle some crushed peanuts or a pinch of sea salt on top for a rustic touch. These small efforts make your treat feel special. For the full recipe, check out the [Full Recipe]. {{image_4}} If you want to make these bars healthier, you have options. You can use less sweetener. Try using only 1/4 cup of pure maple syrup. You can also replace coconut oil with unsweetened applesauce. This swap cuts calories and adds moisture. Another great idea is to use a sugar substitute. Look for options like stevia or monk fruit. These can help you cut sugar without losing sweetness. Want to switch up the flavor? Add fruits like mashed bananas or shredded coconut. Bananas give a creamy texture, while coconut adds a tropical twist. You can even mix in some almond extract for a nutty flavor boost. Experiment with different nut butters too! Almond butter or cashew butter can change the taste. Each nut butter brings a unique flavor. It’s fun to find your favorite blend. Toppings can make your bars even better. Try sprinkling crushed nuts on top. Walnuts or pecans add a nice crunch. You can also use coconut flakes for a chewy texture. For a sweet finish, drizzle melted chocolate over the top. You can use dark, milk, or even white chocolate. This extra layer makes the bars look fancy and taste amazing. For the full recipe, check out the detailed instructions above. To keep your chocolate peanut butter bars fresh, use an airtight container. This helps prevent moisture and keeps them from drying out. You can store them in the refrigerator or freezer, depending on how long you want to keep them. If you plan to eat them within a week, the fridge is perfect. For longer storage, the freezer is your best option. In the fridge, these bars can last about one week. If you notice any changes in color or smell, it's best to throw them away. Signs of spoilage include a dry texture or a strange odor. Always inspect your bars before enjoying them. You can freeze the bars either one by one or as a whole batch. If you freeze them individually, wrap each bar in plastic wrap or foil. This way, you can grab one whenever you want a treat. If you prefer to freeze the whole batch, just place the container in the freezer. When you're ready to eat, let them thaw in the fridge for a few hours. For the full recipe, check the earlier section. Yes, you can use crunchy peanut butter! It adds a fun texture. The bars will have a nice bite from the peanut pieces. Keep in mind, the flavor may be more intense with crunchy peanut butter. If you enjoy that nutty crunch, go for it! To check if the bars are set, gently press the top with your finger. If it feels firm and springs back, they are ready. You can also look for a slight sheen on the surface. If it’s still soft, give it more time in the fridge. Patience makes perfect bars! For clean cuts, use a sharp knife. Run the knife under hot water, then dry it off. This helps the knife glide through the bars easily. Cut them into squares or rectangles, depending on your preference. If they crumble, try chilling them longer before cutting. Absolutely! To make these bars vegan, use maple syrup instead of honey. Ensure your chocolate chips are dairy-free. Check that your peanut butter has no added ingredients. With these swaps, you can enjoy a tasty vegan treat! In summary, this guide covered how to make delicious no-bake bars. You learned about the key ingredients, measurement tips, and how to mix everything smoothly. We shared storage techniques to keep your bars fresh and variations to suit your taste. Remember, small changes can lead to big flavor. Experiment with different add-ins and toppings to make these bars your own. By following these tips, you’ll enjoy tasty treats that fit your needs. Enjoy making your no-bake bars!](https://fastmealmate.com/wp-content/uploads/2025/06/11f9b23d-ca49-49dd-b442-fa08a6216cde-768x768.webp)


