Chocolate Pocky Christmas Trees Fun and Festive Treats

Get ready to spread holiday cheer with a fun treat: Chocolate Pocky Christmas Trees! These festive bites are simple to make and perfect for adding joy to your celebrations. With just a few ingredients, you can create edible trees that look great and taste even better. Join me as we dive into this easy project that will delight kids and adults alike. Let’s create some holiday magic together!
Ingredients
List of Essential Ingredients
– Plain Pocky sticks – approx 30 sticks
– Dark chocolate chips – 1 cup
– Colorful sprinkles – 1 cup
– Pretzel sticks – 1 cup (for tree trunks)
– Mini marshmallows – 1/2 cup (for decoration)
– Green food coloring – optional
– Edible glitter – optional
When making Chocolate Pocky Christmas Trees, you need simple, fun ingredients. The plain Pocky sticks form the base of your trees. You can find them at most stores. Grab a cup of dark chocolate chips for melting and dipping. Colorful sprinkles add a festive touch to your trees. Pretzel sticks serve as the trunks, giving a nice crunch. Mini marshmallows can decorate the branches and bring a soft texture. You can also use green food coloring for extra flair. Edible glitter makes your trees sparkle. This mix of flavors and textures will delight everyone!
Step-by-Step Instructions
Melting the Chocolate
To start, we need to melt the dark chocolate chips. Use a microwave-safe bowl for this. Heat the chocolate in 30-second bursts. Stir well after each burst. This will help you get a smooth mix. If you want, add green food coloring for a festive look. Stir it in well. Be sure to keep stirring frequently. This makes sure the chocolate melts evenly and does not burn.
Decorating the Pocky Sticks
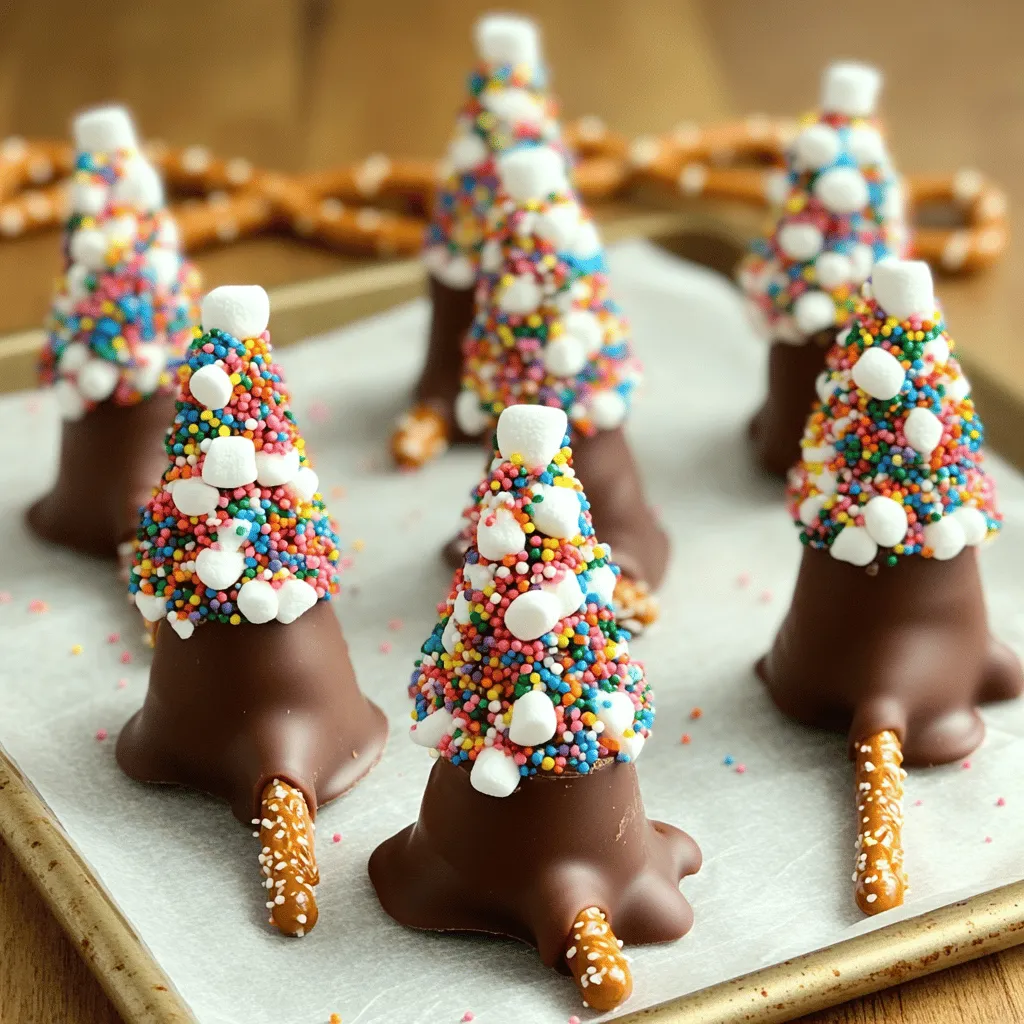
Now, take each Pocky stick. Dip one end into the melted chocolate. Make sure to coat it well. Gently shake off any extra chocolate. Next, roll the chocolate end into the colorful sprinkles. This gives the look of vibrant foliage. You can use any color combination you like. Mix colors for a fun effect. Try using red and green for classic holiday colors.
Assembling the Christmas Trees
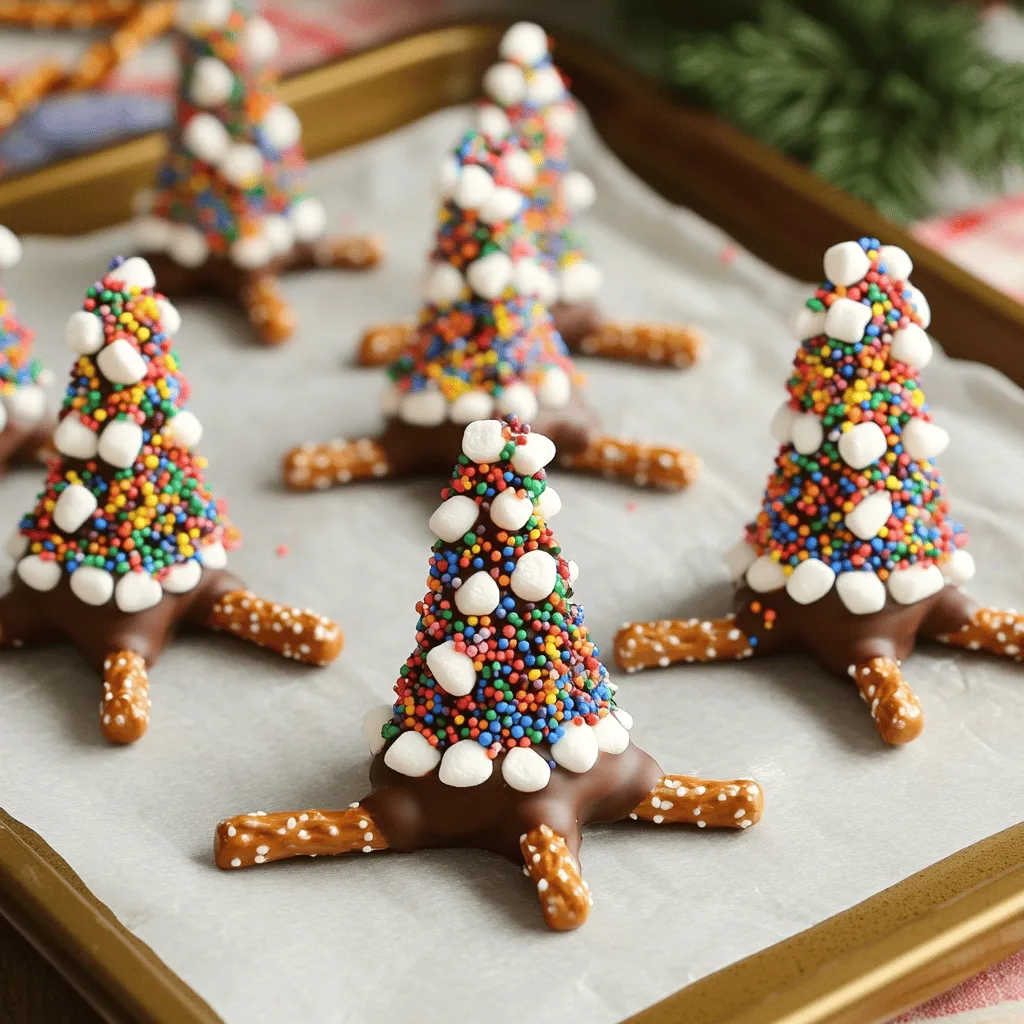
Once your Pocky sticks are decorated, it’s time to assemble the trees. Take the pretzel sticks and cut them in half. These will be the trunks of your trees. When the chocolate on the Pocky sticks is hard, insert the cut end of a pretzel into the bottom. This creates the trunk of your tree.
For extra fun, place mini marshmallows on the branches. You can also sprinkle edible glitter for sparkle. Arrange the marshmallows in a fun way. This adds to the festive look. Make sure everything is set before showing off your tasty creations.
Tips & Tricks
Perfecting Your Chocolate Pocky Trees
To make the best Chocolate Pocky Christmas Trees, avoid these common mistakes:
– Not melting the chocolate properly: Heat it in short bursts and stir.
– Overdipping the Pocky sticks: Keep the chocolate coating light for balance.
– Skimping on sprinkles: Use enough to create a fun look.
To ensure your chocolate sets well, try these tips:
– Chill the decorated sticks in the fridge for faster hardening.
– Use a parchment-lined baking sheet to prevent sticking.
Time-Saving Techniques
You can make these trees ahead of time. Simply store them in an airtight container. They will stay fresh for days!
To simplify the decorating process:
– Use a small bowl for your sprinkles. This helps keep the mess down.
– Have all your ingredients ready before you start. This keeps you organized.
Serving Suggestions
Get creative when presenting your trees! Try placing them on a festive platter. You can also use pretty holiday plates for a nice touch.
Pair these treats with hot cocoa or eggnog. They make great snacks at holiday parties. You can also serve them with a side of whipped cream for dipping.

Variations
Alternative Decoration Ideas
You can get creative with your Chocolate Pocky Christmas Trees. Start by using different colored chocolates. Try white or milk chocolate for a fun twist. You can also swirl colors together for a marbled look. In addition to sprinkles, think about using other edible toppings. Mini candies, crushed nuts, or coconut flakes can add great texture.
Flavor Variations
Flavor is key! Consider flavored Pocky sticks to change things up. You can find options like strawberry or matcha. These flavors will mix well with the chocolate. You can also enhance the chocolate coating. Add a drop of peppermint extract or orange zest for a burst of flavor. These small changes will make your treats stand out.
Dietary Modifications
If you need gluten-free options, swap plain Pocky sticks for gluten-free ones. Many brands offer tasty alternatives that work well. For a vegan-friendly version, use dairy-free chocolate chips. There are many brands now that cater to vegan diets. Check the labels to ensure all ingredients fit your needs. Enjoy your Chocolate Pocky Christmas Trees with these simple swaps!
Storage Info
Best Practices for Storing
To keep your Chocolate Pocky Christmas Trees fresh, store them in a cool, dry place. Heat can make the chocolate melt or lose its shine. I like to use an airtight container for storage. This keeps the treats from getting stale or soggy.
– Use a shallow, airtight container.
– Separate layers with parchment paper to avoid sticking.
– Keep the container in a cool spot, away from sunlight.
Freezing Chocolate Pocky Trees
Freezing these treats is a great option for longer storage. Follow these steps for freezing:
1. Wait for the chocolate to fully harden.
2. Place the Pocky trees in a single layer on a baking sheet.
3. Freeze them for about 1 hour until solid.
4. Transfer the frozen trees to an airtight freezer bag.
When you want to serve them, here are tips for thawing:
– Take them out of the freezer and let them sit for 10-15 minutes.
– Avoid using a microwave, as this can melt the chocolate.
– Enjoy your treats once they are at room temperature!
FAQs
How long do Chocolate Pocky Christmas Trees last?
Chocolate Pocky Christmas Trees last about 5 to 7 days when stored properly. Keep them in a cool, dry place. If you seal them in an airtight container, they stay fresh longer. You can enjoy these treats for days, but they taste best when they are fresh!
Can I use other types of chocolate?
Yes, you can use different types of chocolate! White chocolate and milk chocolate are great options. Just melt them the same way you would with dark chocolate. Each type gives a unique taste and look to your trees. Think about using colored chocolate for extra fun!
Where can I buy Pocky sticks?
You can find Pocky sticks in many stores. Look in the snack aisle of big grocery stores. Asian markets often have a wide selection too. If you prefer shopping online, websites like Amazon and specialty food stores carry them. You can easily find the flavors you love!
Are there nut-free Pocky options available?
Yes, there are nut-free Pocky options! Many brands make Pocky that do not contain nuts. Always check the packaging for allergen information. If you have nut allergies, look for brands that are labeled as allergen-friendly. This way, everyone can enjoy these fun treats!
In this article, we explored how to create festive Chocolate Pocky Christmas Trees. We covered essential ingredients, step-by-step instructions, and useful tips. You learned how to melt chocolate, decorate the sticks, and assemble your treat. We also shared storage tips and flavor variations to try.
These trees are fun to make and enjoyable to share. Get creative with decorations to make them truly unique. Enjoy these tasty treats at your next holiday gathering!


![- 1 lb (450g) boneless, skinless chicken thighs, cut into bite-sized pieces - 4 tablespoons unsalted butter, divided - 4 cloves garlic, minced finely - 1 large lemon, zested and juiced - 1 teaspoon dried thyme - 1 teaspoon paprika - Salt and freshly ground black pepper to taste - Fresh parsley, chopped (for garnish) These ingredients make the dish shine. The chicken thighs give a tender bite. Garlic adds a strong aroma. Lemon brings brightness and tang. Butter makes everything rich and smooth. Thyme and paprika add depth and warmth. - Red pepper flakes for heat - Fresh herbs like basil or cilantro - A splash of white wine for extra richness - Honey for a touch of sweetness Adding some of these can make your dish unique. Red pepper flakes can spice things up. Fresh herbs can add a pop of freshness. A splash of wine creates a deeper flavor. Honey can balance the tartness of lemon. - Large skillet for cooking - Cutting board for prepping the chicken - Sharp knife for cutting the chicken - Measuring spoons for accuracy - Tongs for turning the chicken These tools will help you cook efficiently. A large skillet allows even cooking. A cutting board keeps the workspace tidy. A sharp knife ensures safe and quick cutting. Measuring spoons keep your flavors balanced. Tongs help with easy flipping and serving. For the detailed cooking steps and more, check the Full Recipe. Start by gathering your ingredients. You will need: - 1 lb boneless, skinless chicken thighs, cut into bite-sized pieces - 4 tablespoons unsalted butter, divided - 4 cloves garlic, minced finely - 1 large lemon, zested and juiced - 1 teaspoon dried thyme - 1 teaspoon paprika - Salt and freshly ground black pepper to taste - Fresh parsley, chopped (for garnish) Next, melt 2 tablespoons of butter in a skillet over medium heat. As it melts, season the chicken thighs with paprika, salt, and pepper. This step adds great flavor. Once the butter is bubbling, add the chicken pieces to the skillet. Spread them out evenly for the best sear. Sear the chicken for 5-7 minutes. Turn the chicken occasionally until it turns golden brown on all sides. This browning adds depth to the dish. When done, remove the chicken and set it aside on a plate. In the same skillet, melt the remaining 2 tablespoons of butter. Add the minced garlic and sauté it for about 30 seconds. Stir constantly to prevent burning. Once fragrant, stir in the lemon juice and zest, along with the dried thyme. Let this simmer for 1-2 minutes. This step melds all the flavors together. Now, return the cooked chicken to the skillet. Toss it in the lemon garlic butter sauce until well coated. Cook everything together for another 2 minutes. This helps the chicken absorb the sauce and heat through completely. Once finished, remove the skillet from the heat. Sprinkle fresh parsley over the chicken bites for a vibrant look. Serve the chicken bites in a large dish or individual bowls. Drizzle any remaining garlic butter sauce over the top. Add lemon wedges and extra parsley for an inviting presentation. For the full recipe, check the earlier section. To get juicy chicken, use boneless, skinless thighs. They cook faster and stay moist. Cut the chicken into even pieces for uniform cooking. Sear the chicken in a hot skillet. This gives a nice brown crust. Cook it for 5-7 minutes, flipping halfway through. Always check for doneness; the chicken should reach 165°F (75°C) inside. For a richer sauce, use high-quality butter. Add fresh herbs like rosemary or basil. If you like heat, toss in red pepper flakes. A splash of white wine adds depth, too. For extra zing, use fresh lemon juice instead of bottled. Don’t forget to taste and adjust seasoning. Every bite should burst with flavor. Prep your ingredients before you start cooking. Chop garlic and zest the lemon ahead of time. Use a sharp knife for quick cutting. Consider using a pre-made garlic butter if you’re short on time. You can also marinate the chicken a few hours before cooking. This step adds flavor and cuts down on cooking time. Feel free to explore the [Full Recipe] for complete instructions! {{image_4}} You can swap chicken thighs for other proteins. Try shrimp for a quick cook. Just sauté until they turn pink. You can use pork tenderloin, cut into small pieces. It cooks fast and absorbs flavor well. Even beef cubes work if you like a heartier bite. Adjust cooking time to match the protein you choose. For a vegetarian version, use mushrooms or tofu. Both soak up flavors like a sponge. Sauté mushrooms until golden brown. For tofu, press to remove water, then cut into cubes. Cook until crispy on all sides. Toss these in the lemon garlic butter sauce just like the chicken. If you have allergies, there are easy swaps. Use olive oil instead of butter for a dairy-free option. You can replace garlic with garlic powder if you're sensitive to fresh garlic. For a low-sodium version, use less salt and a salt substitute. Adjust the recipe to fit your taste and needs. Check out the Full Recipe for more ideas and details! To keep your leftover chicken bites fresh, place them in an airtight container. Make sure to let them cool to room temperature first. Store the container in the refrigerator. They will stay good for up to three days. Label the container with the date for easy tracking. Reheating is simple! You can use a skillet or microwave. For the skillet, heat a little butter over medium heat. Add the chicken bites and stir until warmed through. This keeps the flavors intact. If using a microwave, place the chicken in a microwave-safe dish. Cover it with a damp paper towel and heat in 30-second intervals until hot. If you want to freeze the chicken bites, make sure they are cool first. Place them in a freezer-safe bag or container. Remove as much air as possible to avoid freezer burn. They can last for up to three months in the freezer. When ready to eat, thaw them in the fridge overnight. Then reheat them as mentioned above. Enjoy your Lemon Garlic Butter Chicken Bites again! For the full recipe, check out the earlier section. Yes, you can use chicken breast instead of thighs. Chicken breast is leaner and will cook faster. Just make sure to cut it into similar bite-sized pieces. You may need to adjust the cooking time to keep it juicy. Lemon Garlic Butter Chicken Bites pair well with many sides. Here are a few ideas: - Steamed rice - Pasta with olive oil - Roasted vegetables - A fresh green salad - Garlic bread These options balance the rich flavors of the chicken and add variety to your meal. This recipe is not spicy. It focuses on lemon, garlic, and herbs for flavor. If you want some heat, you can add red pepper flakes. Start with a small amount and taste as you go. To keep the chicken juicy, follow these tips: - Do not overcook the chicken. Use a meat thermometer to check for doneness. - Let the chicken rest for a few minutes after cooking. This helps keep the juices inside. - Use the butter and garlic sauce generously. It adds moisture and flavor. Following these steps will help you achieve tender and juicy chicken bites. For the complete recipe, check out the [Full Recipe]. This blog covered how to make Lemon Garlic Butter Chicken Bites. We looked at key and optional ingredients, as well as the tools you need. I provided step-by-step cooking instructions and tips for perfect chicken. We explored variations, storage methods, and answered common questions. Now, you have all the tools to whip up this dish with ease. Enjoy cooking and share your tasty results!](https://fastmealmate.com/wp-content/uploads/2025/05/97cbb791-292c-4238-a79b-781f43956dc5-768x768.webp)
. Prepare to impress your friends and family! - In a medium saucepan, combine diced Granny Smith apples, brown sugar, ground cinnamon, ground nutmeg, and fresh lemon juice. - Cook over medium heat for 5-7 minutes. Stir occasionally until the apples are tender and caramelized. Cooking the apples is key. The sugar helps them become sweet, while the spices add warmth. The lemon juice brightens the flavor, making it pop. You want the apples to be soft but not mushy. The perfect mix will smell heavenly! - Take a large serving board and spread softened butter evenly across the surface. - Carefully layer the warm caramelized apples over the butter. The butter acts as a rich base. It helps the apples stick and adds creaminess. Make sure to cover the board well. This step sets the stage for the sweet treats to come. - Generously drizzle caramel sauce over the apples. - If you like, sprinkle chopped pecans or walnuts on top. Finish with a pinch of flaky sea salt. The caramel sauce enhances the sweetness and creates a lovely glossy finish. The nuts give a nice crunch, while the sea salt balances the flavor. This dish looks amazing and tastes even better! You can serve it with toasted crostini or crisp apple slices. Don't forget to check out the Full Recipe for more details! For this recipe, I recommend using tart apple varieties. Granny Smith apples work great. Their tartness balances the sweet caramel. Honeycrisp apples are another excellent choice. They add a nice crunch and flavor. Make sure your butter is at room temperature. Softened butter spreads easily on the board. This creates a smooth base for the apples. If the butter is too cold, it will not spread well. Feel free to experiment with spices. Add a pinch of cloves for warmth. You could also try vanilla extract for extra depth. These little tweaks can elevate the taste. Each bite can become even more delightful. {{image_4}} You can easily add a twist to your butter board. Incorporate chocolate chips. Just sprinkle them over the caramelized apples. You can also drizzle melted chocolate on top. This adds rich flavor and a fun look. Do you have nut allergies? No problem! Replace the nuts with seeds like pumpkin or sunflower seeds. If you prefer, you can skip the nuts entirely. Your butter board will still taste amazing! Feel free to switch up the flavors! Use different nut butters, like almond or cashew. You can also try flavored butter spreads. Each variation brings a new taste and experience. Keep your Caramel Apple Pie Butter Board in the refrigerator. Use an airtight container to keep it fresh. This helps to maintain the flavors and textures. For the best taste, enjoy this treat within 2-3 days. After that, the apples may lose their crispness. If you want to serve it warm, gently warm it in the microwave. Heat it in short bursts to avoid cooking the apples again. This helps to bring back the cozy, warm flavors that make this dish so special. A butter board is a fun and tasty way to serve butter. You take a large board and spread softened butter across it. Then, you add delicious toppings. It’s like a charcuterie board, but with butter! You can use sweet or savory toppings. The Caramel Apple Pie Butter Board uses caramelized apples, cinnamon, and nuts for a sweet treat. It’s perfect for sharing at parties or family gatherings. Yes, you can prep this butter board ahead! Make the caramelized apples and store them in the fridge. Just keep them in an airtight container. You can spread the butter on the board when you are ready to serve. Then, layer the apples and drizzle the caramel sauce. This way, you save time and still enjoy a fresh dish. Yes, you can make a vegan version! For the butter, use coconut oil or vegan butter. You can also make your own caramel using coconut milk and brown sugar. This way, you keep the same flavors but make it vegan-friendly. Enjoy the same delicious taste while being kind to dietary needs! This butter board recipe is simple, fun, and full of flavor. We started with caramelized apples and buttery goodness, then added our favorite toppings. You can adjust the recipe to fit your taste. Use different apples, add nuts, or go nut-free. Remember, store leftovers well to keep them fresh. This dish is perfect for sharing and can fit any diet with easy swaps. Enjoy making your own version of this tasty treat!](https://fastmealmate.com/wp-content/uploads/2025/07/ddf5207e-0125-4d49-a59c-c6b722e82f52-768x768.webp)
