
If you’re craving something tasty and easy, look no further! Chilled Buffalo Chicken Dip packs big flavor into every scoop. With just a few simple ingredients, this dip is perfect for gatherings or a cozy night at home. You can make it spicier or milder, depending on your taste. Get ready to impress your friends and family with this savory delight that’s a breeze to whip up!
Why I Love This Recipe
- Flavorful Kick: This dip delivers a deliciously spicy flavor that’s perfect for any gathering or game day party.
- Easy Preparation: With just a few simple steps, you can whip up this dip in no time, making it a go-to recipe for last-minute entertaining.
- Versatile Pairing: It pairs wonderfully with both crunchy tortilla chips and fresh veggie sticks, catering to various taste preferences.
- Chilled Perfection: Chilling the dip allows the flavors to meld beautifully, resulting in a creamy and refreshing appetizer.
Ingredients
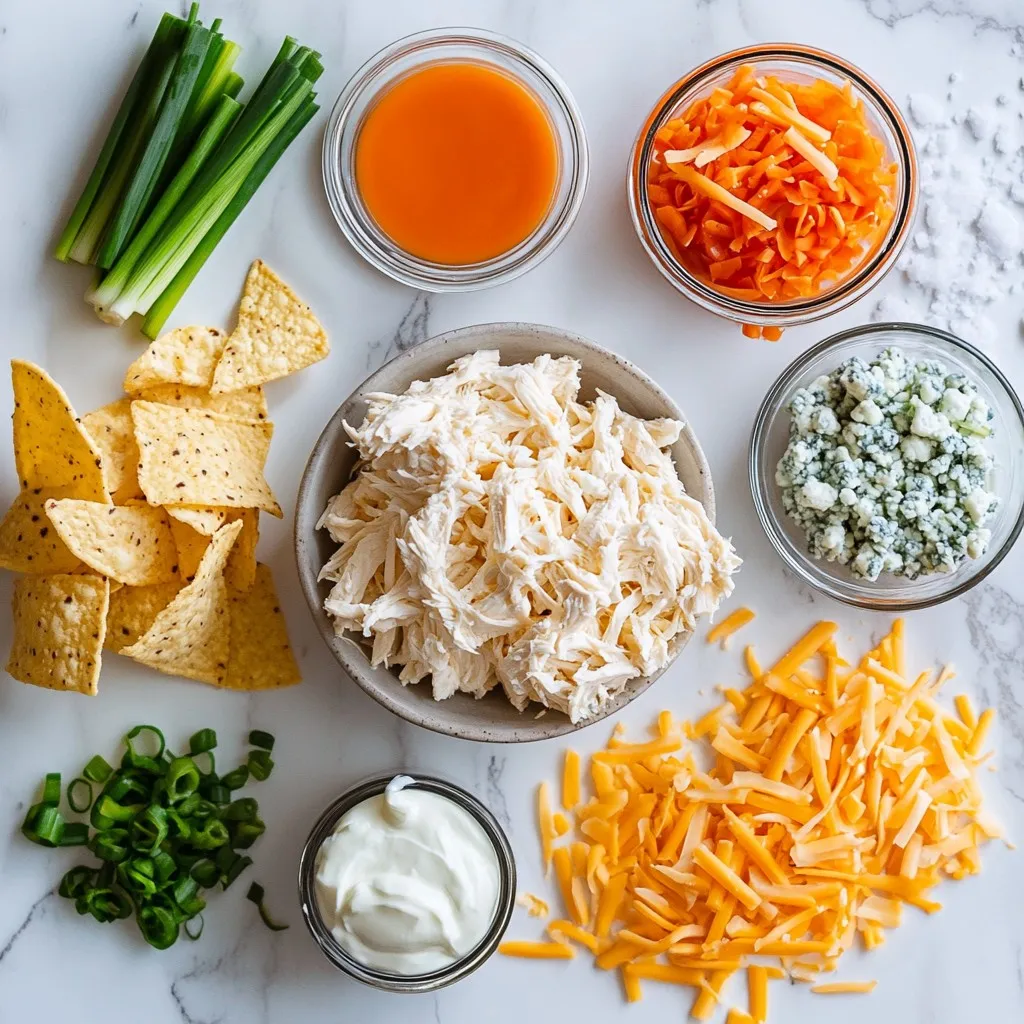
Main Ingredients
– 2 cups shredded cooked chicken
– 8 oz cream cheese, softened
– 1/2 cup Greek yogurt
– 1/2 cup buffalo sauce
– 1 cup shredded cheddar cheese
– 1/4 cup blue cheese crumbles (optional)
– 1/4 cup green onions, finely sliced
Additional Ingredients for Serving
– Tortilla chips
– Fresh veggie sticks (carrots, celery, bell peppers)
To make Chilled Buffalo Chicken Dip, you need a few simple ingredients. First, have your shredded chicken ready. I often use leftover chicken for ease. Next, grab some cream cheese, which gives the dip a rich texture. You will also need Greek yogurt for a touch of creaminess and tang. Buffalo sauce adds the spicy kick, so choose one that matches your taste.
For cheese lovers, shredded cheddar is a must. If you enjoy a bold flavor, blue cheese crumbles are a great choice. Finally, green onions add a fresh crunch and color.
To serve, have tortilla chips on hand. They are perfect for dipping. Fresh veggie sticks like carrots, celery, and bell peppers also make great dippers. This dip is not only tasty but also fun to serve!
Step-by-Step Instructions
Preparation of the Base
To start, grab a large mixing bowl. Combine 8 oz of softened cream cheese, 1/2 cup of Greek yogurt, and 1/2 cup of buffalo sauce in this bowl. Use a hand mixer or a sturdy spatula to blend these three until you achieve a smooth and creamy texture. This will be the base of your dip.
Incorporating Additional Ingredients
Next, gently fold in 2 cups of shredded cooked chicken. Then, add 1 cup of shredded cheddar cheese and, if you like, 1/4 cup of blue cheese crumbles for extra flavor. Stir until everything mixes well. Finally, toss in 1/4 cup of finely sliced green onions. Season this mixture with salt and pepper to taste.
Chilling and Serving
Carefully transfer the dip to a decorative serving bowl. Cover it tightly with plastic wrap. Place it in the refrigerator and chill for at least 2 hours. This helps the flavors blend together. Right before serving, stir the dip again to freshen it up. You can serve this chilled dip with crispy tortilla chips or fresh veggie sticks like carrots, celery, and bell peppers for a crunchy bite.
Tips & Tricks
Flavor Enhancement Techniques
– Adjusting buffalo sauce for spice preference
You can change the heat level of your dip. Start with half a cup of buffalo sauce. If you like it hot, add more sauce. For a milder flavor, use less. Always taste it as you mix.
– Adding extra blue cheese for tanginess
Blue cheese adds a rich flavor. If you love it, add more than a quarter cup. This will make your dip creamier and more tangy. It’s a great way to boost flavor.
Serving Suggestions
– Arranging tortilla chips and veggie sticks for presentation
Make your serving look fun. Place tortilla chips in a circle around the dip. Add colorful veggie sticks like carrots, celery, and bell peppers. This adds color and crunch.
– Garnishing with additional green onions or blue cheese
Just before serving, sprinkle more green onions on top. You can also add extra blue cheese crumbles. This makes your dip look nice and inviting.
Tools and Equipment
– Suggested mixing tools
Use a hand mixer for a smooth dip. A sturdy spatula is great for folding in ingredients. These tools make mixing easy and fun.
– Recommended serving dishes
A decorative bowl is perfect for serving. It makes your dip look special. You can also use a platter to display chips and veggies with the dip in the center.
Pro Tips
- Mixing Technique: Use a hand mixer for a smoother dip, ensuring all ingredients are well blended without any lumps.
- Chill Time: Allow the dip to chill for at least 2 hours, as this enhances the flavors and gives a better texture.
- Spice Control: Adjust the amount of buffalo sauce based on your spice tolerance; start with less and add more if needed.
- Serving Suggestions: For a beautiful presentation, arrange tortilla chips and veggie sticks around the serving bowl.
Variations
Alternative Ingredients
You can change a few ingredients for a new taste. Instead of Greek yogurt, use sour cream. This swap makes the dip creamier and adds a slight tang.
For cheese, try using different types. Pepper jack adds a nice kick. Mozzarella gives a mild flavor and more stretch. Mixing cheeses can create a unique dip.
Homemade Buffalo Sauce
Making your own buffalo sauce is easy. Combine hot sauce, melted butter, and vinegar in a bowl. Adjust the heat by adding more or less hot sauce.
You can also mix in garlic powder or cayenne for extra flavor. Homemade sauce lets you control the spice level, making the dip just right for you.
Dietary Adjustments
If you need gluten-free options, serve with veggie sticks. Carrots, celery, and bell peppers are great choices. They add crunch and are healthy too.
For low-carb versions, skip the chips and enjoy the dip with fresh veggies. This way, you can savor all the flavors without the extra carbs.
Storage Info
Refrigeration Guidelines
You can store Chilled Buffalo Chicken Dip in the fridge for up to 5 days. To keep it fresh, cover the dip tightly with plastic wrap or place it in an airtight container. This helps to seal in the flavors and prevents any unwanted odors from sneaking in.
Freezing Tips
Yes, you can freeze Chilled Buffalo Chicken Dip! To do this, place it in a freezer-safe container and leave some space at the top for expansion. When you want to enjoy it again, thaw it in the fridge overnight. This keeps the flavors intact. After thawing, stir it well and add a splash of fresh buffalo sauce if needed to refresh the taste.
Serving After Storage
If your dip thickens after storage, simply add a little Greek yogurt or cream cheese and mix well. This will help bring back its creamy texture. For leftovers, you can serve the dip cold or warm it up in the microwave. Heat it in short bursts to avoid overheating. Enjoy it with your favorite tortilla chips or veggie sticks!
FAQs
Can I make Chilled Buffalo Chicken Dip ahead of time?
Yes, you can make this dip ahead of time. I recommend preparing it at least 2 hours before serving. This allows the flavors to blend well. You can also make it the day before. Just store it in the fridge until you are ready to serve.
What are the best dippers for this dip?
The best dippers for this dip are tortilla chips and fresh veggie sticks. Here are some great options:
– Tortilla chips
– Carrot sticks
– Celery sticks
– Bell pepper strips
These dippers add a nice crunch and balance the creamy dip.
Is this dip spicy?
Yes, the dip can be spicy depending on the buffalo sauce you use. If you want less heat, use less buffalo sauce. You can also mix in some Greek yogurt to cool it down. For more heat, add extra buffalo sauce. Adjust it to fit your taste!
You now know how to make a delicious Chilled Buffalo Chicken Dip. We combined shredded chicken, creamy ingredients, and zesty flavors for a perfect appetizer. Remember to chill it for at least two hours before serving for that amazing taste. Feel free to adjust the spice and try new cheese options. With proper storage, this dip stays tasty for days. Enjoy sharing this dish with others; it will be a hit at any gathering. Happy dippin


