Chicken Cordon Bleu Casserole Hearty and Simple Dish

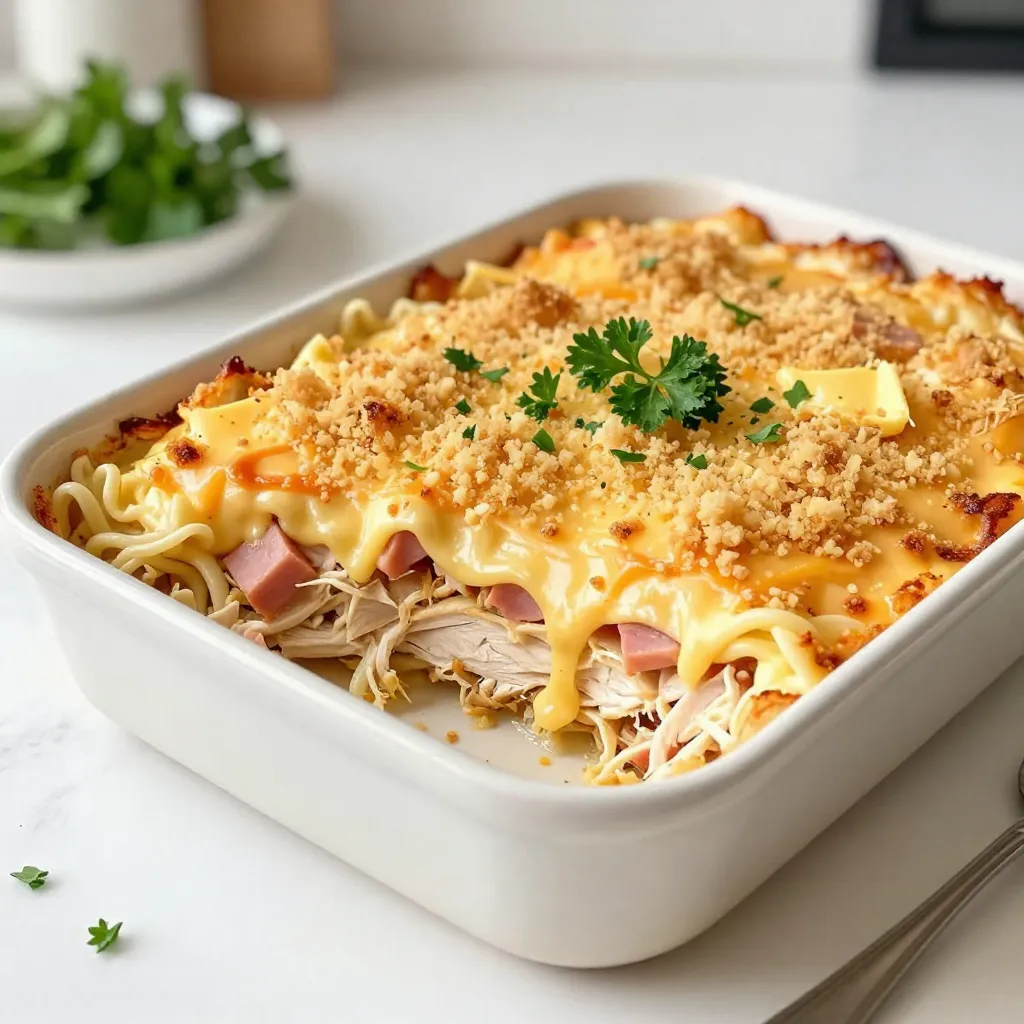
Craving a comforting meal? This Chicken Cordon Bleu Casserole is your answer! It’s hearty, simple, and packed with flavors you love. Imagine tender chicken and ham, melted cheese, and a creamy sauce, all in one dish. Whether you want to impress guests or whip up a quick dinner, this casserole checks all the boxes. Dive into this easy recipe, and let me show you how to make it shine!
Why I Love This Recipe
- Comforting Flavor: This casserole brings together the classic flavors of chicken cordon bleu in a warm and hearty dish, perfect for cozy family dinners.
- Easy to Prepare: With simple ingredients and straightforward steps, this recipe is ideal for busy weeknights when you want a delicious meal without the fuss.
- Cheesy Goodness: Who doesn’t love a cheesy casserole? The combination of Swiss and mozzarella cheeses creates a creamy, indulgent experience that’s hard to resist.
- Versatile Meal: This dish can easily be adapted with different proteins or vegetables, making it a flexible option for using up leftovers or adjusting to your family’s preferences.
Ingredients
Main ingredients needed for Chicken Cordon Bleu Casserole
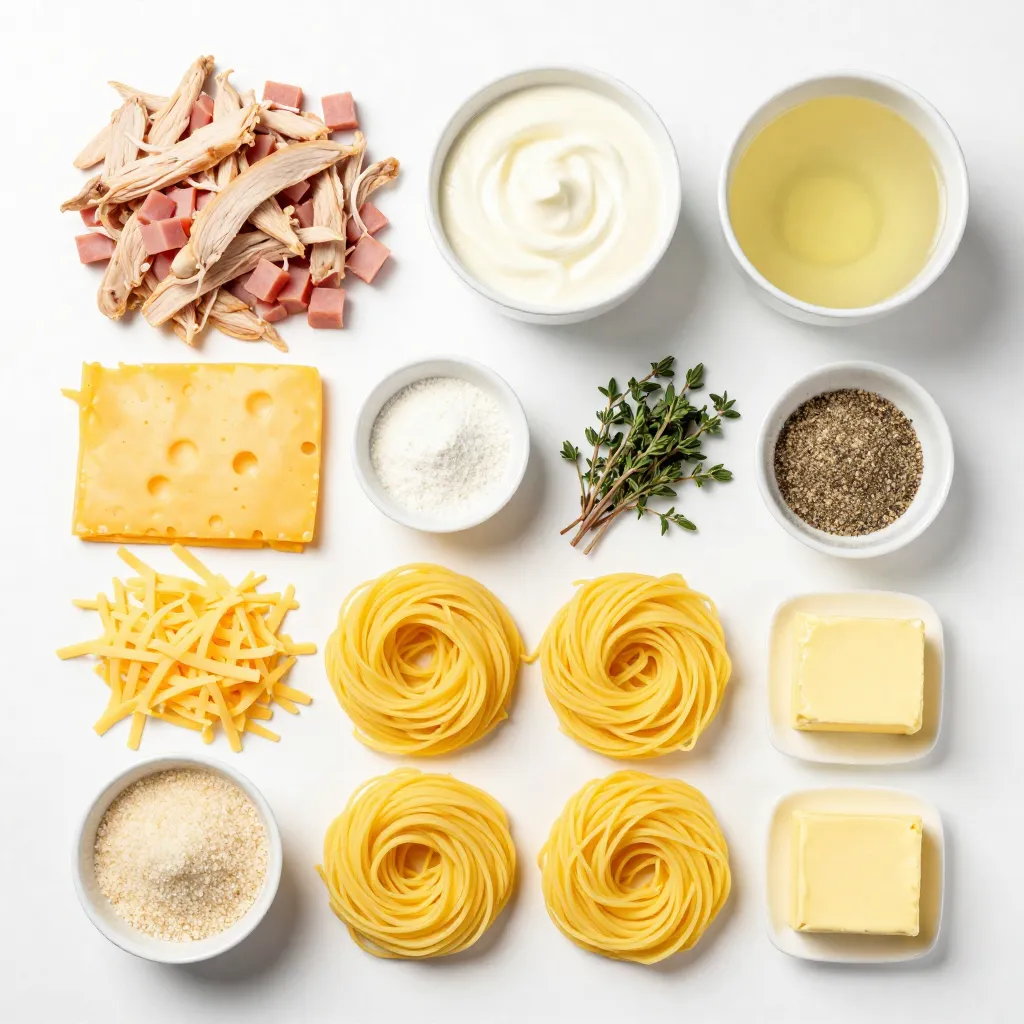
To make Chicken Cordon Bleu Casserole, you will need a few key ingredients. Here’s what you will need:
– 2 cups cooked chicken, shredded
– 1 cup cooked ham, diced into small pieces
– 1 cup Swiss cheese, freshly shredded
– 1 cup mozzarella cheese, freshly shredded
– 1 cup heavy cream
– 1 cup low-sodium chicken broth
– 1 teaspoon garlic powder
– 1 teaspoon onion powder
– 1 teaspoon dried thyme
– ½ teaspoon freshly ground black pepper
– 4 cups cooked egg noodles, drained
– ½ cup breadcrumbs (preferably panko for extra crunch)
– 2 tablespoons unsalted butter, melted
These ingredients come together to create a rich and creamy dish that everyone will love.
Cheese options: Swiss and mozzarella
The cheese choices in this casserole are important. Swiss cheese gives a nutty flavor and melts well. Mozzarella adds stretch and creaminess. Using both cheeses creates a great balance. If you can’t find Swiss, try Gruyère or even provolone. Each option will still bring a delicious taste.
Substitutions for cooked chicken and ham
You can easily swap out the cooked chicken and ham if needed. For chicken, you can use rotisserie chicken or turkey. If you want a meatless option, try using mushrooms or spinach. For ham, diced turkey or bacon can work well, too. These swaps keep the dish tasty while catering to your needs.

Step-by-Step Instructions
Prepping your casserole dish
First, preheat your oven to 350°F (175°C). This step warms the oven for even cooking. Next, take a 9×13 inch casserole dish. Grease it well with butter or cooking spray. This helps the casserole come out easily after baking.
Mixing the main casserole ingredients
In a large bowl, add 2 cups of shredded cooked chicken. Then, toss in 1 cup of diced cooked ham. Next, add 1 cup of freshly shredded Swiss cheese and 1 cup of freshly shredded mozzarella cheese. Finally, mix in 4 cups of cooked egg noodles. Use a spatula to blend everything well. You want all the ingredients to be evenly mixed.
Preparing the creamy sauce mixture
In another bowl, whisk together 1 cup of heavy cream and 1 cup of low-sodium chicken broth. Then, add 1 teaspoon each of garlic powder and onion powder. Next, sprinkle in 1 teaspoon of dried thyme and ½ teaspoon of black pepper. Mix until smooth. This sauce gives your casserole a rich flavor.
Assembling the casserole
Pour the creamy sauce over the chicken and noodle mixture. Gently fold everything together with a spatula. Make sure every piece is coated with that creamy goodness. Now, transfer the mixture into your greased casserole dish. Spread it out evenly.
Baking times and temperature settings
Now it’s time to add the finishing touch. In a small bowl, mix ½ cup of panko breadcrumbs with 2 tablespoons of melted butter. This makes a crunchy topping. Sprinkle it evenly over the casserole. Place the dish in your preheated oven and bake for 30-35 minutes. Watch for bubbly edges and a golden brown top. After baking, let it sit for 5-10 minutes. This helps it set before you serve.
Tips & Tricks
How to ensure a creamy texture
To keep your casserole creamy, use heavy cream. It adds richness. You can also mix in some low-sodium chicken broth. This helps balance the flavors. When you combine these liquids, whisk them well. This step prevents lumps. Make sure to coat every noodle and piece of meat. A well-mixed dish is both creamy and delicious.
Best practices for freezing leftovers
Freezing leftovers is simple. Allow the casserole to cool first. Then, cut it into portions. Use airtight containers or heavy-duty freezer bags. Label each bag with the date. This way, you know how long it’s been there. Casserole lasts for about three months in the freezer. When ready to eat, thaw it overnight in the fridge. Reheat it gently in the oven for best results.
Enhancing flavor with herbs and spices
Herbs and spices bring your casserole to life. I suggest using dried thyme for a warm taste. You can also add garlic and onion powder for depth. For a kick, consider a pinch of paprika or cayenne. Fresh herbs, like parsley, make a great garnish. Just chop them finely and sprinkle on top before serving. This adds color and freshness.
Pro Tips
- Use Leftovers Wisely: This casserole is a great way to use up any leftover rotisserie chicken or ham you might have. It saves time and enhances the flavor!
- Cheese Variations: Feel free to experiment with different types of cheese. Gruyère or cheddar can add a unique twist to the flavor profile of your dish.
- Make Ahead: You can prepare this casserole a day in advance and refrigerate it. Just bake it when you’re ready to serve for a quick and easy meal!
- Perfectly Golden Topping: To achieve an extra crispy breadcrumb topping, broil the casserole for an additional 2-3 minutes after baking. Keep a close eye to prevent burning!
Variations
Vegetarian Chicken Cordon Bleu Casserole
You can make a tasty vegetarian version of this casserole. Replace the chicken and ham with cooked mushrooms and spinach. Use a mix of hearty vegetables like zucchini or bell peppers. For added flavor, toss in some artichoke hearts. The cheese and creamy sauce will still give you that rich taste. This dish stays filling and satisfying without meat.
Gluten-free adaptations
For a gluten-free casserole, swap the egg noodles with gluten-free pasta. Check the labels for the right kind. Use gluten-free breadcrumbs on top for that nice crunch. Ensure your chicken broth and other ingredients are also gluten-free. This way, you can enjoy the dish without worry.
Alternative cheese combinations
While Swiss and mozzarella are classic choices, feel free to switch it up. Try using gouda or cheddar for a sharper taste. You can even blend in some cream cheese for extra creaminess. Mixing in different cheeses can give your casserole a new twist. Explore flavors that you love!
Storage Info
Proper storage techniques for leftovers
To keep your Chicken Cordon Bleu Casserole fresh, allow it to cool first. Use an airtight container to store it. Make sure to cover it well to prevent drying out. You can also place it in the original baking dish, but cover it tightly with plastic wrap or foil.
Reheating instructions
When it’s time to eat your leftovers, preheat your oven to 350°F (175°C). Place the casserole in an oven-safe dish. Cover it with foil to keep moisture in. Heat for about 20 minutes or until hot. You can also microwave it, but stir it halfway through to heat evenly.
How long does it last in the fridge/freezer?
In the fridge, this casserole stays good for about 3 to 4 days. For longer storage, you can freeze it. Make sure it’s in a freezer-safe container. It will last for up to 2 to 3 months in the freezer. Just remember to label the container, so you know when it was made!
FAQs
Can I make this casserole ahead of time?
Yes, you can prepare this casserole ahead of time. Just follow the steps until you assemble it. Cover the dish and store it in the fridge. When you’re ready to bake, take it out and let it sit for about 30 minutes. This helps it cook evenly. Baking might take a little longer, so keep an eye on it.
What sides pair well with Chicken Cordon Bleu Casserole?
This casserole pairs well with many sides. Here are some great options:
– Crisp side salad
– Steamed broccoli or green beans
– Garlic bread or dinner rolls
– Roasted vegetables
These sides balance the rich flavors of the casserole and add freshness to your meal.
Can I use rotisserie chicken for this recipe?
Absolutely! Rotisserie chicken works great in this recipe. It saves time and adds flavor. Just shred the chicken and mix it with the other ingredients. This is a perfect shortcut for busy days. You can enjoy a tasty meal with less effort.
This post covered how to make Chicken Cordon Bleu Casserole. We discussed main ingredients like chicken, ham, and cheese options. You learned step-by-step instructions for prepping, mixing, and baking your dish. I shared tips for creamy texture and flavor boosts. Variations like vegetarian and gluten-free options make this dish flexible. Finally, I provided storage tips and answered common questions.
Now you’re ready to enjoy a tasty casserole that fits any situation. Happy cookin

Cheesy Chicken Cordon Bleu Casserole
Ingredients
- 2 cups cooked chicken, shredded
- 1 cup cooked ham, diced into small pieces
- 1 cup Swiss cheese, freshly shredded
- 1 cup mozzarella cheese, freshly shredded
- 1 cup heavy cream
- 1 cup low-sodium chicken broth
- 1 teaspoon garlic powder
- 1 teaspoon onion powder
- 1 teaspoon dried thyme
- 0.5 teaspoon freshly ground black pepper
- 4 cups cooked egg noodles, drained
- 0.5 cup breadcrumbs (preferably panko for extra crunch)
- 2 tablespoons unsalted butter, melted
Instructions
- Begin by preheating your oven to 350°F (175°C). Generously grease a 9x13 inch casserole dish with butter or cooking spray to ensure easy serving later.
- In a large mixing bowl, combine the shredded cooked chicken, diced cooked ham, Swiss cheese, mozzarella cheese, and the cooked egg noodles. Use a spatula to mix until the ingredients are evenly distributed.
- In a separate mixing bowl, whisk together the heavy cream, chicken broth, garlic powder, onion powder, dried thyme, and black pepper until the mixture is smooth and well combined.
- Pour the creamy mixture over the chicken, ham, cheese, and noodle mixture, gently folding everything together until each piece is well coated.
- Carefully transfer the entire mixture into the greased casserole dish, spreading it out with the spatula to ensure even distribution.
- In a small bowl, combine the breadcrumbs with the melted butter, mixing until the breadcrumbs are fully coated. Sprinkle this crunchy mixture evenly over the top of the casserole.
- Place the casserole in the preheated oven and bake for 30-35 minutes, or until the edges are bubbly and the breadcrumb topping has turned a golden brown color.
- Once baked to perfection, remove the casserole from the oven and allow it to sit for about 5-10 minutes to set before serving.


![When making Hot Honey Feta Chicken, you need to gather some key ingredients. Here’s what to prepare: - Chicken breasts - Crumbled feta cheese - Hot honey (store-bought or homemade) - Extra-virgin olive oil - Garlic powder - Smoked paprika - Salt and freshly cracked black pepper - Freshly chopped parsley (for garnish) - Lemon wedges (for serving) These ingredients come together to create a dish that is both simple and packed with flavor. The chicken breasts are the star, providing a juicy base. The crumbled feta cheese adds a creamy and salty touch, while the hot honey brings in that sweet heat. Extra-virgin olive oil ensures the chicken stays moist and flavorful. Each spice plays a role. Garlic powder offers depth, and smoked paprika gives it a warm, smoky flavor. Don’t forget the salt and pepper; they are essential for enhancing all the tastes. Finally, fresh parsley brightens the dish, and lemon wedges add a refreshing twist when served. Make sure to check the Full Recipe to see how each ingredient shines in this delightful dish. - Preheat the oven to 375°F (190°C). - In a medium bowl, mix 1 cup of crumbled feta cheese with 1/3 cup of hot honey. Stir well until it's creamy and smooth. Set this aside for later. - Take 4 boneless, skinless chicken breasts. Drizzle 2 tablespoons of extra-virgin olive oil over them. - Make sure each breast is well coated. Season both sides with 1 teaspoon of garlic powder, 1 teaspoon of smoked paprika, salt, and freshly cracked black pepper to taste. - Place the seasoned chicken in a baking dish, laying them flat. - Spoon the hot honey feta mixture over each breast. Cover them well to keep in moisture and flavor. - Put the baking dish in the oven. Bake for about 25-30 minutes. Check that the chicken reaches an internal temperature of 165°F (74°C). It should look juicy and slightly golden. - Once done, take the dish out and let the chicken rest for 5 minutes. This helps keep it moist. - Finally, sprinkle chopped parsley on top. Serve with lemon wedges for a fresh touch. For the complete recipe, check out the [Full Recipe]. To make your chicken juicy and flavorful, start with fresh chicken breasts. They should be boneless and skinless for the best results. Pat them dry with paper towels before seasoning. This helps the spices stick better. For seasoning, use garlic powder and smoked paprika. These add depth to the flavor. Don’t forget to sprinkle salt and pepper, too. Be generous but don't overdo it. To achieve a golden crust, coat each chicken breast with olive oil. This creates a beautiful, crispy layer. Make sure to bake it in a preheated oven. The heat helps in getting that crust just right. When serving the chicken, presentation matters. Place it on a large platter. Garnish with freshly chopped parsley. This adds color and freshness. Add lemon wedges on the side. They provide a zesty flavor that brightens the dish. For sides, consider serving it with roasted vegetables or a simple salad. Both complement the chicken well. You can also serve it with quinoa or rice for a complete meal. For more detailed steps, refer to the Full Recipe. {{image_4}} If you want to mix things up, consider using different types of cheese. You can try goat cheese or ricotta for a creamy texture. Both add unique flavors. If you are lactose intolerant or prefer dairy-free options, look for plant-based cheeses. Almond or cashew-based cheeses work well and can mimic feta's tangy taste. Adjusting the heat level is easy and fun. You can reduce the amount of hot honey if you prefer a milder dish. Start with less and taste as you go. If you want more heat, try adding crushed red pepper flakes or cayenne pepper. This adds spice without changing the dish too much. Remember, the key is to find a balance that suits your taste. After you enjoy your hot honey feta chicken, you will likely have some leftovers. To keep them fresh, follow these steps: - Refrigeration: Place the chicken in an airtight container. This helps keep moisture in and air out. Store it in the fridge for up to three days. - Reheating: When ready to eat, reheat the chicken in the oven at 350°F (175°C). This helps keep the chicken juicy. Cover it with foil to prevent it from drying out. Heat it for about 10-15 minutes, or until warmed through. If you want to keep some chicken for later, freezing is a great option. Here’s how: - Freezing Portion Sizes: Cut the chicken into portions before freezing. This makes it easy to grab just what you need. Place each piece in a freezer bag. Remove as much air as possible to avoid freezer burn. - Defrosting Tips: When you’re ready to eat your frozen chicken, let it thaw in the fridge overnight. This keeps the taste fresh. You can also use the microwave for faster thawing, but be careful not to cook it. After thawing, reheat as mentioned before to keep the flavors intact. For the complete recipe, check out the [Full Recipe]. Bake the chicken at 375°F (190°C) for 25-30 minutes. This time ensures the chicken cooks evenly. Use a meat thermometer to check. The internal temperature should reach 165°F (74°C). This guarantees juicy chicken that is safe to eat. Yes, you can use chicken thighs! They have more fat and flavor, making them tender. However, chicken thighs may require a bit more time to cook. Bake them for 30-35 minutes, checking the internal temperature, just like with breasts. Hot honey has a sweet and spicy flavor. The heat level varies by brand. Some are mild, while others pack a punch. If you are unsure, taste a small amount first. Adjust the amount you use in the recipe if you prefer less heat. Hot honey adds a unique twist to this dish, balancing sweetness and spice. For the complete recipe, be sure to check the full recipe section. This blog post covered the essentials for making a delicious chicken dish. You learned about the key ingredients, like chicken, feta cheese, and hot honey. I shared step-by-step instructions to help you bake it perfectly. We also explored tips for juicy chicken and creative serving ideas. Variations let you switch up flavors, and I provided storage tips for leftovers. Remember, cooking can be simple and fun. Enjoy making this dish and impressing your friends and family!](https://fastmealmate.com/wp-content/uploads/2025/06/84055c4e-16bd-4803-b39c-56f6143ad9ea-768x768.webp)
 to guide you through each step. - Preheat your oven to 375°F (190°C). - Rinse and prepare the quinoa and vegetables. To start, turn on your oven and set it to 375°F (190°C). This step ensures your oven is hot and ready when it’s time to bake. While it heats, take one cup of quinoa and rinse it under cool water. This helps remove any bitterness. Next, chop your zucchinis and bell pepper. Dice the zucchini into small cubes and chop the bell pepper into bite-sized pieces. Don’t forget to finely dice one small onion and mince three cloves of garlic. - Sauté onion and garlic in olive oil until translucent. - Add zucchini and bell pepper, cooking until softened. Next, grab a medium saucepan. Add one tablespoon of olive oil and heat it over medium. Once the oil is warm, toss in your diced onion and minced garlic. Stir them for about 3-4 minutes. You want the onion to turn translucent and smell great. After that, add the diced zucchini and chopped bell pepper. Cook these veggies for around 5 minutes, stirring often. They should soften but still have a little crunch. - Mix in quinoa, cherry tomatoes, broth, and seasonings. - Transfer to a casserole dish and bake for 20-25 minutes. Now comes the fun part! Mix in your rinsed quinoa, one cup of halved cherry tomatoes, and two cups of vegetable broth into the pan. Add one teaspoon of dried oregano, one teaspoon of dried basil, and sprinkle salt and pepper to taste. Stir everything well to combine. Bring this mix to a gentle boil. Once it bubbles, reduce the heat to low, cover the pan, and let it simmer for 15 minutes. This allows the quinoa to absorb the broth. Once done, transfer the mixture into a lightly greased 9x13 inch casserole dish. If you love cheese, sprinkle one cup of shredded mozzarella on top. Place the dish in your preheated oven and bake for 20-25 minutes. You’ll know it’s ready when it bubbles and the cheese is golden brown. To make fluffy quinoa, rinse it well before cooking. This removes the bitter coating called saponin. Use two cups of vegetable broth for one cup of quinoa. Bring it to a boil, then lower the heat and cover. Let it simmer for 15 minutes. After cooking, let it rest for five minutes before fluffing with a fork. This will keep it light and airy. For the vegetables, sauté onion and garlic first in olive oil. Cook them until they are soft and fragrant. Then add zucchini and bell pepper. Stir them for about five minutes until they soften. This builds a great flavor base for your casserole. To elevate the dish, try adding a pinch of red pepper flakes for heat. Fresh herbs like thyme or parsley can add brightness. You can also swap out the dried oregano and basil for fresh herbs. Fresh herbs bring a stronger flavor. If you want to change ingredients, use brown rice instead of quinoa. You can also add cooked beans for a protein boost. For a creamier texture, mix in some ricotta cheese or yogurt before baking. Pair the casserole with a light side salad or some crusty bread. A fresh garden salad with lemon vinaigrette works well. It adds a nice contrast to the warm casserole. For gatherings, serve the casserole directly from the dish. Garnish with fresh basil leaves to make it look inviting. You can also sprinkle some extra cheese on top just before serving for a melty touch. {{image_4}} You can easily change the vegetables in this casserole. Try using bell peppers, spinach, or even eggplant. These swaps keep the dish vibrant and fresh throughout the summer. You can also mix in seasonal veggies like corn or cherry tomatoes for a burst of flavor. If you need a quinoa substitute, consider using brown rice or farro. These grains add a nice texture and flavor. Other options include couscous or even cauliflower rice for a low-carb choice. To make this casserole vegan, simply skip the cheese or use a plant-based cheese. You'll still get a creamy texture from the cooked veggies and broth. For a gluten-free option, use certified gluten-free quinoa. This way, everyone can enjoy the dish. If you're looking to cut calories, reduce the olive oil or skip the cheese. You can also use less quinoa and bulk up with more veggies. This keeps the dish light, tasty, and full of nutrients. Each of these variations allows you to enjoy this Summer Zucchini Quinoa Casserole in your own way. For the full recipe, check out the detailed instructions above. To keep your summer zucchini quinoa casserole fresh, first let it cool. Once cool, store it in an airtight container. You can refrigerate it for up to five days. If you want to save it for later, freeze it. Use a freezer-safe container or heavy-duty freezer bags. This way, it can last for up to three months. Remember to label the container with the date. This helps you track how long it has been stored. When you want to enjoy the casserole again, reheating is easy. For the best texture, use an oven. Preheat the oven to 350°F (175°C). Place the casserole in an oven-safe dish and cover it with foil. Heat for about 20 minutes or until warm. If you're in a hurry, you can use the microwave. Place a single serving in a microwave-safe dish. Heat for 1-2 minutes, checking every 30 seconds. This will keep the flavors and texture intact. Enjoy your delicious meal! Can I prepare the Summer Zucchini Quinoa Casserole in advance? Yes, you can prepare it ahead of time. Make the casserole, then cover and refrigerate it. When you're ready to eat, just bake it straight from the fridge. You may need to add a few more minutes to the cooking time. How to customize the recipe to suit my taste preferences? Feel free to swap out the veggies. For instance, you can use spinach, carrots, or even corn. You can also change the cheese or add some cooked chicken for extra protein. What are the best herbs to use for added flavor? Fresh herbs like basil and thyme work great. You can also try parsley or cilantro. These herbs add a fresh taste and brighten up your dish. Is this recipe suitable for a low-carb diet? This recipe is not low-carb due to the quinoa. Quinoa has more carbs than other grains but is also high in protein. If you want a lower carb option, you can use cauliflower rice instead of quinoa. What are the main nutritional benefits of zucchini and quinoa? Zucchini is low in calories and high in vitamins A and C. It also has a lot of water, which keeps you hydrated. Quinoa is a complete protein, meaning it has all nine essential amino acids. It’s also high in fiber, which is good for digestion. What should I do if my casserole is too watery? If your casserole is watery, try draining some liquid before baking. You can also bake it longer to help it thicken up. How can I prevent the quinoa from sticking together? To prevent sticking, rinse the quinoa well before cooking. This removes excess starch. Also, fluff the quinoa with a fork after it cooks to keep it separate. For the full recipe, check out the details above! You learned how to make a tasty Summer Zucchini Quinoa Casserole. We covered the ingredients, simple steps, and tips for perfect results. You can adjust the recipe to fit your taste and needs. Explore flavor swaps and storage tips to keep it fresh. With this dish, enjoy a healthy meal that is easy to make. I hope you try it and enjoy every bite!](https://fastmealmate.com/wp-content/uploads/2025/07/552d1654-693f-4b1b-8ee9-d91b85ff9950-768x768.webp)

![- 2 cups fresh or frozen cherries, pitted - 1 cup cherry cola - 1/2 cup granulated sugar - 1 tablespoon freshly squeezed lemon juice - 1 teaspoon pure vanilla extract - A pinch of salt When I make no churn cherry cola sorbet, I start with fresh or frozen cherries. I always pit the cherries first, as this makes blending easy. The cherry cola gives the sorbet a fun and fizzy flavor. I use granulated sugar to sweeten the mix. If you want a tart twist, add freshly squeezed lemon juice. I also add a teaspoon of pure vanilla extract for depth. A pinch of salt balances the sweetness and enhances the flavors. You can swap out granulated sugar for other sweeteners like honey or agave syrup. These can change the taste, making it unique. You might also try adding a splash of almond extract for a nutty flavor. Or, mix in a handful of mint leaves for a refreshing touch. Each variation leads to a new and exciting treat! For the full recipe, check out the [Full Recipe]. To start, you will blend the cherries and cola. Take your pitted cherries and add them to a high-speed blender. Pour in the cherry cola. Blend on high speed until the mixture is smooth. This smooth texture is key for your sorbet. If it’s too chunky, blend it a bit longer. Next, it's time to mix in the flavorings. Add in the granulated sugar, lemon juice, vanilla extract, and a pinch of salt. Blend again until all the ingredients are well combined. The sugar should dissolve completely. You can taste the mixture to see if you want it sweeter. If so, slowly add more sugar and blend until smooth. Now, you’ll prepare to freeze your mixture. Pour the cherry cola blend into a shallow dish. This shape helps it freeze faster. Place the dish in the freezer for about 2 hours. After 2 hours, take it out and scrape the mixture with a fork. This step breaks up ice crystals, giving a nice texture. Return the dish to the freezer. For the next 2 hours, scrape it every hour. This helps keep it light and fluffy. After about 6 hours, your sorbet should be ready. Let it sit at room temp for a few minutes before serving. Serve in chilled bowls for the best look. Enjoy your No Churn Cherry Cola Sorbet! To make a smooth sorbet, avoid ice crystals. After the first two hours of freezing, take the mixture out and scrape it with a fork. This breaks up any ice. Repeat this every hour for the next two hours. It helps create a light and fluffy texture. Use a shallow dish for freezing. This gives the mixture more surface area. A food processor or high-speed blender works best to blend the cherries and cola. These tools help achieve a creamy consistency. Taste your mixture after blending in the sugar. If it’s not sweet enough, add more sugar. Do this little by little. Blend until it’s smooth. You want the flavor to pop. Remember, the sweetness can change after freezing. Serve your sorbet in chilled bowls or glass cups. This keeps it cool longer. For a fun touch, garnish with fresh cherries or mint leaves. You can also drizzle a little chocolate sauce on top. It adds visual appeal and extra flavor. Enjoy showing off your beautiful dessert! {{image_4}} You can mix up this cherry cola sorbet by using different fruits. Here are some fun ideas: - Raspberry Cola: Swap cherries for raspberries. This gives a tart twist. - Peach Delight: Use fresh peaches for a sweet and juicy flavor. - Mixed Berry: Combine strawberries, blueberries, and blackberries for a berry blast. You can also enhance the flavor with simple extras: - Mint: Add fresh mint for a refreshing taste. - Lemon Zest: A bit of lemon zest can brighten the sorbet. - Coconut Milk: For a creamy texture, mix in coconut milk. If you want to make this sorbet healthier, there are easy swaps for sugar. Here are some options: - Honey: Use honey instead of granulated sugar for natural sweetness. - Agave Syrup: This works well for a lower glycemic option. - Stevia: This zero-calorie sweetener is a great choice for low-sugar diets. For those following a vegan diet, you can make this sorbet vegan-friendly. Just make sure to choose a vegan-friendly cola. The other ingredients are naturally plant-based, so you are all set! To keep your sorbet fresh, store it in an airtight container. This helps prevent ice crystals from forming. You can also use a shallow dish for freezing. This allows for quicker freezing and a smoother texture. If you have leftovers, let them cool before sealing. You can layer parchment paper on top to reduce air exposure. This extra step helps maintain its flavor and texture. No churn cherry cola sorbet lasts about two weeks in the freezer. After this time, the flavor may fade. The texture could change too, becoming icy and less smooth. To enjoy it at its best, try to eat it within this time frame. If you notice any signs of freezer burn, it’s best to toss it. Enjoy this sweet treat while it’s fresh! To make this sorbet, follow these simple steps: 1. Blend the Cherries: Start by mixing the pitted cherries with cherry cola in a blender. Blend until smooth. 2. Mix in Flavorings: Add sugar, lemon juice, vanilla, and salt. Blend until well combined. 3. Taste and Adjust Sweetness: Sample the mix and add more sugar if needed. Blend again. 4. Prepare to Freeze: Pour the mixture into a shallow dish. Spread it out evenly. 5. Initial Freezing: Freeze for about 2 hours, then scrape the mixture with a fork. 6. Scrape and Refine: Freeze again, scraping every hour for 2 more hours. 7. Final Freezing: After 6 hours, let it sit for a few minutes before scooping. This method creates a light and fluffy sorbet. For the full recipe, check out the section above. Yes, you can use diet or caffeine-free cherry cola. This option is great for those who want fewer calories or caffeine. The flavor may change slightly, but it will still be tasty. Many brands offer these choices, so look for one you like. If you don’t have fresh cherries, frozen cherries work well too. They are picked at peak ripeness and often taste just as good. Using frozen cherries saves prep time since they come pitted. Just blend them straight from the freezer for a smooth consistency. You can make this sorbet ahead of time. It stays fresh in the freezer for up to two weeks. Just be sure to store it in an airtight container. This makes it a perfect treat for parties or hot summer days. Prepare it a day in advance to let the flavors meld together nicely. This blog post covered how to make Cherry Cola Sorbet from start to finish. We explored essential ingredients and optional add-ons, ensuring you can personalize your treat. You learned about blending and freezing techniques to get the best texture. I shared tips on adjusting sweetness and creative ways to serve your sorbet. Finally, remember that this recipe is flexible. You can switch fruits, and modify sweetness, and dietary needs. Enjoy making your sorbet, and let your taste buds celebrate!](https://fastmealmate.com/wp-content/uploads/2025/07/14b20058-6f09-46d4-b73d-218062a29ce5-768x768.webp)

![- 200g ramen noodles - 150g pancetta or guanciale, diced - 2 large eggs The key to this dish starts with the ramen noodles. They add a lovely texture. We use 200g of fresh ramen noodles. You can also use dried noodles if needed. Next, we have the pancetta or guanciale. I prefer guanciale for its rich flavor, but pancetta works great too. You need about 150g, diced into small pieces. Finally, the eggs bind everything together, giving a creamy texture. - 1 cup heavy cream - 1 cup grated Parmesan cheese - 2 cloves garlic, minced For the creamy sauce, use 1 cup of heavy cream. This gives the dish its rich base. Add in 1 cup of grated Parmesan cheese for a salty kick. The cheese melts beautifully into the sauce. Don't forget 2 cloves of minced garlic. Garlic adds depth and a warm aroma. - Fresh black pepper, to taste - Salt, to taste - Fresh parsley, chopped (for garnish) Seasoning is crucial. I recommend using fresh black pepper to taste. It adds a nice heat. You will also need salt to enhance the flavors. Finally, chop some fresh parsley for garnish. It adds color and freshness to the dish. For the full recipe, check out the details provided earlier. To cook ramen noodles properly, I follow the package instructions. I boil water in a pot and add the noodles. I cook them for about 3-4 minutes until they are tender. Then, I drain the noodles but save a small cup of the pasta water. This water helps adjust the sauce later, making it creamy. For crispy pancetta, I heat olive oil in a large skillet over medium heat. I add the diced pancetta and sauté it for 5-7 minutes. The pancetta should turn golden brown and crisp up nicely. Next, I add minced garlic to the skillet. I cook it for just one minute, stirring all the time. This way, the garlic does not burn and turn bitter. Now, I whisk together two large eggs, one cup of heavy cream, and one cup of grated Parmesan cheese in a bowl. I make sure the mixture is smooth. Season with fresh black pepper and a pinch of salt to boost the flavors. This creamy sauce makes the dish rich and tasty. For the full recipe, check out the instructions again. To get that perfect creamy texture, you must mix the egg and cream well. Whisk the eggs, cream, and cheese together until smooth. This will help avoid scrambling the eggs when you add them to the hot noodles. When you mix the sauce with the ramen, keep the heat low. Slowly pour the egg mixture while tossing the noodles. If the sauce seems thick, add a little reserved pasta water. This will make it silky and rich. Using fresh ingredients can greatly change the taste. Fresh pancetta or guanciale adds a deeper flavor. Look for high-quality meat for the best results. When buying pancetta, choose one that is thick-cut and well-marbled. Guanciale is even better, but it can be harder to find. If you can’t get either, good bacon can work too, but it will change the taste slightly. Serve your creamy carbonara ramen right after mixing. This dish tastes best hot and fresh. Once you finish mixing, transfer it to bowls quickly. To know if it’s ready, check if the noodles are coated well and warm. You want to see a glossy sauce, not clumpy or dry. For the best experience, add a sprinkle of fresh parsley right before serving from the [Full Recipe]. This adds color and freshness to your dish. {{image_4}} You can add fresh spinach or green peas to your ramen bowls. They bring color and nutrition. - Spinach: Add it just before serving. It wilts quickly and adds a nice touch. - Peas: Stir them in while cooking the pancetta. They cook fast and add sweetness. Other vegetables can also work. Try sliced mushrooms for umami, or julienned carrots for crunch. If you want a different meat, consider bacon or turkey. They both give a distinct taste. - Bacon: Use it for a smoky flavor. Cook until crispy, just like the pancetta. - Turkey: A leaner choice that still adds great flavor. For a meatless option, use mushrooms or tofu. They absorb flavors well and make the dish hearty. Want some heat? Red pepper flakes are a great start. Add them based on your spice level. - Mild: Start with a pinch. You can always add more later. - Spicy: Use a teaspoon or more for a real kick. You can also try other spices. Fresh herbs like basil or thyme add freshness. Garlic powder or onion powder can boost flavor too. For the complete experience, check the Full Recipe. To keep your Creamy Carbonara Ramen Bowls fresh, store them in the fridge. Use airtight containers to prevent moisture loss. It’s best to eat leftovers within 2-3 days for the best taste. Make sure to cool the dish to room temperature before sealing it up. This helps keep the flavors intact. When reheating, do so gently. Use a skillet over low heat to warm the noodles. Add a splash of cream or pasta water to keep it creamy. Stir often to avoid burning. Never microwave it directly, as it can make the sauce clumpy. You can freeze this dish, but it’s not ideal. The cream may separate when thawed. If you choose to freeze, do so in portions. Use freezer-safe containers and label them. When ready to eat, thaw in the fridge overnight. Then, reheat gently, adding a bit of cream to restore its smooth texture. Yes, you can. To make a vegetarian version, swap the pancetta for mushrooms. Use shiitake or cremini for a rich taste. You can also add spinach or peas for extra color and flavor. Another great option is to use smoked tofu for a protein boost. Parmesan cheese is the classic choice. Its salty and nutty flavor works well. Pecorino Romano is another good option. It’s sharper and adds a nice kick. You can mix both cheeses for a layered taste. To keep your sauce smooth, add pasta water gradually. Start with a small splash and mix it in. This helps create a creamy texture without clumping. Stir quickly to combine and avoid scrambling the eggs. The total time for Creamy Carbonara Ramen Bowls is about 30 minutes. Prep time takes around 10 minutes. Cooking the dish takes about 20 minutes. This quick recipe is perfect for busy nights. Pair this dish with garlic bread for a crunchy side. A fresh green salad also works well. You can add a light vinaigrette to balance the rich flavors. For a fun twist, try pickled vegetables for a tangy contrast. In this article, we explored how to create delicious Creamy Carbonara Ramen Bowls. We covered the main ingredients, including ramen noodles, pancetta, eggs, and a rich sauce made from cream and Parmesan. You learned step-by-step instructions for cooking the noodles, preparing the pancetta, and making the creamy sauce. Remember, using fresh ingredients can greatly enhance the dish's flavor. Try out the variations and tips for success. Enjoy your creamy creation and make it your own!](https://fastmealmate.com/wp-content/uploads/2025/07/91aa5888-7f38-4185-abdc-18228452c956-768x768.webp)