Chicken Caesar Pasta Salad Tasty and Fresh Recipe
![For the Chicken Caesar Pasta Salad, you will need these main ingredients: - 8 oz fusilli pasta - 1 cup cooked chicken breast, diced (or rotisserie chicken) - 1 cup romaine lettuce, chopped into bite-sized pieces - 1/2 cup cherry tomatoes, halved - 1/4 cup freshly grated Parmesan cheese - 1/4 cup Caesar dressing - 2 tablespoons freshly squeezed lemon juice - 1 teaspoon garlic powder - Salt and black pepper, to taste - 1/4 cup crunchy croutons (for garnish) - Fresh parsley, finely chopped (for garnish) These ingredients come together to create a vibrant and tasty dish. Feel free to customize your salad with these optional ingredients: - Avocado slices for creaminess - Grilled zucchini or bell peppers for extra veggies - Bacon bits for a smoky flavor - Extra herbs like basil or dill for freshness Adding these extras can make your salad unique and tailored to your taste. This salad not only tastes great but also packs some nutritional value. Here is a rough estimate of what you get per serving: - Calories: About 400 - Protein: 30g - Carbohydrates: 35g - Fat: 20g - Fiber: 3g This Chicken Caesar Pasta Salad is a balanced meal, making it perfect for lunch or dinner. You can find the full recipe at [Full Recipe]. First, grab a large pot and fill it with water. Bring the water to a rolling boil. Add a pinch of salt to the water. Now, add 8 oz of fusilli pasta. Cook it for 8-10 minutes until it's al dente. When the pasta is done, drain it well. Rinse it under cold water to stop cooking. This helps keep the pasta firm and cool. Set the pasta aside in a large bowl. Next, let’s focus on the chicken. If you have leftover cooked chicken, chop it into small pieces. If you’re using fresh chicken, season it with salt, black pepper, and 1 teaspoon of garlic powder. Cook it in a skillet over medium heat for 6-8 minutes. Make sure it’s cooked through and no longer pink. Let the chicken rest for a few minutes, then chop it into bite-sized pieces. Now, it’s time to bring it all together. In the large bowl with the pasta, add the diced chicken. Then, toss in 1 cup of chopped romaine lettuce and 1/2 cup of halved cherry tomatoes. Gently mix everything to keep the lettuce fresh. In a small bowl, whisk together 1/4 cup of Caesar dressing and 2 tablespoons of fresh lemon juice. Pour the dressing over the salad and toss it all together. Sprinkle 1/4 cup of grated Parmesan cheese and 1/4 cup of crunchy croutons on top. For a fresh touch, add some chopped parsley. Enjoy your Chicken Caesar Pasta Salad right away for the best taste! To make the best Caesar dressing, use fresh ingredients. Start with a good Caesar dressing base. Add freshly squeezed lemon juice for a bright taste. This gives your salad a fresh kick. If you like garlic, mix in some minced garlic. This adds depth to the flavor. Taste your dressing before pouring it over the salad. Adjust salt and pepper to your liking. For a creamier texture, whisk in some Greek yogurt or sour cream. This can make the salad richer and more satisfying. Serve this salad in a big bowl to show off its colors. Layer it with extra romaine for a nice crunch. Add more cherry tomatoes for a sweet touch. For a fun twist, sprinkle some bacon bits or chopped olives on top. This adds extra flavor and texture. You can also serve it as a side dish for grilled meats. Pair it with garlic bread for a full meal. For a picnic, pack the salad in a jar. Just layer the ingredients and keep the dressing separate until serving. To save time, use rotisserie chicken. It’s already cooked and ready to go. You can also cook the pasta in advance. Just store it in the fridge until you’re ready to mix the salad. Pre-chop your veggies and store them in airtight containers. This makes assembly quick and easy. If you have leftovers, make sure to keep the dressing separate. This keeps the salad fresh and crunchy. You can enjoy it for lunch the next day, too! Check out the full recipe for more details. {{image_4}} You can add many proteins to your Chicken Caesar Pasta Salad. Grilled shrimp gives a sweet and savory taste. You can use steak for a heartier meal. If you like fish, try adding tuna for a fresh twist. Each protein adds a unique flavor and texture. For a vegetarian version, skip the chicken and use chickpeas. They add protein and a nice bite. To make it vegan, swap the Caesar dressing for a plant-based version. You can also use nutritional yeast instead of Parmesan cheese for a cheesy flavor without dairy. If you have dietary needs, you can make simple swaps. Use gluten-free pasta if you need to avoid gluten. For a lower carb option, try zucchini noodles. If you're watching calories, cut down on the dressing or use a lighter version. Always feel free to adjust this recipe to fit your diet. To store your Chicken Caesar Pasta Salad, place it in an airtight container. This keeps the flavors fresh and prevents it from drying out. Make sure it cools down first before sealing. You can store it in the fridge for up to three days. For meal prep, divide the salad into single-serving containers. This makes it easy to grab and go. Keep the croutons and dressing separate until you're ready to eat. This way, the salad stays crisp, and the flavors blend perfectly when you mix it. The salad tastes best cold. If you want to reheat it, warm the chicken separately, then mix it back in. However, I recommend enjoying it cold for the best flavor. The salad keeps well for about three days, but the croutons may lose their crunch after a day. For the freshest taste, eat it sooner rather than later. For more details, check out the Full Recipe. To make Chicken Caesar Pasta Salad less calorie-dense, you can swap some ingredients. Use whole wheat pasta instead of regular. This change adds fiber and nutrients. You can also replace Caesar dressing with a lighter version or make your own with yogurt. This option cuts down on fat. Reducing the amount of cheese and croutons helps too. You get the flavor without the extra calories. Focus on using more veggies, like cucumbers or bell peppers. They add crunch and volume without many calories. Yes, you can use different types of pasta for this salad. Fusilli is great, but penne, rotini, or even whole wheat pasta works well too. Gluten-free pasta is an option if you need it. Each type brings its unique shape and texture. Just make sure to cook it al dente as per package directions. This ensures it holds up well with the dressing and other ingredients. When looking for the best store-bought Caesar dressings, I recommend a few brands. Look for ones with natural ingredients and low sugar. Some great options include Annie's Organic Caesar, Ken's Steakhouse, and Cardini's. These dressings have a good balance of flavor and creaminess. Always check the label. You want a dressing that fits your taste and dietary needs. If possible, try a few to find your favorite! This post detailed how to make Chicken Caesar Pasta Salad. You learned about main ingredients, tips for making the best dressing, and how to customize your meal. We covered storage, time-saving tricks, and tasty variations. In summary, this salad is easy to make. You can enjoy it fresh or save it for later. Use these tips to make your dish unique. Enjoy your cooking journey!](https://fastmealmate.com/wp-content/uploads/2025/06/c8df564d-281f-4520-b900-ec1f4444fefb.webp)
Are you ready to spice up your meal routine? My Chicken Caesar Pasta Salad is a tasty and fresh dish that combines classic flavors with delicious pasta. This recipe is perfect for busy weekdays or weekend gatherings. I’ll guide you through easy steps to create a satisfying salad packed with nutrition. Let’s dive into the ingredients and prep so you can enjoy this delightful dish today!
Ingredients
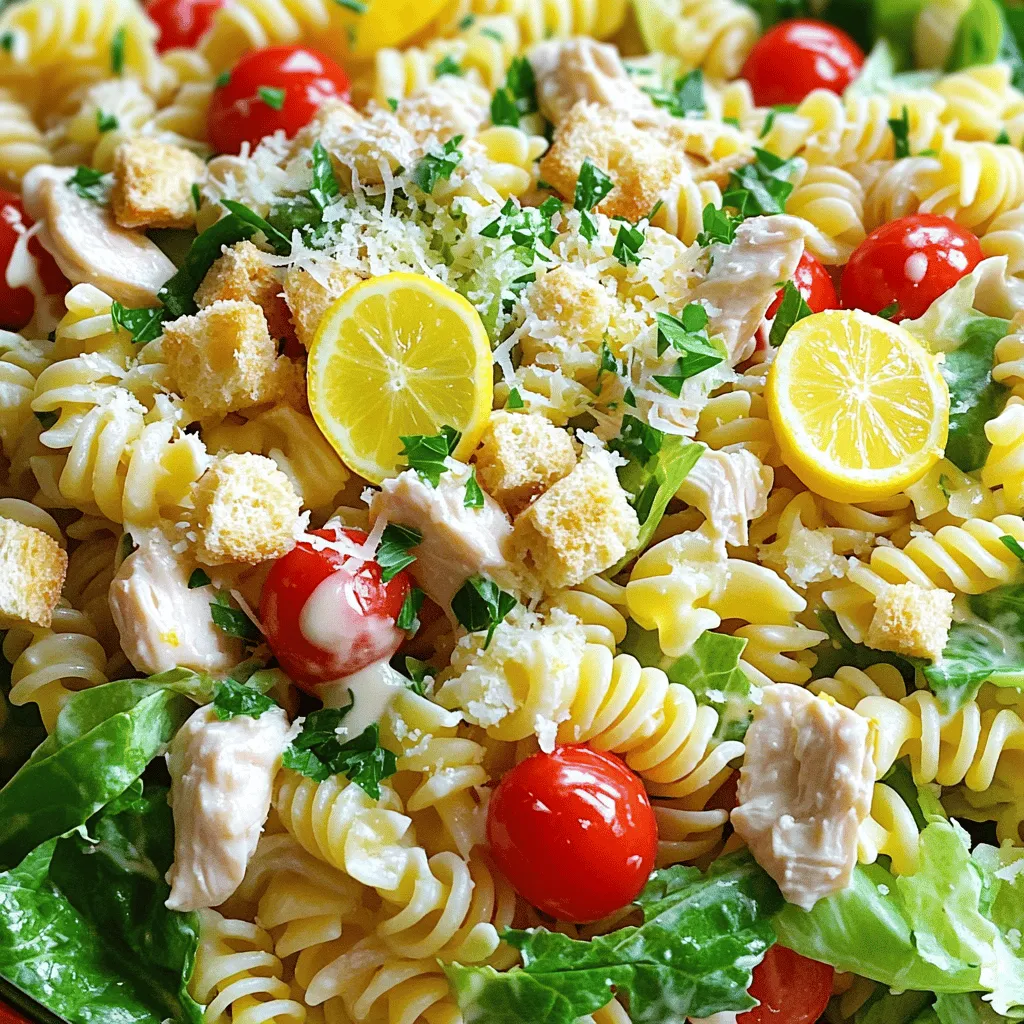
Main Ingredients for Chicken Caesar Pasta Salad
For the Chicken Caesar Pasta Salad, you will need these main ingredients:
– 8 oz fusilli pasta
– 1 cup cooked chicken breast, diced (or rotisserie chicken)
– 1 cup romaine lettuce, chopped into bite-sized pieces
– 1/2 cup cherry tomatoes, halved
– 1/4 cup freshly grated Parmesan cheese
– 1/4 cup Caesar dressing
– 2 tablespoons freshly squeezed lemon juice
– 1 teaspoon garlic powder
– Salt and black pepper, to taste
– 1/4 cup crunchy croutons (for garnish)
– Fresh parsley, finely chopped (for garnish)
These ingredients come together to create a vibrant and tasty dish.
Optional Ingredients for Customization
Feel free to customize your salad with these optional ingredients:
– Avocado slices for creaminess
– Grilled zucchini or bell peppers for extra veggies
– Bacon bits for a smoky flavor
– Extra herbs like basil or dill for freshness
Adding these extras can make your salad unique and tailored to your taste.
Nutritional Information
This salad not only tastes great but also packs some nutritional value. Here is a rough estimate of what you get per serving:
– Calories: About 400
– Protein: 30g
– Carbohydrates: 35g
– Fat: 20g
– Fiber: 3g
This Chicken Caesar Pasta Salad is a balanced meal, making it perfect for lunch or dinner.
Step-by-Step Instructions
Cooking the Pasta
First, grab a large pot and fill it with water. Bring the water to a rolling boil. Add a pinch of salt to the water. Now, add 8 oz of fusilli pasta. Cook it for 8-10 minutes until it’s al dente. When the pasta is done, drain it well. Rinse it under cold water to stop cooking. This helps keep the pasta firm and cool. Set the pasta aside in a large bowl.
Preparing the Chicken
Next, let’s focus on the chicken. If you have leftover cooked chicken, chop it into small pieces. If you’re using fresh chicken, season it with salt, black pepper, and 1 teaspoon of garlic powder. Cook it in a skillet over medium heat for 6-8 minutes. Make sure it’s cooked through and no longer pink. Let the chicken rest for a few minutes, then chop it into bite-sized pieces.
Assembling the Salad
Now, it’s time to bring it all together. In the large bowl with the pasta, add the diced chicken. Then, toss in 1 cup of chopped romaine lettuce and 1/2 cup of halved cherry tomatoes. Gently mix everything to keep the lettuce fresh. In a small bowl, whisk together 1/4 cup of Caesar dressing and 2 tablespoons of fresh lemon juice. Pour the dressing over the salad and toss it all together. Sprinkle 1/4 cup of grated Parmesan cheese and 1/4 cup of crunchy croutons on top. For a fresh touch, add some chopped parsley. Enjoy your Chicken Caesar Pasta Salad right away for the best taste!
Tips & Tricks
Perfecting the Dressing
To make the best Caesar dressing, use fresh ingredients. Start with a good Caesar dressing base. Add freshly squeezed lemon juice for a bright taste. This gives your salad a fresh kick. If you like garlic, mix in some minced garlic. This adds depth to the flavor. Taste your dressing before pouring it over the salad. Adjust salt and pepper to your liking. For a creamier texture, whisk in some Greek yogurt or sour cream. This can make the salad richer and more satisfying.
Serving Suggestions
Serve this salad in a big bowl to show off its colors. Layer it with extra romaine for a nice crunch. Add more cherry tomatoes for a sweet touch. For a fun twist, sprinkle some bacon bits or chopped olives on top. This adds extra flavor and texture. You can also serve it as a side dish for grilled meats. Pair it with garlic bread for a full meal. For a picnic, pack the salad in a jar. Just layer the ingredients and keep the dressing separate until serving.
Time-Saving Tips
To save time, use rotisserie chicken. It’s already cooked and ready to go. You can also cook the pasta in advance. Just store it in the fridge until you’re ready to mix the salad. Pre-chop your veggies and store them in airtight containers. This makes assembly quick and easy. If you have leftovers, make sure to keep the dressing separate. This keeps the salad fresh and crunchy. You can enjoy it for lunch the next day, too!

Variations
Adding Different Proteins
You can add many proteins to your Chicken Caesar Pasta Salad. Grilled shrimp gives a sweet and savory taste. You can use steak for a heartier meal. If you like fish, try adding tuna for a fresh twist. Each protein adds a unique flavor and texture.
Vegetarian and Vegan Options
For a vegetarian version, skip the chicken and use chickpeas. They add protein and a nice bite. To make it vegan, swap the Caesar dressing for a plant-based version. You can also use nutritional yeast instead of Parmesan cheese for a cheesy flavor without dairy.
Ingredient Swaps for Dietary Needs
If you have dietary needs, you can make simple swaps. Use gluten-free pasta if you need to avoid gluten. For a lower carb option, try zucchini noodles. If you’re watching calories, cut down on the dressing or use a lighter version. Always feel free to adjust this recipe to fit your diet.
Storage Info
How to Store Leftovers
To store your Chicken Caesar Pasta Salad, place it in an airtight container. This keeps the flavors fresh and prevents it from drying out. Make sure it cools down first before sealing. You can store it in the fridge for up to three days.
Best Practices for Meal Prep
For meal prep, divide the salad into single-serving containers. This makes it easy to grab and go. Keep the croutons and dressing separate until you’re ready to eat. This way, the salad stays crisp, and the flavors blend perfectly when you mix it.
Shelf Life and Reheating
The salad tastes best cold. If you want to reheat it, warm the chicken separately, then mix it back in. However, I recommend enjoying it cold for the best flavor. The salad keeps well for about three days, but the croutons may lose their crunch after a day. For the freshest taste, eat it sooner rather than later.
FAQs
How to make Chicken Caesar Pasta Salad less calorie-dense?
To make Chicken Caesar Pasta Salad less calorie-dense, you can swap some ingredients. Use whole wheat pasta instead of regular. This change adds fiber and nutrients. You can also replace Caesar dressing with a lighter version or make your own with yogurt. This option cuts down on fat. Reducing the amount of cheese and croutons helps too. You get the flavor without the extra calories. Focus on using more veggies, like cucumbers or bell peppers. They add crunch and volume without many calories.
Can I use a different type of pasta?
Yes, you can use different types of pasta for this salad. Fusilli is great, but penne, rotini, or even whole wheat pasta works well too. Gluten-free pasta is an option if you need it. Each type brings its unique shape and texture. Just make sure to cook it al dente as per package directions. This ensures it holds up well with the dressing and other ingredients.
What are the best store-bought Caesar dressings?
When looking for the best store-bought Caesar dressings, I recommend a few brands. Look for ones with natural ingredients and low sugar. Some great options include Annie’s Organic Caesar, Ken’s Steakhouse, and Cardini’s. These dressings have a good balance of flavor and creaminess. Always check the label. You want a dressing that fits your taste and dietary needs. If possible, try a few to find your favorite!
This post detailed how to make Chicken Caesar Pasta Salad. You learned about main ingredients, tips for making the best dressing, and how to customize your meal. We covered storage, time-saving tricks, and tasty variations.
In summary, this salad is easy to make. You can enjoy it fresh or save it for later. Use these tips to make your dish unique. Enjoy your cooking journey!
![For the Chicken Caesar Pasta Salad, you will need these main ingredients: - 8 oz fusilli pasta - 1 cup cooked chicken breast, diced (or rotisserie chicken) - 1 cup romaine lettuce, chopped into bite-sized pieces - 1/2 cup cherry tomatoes, halved - 1/4 cup freshly grated Parmesan cheese - 1/4 cup Caesar dressing - 2 tablespoons freshly squeezed lemon juice - 1 teaspoon garlic powder - Salt and black pepper, to taste - 1/4 cup crunchy croutons (for garnish) - Fresh parsley, finely chopped (for garnish) These ingredients come together to create a vibrant and tasty dish. Feel free to customize your salad with these optional ingredients: - Avocado slices for creaminess - Grilled zucchini or bell peppers for extra veggies - Bacon bits for a smoky flavor - Extra herbs like basil or dill for freshness Adding these extras can make your salad unique and tailored to your taste. This salad not only tastes great but also packs some nutritional value. Here is a rough estimate of what you get per serving: - Calories: About 400 - Protein: 30g - Carbohydrates: 35g - Fat: 20g - Fiber: 3g This Chicken Caesar Pasta Salad is a balanced meal, making it perfect for lunch or dinner. You can find the full recipe at [Full Recipe]. First, grab a large pot and fill it with water. Bring the water to a rolling boil. Add a pinch of salt to the water. Now, add 8 oz of fusilli pasta. Cook it for 8-10 minutes until it's al dente. When the pasta is done, drain it well. Rinse it under cold water to stop cooking. This helps keep the pasta firm and cool. Set the pasta aside in a large bowl. Next, let’s focus on the chicken. If you have leftover cooked chicken, chop it into small pieces. If you’re using fresh chicken, season it with salt, black pepper, and 1 teaspoon of garlic powder. Cook it in a skillet over medium heat for 6-8 minutes. Make sure it’s cooked through and no longer pink. Let the chicken rest for a few minutes, then chop it into bite-sized pieces. Now, it’s time to bring it all together. In the large bowl with the pasta, add the diced chicken. Then, toss in 1 cup of chopped romaine lettuce and 1/2 cup of halved cherry tomatoes. Gently mix everything to keep the lettuce fresh. In a small bowl, whisk together 1/4 cup of Caesar dressing and 2 tablespoons of fresh lemon juice. Pour the dressing over the salad and toss it all together. Sprinkle 1/4 cup of grated Parmesan cheese and 1/4 cup of crunchy croutons on top. For a fresh touch, add some chopped parsley. Enjoy your Chicken Caesar Pasta Salad right away for the best taste! To make the best Caesar dressing, use fresh ingredients. Start with a good Caesar dressing base. Add freshly squeezed lemon juice for a bright taste. This gives your salad a fresh kick. If you like garlic, mix in some minced garlic. This adds depth to the flavor. Taste your dressing before pouring it over the salad. Adjust salt and pepper to your liking. For a creamier texture, whisk in some Greek yogurt or sour cream. This can make the salad richer and more satisfying. Serve this salad in a big bowl to show off its colors. Layer it with extra romaine for a nice crunch. Add more cherry tomatoes for a sweet touch. For a fun twist, sprinkle some bacon bits or chopped olives on top. This adds extra flavor and texture. You can also serve it as a side dish for grilled meats. Pair it with garlic bread for a full meal. For a picnic, pack the salad in a jar. Just layer the ingredients and keep the dressing separate until serving. To save time, use rotisserie chicken. It’s already cooked and ready to go. You can also cook the pasta in advance. Just store it in the fridge until you’re ready to mix the salad. Pre-chop your veggies and store them in airtight containers. This makes assembly quick and easy. If you have leftovers, make sure to keep the dressing separate. This keeps the salad fresh and crunchy. You can enjoy it for lunch the next day, too! Check out the full recipe for more details. {{image_4}} You can add many proteins to your Chicken Caesar Pasta Salad. Grilled shrimp gives a sweet and savory taste. You can use steak for a heartier meal. If you like fish, try adding tuna for a fresh twist. Each protein adds a unique flavor and texture. For a vegetarian version, skip the chicken and use chickpeas. They add protein and a nice bite. To make it vegan, swap the Caesar dressing for a plant-based version. You can also use nutritional yeast instead of Parmesan cheese for a cheesy flavor without dairy. If you have dietary needs, you can make simple swaps. Use gluten-free pasta if you need to avoid gluten. For a lower carb option, try zucchini noodles. If you're watching calories, cut down on the dressing or use a lighter version. Always feel free to adjust this recipe to fit your diet. To store your Chicken Caesar Pasta Salad, place it in an airtight container. This keeps the flavors fresh and prevents it from drying out. Make sure it cools down first before sealing. You can store it in the fridge for up to three days. For meal prep, divide the salad into single-serving containers. This makes it easy to grab and go. Keep the croutons and dressing separate until you're ready to eat. This way, the salad stays crisp, and the flavors blend perfectly when you mix it. The salad tastes best cold. If you want to reheat it, warm the chicken separately, then mix it back in. However, I recommend enjoying it cold for the best flavor. The salad keeps well for about three days, but the croutons may lose their crunch after a day. For the freshest taste, eat it sooner rather than later. For more details, check out the Full Recipe. To make Chicken Caesar Pasta Salad less calorie-dense, you can swap some ingredients. Use whole wheat pasta instead of regular. This change adds fiber and nutrients. You can also replace Caesar dressing with a lighter version or make your own with yogurt. This option cuts down on fat. Reducing the amount of cheese and croutons helps too. You get the flavor without the extra calories. Focus on using more veggies, like cucumbers or bell peppers. They add crunch and volume without many calories. Yes, you can use different types of pasta for this salad. Fusilli is great, but penne, rotini, or even whole wheat pasta works well too. Gluten-free pasta is an option if you need it. Each type brings its unique shape and texture. Just make sure to cook it al dente as per package directions. This ensures it holds up well with the dressing and other ingredients. When looking for the best store-bought Caesar dressings, I recommend a few brands. Look for ones with natural ingredients and low sugar. Some great options include Annie's Organic Caesar, Ken's Steakhouse, and Cardini's. These dressings have a good balance of flavor and creaminess. Always check the label. You want a dressing that fits your taste and dietary needs. If possible, try a few to find your favorite! This post detailed how to make Chicken Caesar Pasta Salad. You learned about main ingredients, tips for making the best dressing, and how to customize your meal. We covered storage, time-saving tricks, and tasty variations. In summary, this salad is easy to make. You can enjoy it fresh or save it for later. Use these tips to make your dish unique. Enjoy your cooking journey!](https://fastmealmate.com/wp-content/uploads/2025/06/c8df564d-281f-4520-b900-ec1f4444fefb-300x300.webp)

![To make a classic Italian zucchini pasta casserole, you will need the following ingredients: - 3 medium zucchinis, sliced into thin, even rounds - 2 cups cooked pasta (choose your favorite like penne or fusilli) - 1 cup marinara sauce (preferably homemade or high-quality store-bought) - 1 cup creamy ricotta cheese - 1 cup shredded mozzarella cheese, plus extra for topping - 1/2 cup grated Parmesan cheese - 1 large egg, lightly beaten - 2 cloves garlic, minced - 1 teaspoon dried oregano - 1 teaspoon dried basil - Sea salt and freshly cracked black pepper, to taste - Olive oil, for drizzling and greasing - Fresh basil leaves, for garnish Each ingredient plays a key role in building flavor and texture. The zucchini adds a fresh crunch, while the pasta provides a hearty base. The cheeses bring creaminess and richness. Marinara sauce ties everything together with its robust flavor. When I make this dish, I focus on using fresh ingredients. It makes a big difference. Quality marinara or homemade sauce enhances the taste. I also love to mix different cheeses for added depth. You can switch up the cheeses based on your preference. Using good olive oil is essential for greasing the dish and drizzling on top. It adds a lovely finish. As for herbs, oregano and basil deliver classic Italian flavor. Feel free to personalize this recipe. Adjust the seasonings to suit your taste. This dish is forgiving, making it easy to put your spin on it. For the full recipe, check out the complete instructions. 1. Preheating the Oven and Sautéing Zucchini - First, set your oven to 375°F (190°C). This temperature works well for baking. - Next, grab a skillet and drizzle some olive oil into it. Heat it over medium heat. - Add the sliced zucchinis and minced garlic to the skillet. Sauté them for about 5-7 minutes. - Keep stirring until the zucchinis become soft and slightly golden. - Season with sea salt, black pepper, oregano, and basil. This adds a punch of flavor. - Once done, remove the skillet from the heat and let it cool for a few moments. 2. Mixing Ingredients for the Casserole - While the zucchini cools, take a large mixing bowl and combine the cooked pasta, marinara sauce, ricotta cheese, and the lightly beaten egg. - Add half of the mozzarella and half of the Parmesan cheese to the bowl. - Stir everything together until well mixed. This will create a creamy base. - Now, gently fold the sautéed zucchini into the pasta mixture. Make sure it blends without mashing the veggies. 1. Assembling the Casserole - Grease a 9x13 inch baking dish with olive oil. This keeps the casserole from sticking. - Pour the pasta and zucchini mixture into the greased dish. Spread it out evenly with a spatula. - To finish, sprinkle the remaining mozzarella and Parmesan on top. This creates a cheesy crust. 2. Baking and Best Practices - Cover the dish tightly with aluminum foil and place it in the preheated oven. - Bake for 20 minutes. This helps all the flavors mix well. - After 20 minutes, carefully take off the foil. Bake for another 10-15 minutes. Watch for the cheese to melt and turn golden brown. - Once it’s done, remove the casserole from the oven. Let it cool for a few minutes before serving. - For a lovely touch, garnish with fresh basil leaves. This adds color and flavor to your dish. For the complete recipe, refer to [Full Recipe]. - Seasoning Suggestions: I love using fresh herbs. Basil and oregano add a lovely taste. Don’t forget to season with sea salt and black pepper. These simple touches make a big difference. Consider adding a pinch of red pepper flakes for a bit of heat. - Achieving the Perfect Cheese Crust: To get that golden crust, use a mix of mozzarella and Parmesan on top. When you bake the casserole, keep it covered for the first part of cooking. This helps the cheese melt nicely. Uncover it towards the end to allow browning. - Sautéing Tips: When sautéing zucchini, cut it into thin, even rounds. This ensures even cooking. Don’t overcrowd the pan; this can lead to steaming instead of browning. Give them enough space to caramelize. - Alternative Pasta Cooking Methods: You can use different pasta shapes, like penne or fusilli. You don’t need to cook it all the way. Make it al dente, as it will cook more in the oven. This keeps the pasta from getting mushy in the casserole. Make sure to check out the Full Recipe for all the steps and details! {{image_4}} Different Cheese Options Cheese makes this dish rich and creamy. You can swap ricotta for cottage cheese if you like. For a sharper taste, use aged provolone or gouda. If you want a bit of tang, try feta cheese. Each cheese brings its unique flavor to the casserole. Meat Additions and Alternatives For meat lovers, ground beef or turkey can add protein. Cook the meat first and mix it with the pasta. If you prefer a lighter option, add cooked chicken or sausage. You can also use plant-based meats for a tasty, hearty dish. Gluten-Free Options To make this casserole gluten-free, choose gluten-free pasta. Many brands offer great options that hold up well in baking. Just check the package for cooking times to ensure perfect texture. Vegan Adaptations For a vegan version, swap all cheeses for cashew cream or tofu ricotta. You can also use a flax egg instead of the beaten egg for binding. Use your favorite marinara sauce that is dairy-free, and you’ll have a delicious vegan casserole. Experimenting with these swaps and modifications can make the Classic Italian Zucchini Pasta Casserole fit any diet or taste. For the full recipe, check out the details above. After enjoying your Classic Italian Zucchini Pasta Casserole, let’s talk storage. First, cool the casserole completely. This helps prevent condensation, which can make it soggy. Once cool, place leftovers in an airtight container. Store them in the fridge for up to three days. If you want to save it for longer, freezing works too. Cut the casserole into portions. Wrap each slice tightly in plastic wrap, then place them in a freezer-safe bag. This way, you can enjoy it for up to three months. When ready to enjoy your casserole again, reheating is key. The best method is using an oven. Preheat it to 350°F (175°C). Place the casserole in a baking dish and cover it with foil. Heat for 20-25 minutes. This helps keep the texture nice and creamy. If you’re in a hurry, a microwave works too. Use a microwave-safe plate and cover it with a damp paper towel. Heat in short bursts, stirring in between, until hot. This method may not keep the texture as good as the oven. For the best flavor and texture, always let it cool slightly before serving. Enjoy! Can I use other vegetables? Yes, you can use other veggies. Try bell peppers, spinach, or mushrooms. Just chop them small so they cook well. Mixing different vegetables adds flavor and color to your dish. How to make it ahead of time? You can make this casserole a day ahead. Just prepare it like normal, but do not bake it. Cover it and store it in the fridge. When ready, bake it as instructed, adding a few extra minutes if needed. What types of pasta work best? I love using penne or fusilli for this dish. Both types hold sauce well and stay firm while baking. You can also use gluten-free pasta if you prefer. How long can it be stored in the fridge? You can keep leftovers in the fridge for about three days. Make sure to cover it well. To reheat, just warm it in the oven or microwave until hot. Recommended Side Dishes Serve this casserole with a fresh salad or garlic bread. A simple mixed greens salad adds a crisp touch. Garlic bread brings a nice crunch and flavor. Pairing Wine with Casserole A light red wine like Chianti pairs well with this dish. It balances the flavors of the zucchini and cheese. If you prefer white, try a crisp Pinot Grigio. How to Garnish and Serve Garnish with fresh basil leaves for a pop of color. You can also sprinkle extra Parmesan on top before serving. This adds flavor and looks great on the table. For the full recipe, check the details above. Enjoy your cooking! In this blog post, we explored a delicious zucchini pasta casserole. We covered ingredients like zucchini, pasta, marinara, and various cheeses. You learned step-by-step instructions for preparation and baking. We included helpful tips for flavor and texture enhancement. You also discovered variations to suit different diets and preferences. In closing, this casserole is versatile and easy to make. Enjoy the cooking process and share it with loved ones.](https://fastmealmate.com/wp-content/uploads/2025/07/1e9eddde-dee0-4a9c-92bd-9b0350c13af8-768x768.webp)


![- 1 ½ cups graham cracker crumbs - ½ cup unsalted butter, melted - 2 tablespoons granulated sugar - 8 oz cream cheese, softened - ½ cup powdered sugar - ½ cup heavy whipping cream - Zest and juice of 1 lemon - 1 teaspoon pure vanilla extract - Assorted fresh berries (for topping) - Fresh mint leaves (for garnish) Gathering the right ingredients is key. The graham cracker crumbs form a sweet and crunchy crust. Unsalted butter adds richness, while granulated sugar gives a touch of sweetness. Cream cheese provides that classic cheesecake texture. Powdered sugar balances the filling's flavor. Next, I add heavy whipping cream for lightness. The zest and juice from the lemon bring bright flavor. Pure vanilla extract adds depth. For garnishing, I use fresh berries on top for color and mint leaves for a fresh touch. These ingredients come together to create a treat that is light, creamy, and bursting with flavor. You can find the detailed steps in the Full Recipe. - Combine 1 ½ cups of graham cracker crumbs, ½ cup melted unsalted butter, and 2 tablespoons granulated sugar in a bowl. - Press this mixture firmly into mini tart molds. Ensure it is even and tight. - Chill the crusts in the refrigerator for 10-15 minutes to help them set. - In a large bowl, beat 8 oz of softened cream cheese until it is smooth. - Mix in ½ cup powdered sugar, zest and juice of 1 lemon, and 1 teaspoon vanilla extract. Blend until there are no lumps. - In a separate bowl, whip ½ cup heavy cream with an electric mixer until stiff peaks form. - Gently fold the whipped cream into the cream cheese mixture using a spatula. Be careful not to deflate the whipped cream. - Take the chilled crusts out of the refrigerator. - Fill each crust with the lemon cheesecake filling, smoothing the tops evenly. - Place the filled tarts back in the refrigerator. Chill for at least 2 hours to let the filling set. - Gently remove the tarts from their pans. - Top each tart with fresh berries and a mint leaf for a lovely touch. For the full recipe, please refer to the earlier section. Enjoy making these delightful mini no-bake lemon cheesecake tarts! To make the crust strong, pack the mixture tightly. This helps keep the shape. You can also try different cookies. For example, use chocolate cookies or gingersnaps. Each cookie gives a unique flavor. For a smooth filling, use cream cheese at room temperature. Cold cream cheese can make lumps. You can adjust the lemon juice to find your perfect tartness. If you love tart, add more lemon. For a milder taste, use less juice. To fill the tarts neatly, use a piping bag. This gives a professional look. You can also sprinkle extra lemon zest on the plate. It adds color and makes your dessert pop. For a fun touch, place fresh mint leaves around the tarts. It looks great and adds freshness! You can find the Full Recipe for these delightful tarts to explore more tips. {{image_4}} You can change up the taste of these mini tarts easily. Swap lemon for lime for a zesty twist. The tartness from lime adds a fresh kick. If you want something rich, use chocolate or fruit purees for a unique filling. Chocolate brings sweet indulgence, while fruit purees add a fruity burst. Not everyone can eat the same way. You can make a gluten-free crust with gluten-free crumbs. This way, everyone can enjoy these tarts. For those avoiding dairy, substitute with vegan cream cheese and coconut cream. These options keep the creamy texture while being dairy-free. Garnishing can elevate your dessert. Top your tarts with seasonal fruits like strawberries or raspberries. The colors and flavors will pop! You can also use edible flowers for an elegant presentation. They add a touch of beauty and whimsy to your tarts. For the full recipe, check out the [Full Recipe]. You can store the mini no-bake lemon cheesecake tarts in the refrigerator. They will last for up to three days if covered. To keep them fresh, make sure to cover them well. It’s best to keep the tarts separate from any garnishes until you are ready to serve them. This way, they stay fresh and look great. If you want to save some for later, you can freeze the unfilled crusts. This is a great option if you plan to make them ahead of time. The filled tarts can also be frozen for up to a month. Just remember to thaw them before serving. This will help keep their creamy texture. To prevent the tarts from drying out, use airtight containers. This keeps them fresh and tasty. It’s also smart to label your containers with dates. This way, you can easily track how long they have been stored. Yes, you can prepare these tarts a day in advance and chill them. This makes them great for parties or busy days. Just keep them in the fridge until you are ready to serve. Lightly grease the tart pans before filling them. You can also use silicone molds. Both methods help the tarts pop out without breaking. You can use bottled lemon juice in a pinch. However, fresh lemons give the best flavor. The zest adds a bright taste that makes these tarts stand out. Yes, Greek yogurt or vegan cream cheese works well as substitutes. These options can change the flavor slightly, but they still taste great. This recipe yields 12 mini tarts. Perfect for sharing or enjoying over a few days! Pair your mini tarts with coffee or tea. This makes for a delightful dessert experience that everyone will love. For the full recipe, check out the details above! This blog post covers how to make delicious mini lemon cheesecake tarts. We discussed each ingredient, from the crust to the creamy filling, and shared tips for a perfect dessert. You can customize flavors and garnishes to suit your taste. Remember, storage is key for keeping them fresh. Enjoy making these tarts for any occasion. Your friends and family will love them!](https://fastmealmate.com/wp-content/uploads/2025/06/a8bd9651-0c39-4151-9790-24600a8eb0ea-768x768.webp)
