
Looking for a delicious way to start your day? This Cheesy Sausage Breakfast Casserole is the answer! It’s quick to make, perfect for families, and packed with flavor. With savory sausage, fluffy eggs, and gooey cheese, it brings everyone together at the breakfast table. Plus, I’ll share tips and tricks to make it even better. Get ready to impress your family with this easy meal!
Why I Love This Recipe
- Deliciously Savory: This casserole combines the rich flavors of sausage, cheese, and spices, creating a hearty breakfast that is both satisfying and delicious.
- Easy to Prepare: With simple steps and minimal prep time, this recipe is perfect for busy mornings or when entertaining guests.
- Customizable Ingredients: You can easily swap in your favorite vegetables or cheeses, making it a versatile dish that caters to personal preferences.
- Feeds a Crowd: With eight generous servings, this casserole is ideal for family gatherings, brunch parties, or meal prep for the week ahead.
Ingredients
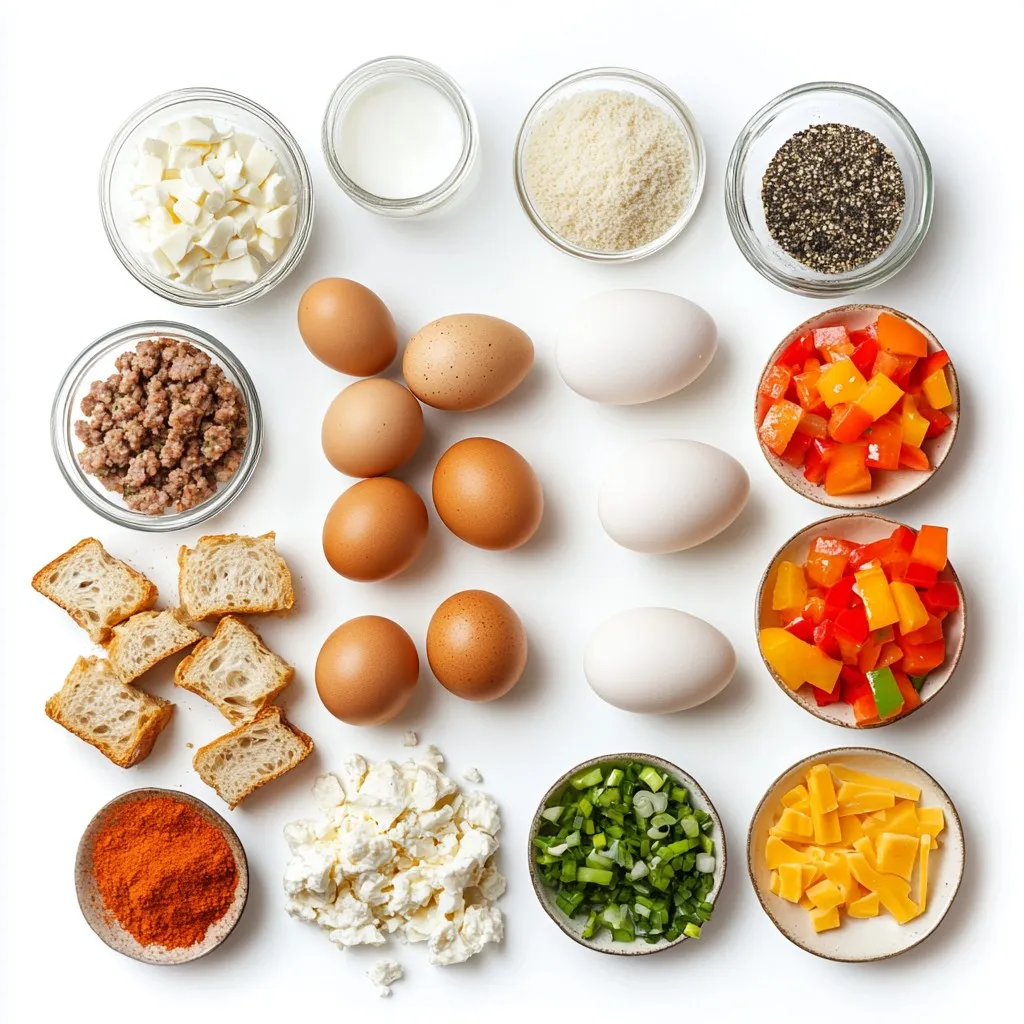
Main Ingredients
– 1 pound fully cooked breakfast sausage, crumbled
– 6 large eggs
– 2 cups whole milk
The heart of this dish lies in its main ingredients. The breakfast sausage adds a savory bite. Eggs bring richness and structure. Whole milk makes the casserole creamy and soft.
Seasonings and Spices
– 1 teaspoon garlic powder
– 1 teaspoon onion powder
– 1 teaspoon dried oregano
– 1 teaspoon salt
– ½ teaspoon freshly ground black pepper
Seasonings are crucial for flavor. Garlic and onion powders add depth. Dried oregano gives an earthy taste. Salt and pepper enhance all the other flavors.
Additional Ingredients
– 4 cups of cubed baguette or your favorite bread
– 2 cups shredded sharp cheddar cheese
– 1 cup diced bell peppers (use a mix of red, green, and yellow for vibrant colors)
– ½ cup chopped green onions (for garnish)
Bread acts as a base, soaking up the egg mix. Cheese melts into a gooey top layer. Bell peppers add color and a fresh crunch. Green onions serve as a bright garnish.
Step-by-Step Instructions
Prepping the Casserole
– Preheat your oven to 350°F (175°C). This helps the casserole cook evenly.
– Grease your 9×13 inch baking dish. Use cooking spray or butter for easy cleanup.
Cooking the Sausage
– In a large skillet, add crumbled breakfast sausage.
– Cook over medium heat for 5-7 minutes. Stir often until the sausage is well-browned and hot.
Combining the Egg Mixture
– Crack 6 large eggs in a bowl. Pour in 2 cups of milk.
– Add 1 teaspoon of garlic powder, onion powder, dried oregano, salt, and black pepper.
– Whisk the mixture until all ingredients blend well and become slightly frothy. This helps create a fluffy texture.
Assembling the Casserole
– Spread cubed bread evenly across the bottom of the greased dish.
– Layer the cooked sausage over the bread.
– Scatter diced bell peppers on top. Use a mix of red, green, and yellow for color.
Baking Process
– Pour the egg mixture over the layered bread, sausage, and peppers.
– Press down gently to soak the bread.
– Sprinkle 2 cups of shredded sharp cheddar cheese on top. This will create a tasty, cheesy crust.
– Bake in the preheated oven for 30-35 minutes. The casserole is done when the egg is set and cheese is golden.
Final Presentation
– Let the casserole cool for 10 minutes after baking. This makes it easier to cut into squares.
– Garnish with chopped green onions for a fresh look.
– Serve on colorful plates. Add a side of fresh fruit or salad for a balanced meal.
Tips & Tricks
Ensuring Perfect Texture
To get the best texture, soak the bread. This helps it absorb the egg mixture well. I recommend using cubed baguette or any bread you like. Let the bread soak for about 10 minutes. This makes it soft and fluffy inside.
For the egg mixture, whisk the eggs and milk well. You want it to be frothy. This helps the casserole rise nicely when baking. Don’t rush this step; it makes a big difference.
Flavor Enhancements
You can boost the flavor by adding spices. A pinch of cayenne pepper adds warmth. You can also try smoked paprika for a smoky taste. Mix these in with the egg mixture for a tasty kick.
Cheese alternatives can change the taste too. Sharp cheddar gives a bold flavor. But you can use mozzarella for a milder taste. Goat cheese adds creaminess and tanginess. Choose what you love most.
Make-ahead Instructions
Want to save time? You can prep this casserole overnight. Just assemble it in the baking dish, cover it, and refrigerate. In the morning, bake it straight from the fridge. Just add a few extra minutes to the baking time.
When reheating, the oven is best. Bake at 350°F until warm. This keeps the texture nice. If you use a microwave, it may turn soggy. Enjoy your leftovers as a quick meal!
Pro Tips
- Use Fresh Ingredients: Opt for freshly diced bell peppers and high-quality sausage to elevate the flavor of your casserole.
- Let it Soak: Allow the casserole to sit for 15-20 minutes before baking to let the bread absorb the egg mixture for a creamier texture.
- Cheese Variations: Experiment with different cheeses such as Monterey Jack or pepper jack for a unique twist on the classic cheddar.
- Make Ahead: Prepare the casserole the night before, cover it, and refrigerate. Just bake it in the morning for a quick breakfast option.
Variations
Ingredient Swaps
You can make this casserole your own by swapping out the meat. Instead of breakfast sausage, try:
– Ground turkey
– Chorizo for a spicy kick
– Bacon for a smoky flavor
If you want a vegetarian option, use these ideas:
– Crumbled tofu with spices
– Black beans for protein
– Sautéed mushrooms for a hearty texture
Cheese Choices
Cheese adds great flavor to your casserole. Here are some fun options:
– Mozzarella for a stretchy texture
– Pepper jack for a spicy twist
– Feta for a tangy kick
If you’re dairy-free, try these alternatives:
– Vegan cheddar cheese
– Nutritional yeast for a cheesy flavor
– Cashew cheese for creaminess
Seasonal Variations
You can change your casserole with the seasons. For holidays, think about adding:
– Cooked spinach for Easter
– Sweet potatoes for Thanksgiving
– Cranberries for a festive touch
Using seasonal vegetables can also elevate your dish. Try:
– Zucchini in summer
– Butternut squash in fall
– Asparagus in spring
These swaps will keep your Cheesy Sausage Breakfast Casserole fresh and fun!
Storage Info
Storing Leftovers
Store any leftover cheesy sausage breakfast casserole in the fridge. Use an airtight container. It will stay fresh for about 3-4 days. To freeze, cut the casserole into portions. Wrap each piece tightly in plastic wrap, then place it in a freezer bag. This way, you can enjoy it later without losing flavor.
Reheating Instructions
You have two main options for reheating: the oven or microwave. The oven is best for texture. Preheat it to 350°F (175°C). Place the casserole in a baking dish. Cover it with foil to keep it moist. Bake for about 15-20 minutes. For the microwave, heat individual portions in 30-second bursts. Check for warmth to avoid overcooking.
Shelf Life
The casserole lasts about 3-4 days in the fridge. If you freeze it, aim to eat it within 2-3 months for the best taste. Look for signs of spoilage like an off smell or mold. If you see any, it’s best to throw it away. Always trust your senses when it comes to food safety.
FAQs
Can I prepare this casserole ahead of time?
Yes, you can prepare this casserole the night before. First, cook the sausage and let it cool. Whisk the eggs and milk with the spices. Then, layer the bread, sausage, and peppers in your dish. Finally, pour the egg mix over everything. Cover it tightly with plastic wrap and place it in the fridge. In the morning, just bake it as usual. This method saves time on busy mornings.
What is the best type of bread to use?
You have many great options for bread. Baguette works well because it soaks up the egg mix. Sourdough gives a nice tangy flavor. If you prefer softer bread, use white or whole wheat bread. Each choice offers a different taste and texture. Choose what your family likes best.
Can I add extra vegetables?
Absolutely! Adding veggies boosts flavor and nutrition. Some great options are spinach, mushrooms, or zucchini. You can also use chopped tomatoes for a fresh taste. Just be sure to chop them finely so they cook well. Mix and match to find your favorite veggie combo.
How do I make this casserole spicy?
To add some heat, you can use spicy sausage instead of regular. Another option is to add chopped jalapeños or red pepper flakes. If you like it really spicy, add hot sauce to the egg mix. Taste as you go to find your perfect spice level.
This blog shared how to make a delicious breakfast casserole. You learned about key ingredients like sausage, eggs, and milk. We covered seasoning options to enhance flavor and various ingredient swaps for fun variations. Following easy steps, you can prepare and bake this dish perfectly.
Remember, you can always customize with different cheeses or veggies. Make this recipe your own and enjoy it at any meal! Your kitchen will smell great, and everyone will love the final dis


