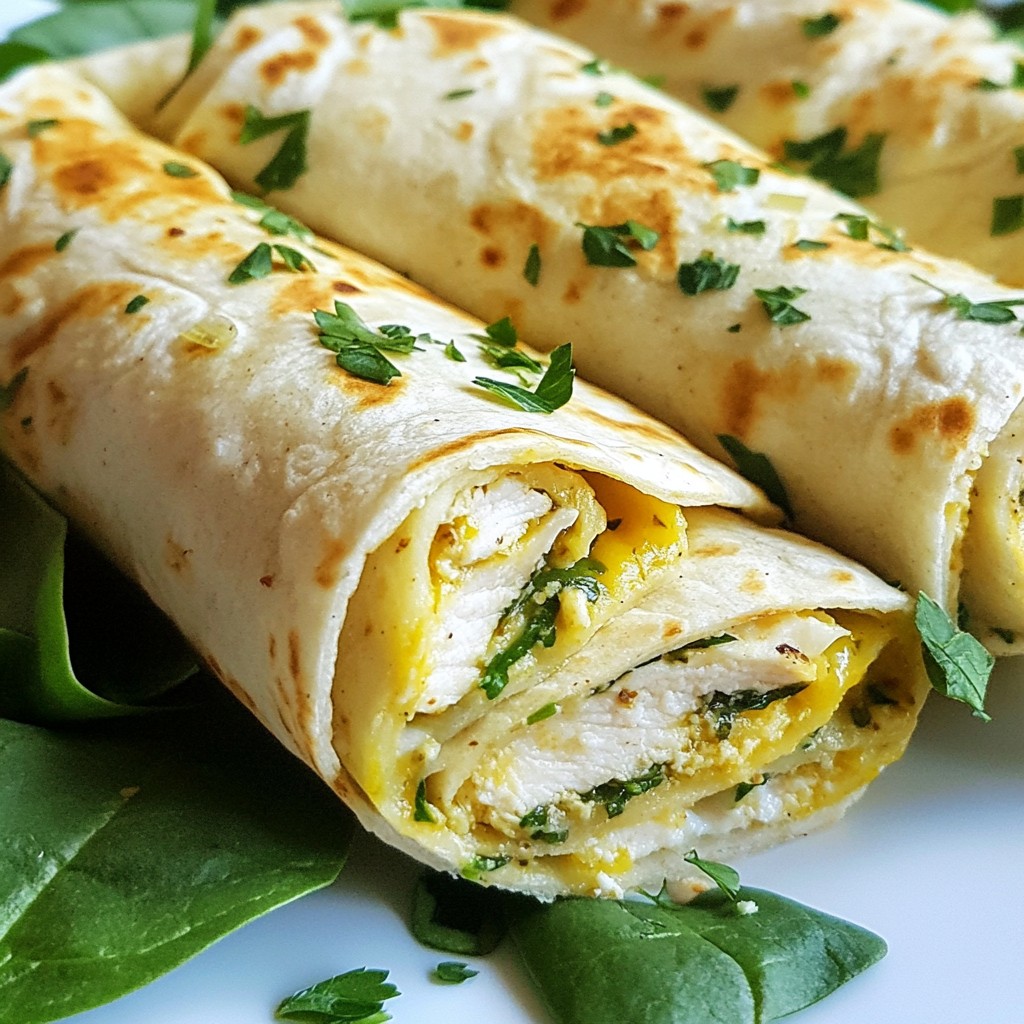
Looking for a delicious, easy recipe that will make your taste buds dance? I’ve got just the thing for you: Cheesy Garlic Chicken Wraps! Packed with tender chicken, creamy cheese, and bold flavors, this dish is perfect for a quick weeknight dinner or a fun party snack. In under an hour, you’ll have a meal that’s sure to impress. Ready to dive in? Let’s gather our ingredients and get cooking!
Why I Love This Recipe
- Quick and Easy: This recipe is perfect for busy weeknights, taking just 50 minutes from start to finish.
- Cheesy Goodness: With both mozzarella and cream cheese, each bite is a delightful cheesy experience.
- Flavor Packed: The combination of garlic and Italian seasoning elevates the taste, making it a family favorite.
- Customizable: You can easily add your favorite vegetables or spices to make this wrap your own!
Ingredients
Main Ingredients
- 2 boneless, skinless chicken breasts
- 1 cup shredded mozzarella cheese
- 1/2 cup cream cheese, softened to room temperature
Seasoning and Flavoring
- 4 cloves garlic, finely minced
- 1 teaspoon Italian seasoning
- Salt and freshly cracked black pepper to taste
Additional Components
- 4 large flour tortillas
- 1 cup fresh spinach leaves, roughly chopped
- 1 tablespoon olive oil
- Optional: Chopped fresh parsley for a vibrant garnish
When making cheesy garlic chicken wraps, the right ingredients make all the difference. Start with boneless, skinless chicken breasts. They cook quickly and stay tender. For cheese, I love using shredded mozzarella and cream cheese. The mozzarella gives that gooey stretch, while cream cheese adds a rich flavor.
Next, don’t skip the garlic! You will need four cloves, minced finely. Garlic adds a wonderful aroma and taste. Italian seasoning combines herbs that boost the flavor. Use salt and black pepper to season the chicken, ensuring every bite is tasty.
For the wraps, grab four large flour tortillas. They are the perfect size for filling. You’ll also need fresh spinach leaves. They add color and a healthy crunch. Finally, some olive oil helps brown the chicken nicely. If you want to make it pretty, chop some fresh parsley for garnish. This combination creates a wrap that is not only easy to make but also bursting with flavor!

Step-by-Step Instructions
Preparation Steps
1. Preheat the oven and season the chicken
Start by preheating your oven to 375°F (190°C). This helps the wraps cook evenly. While the oven heats, season both sides of the chicken breasts. Use salt, black pepper, and Italian seasoning. This adds a big flavor boost to the chicken.
2. Sautéing the chicken to perfection
Heat a large skillet over medium heat. Add the olive oil once the skillet is hot. Carefully place the seasoned chicken breasts in the skillet. Cook for 5-7 minutes on each side. You want them golden brown and fully cooked. Check the internal temperature; it should reach 165°F (74°C). When done, remove the chicken and let it cool for a few minutes.
Cheese Mixture Preparation
1. Combining cream cheese and garlic
While the chicken cools, grab a mixing bowl. Add the softened cream cheese and minced garlic. Mix well until it’s smooth. This blend gives a rich, savory flavor.
2. Shredding chicken and mixing with cheese
When the chicken is cool enough, shred it using two forks or your fingers. Add the shredded chicken to the cheese mixture. Stir until the chicken is evenly coated. This ensures every bite is packed with flavor.
Assembling the Wraps
1. Layering spinach and cheese mixture
Take a large flour tortilla and lay it flat on a clean surface. Place a small handful of chopped spinach in the center. This adds freshness and a nice crunch.
2. Wrapping technique for secure rolls
Spoon a good amount of the cheesy garlic chicken mixture over the spinach. Then, sprinkle some of the remaining mozzarella cheese on top. To wrap, fold the sides of the tortilla over the filling. Roll it tightly from the bottom up. This keeps all the goodness inside.
3. Baking the wraps to golden perfection
Place the wraps seam-side down on a baking sheet lined with parchment paper. Bake in the preheated oven for about 15 minutes. Look for a golden brown color and melted cheese. Once done, take them out and let them cool slightly. For a nice presentation, slice each wrap diagonally before serving.
Tips & Tricks
Cooking Tips
How to ensure chicken is cooked fully? Cook chicken until it reaches 165°F (74°C) inside. Use a meat thermometer for best results. This step keeps your meal safe and tasty. If you cut into the chicken, the juices should run clear.
Tips for perfect cheese melting: To melt cheese perfectly, use a mix of mozzarella and cream cheese. Cream cheese gives a creamy base while mozzarella offers that great stretch. Bake your wraps until golden brown for best cheese results.
Wrapping Techniques
Best practices for a tight wrap: Lay your tortilla flat. Add filling in the center, but not too much. Fold the sides over the filling first. Then roll from the bottom to the top. This way, your wrap stays tight.
How to prevent filling spillage: Make sure not to overfill your wrap. Keep the edges clean for easy folding. You can also press down on the wrap as you roll. This helps keep everything inside.
Serving Suggestions
Accompaniments and side dish ideas: Serve these wraps with a simple green salad. You can also pair them with a side of roasted veggies or a light dip. A tangy yogurt sauce works great too.
Garnishing for visual appeal: For a lovely touch, sprinkle chopped parsley on top. This adds color and freshness. You can also serve with lemon wedges for a zesty lift.
Pro Tips
- Rest the Chicken: Allow the cooked chicken to rest for a few minutes before shredding. This helps retain its juices and ensure a moist filling.
- Mix It Up: Feel free to add other ingredients to the cheese mixture, such as sun-dried tomatoes or diced bell peppers, for extra flavor and texture.
- Perfectly Folded Wraps: When wrapping, make sure to fold the sides in tightly to prevent any filling from spilling out during baking.
- Serving Suggestions: Serve with a side of marinara or ranch dressing for dipping, adding an extra layer of flavor to your wraps.
Variations
Cheese Alternatives
You can switch up the cheese in your wraps for a new taste. Instead of mozzarella, try cheddar or gouda. Both add a rich, creamy flavor. If you want a vegan option, use a plant-based cheese. Look for brands that melt well to keep the texture nice.
Healthier Twists
For a lighter wrap, choose low-carb tortillas. These options cut carbs and calories. You can also pack your wraps with more veggies. Adding bell peppers or zucchini boosts nutrition and keeps things crunchy. Fresh herbs like cilantro or basil can enhance flavor, too.
Flavor Variations
Want a kick? Add jalapeños for some heat. You could also mix in crushed red pepper to spice up the filling. Don’t forget about herbs! Try fresh basil or oregano for a fresh twist. Garlic powder or smoked paprika can also add a fun layer of taste.
Storage Info
Refrigeration Instructions
To store leftovers, let them cool first. Wrap each cheesy garlic chicken wrap in plastic wrap. Place them in an airtight container. This keeps them fresh. You can store them in the fridge for up to three days. For best results, use glass or BPA-free containers.
Reheating Tips
When reheating, I suggest using an oven or air fryer. Preheat your oven to 350°F (175°C). Place the wraps on a baking sheet. Heat for about 10-15 minutes. This keeps them crispy. If you use a microwave, wrap each in a damp paper towel. This helps with moisture but may soften the wraps.
Freezing Recommendations
For longer storage, freeze the wraps. Wrap each one tightly in plastic wrap. Place them in a freezer-safe bag. They can last for up to three months. When ready to eat, take them out and thaw in the fridge overnight. For best results, reheat from thawed. This ensures even cooking and keeps them tasty.
FAQs
Common Questions
How can I make cheesy garlic chicken wraps without cream cheese? You can replace cream cheese with Greek yogurt. It still adds creaminess. You can also use ricotta cheese for a different taste. Just mix it with garlic and cheese as you would with cream cheese.
What are some good side dishes for cheesy garlic chicken wraps? Great side dishes include a simple green salad or garlic bread. You can also serve them with fresh fruit or vegetable sticks. These sides balance the cheesy wraps well.
Can these wraps be made ahead of time? Yes, you can prepare the wraps ahead of time. Just assemble them and store in the fridge. Wrap them well in plastic wrap to keep them fresh. Bake them just before serving for the best taste.
What is the best way to heat up leftover wraps? The best way is to use an oven. Preheat it to 350°F (175°C). Place the wraps on a baking sheet for about 10 minutes. This keeps them crispy and melty.
How do I know when the chicken is cooked through? Use a meat thermometer to check. The chicken should reach an internal temperature of 165°F (74°C). If you don't have a thermometer, cut into the thickest part. The meat should be white, not pink.
You now have all the details to make cheesy garlic chicken wraps. We covered ingredients, step-by-step instructions, and tips to perfect your dish. You can even explore variations for different tastes. Remember to store and reheat them properly to keep them delicious. Enjoy experimenting with flavors and sides to make it your own. You’ll impress anyone who tries these wraps! Happy cooking!