Are you ready to impress your guests with a fun twist on a classic dessert? The Caramel Apple Pie Butter Board is the perfect treat for any gathering! In just a few simple steps, you’ll create a sweet and creamy spread that brings the flavors of apple pie to a new level. Let’s dive into the tasty details and make your next event unforgettable!
Ingredients
To create the Caramel Apple Pie Butter Board, you’ll need the following ingredients:
– 1 cup unsalted butter, softened to room temperature
– 1/2 cup brown sugar, packed firmly
– 1/2 teaspoon ground cinnamon
– 1/4 teaspoon ground nutmeg
– 1 teaspoon pure vanilla extract
– 2 medium Granny Smith apples, peeled, cored, and finely diced
– 1 cup crushed graham crackers
– 1/2 cup caramel sauce, warmed until slightly runny
– Coarsely chopped pecans or walnuts (optional, for garnish)
– Sliced fruits (for dipping)
– Assorted cookies or crackers (for dipping)
These ingredients blend together to form a creamy, sweet treat that will impress your friends and family. The apples add a fresh crunch while the warm caramel sauce gives it a rich finish. Using Granny Smith apples provides a nice tartness that balances the sweetness. The crushed graham crackers mimic the flavor of pie crust, tying it all together.
This delightful treat makes for a fun dessert or snack option. You can also customize it with your favorite fruits or nuts. The choices are endless!
Step-by-Step Instructions
Preparation Steps
1. Start by taking a large bowl. Add the softened butter and brown sugar. Mix these together until they become fluffy. This should take about 2-3 minutes.
2. Next, add in the ground cinnamon, ground nutmeg, and vanilla extract. Stir well to blend these flavors.
3. Now, fold in the diced Granny Smith apples. Make sure they are evenly mixed into the buttery blend.
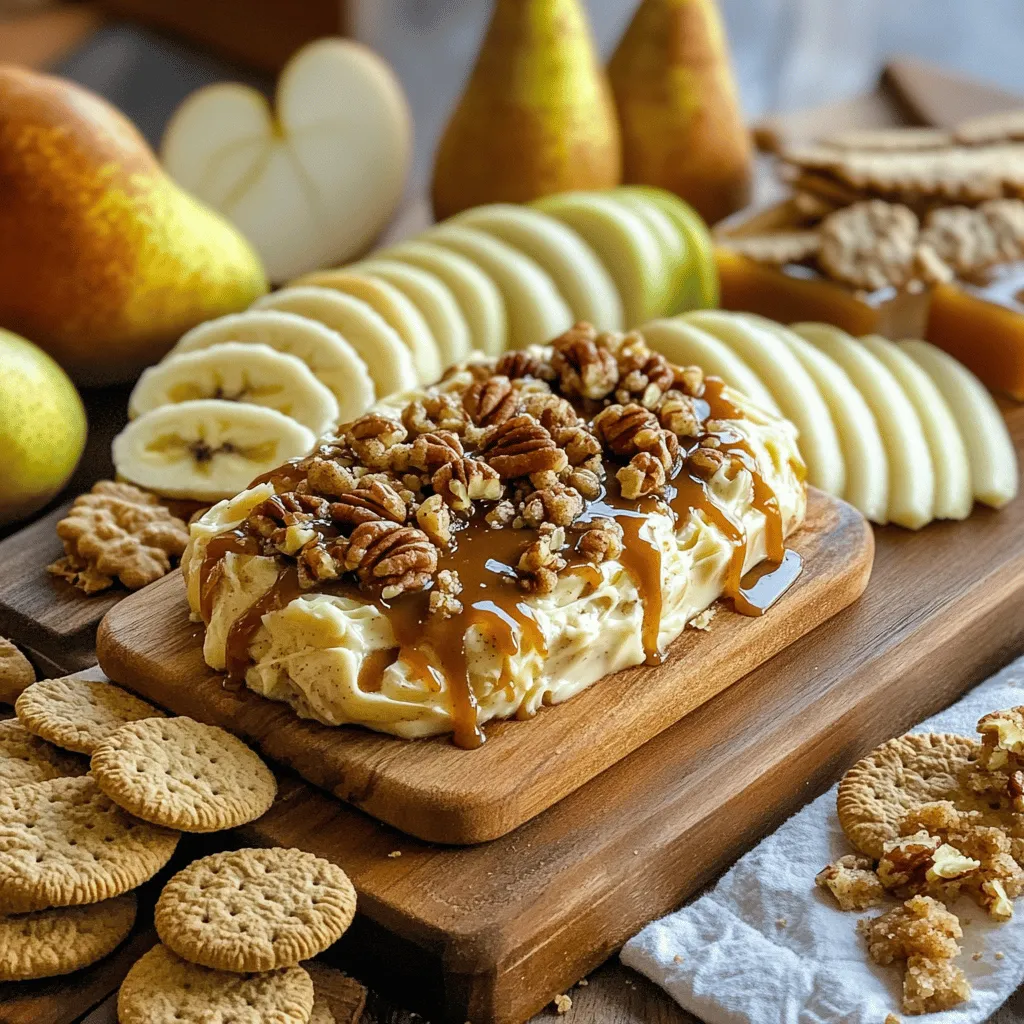
Assembling the Butter Board
1. Grab a large serving board. Spread the apple butter mixture across it. Aim for an even layer.
2. Take the warm caramel sauce. Drizzle it over the top of the butter layer. Let it create beautiful streaks.
3. Sprinkle the crushed graham crackers on top. This adds a nice crunch that mimics pie crust.
4. If you like, scatter chopped pecans or walnuts for added taste and texture.
Serving Suggestions
1. Surround the butter board with sliced fruits and assorted cookies. This makes it fun for dipping.
2. For a lovely touch, garnish with extra apple slices. Add a bit more caramel sauce for sweetness and charm.
This caramel apple pie butter board is a fun and tasty treat to share. Enjoy the blend of flavors and textures!
Tips & Tricks
Perfecting the Flavor
Choosing the right apples is key for great taste. I love using Granny Smith apples. Their tartness balances the sweet caramel and buttery mix. You can also try Honeycrisp apples for a sweeter flavor. Both types add a nice crunch.
Softened butter makes a big difference. It blends easily with the sugar and spices. This gives your butter board a creamy texture. To soften the butter, leave it out of the fridge for about 30 minutes. You can also cut it into small pieces to speed up the process.
Presentation Tips
Choose a rustic wooden board for a warm look. A large cutting board works well. It gives enough space for all the goodies. Arrange the butter mixture in the center, leaving room for dippers.
Garnishing adds charm. Use extra apple slices around the edge. Drizzle more caramel sauce on top for a shiny finish. You can also sprinkle cinnamon or chopped nuts for added flair.
Enhancing the Taste
Don’t be shy with spices! Adding a pinch of allspice or ginger can boost the flavor. These spices add warmth and depth. You can also mix in some orange zest for a fresh twist.
Pair your butter board with drinks that complement its sweetness. Hot apple cider or a spiced chai tea works well. For a fun twist, serve with sparkling water for a refreshing contrast.

Variations
Alternative Ingredients
You can switch out regular butter for plant-based options. Use vegan butter or coconut oil for a dairy-free treat. This change still keeps the rich taste while being friendly for all diets.
For sweeteners, try using maple syrup or honey. They add different flavors and can change the texture. Brown sugar gives you that warm taste, but experimenting can lead to fun results.
Themed Variations
Fall is the perfect time to spice things up. Add pumpkin spice or cloves to your butter mix. This gives your board a cozy, autumn feel. You can also use apple cider for extra flavor.
For holidays, consider adding cranberries or pumpkin pie filling. These ingredients bring a festive twist. They are perfect for holiday gatherings and family get-togethers.
Flavor Add-Ins
Do you love chocolate? Try mixing in chocolate chips or swirls of fudge. They give a rich, sweet touch to your board. You can also add caramel drizzle for an extra layer of sweetness.
Dried fruits like raisins or apricots work well too. They create a chewy contrast to the creamy butter. Nuts, like almonds or walnuts, add crunch and flavor. These small changes can make your caramel apple pie butter board truly unique.
Storage Info
Short-Term Storage
To store leftovers in the fridge, place the butter board in an airtight container. Cover it tightly to keep air out. This will help maintain the creamy texture and flavors. You can also wrap it in plastic wrap. It will stay fresh for about three days.
To maintain freshness, avoid leaving the butter board at room temperature for long. Store it right away after your gathering. This step helps prevent spoilage. Always use a clean utensil to scoop out leftovers. This keeps bacteria away.
Long-Term Storage
For long-term storage, you can freeze the butter mixture. Place it in a freezer-safe container. Seal it well to prevent freezer burn. The butter can last up to three months in the freezer.
When you are ready to enjoy it again, thaw it in the fridge overnight. Reheat the caramel sauce gently in a pot on low heat. Stir it until warm and smooth. This will make it easy to drizzle over the butter board again.
Quality Checking
To check for freshness, look for changes in color or smell. If the butter looks discolored or has an off smell, it’s best to toss it. Additionally, check for any signs of mold.
For the best taste, use the butter within three days if stored in the fridge. If frozen, try to use it within three months for optimal flavor. Always trust your senses; they guide you well in the kitchen.
FAQs
Common Questions
What is a butter board?
A butter board is a fun way to serve flavored butter. You spread a mix of butter and sweet or savory ingredients on a board. Guests can dip fruits, cookies, or crackers into the spread. It’s perfect for gatherings or casual snacks.
Can I make this recipe ahead of time?
Yes, you can make the butter mix ahead. Store it in the fridge for up to two days. Just bring it back to room temp before serving. Drizzle the caramel and add toppings right before you serve.
How do I make the caramel sauce from scratch?
To make caramel sauce, start with sugar and water in a pan. Heat over medium until the sugar dissolves. Let it boil until it turns golden brown. Remove from heat and stir in cream and butter. Let it cool before using.
Ingredient Substitutions
What can I use instead of Granny Smith apples?
If you can’t find Granny Smith apples, use Honeycrisp or Fuji apples. They add sweetness and crunch. You can also try tart pears for a different flavor.
How to substitute for brown sugar in the recipe?
You can use white sugar with molasses. Mix one cup of white sugar with one tablespoon of molasses to mimic brown sugar. This works well in recipes.
Serving and Enjoying
Are there gluten-free options for dippers?
Yes! Use gluten-free cookies or rice cakes. Fresh fruits like apples and pears are also great options. They add flavor and crunch without gluten.
How long can I keep the butter board out for serving?
Keep the butter board out for about two hours. After that, it’s best to store it in the fridge. This keeps the flavors fresh and safe to eat.
This blog post covered how to make a tasty butter board with simple steps. We explored the ingredients, from creamy butter to crisp apples and warm caramel. I shared tips for improving flavors and presentation, plus some fun variations. Remember, you can store leftovers easily and even freeze the mixture. This recipe is easy to adapt for any season or occasion. Enjoy creating this delicious treat that sparks creativity and joy at your table.


