
Are you ready to spice up your snack game? My Buffalo Chicken Bombs are flavorful, easy to make, and perfect for any gathering. You’ll love how the crispy outside gives way to a hot, cheesy filling. Whether you’re hosting game night or just craving something yummy, these bombs will impress your friends and family. Let’s dive into this simple recipe that delivers big taste with minimal effort!
Why I Love This Recipe
- Flavor Explosion: The combination of spicy buffalo sauce and creamy cheese creates a delightful flavor explosion in every bite.
- Easy to Make: This recipe is simple and quick, making it perfect for a busy weeknight or a last-minute gathering.
- Versatile Serving Options: These bombs can be served with a variety of dips and sides, allowing you to customize your experience.
- Fun for Everyone: These bite-sized snacks are a hit at parties and gatherings, appealing to both adults and kids alike.
Ingredients
Main Ingredients for Buffalo Chicken Bombs
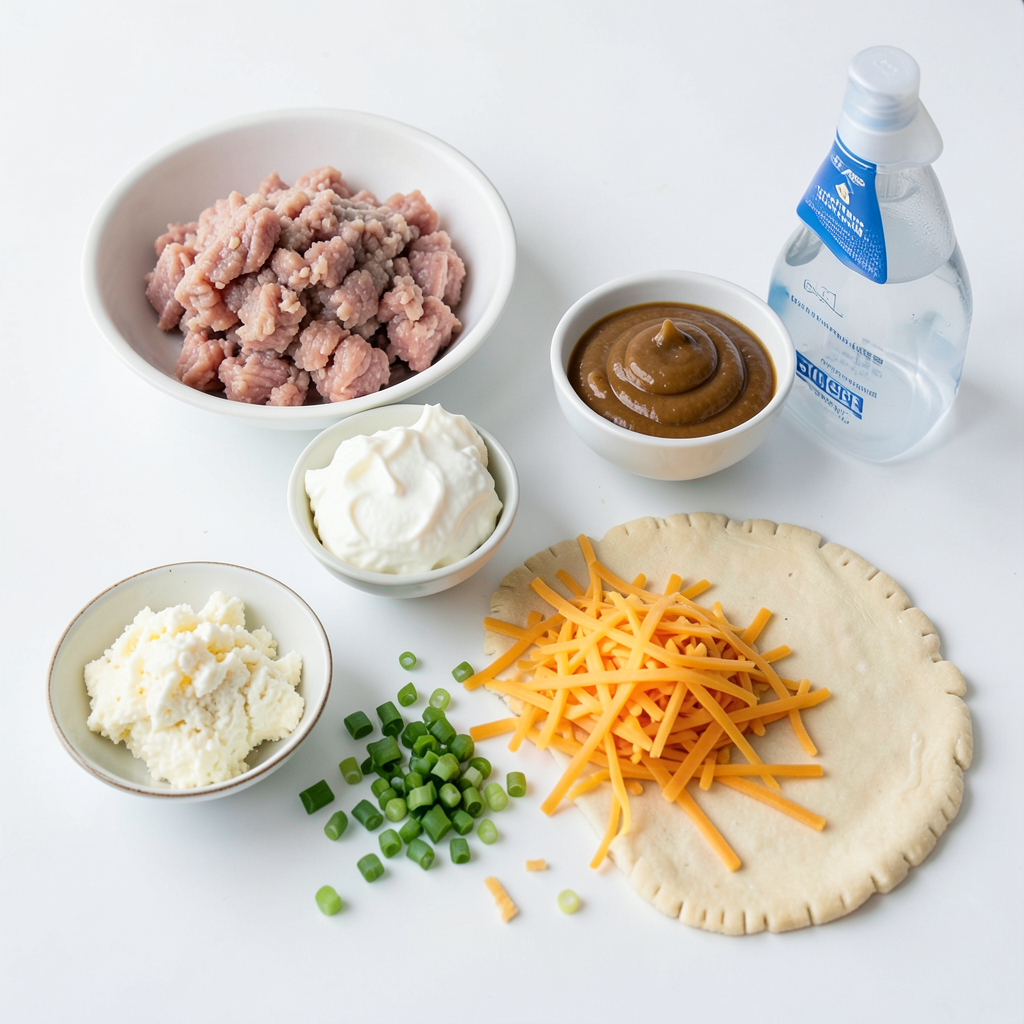
- 1 lb ground chicken
- 1/2 cup buffalo sauce (choose your heat level, from mild to hot)
- 1/2 cup cream cheese, softened to room temperature
- 1/2 cup shredded cheddar cheese
- 1/4 cup green onions, finely chopped
- 1 package refrigerated biscuit dough (contains 8 biscuits)
- Cooking spray for greasing
These ingredients create a tasty filling and a nice crust. The ground chicken brings protein and flavor. The buffalo sauce adds heat and tang. Cream cheese makes the filling creamy. Cheddar cheese adds richness. Green onions give a fresh taste. The biscuit dough wraps everything up nicely.
Optional Ingredients for Serving
- Celery sticks
- Ranch dressing
Celery sticks add crunch. They balance the heat from the buffalo sauce. Ranch dressing brings creaminess and cools the spice. These sides make the dish even better.
Ingredient Substitutions
If you can’t find ground chicken, you can use shredded rotisserie chicken. It saves time and still tastes great. Instead of cream cheese, try sour cream for a different flavor. For a dairy-free option, use vegan cream cheese. You can also swap cheddar for mozzarella if you prefer a milder cheese. These swaps keep the dish fun and flexible.
Step-by-Step Instructions
Prepping the Oven and Ingredients
First, set your oven to 375°F (190°C). This helps cook the chicken bombs evenly. Gather all your ingredients. You will need ground chicken, buffalo sauce, cream cheese, cheddar cheese, and green onions. Having everything ready makes cooking easy and fun.
Mixing the Cheese and Chicken Filling
In a large bowl, mix the ground chicken with the buffalo sauce. Add the softened cream cheese and shredded cheddar cheese. Chop the green onions and stir them in as well. Keep mixing until everything is smooth and creamy. This filling is where the flavor starts!
Assembling the Chicken Bombs
Open the package of biscuit dough and gently separate each biscuit. On a clean surface, flatten each biscuit to about 4 inches wide. Place about 2 tablespoons of your chicken filling in the center of each biscuit. Fold the edges over the filling. Pinch and twist to seal them tightly. This helps keep the tasty filling inside.
Baking Instructions
Place the sealed bombs on a greased baking sheet. Leave about 2 inches between each one. Lightly spray the tops with cooking spray for a golden finish. Bake in the oven for 15-20 minutes. Look for a nice puffed and golden color. Once they are done, let them cool for a few minutes. Then, they are ready to eat!
Tips & Tricks
How to Ensure Perfectly Sealed Bombs
To get your bombs sealed well, follow these steps. After you fill each biscuit, gather the edges carefully. Pinch them tightly together. Twist the edges to lock in the filling. This will keep all the tasty goodness inside while baking. If you notice any cracks, press them firmly to seal. A tight seal makes a big difference!
Cooking Time Tips for Varying Oven Types
Ovens can act differently, so keep an eye on your bombs. If your oven runs hot, check them at 15 minutes. If they are golden brown, they are ready. If your oven runs cooler, they may need a few extra minutes. Always trust your eyes. The bombs should look puffy and brown.
Tricks for a Crispier Finish
For a crisp outer layer, try these tricks. Lightly spray the tops of the bombs with cooking spray. This helps them brown nicely. You can also bake them on a wire rack. This allows hot air to circulate around the bombs. A crispier texture makes every bite more enjoyable!
Pro Tips
- Choose Your Heat Level: Select a buffalo sauce that matches your spice preference. This allows you to customize the flavor and heat intensity of your chicken bombs.
- Seal Well: Make sure to pinch and twist the biscuit dough tightly around the filling. This prevents any leakage during baking and keeps the flavors intact.
- Experiment with Cheese: Feel free to mix different types of cheese, such as mozzarella or pepper jack, for added flavor and creaminess to the filling.
- Serve Fresh: For the best taste and texture, serve these buffalo chicken bombs immediately after baking. They are best enjoyed warm and fresh out of the oven.
Variations
Spicy Buffalo Chicken Bombs
If you love heat, try adding more buffalo sauce to your mixture. You can also use spicy ground chicken or add chopped jalapeños. This will give your bombs an extra kick! Just remember, the heat level is up to you. Adjust it to meet your taste.
Vegetarian Options for Buffalo Bombs
You can make a great vegetarian version too. Swap out the ground chicken for a mix of black beans and corn. Use the same buffalo sauce for flavor. Cream cheese can be replaced with a plant-based option to keep it creamy. This way, everyone can enjoy these tasty bombs.
Different Cheese or Sauce Combinations
Mixing up the cheese can add fun flavors. Try mozzarella for a stretchy, gooey texture. Or, use pepper jack for a bit of spice. You can also experiment with sauces. Instead of buffalo sauce, use barbecue sauce for a sweet twist. The possibilities are endless!
Storage Info
Storing Leftover Buffalo Chicken Bombs
To store leftover Buffalo Chicken Bombs, wait until they cool down. Place them in an airtight container. They will stay fresh in the fridge for up to three days. Make sure to separate layers with parchment paper to avoid sticking. This keeps them nice and intact for your next meal.
Reheating Tips for Best Flavor and Texture
Reheating buffalo chicken bombs is easy. Preheat your oven to 350°F (175°C). Place the bombs on a baking sheet. Heat them for about 10-15 minutes. This method helps maintain their crispy texture. You can also use a microwave, but the oven is better for keeping them crispy.
Freezing Instructions for Future Meals
If you want to save some for later, freezing is a great option. First, let the bombs cool completely. Wrap each bomb tightly in plastic wrap. Then, place them in a freezer-safe bag. They can last up to three months in the freezer. When you’re ready to eat, thaw them overnight in the fridge. Then, reheat as mentioned above for a tasty snack.
FAQs
How Long Do Buffalo Chicken Bombs Last in the Fridge?
Buffalo chicken bombs last about 3 to 4 days in the fridge. To keep them fresh, store them in an airtight container. This helps maintain their flavor and texture.
Can I Make Buffalo Chicken Bombs in Advance?
Yes, you can prepare buffalo chicken bombs in advance. Assemble them but do not bake. Store the uncooked bombs in the fridge for up to 24 hours. When ready, bake them straight from the fridge for best results.
What Can I Serve with Buffalo Chicken Bombs?
Buffalo chicken bombs pair well with several sides. I recommend serving them with crisp celery sticks. Ranch dressing makes a great dip. You can also add extra buffalo sauce for those who enjoy more heat.
Can I Bake Buffalo Chicken Bombs Without Cooking Spray?
Yes, you can bake buffalo chicken bombs without cooking spray. Instead, use parchment paper on your baking sheet. This prevents sticking and keeps your bombs intact while baking.
Buffalo chicken bombs are fun and tasty treats you can easily make at home. We covered the key ingredients, step-by-step instructions, and helpful tips to ensure great results. You can also try different cheese or sauce to mix things up. Remember to store leftovers properly, so they stay fresh. Enjoy your cooking and share these bites with friends and family. Discovering new flavors can be really fun, so don’t hesitate to get creative!