Blueberry Boba Drink Refreshing and Flavorful Treat

Looking for a fun and tasty treat? The Blueberry Boba Drink is packed with vibrant flavors and is easy to make at home! With fresh blueberries, chewy tapioca pearls, and a splash of your favorite tea, this drink is a refreshing way to cool down. Join me as I guide you through each step to create this flavorful delight, and discover tips to customize it just for you. Let’s dive in!
Ingredients
Fresh Ingredients for the Blueberry Boba Drink
– 1 cup fresh blueberries
– 1/4 cup sugar (to taste)
– 2 cups water (for syrup and tapioca)
For this drink, fresh blueberries are key. They give the drink its bright flavor and color. I usually pick sweet blueberries. If they taste tart, adjust the sugar to fit your taste. You can use more or less sugar based on how sweet you want it. The water helps turn the blueberries into a syrup.
Boba Ingredients
– 1/2 cup tapioca pearls
– Iced tea options (2-3 cups iced green tea or other)
– 1/2 cup milk (dairy or non-dairy options)
Tapioca pearls add fun texture. They are chewy and make the drink exciting. You can choose iced green tea or any tea you like. I prefer green tea for its light taste. Milk makes the drink creamy. You can use dairy or a plant-based milk like almond or oat.
Optional Garnishes
– Ice cubes
– Fresh mint leaves for garnish
Ice cubes keep your drink cold and refreshing. Fresh mint adds a nice touch. It looks great and smells amazing. You can add it on top before serving. It makes the drink pop with color and flavor.
Step-by-Step Instructions
Preparing the Blueberry Syrup
– Combine 1 cup of fresh blueberries, 1/4 cup of sugar, and 1 cup of water in a small pot.
– Place the pot on medium heat. Stir until the sugar dissolves.
– Bring the mixture to a gentle boil. This will take just a few minutes.
– Once boiling, reduce the heat to low. Let it simmer for about 10-15 minutes. This helps the blueberries break down into a thick syrup.
– After simmering, strain the mixture through a fine mesh sieve into a bowl. Press the blueberries to get out as much liquid as you can.
– Set the blueberry syrup aside to cool.
Cooking the Tapioca Pearls
– In another pot, boil 1 cup of water on high heat.
– Once boiling, add 1/2 cup of tapioca pearls. Stir to prevent sticking.
– Cook the pearls according to the package instructions. This usually takes 5-10 minutes.
– When done, drain the pearls and rinse them under cold water. This stops the cooking and keeps them chewy.
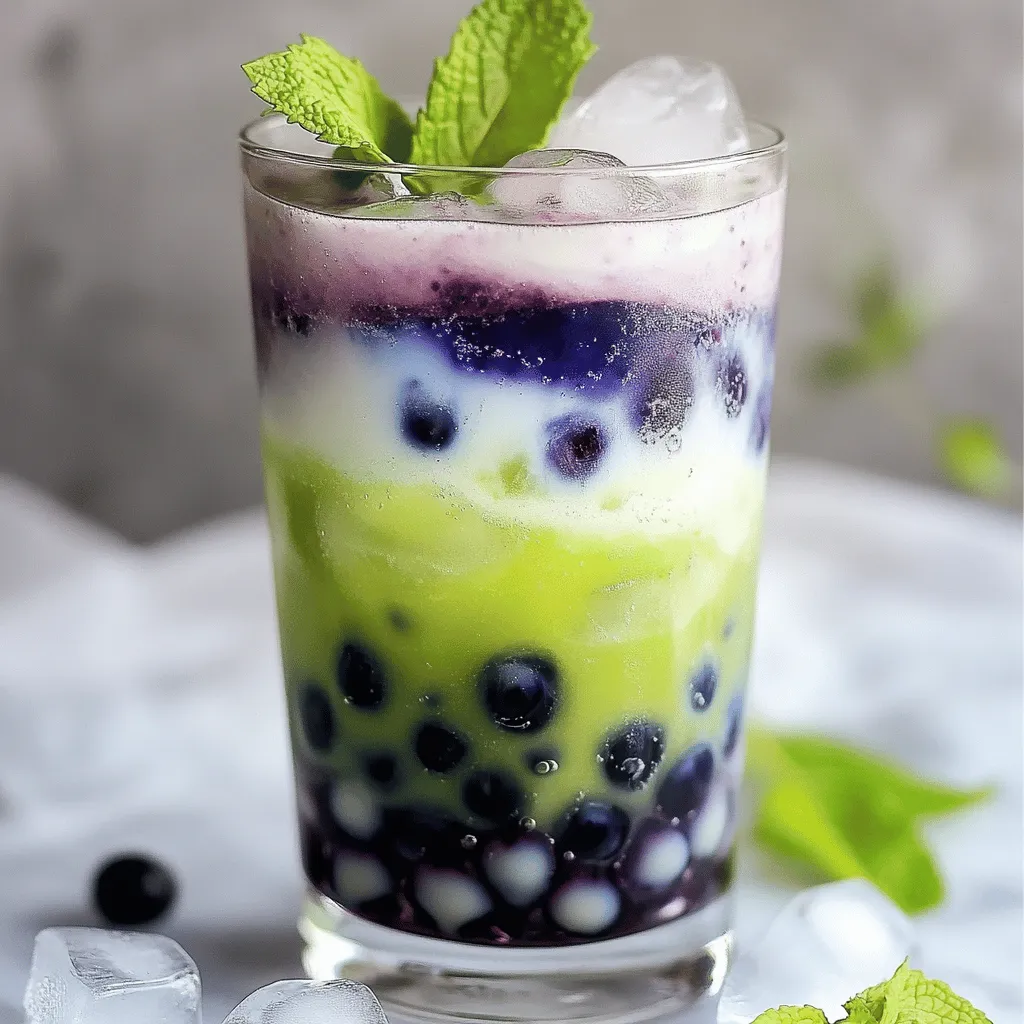
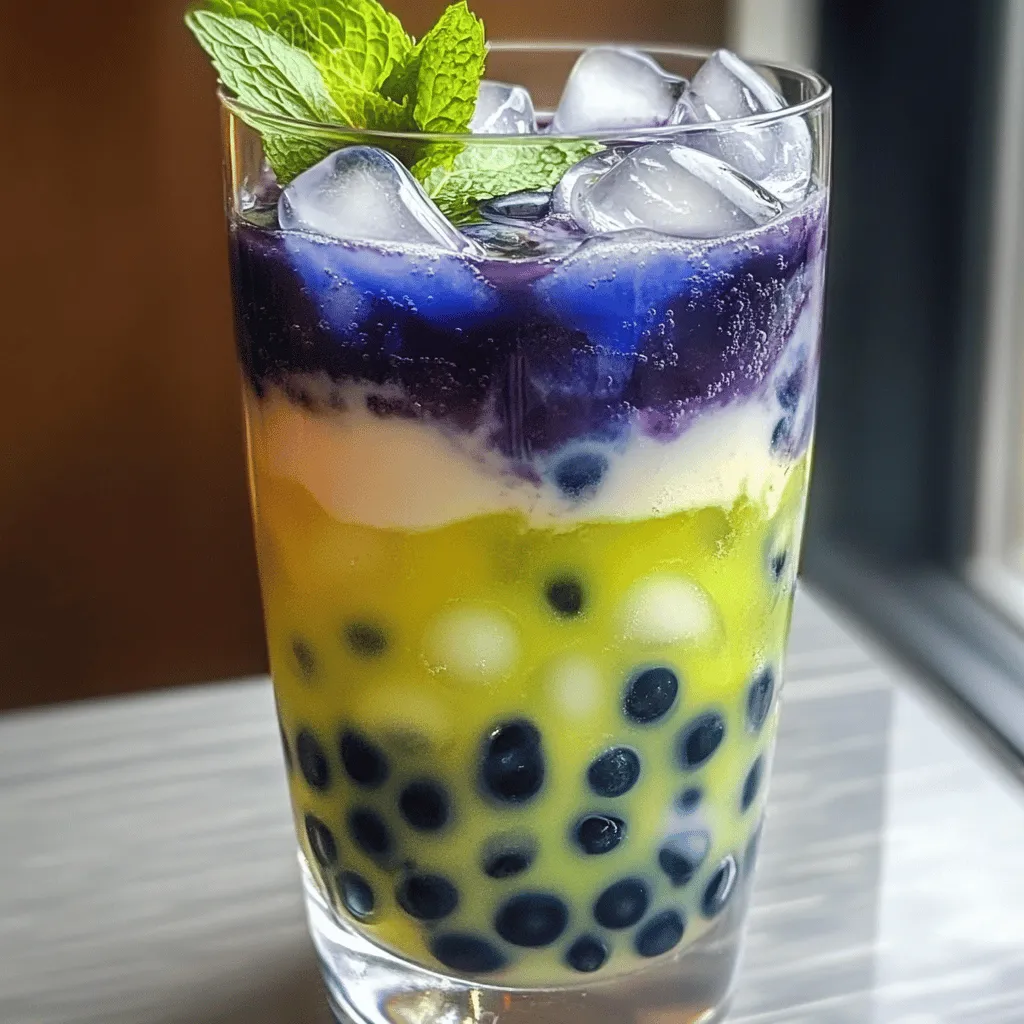
Assembling the Blueberry Boba Drink
– In your serving glass, add a few tablespoons of cooked tapioca pearls at the bottom.
– Fill the glass with ice cubes to keep it cold.
– Carefully pour in your choice of iced tea, leaving some space at the top for milk.
– Generously drizzle the cooled blueberry syrup over the iced tea and pearls. Adjust the amount based on how sweet you want it.
– Finally, pour in 1/2 cup of milk on top. Stir gently to create a beautiful marbled effect.
– For a fun touch, add fresh mint leaves on top for color and freshness. Enjoy your Blueberry Boba Drink!
Tips & Tricks
Achieving the Perfect Blueberry Syrup
To make a great blueberry syrup, first adjust the sweetness. You can add more sugar or less based on your taste. I often start with 1/4 cup of sugar. If you like it sweeter, add a bit more. For the syrup thickness, simmer the mixture for about 10 to 15 minutes. This helps the blueberries break down, giving you a nice, thick syrup.
Cooking Tapioca Pearls Successfully
After cooking the tapioca pearls, rinse them well. Rinsing stops the cooking process and keeps them chewy. To avoid clumping, stir the pearls gently while they cook. Keep an eye on them, as they usually cook for 5 to 10 minutes. If you want the best texture, don’t overcrowd your pot.
Presentation Enhancements
For a stunning drink, use clear glassware. This way, you can show off the beautiful layers of blueberry syrup and iced tea. You can also add fresh mint leaves on top for a pop of color. Try serving the drink with a wide straw to make sipping the boba fun!

Variations
Flavor Variations
You can swap out blueberries for different fruits in the syrup. Strawberries, raspberries, or blackberries work well. Just follow the same steps for making the syrup. Each fruit brings its own taste and color, making the drink unique.
For tea bases, try hibiscus, oolong, or even chai. Each tea adds a new flavor twist. Experiment with these options to find your favorite mix!
Milk Alternatives
If you want a non-dairy drink, there are many options. Almond, oat, and coconut milk are great choices. Each milk has a different taste, so try a few to see what you like best.
You can also infuse the milk with flavors. Add a splash of vanilla or a sprinkle of cinnamon. These small changes can make your drink stand out.
Sweetness Levels
You can easily adjust the sweetness of your drink. If you like it sweeter, add more syrup. For less sweetness, use less syrup or sugar.
If you want a healthier option, try using honey or agave syrup. There are also sugar-free syrups available. These options let you enjoy a tasty drink without the extra calories.
Storage Info
How to Store Blueberry Syrup
To keep your blueberry syrup fresh, refrigerate it. Use a clean, airtight jar. The syrup can last about one week in the fridge. If you want to store it longer, freezing is your best option. Pour the cooled syrup into ice cube trays for easy use. Once frozen, transfer the cubes to a freezer bag. This makes it easy to add a burst of blueberry flavor to drinks or desserts later.
Storing Tapioca Pearls
After cooking, store tapioca pearls in a sealable container. Keep them in the fridge, and use them within one to two days. If they sit too long, they may harden. To revive leftover pearls, simply boil them again for a minute. Rinse with cold water, and they should be good as new.
Shelf Life Expectations
The shelf life of the drink components varies. Blueberry syrup lasts about one week in the fridge. Cooked tapioca pearls remain fresh for two days. If you see any signs of spoilage, like mold or off smells, discard them immediately. Always check your ingredients before use to ensure safety and freshness.
FAQs
What is a Blueberry Boba Drink?
A Blueberry Boba Drink is a fun and fruity beverage. It blends fresh blueberries, sweet syrup, and chewy tapioca pearls. You start with fresh blueberries and sugar to make a syrup. You then mix this syrup with iced tea and milk. The tapioca pearls add a unique texture. The drink is colorful and refreshing.
Can I make this drink without boba pearls?
Yes! You can enjoy blueberry flavor without boba pearls. Just skip the tapioca and use the blueberry syrup in iced tea. You can also blend the blueberries into the drink for a smooth texture. This way, you still get the great blueberry taste.
How do I modify the drink for dietary restrictions?
If you need a gluten-free option, this drink is naturally safe. Just check the tapioca pearls for gluten-free labels. For vegan options, use plant-based milk like almond or oat milk. To lower sugar, reduce the amount of sugar in the syrup. You can also use a sugar substitute if you prefer.
Where can I buy Blueberry Boba Drinks outside the home?
You can find Blueberry Boba Drinks at many cafes and tea shops. Look for bubble tea places that have a wide drink menu. Some grocery stores sell pre-made versions too. Ask your local shop if they can customize a drink for you.
Can I use frozen blueberries instead of fresh?
Yes, frozen blueberries work well in this drink. They are often picked at peak ripeness and can be just as flavorful. However, they may need a bit more time to break down in the syrup. The texture may also be slightly different, but the taste will still be great.
What type of tea works best for this drink?
I recommend using iced green tea for this drink. It has a mild flavor that pairs well with blueberries. You can also try black tea or herbal tea for different tastes. Just make sure the tea is chilled before mixing it with the syrup and milk.
This blog post covered how to make a flavorful Blueberry Boba Drink. We discussed fresh ingredients and the key steps for preparing. I shared tips for cooking tapioca pearls and enhancing your drink’s look. You can try many fun variations to suit your taste. Don’t forget storage tips to keep your syrup and pearls fresh. Making this drink at home lets you enjoy it any time you want. Now, go ahead and whip up your delicious Blueberry Boba! Enjoy every sip!


![For a great crispy tofu panini, you need: - 1 block firm tofu, well-pressed and sliced into 1/2 inch slabs - 1 tablespoon soy sauce - 1 tablespoon sesame oil - 1 tablespoon cornstarch - 1 large round ciabatta or focaccia bread, sliced in half horizontally - 1/2 cup fresh spinach leaves, washed and dried - 1/2 red bell pepper, roasted, peeled, and sliced thin - 1 small ripe avocado, sliced - 2 tablespoons hummus or vegan mayonnaise - Salt and freshly ground black pepper to taste - Olive oil, for grilling These ingredients work together to create a crispy, tasty panini that is both filling and healthy. You can add some extra flavor with these ingredients: - Sliced tomatoes for freshness - Red onion for a bit of bite - Fresh herbs like basil or cilantro - A dash of hot sauce for heat If you want to mix things up, these optional ingredients can make your panini even better. To make your meal complete, consider these sides: - A light salad with lemon vinaigrette - Sweet potato fries for crunch - A bowl of soup, like tomato or lentil These sides balance the flavors and add variety to your meal. Plus, they are easy to prepare! For the full recipe, check out the detailed steps to bring your crispy tofu panini to life. To start, we need to prepare the tofu. First, press the block of firm tofu. Use a clean kitchen towel or tofu press. This step removes excess moisture. Removing moisture is key for achieving crispiness later. Once pressed, slice the tofu into even slabs, each about 1/2 inch thick. This ensures even cooking and crispiness. Next, we will marinate the tofu. In a mixing bowl, whisk together soy sauce, sesame oil, and a pinch of salt and pepper. Then, add your tofu slices to this mixture. Make sure each piece gets coated well. Let the tofu soak in the marinade for about 15 minutes. This allows the tofu to absorb all those tasty flavors. Now, it’s time to cook the tofu. After marinating, take the slices out and sprinkle cornstarch on both sides. This coating is crucial for that nice, crispy texture. Heat a non-stick skillet over medium heat. Add a drizzle of olive oil to the pan. When the oil shimmers, carefully lay the coated tofu slices in the skillet. Cook each slice for about 4-5 minutes on each side. Look for a golden brown color and a crispy texture. Once done, transfer the tofu to a plate and set it aside. Let’s move on to assembling the panini. Take your ciabatta or focaccia bread and cut it in half horizontally. Spread hummus or vegan mayo on the inside of both halves. This adds moisture and flavor to the sandwich. On the bottom half, layer fresh spinach leaves first. Then add the crispy tofu slices, followed by roasted red bell pepper slices. Finally, place avocado slices on top. Now, close the sandwich with the top half of the bread. Press it down gently to hold everything in place. Next, we grill the panini. Preheat your panini press or another skillet over medium heat. Brush the outside of the sandwich with olive oil. This helps to create a crunchy crust while grilling. If using a skillet, place a heavy pan on top of the sandwich. This presses it down as it cooks. Grill for about 3-4 minutes on each side. Look for a beautiful golden brown color and a crispy texture. Once grilled to perfection, remove the panini from the heat. Slice it in half with a sharp knife and serve warm for the best taste. Enjoy your crispy tofu panini, a flavorful and satisfying delight! For the full recipe, check out the earlier sections. To make your tofu crispy, follow these tips: - Press the tofu well: Remove as much water as possible. This helps the tofu absorb flavors better. - Use cornstarch: Coat both sides of the tofu slices with cornstarch. This creates a crunchy crust. - Heat your skillet properly: Use medium heat and wait for the oil to shimmer before adding the tofu. - Do not overcrowd the pan: Cook in batches if needed. This allows each piece to get crisp. Here are some mistakes to watch out for: - Skipping the marination: Marinating adds flavor. Don’t rush this step. - Using too little oil: A light drizzle helps achieve that golden color and crisp texture. - Not slicing evenly: Make sure your tofu slabs are even. This ensures consistent cooking. - Opening the panini too soon: Let it grill fully to get the best texture. Having the right tools makes a big difference. Here are my top picks: - Panini press: This tool cooks evenly and gives perfect grill marks. - Non-stick skillet: If you don’t have a press, a good skillet works too. - Heavy pan: Use it to press down the sandwich while it cooks in a skillet. - Sharp knife: A sharp knife helps slice your panini without squishing it. Using these tips and tools, you can create a delicious crispy tofu panini. For the full recipe, check out the earlier sections. {{image_4}} When making a crispy tofu panini, you can switch up the ingredients to match your taste. This adds fun and keeps things interesting. You can use different sauces or spreads. Try using pesto or spicy mustard instead of hummus. Swap spinach for kale or arugula for a bolder flavor. For added crunch, add sliced cucumbers or pickles. You can also replace the red bell pepper with grilled zucchini or eggplant. Each swap brings a new twist to your panini. To keep this dish vegan, stick with plant-based ingredients. Use gluten-free bread to make it gluten-free. Many brands offer delicious options that taste great. Check labels to ensure they have no animal products. This allows everyone to enjoy the crispy tofu panini without worry. Fresh produce can change with the seasons. In spring, try adding fresh asparagus or sprouts. In summer, include ripe tomatoes or zucchini. In fall, swap in roasted butternut squash for a sweet flavor. Winter might call for roasted root vegetables like carrots or sweet potatoes. These seasonal swaps help you enjoy fresh tastes all year long. This recipe offers endless possibilities for creativity. Use the [Full Recipe] as your base, and let your imagination run wild with variations! To keep your crispy tofu panini fresh, wrap it tightly. Use plastic wrap or foil for best results. Store it in the fridge for up to three days. Avoid leaving it out at room temperature. This helps prevent sogginess and keeps the flavors intact. To reheat, use a skillet over medium heat. Place the panini in the skillet and cover it. Heat for about 4-5 minutes on each side. This method helps restore the crispiness. You can also use a toaster oven for a similar effect. Avoid the microwave, as it can make the bread soft. If you want to freeze your panini, wrap it well in plastic wrap and foil. It can last for up to a month in the freezer. When you’re ready to eat, thaw it in the fridge overnight. Reheat it in a skillet for the best texture. This way, you can enjoy a quick meal without losing flavor. To make tofu extra crispy, start with firm tofu. Press it well to remove water. Slice it into even slabs. Marinate the slices in soy sauce and sesame oil. Let them soak for at least 15 minutes. After marinating, coat each slice with cornstarch. This coating helps create that crunchy texture you want. Cook the tofu in a hot skillet with olive oil. Flip it until golden brown on both sides. Yes, you can use many types of bread. Ciabatta and focaccia work great, but others can too. Try sourdough or whole grain for a different taste. Each bread type adds its own flavor and texture. Choose one that you love, and enjoy your panini in a new way. Dipping sauces can enhance your panini experience. Hummus is a classic choice. It adds creaminess and flavor. Vegan mayo also works well for a smooth dip. You can try spicy salsa for a kick. Another option is a tangy vinaigrette. Each sauce complements the crispy tofu and adds fun flavors. For more ideas, check out the Full Recipe for inspiration. In summary, we explored how to make a crispy tofu panini. We covered the main and optional ingredients, step-by-step cooking tips, and even some fun variations. Remember to store leftovers well and reheat them correctly for the best taste. Experiment with flavors and enjoy this dish as part of your meals. With a few simple steps, you can have a delicious, crispy tofu panini that satisfies your cravings. Enjoy your cooking journey!](https://fastmealmate.com/wp-content/uploads/2025/06/c0074219-6fc3-4ba3-a1d2-dcd469194d4e-768x768.webp)


![- Salmon fillets - Sweet chili sauce - Jasmine rice - Mixed vegetables - Soy sauce - Sesame oil - Avocado - Green onions - Sesame seeds - Fresh cilantro (optional) - Baking sheet - Mixing bowl - Medium pot - Non-stick skillet In this Sweet Chili Salmon Bowl, you need fresh salmon fillets as the star. The sweet chili sauce adds a rich flavor that pairs well with the fish. Jasmine rice provides a soft base. Mixed vegetables add color and crunch to the bowl. For added flavor, include soy sauce and sesame oil. Sliced avocado gives a creamy touch. Green onions and sesame seeds serve as tasty garnishes. If you want, sprinkle fresh cilantro for a pop of freshness. To prepare this dish, you will need a few kitchen tools. Use a baking sheet to cook the salmon. A mixing bowl helps combine the marinade. Cook the rice in a medium pot. Lastly, a non-stick skillet is perfect for sautéing the vegetables. You can find the [Full Recipe] to follow these steps easily! With these ingredients and tools, you are set for a delicious meal. - Combine sweet chili sauce, soy sauce, and sesame oil in a bowl. - Place salmon fillets in the bowl and marinate for 15 minutes. Marinating the salmon gives it a rich flavor. The sweet chili sauce adds a nice sweetness. The soy sauce brings some saltiness, while sesame oil adds a nutty taste. This step is key for a tasty salmon bowl. - Bring vegetable broth or water to a boil in a pot. - Add jasmine rice and let it simmer until fluffy. Using vegetable broth adds extra flavor to the rice. Jasmine rice is fragrant and pairs well with the salmon. Once cooked, it should be light and fluffy. - Sauté mixed vegetables in a non-stick skillet. - Cook until they are tender yet crisp. I like to use bell peppers, snap peas, and carrots. These veggies add color and crunch. Sautéing keeps them bright and fresh, which balances the dish. - Preheat the oven to 400°F (200°C). - Bake marinated salmon for 12-15 minutes. Baking the salmon helps it stay moist. It should flake easily with a fork when done. This cooking method keeps the flavors intact. - Fluff the cooked rice and distribute it into bowls. - Top with vegetables, salmon, and avocado slices. Assembling the bowl is fun and creative. You can layer the ingredients however you prefer. The avocado adds creaminess, making every bite delicious. - Sprinkle green onions and sesame seeds on top. - Drizzle remaining marinade if desired. Adding garnishes makes the dish look pretty. Green onions bring a mild onion flavor, while sesame seeds add crunch. The extra marinade enhances the taste, so don’t skip this step! For the complete recipe, check out the Full Recipe. To get the best salmon, focus on the cooking temperature. Aim for 400°F (200°C) when baking. This heat cooks the fish evenly. It keeps the salmon moist and tender. Use a thermometer to check the internal temperature. It should reach 145°F (63°C) for safe eating. Next, look for flakiness to know when it is done. Gently press the salmon with a fork. If it flakes easily, it is ready. Don't overcook it, as this can make the salmon dry. To boost the taste, try different sauces. You can use teriyaki or garlic sauce instead of sweet chili. Each sauce adds a new twist to the dish. Also, add spices to the vegetables before sautéing. A pinch of garlic powder or ginger can elevate the flavor. This simple step makes your veggies pop. Pair your bowl with side salads or crispy wontons for crunch. This adds a nice texture balance. You can also serve it with extra avocado for creaminess. The creamy avocado complements the salmon well. It makes each bite even better. Feel free to explore the [Full Recipe] for more tips and ideas! {{image_4}} You can swap the salmon for chicken or tofu. Chicken works well with the sweet chili sauce. Marinate it just like you do the salmon. Tofu absorbs flavors nicely, making it a great option, too. You can also try different fish like trout or tilapia. Each fish will give your bowl a unique taste. Seasonal vegetables can really change your bowl. Think fresh corn in summer or pumpkin in fall. You can also add leafy greens like spinach or kale. Broccoli offers a nice crunch and pairs well with the sauce. Mix and match to keep it exciting! Want more kick? Try a spicy chili sauce instead of sweet chili sauce. This will give your bowl a bold flavor. You can also add citrus zest, like lime or lemon, for a fresh twist. These small changes can make a big difference in taste. For the full recipe, check out the details above! After you enjoy your Sweet Chili Salmon Bowl, store any leftovers in airtight containers. This keeps the food fresh and tasty. Place the containers in the fridge. Your meal will stay good for 2-3 days. Make sure to cool the food first before sealing it up. If you want to save your meal for longer, freezing is a great option. Freeze the cooked salmon separately to keep its quality. Salmon can lose its texture if frozen with rice and veggies. Store your rice and mixed vegetables in separate containers. This way, they stay fresh and tasty when you thaw them. When you're ready to eat, reheating is easy. You can use the microwave or stovetop for quick reheating. Just be careful not to overcook the salmon. Overcooking can make it dry and tough. Heat it gently to keep the flavor and texture intact. Enjoy your delicious meal again! Yes, you can prepare the ingredients in advance. Store each item separately in the fridge. This way, you save time when you are ready to cook. Just mix and heat everything when you want to eat. If you want a change, you can substitute jasmine rice with brown rice or quinoa. Both options are healthy and add a nice flavor. Quinoa is a great choice if you want extra protein. Absolutely! You can make this bowl spicy by adding fresh chili peppers or a dash of hot sauce. Adjust the heat to your liking. This adds a fun kick to the dish. To make the Sweet Chili Salmon Bowl healthier, reduce the amount of sauce you use. You can also add more veggies, like leafy greens or broccoli. This boosts nutrition and flavor. Yes, this bowl can be enjoyed cold too! It makes a refreshing salad dish. Just let it cool before serving. Enjoy it as a light meal on a warm day. For the full recipe, check out the detailed steps above. This guide showed how to make a tasty salmon bowl using sweet chili sauce and veggies. You learned about the key ingredients, tools, and steps. Remember, marinating the salmon and choosing the right veggies can boost flavor. Feel free to experiment with proteins and spices. Finally, you can store leftovers for quick meals later. Enjoy making this dish your own!](https://fastmealmate.com/wp-content/uploads/2025/07/c95c4cfe-a415-4c4e-8f12-f828502a92fe-768x768.webp)
![For a tasty creamy chicken stroganoff, gather these key ingredients: - 500g boneless chicken breast, sliced into thin strips - 2 cups mushrooms, sliced (button or cremini work well) - 1 medium onion, finely chopped - 3 cloves garlic, minced - 1 tablespoon olive oil - 1 tablespoon unsalted butter - 2 cups chicken broth - 1 cup sour cream - 1 tablespoon Dijon mustard - 1 teaspoon smoked paprika - Salt and freshly ground black pepper to taste - Fresh parsley, finely chopped (for garnish) - 300g egg noodles or pasta of your choice Each ingredient plays a role in making the dish creamy and flavorful. The chicken adds protein, while the mushrooms bring earthy notes. The onion and garlic create a sweet base when cooked. For a garnish, fresh parsley brightens up the dish. You can serve the stroganoff with a side of steamed vegetables or crusty bread. This adds more texture and flavor to your meal. Check [Full Recipe] for all the details on how to put this comfort food together! To start, fill a big pot with water. Add a pinch of salt and bring it to a boil. Once the water is boiling, drop in 300g of egg noodles. Cook them according to the package instructions. This usually takes around 8-10 minutes. You want them al dente, which means they should be tender but still firm. After they are cooked, carefully drain the noodles in a colander. To stop them from sticking, drizzle a bit of olive oil on them. Toss gently to coat. Now, grab a large skillet and heat it over medium heat. Add 1 tablespoon of olive oil. Once hot, add the sliced chicken breast. Season it well with salt and pepper. Cook the chicken for about 5-7 minutes. Stir it often to ensure it cooks evenly. You want that nice golden-brown color. When it is done, remove the chicken from the skillet and place it on a plate. In the same skillet, add 1 tablespoon of unsalted butter. Let it melt over medium heat. Once melted, toss in the chopped onion. Sauté it for about 3-4 minutes until it turns translucent. Next, add 3 cloves of minced garlic and 2 cups of sliced mushrooms. Cook this mixture for around 5-6 minutes. Stir it often until the mushrooms soften and release their moisture. Then, sprinkle in 1 teaspoon of smoked paprika. Mix it well. Gradually pour in 2 cups of chicken broth and bring it to a gentle simmer. Let it cook for about 5 minutes to enhance the flavor. Now it’s time to bring it all together! Return the cooked chicken to the skillet. Stir in 1 cup of sour cream and 1 tablespoon of Dijon mustard. Mix everything until it is well combined and heated through, about 2-3 minutes. Taste the sauce and adjust the seasoning with more salt and black pepper if needed. Finally, add the cooked noodles to the sauce, tossing gently until they are fully coated. If you prefer a fancier look, you can plate the noodles first and then ladle the sauce over them. Don’t forget to garnish with some fresh parsley for a burst of color and flavor. Enjoy this comforting meal! When making creamy chicken stroganoff, avoid a few common mistakes. - Overcooking chicken or noodles: Overcooked chicken can become dry. Noodles can turn mushy. Keep an eye on cooking times. - Insufficient seasoning: Under-seasoned dishes lack flavor. Always taste your sauce and adjust the salt and pepper. You can easily boost the taste of your stroganoff with a few simple changes. - Suggestions for additional spices: Try adding thyme or rosemary for extra depth. A pinch of cayenne adds a nice kick. - Using homemade vs. store-bought broth: Homemade broth gives a richer taste. Store-bought is convenient and still works well. If you or your guests have special diets, there are great options. - Gluten-free alternatives: Use gluten-free pasta or rice instead of egg noodles. This ensures everyone can enjoy the dish. - Dairy-free options: Substitute sour cream with coconut cream or a dairy-free yogurt. These keep the creaminess without the dairy. For the full recipe, check out the complete guide to making creamy chicken stroganoff. Enjoy! {{image_4}} You can switch up the protein in this creamy chicken stroganoff. Beef, pork, or tofu work well. For beef, use tender cuts like sirloin. Cook it for about 10 minutes until browned. For pork, tenderloin is great. Cook it for 7-8 minutes. If you choose tofu, press it first to remove moisture. Sauté it for 5-6 minutes until golden. To add a twist to your dish, consider using wine or mustard. A splash of white wine adds depth to the sauce. Just remember to let it simmer for a few minutes to cook off the alcohol. If you like mustard, try using whole grain or spicy mustard. It brings a unique flavor. You can also add more veggies. Peas, bell peppers, or spinach can enhance the dish. Just sauté them with the onions and mushrooms. This not only adds color but also boosts nutrition. Each variation makes your creamy chicken stroganoff special and fits your taste. For the full recipe, check the linked instructions above. To keep your creamy chicken stroganoff fresh, store it in proper containers. Use airtight containers to prevent moisture loss. It stays good in the fridge for up to three days. Make sure the dish cools down before sealing it. This helps maintain the best flavor and texture. If you want to save some for later, freezing is a great option. Let the stroganoff cool completely before transferring it to freezer-safe containers. Use heavy-duty bags or containers to prevent freezer burn. It can last in the freezer for up to three months. To thaw, place it in the fridge overnight. This slow thawing keeps flavors intact. When ready to eat, reheat it on the stove over low heat. Stir occasionally to ensure even heating. You can also add a splash of broth or water to restore creaminess. Enjoy your stored creamy chicken stroganoff like it’s fresh! You can serve creamy chicken stroganoff with many sides. Here are a few great options: - Steamed green beans - Garlic bread - A fresh green salad - Mashed potatoes These sides add color and balance to your meal. Yes, you can make creamy chicken stroganoff ahead of time. Simply cook the dish, let it cool, and store it in the fridge. It will stay fresh for about three days. When ready to eat, reheat it gently on the stove. Add a splash of chicken broth if it seems too thick. If your sauce is too thin, you can thicken it easily. Here are some methods: - Simmer the sauce longer to reduce it. - Mix a bit of cornstarch with water and stir it in. - Add more sour cream for a richer texture. These tips help you achieve the perfect creamy sauce. Yes, you can make a vegetarian version! Use mushrooms and tofu instead of chicken. Replace chicken broth with vegetable broth. This keeps the flavor while making it meat-free. You can still enjoy that creamy texture with sour cream or a plant-based alternative. Absolutely! You can use different types of noodles for creamy chicken stroganoff. Here are some options: - Egg noodles - Fettuccine - Penne - Gluten-free pasta Each type brings its own texture, making the dish fun and varied. Check the cooking time for each type to ensure they cook perfectly. For the full recipe, refer to the earlier section in this article. You learned how to make Creamy Chicken Stroganoff with fresh ingredients and simple steps. Remember the key points: cook noodles properly, achieve golden-brown chicken, and adjust flavors to your taste. Avoid common mistakes like overcooking and under-seasoning. You can also explore variations with different proteins and flavors. With proper storage, enjoy this dish later too. Now, you have all the tools to create a delicious meal that suits your needs and preferences. Enjoy cooking and sharing this tasty dish with others!](https://fastmealmate.com/wp-content/uploads/2025/06/35ebe0d3-ac06-4ed6-8d84-88d4bff41ffa-768x768.webp)