Blue Christmas No-Bake Truffles for Festive Fun

Get ready for a sweet twist on holiday treats with my Blue Christmas No-Bake Truffles! These fun and easy truffles mix cream cheese, graham crackers, and a splash of blue for a festive touch. Perfect for parties or cozy nights in, these treats will delight any crowd. Let’s dive into the simple ingredients and easy steps to create these delightful bites that bring joy to your festive season!
Why I Love This Recipe
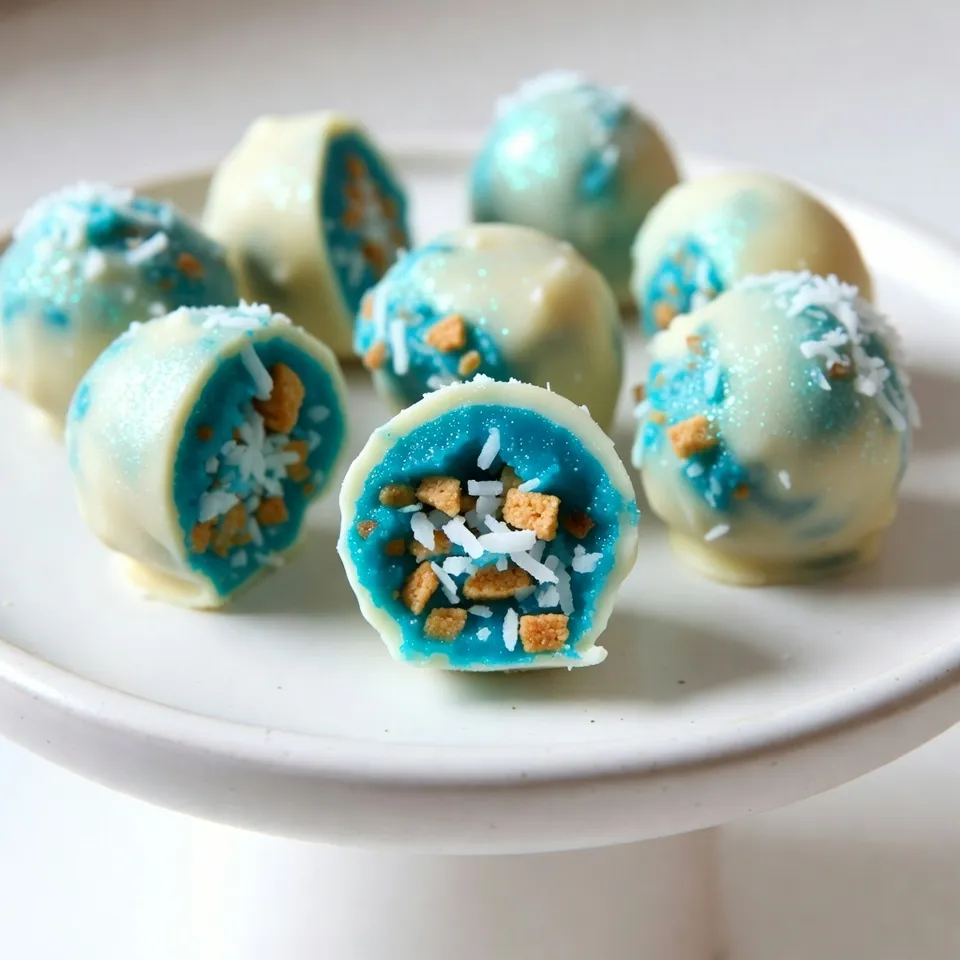
- Festive Appearance: The vibrant blue color and sparkling edible glitter make these truffles a delightful addition to any holiday gathering.
- No-Bake Convenience: With no baking required, this recipe is quick and easy, perfect for busy holiday schedules.
- Customizable Flavor: You can easily adjust the flavor by adding different extracts or spices, making it a versatile treat.
- Perfect for Gifting: These truffles make for a charming homemade gift, beautifully packaged in festive boxes or tins.
Ingredients
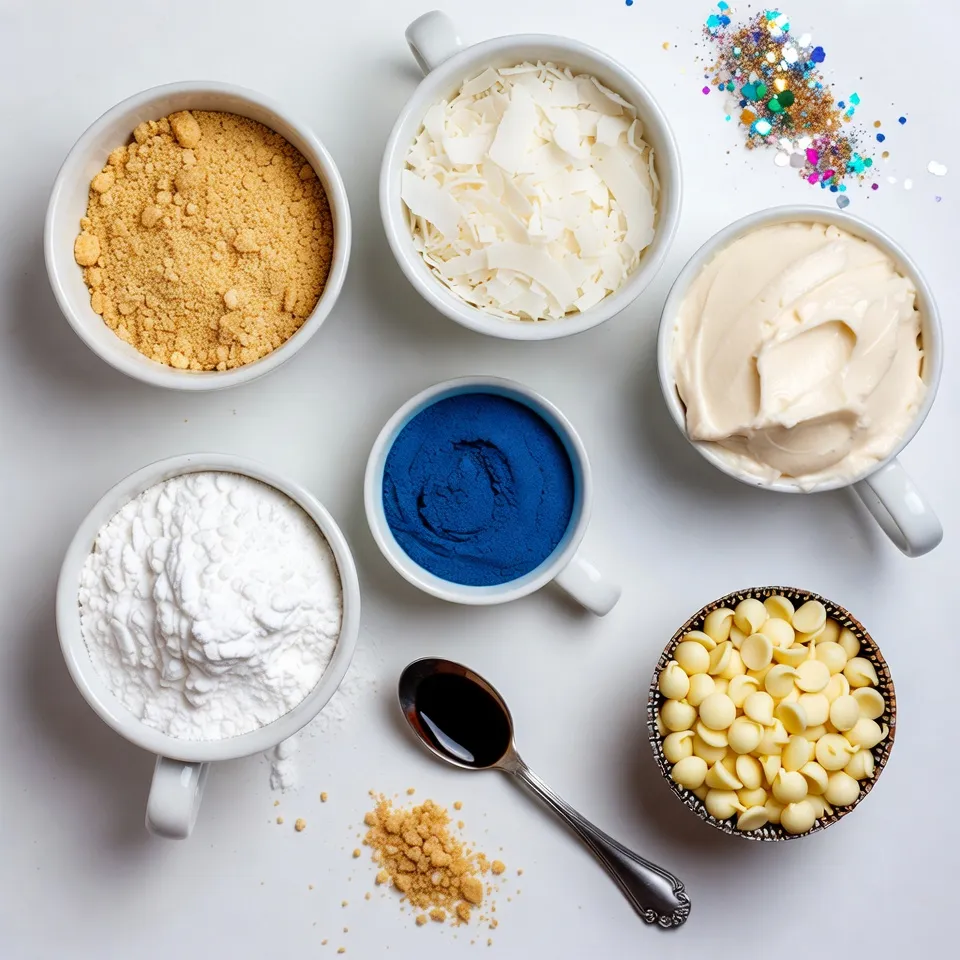
List of Ingredients for Blue Christmas No-Bake Truffles
– 1 cup crushed graham crackers
– 1 cup shredded coconut
– 1/2 cup cream cheese, softened
– 1/2 cup powdered sugar
– 1/4 cup blue food coloring
– 1 teaspoon pure vanilla extract
– 1/2 cup white chocolate chips
– Optional: Edible glitter for decoration
These ingredients create a fun and festive treat. The graham crackers give a nice base, while the coconut adds a tropical twist. The cream cheese makes the truffles creamy and rich. Adding powdered sugar balances the flavors with sweetness. The blue food coloring makes the truffles pop with color. Vanilla adds a warm, inviting taste. Finally, the white chocolate chips provide a smooth finish.
For a magical touch, you can add edible glitter. It makes the truffles sparkle, perfect for a holiday party. Each ingredient plays a key role in making these truffles both delicious and beautiful.

Step-by-Step Instructions
Mixing Dry Ingredients
Start with a large mixing bowl. Add 1 cup of crushed graham crackers. Next, add 1 cup of shredded coconut. Use a spatula to mix them well. Make sure the coconut and crackers are evenly combined. This blend forms the base for our truffles.
Preparing the Cream Cheese Mixture
In another bowl, take 1/2 cup of softened cream cheese. Use an electric mixer on medium speed. Beat the cream cheese until it’s smooth and free of lumps. Slowly add in 1/2 cup of powdered sugar. Keep mixing until it’s smooth and creamy. Next, add in 1/4 cup of blue food coloring and 1 teaspoon of pure vanilla extract. Stir gently until the color is bright and even. No streaks should remain in this mixture.
Forming and Coating the Truffles
Now, fold the dry ingredients into the cream cheese mixture. Use a spatula to ensure everything combines well. Cover the bowl with plastic wrap. Refrigerate for about 30 minutes. This cooling time makes the mixture easier to work with. Once chilled, scoop out portions of the mixture. Form each portion into 1-inch balls.
Next, melt 1/2 cup of white chocolate chips in a microwave-safe bowl. Heat in 30-second intervals, stirring each time until smooth. Dip each truffle into the melted chocolate. Make sure each one is fully coated. Use a fork to let excess chocolate drip off. Place the coated truffles on a parchment-lined baking sheet.
While the chocolate is still wet, sprinkle edible glitter on top. This adds a festive touch. Return the truffles to the fridge for another 30 minutes. This helps the chocolate set firmly. Enjoy your fun and festive Blue Christmas No-Bake Truffles!
Tips & Tricks
Success Tips for Perfect Truffles
To make your Blue Christmas No-Bake Truffles shine, focus on the small details. First, ensure even color distribution with the blue food coloring. I suggest adding the coloring in small amounts. Mix well after each addition. This way, you avoid streaks and get a vibrant blue that pops.
Next, chill the mixture for easier handling. After mixing your ingredients, cover the bowl and refrigerate for about 30 minutes. This will firm up the mixture, making it simple to scoop and roll into balls.
Decorating Ideas
Now, let’s make these truffles festive! Use edible glitter to add sparkle. After dipping each truffle in melted white chocolate, sprinkle the glitter while the chocolate is still wet. This helps the glitter stick well.
Also, consider colorful holiday liners for serving. They add a cheerful touch and make your truffles look even more inviting. Choose liners in bright reds, greens, or even gold to match the festive spirit.
Pro Tips
- Chill for Easier Handling: Make sure to refrigerate the mixture for at least 30 minutes. This will firm up the mixture, making it easier to roll into truffles.
- Perfectly Coated Truffles: When dipping the truffles in melted white chocolate, ensure they are fully coated by gently swirling them in the bowl to avoid any bare spots.
- Customize Your Color: If you want a lighter or darker blue, adjust the amount of blue food coloring to achieve your desired shade. Just remember to mix well to avoid streaks.
- Festive Presentation: Use colorful holiday liners to serve your truffles and consider adding decorative elements like pine branches to elevate your presentation.

Variations
Flavor Variations
You can easily change the flavor of these truffles. Try adding different extracts to the mix. Almond extract gives a sweet nutty touch. Peppermint extract adds a cool, festive twist. Just use about half a teaspoon of any extract. Mix it in when you add the vanilla. This small change can make a big difference in taste.
Alternative Coatings
While white chocolate looks pretty, you have other options. Dark chocolate gives a rich flavor. Milk chocolate brings sweetness and creaminess. To coat your truffles, melt your choice of chocolate. Dip each truffle and let the excess drip off. Each coating creates a new vibe for your truffles.
Dietary Adaptations
Want to make these truffles gluten-free? Just swap the graham crackers for gluten-free ones. For a dairy-free treat, use a vegan cream cheese. Always check labels to ensure they fit your needs. These small swaps allow everyone to enjoy these festive bites!
Storage Info
Best Practices for Storing Truffles
To keep your Blue Christmas No-Bake Truffles fresh, store them in the refrigerator. Place them in an airtight container. This keeps them from drying out and prevents any strong smells from other foods. They can stay good in the fridge for up to one week. If you want to enjoy them later, freezing is a great option.
Freezing Instructions
To freeze your truffles, first, let them cool completely. After that, place them in a single layer on a baking sheet. Freeze them for about an hour. Once they are firm, transfer them to a freezer-safe bag or container. Make sure to label the container with the date. Your truffles can last for up to three months in the freezer.
When you want to enjoy them, remove the truffles from the freezer. Let them thaw in the fridge for a few hours. This way, they will taste fresh and delicious when you’re ready to serve them.
FAQs
Common Questions about Blue Christmas No-Bake Truffles
How long do no-bake truffles last?
No-bake truffles can last up to one week in the fridge. Store them in an airtight container. If you freeze them, they can last up to three months. Just thaw in the fridge when you’re ready to enjoy.
Can I use regular coloring instead of gel food coloring?
You can use regular food coloring, but it may not give the same bright shade. Gel food coloring is thicker and provides a richer color. If you use regular coloring, add it slowly until you reach your desired hue.
What can I substitute for cream cheese?
You can replace cream cheese with Greek yogurt for a tangy twist. Silken tofu is another option for a dairy-free version. Both alternatives will change the taste, but they keep the truffles creamy.
Making Blue Christmas No-Bake Truffles is simple and fun. We covered the key ingredients, detailed steps, and creative tips. You learned how to mix, form, and coat these tasty treats. Also, we explored flavor variations and storage methods.
Enjoy making these festive treats this holiday. They bring cheer and delight. Get ready to impress friends and family with your sweet skill

Blue Christmas No-Bake Truffles
Ingredients
- 1 cup crushed graham crackers
- 1 cup shredded coconut
- 1/2 cup cream cheese, softened to room temperature
- 1/2 cup powdered sugar
- 1/4 cup blue food coloring
- 1 teaspoon pure vanilla extract
- 1/2 cup white chocolate chips
- to taste edible glitter for decoration (optional)
Instructions
- In a spacious mixing bowl, thoroughly mix the crushed graham crackers and shredded coconut until evenly distributed.
- In a separate bowl, use an electric mixer to beat the softened cream cheese on medium speed until it reaches a smooth and creamy consistency, free of lumps.
- Gradually add the powdered sugar to the cream cheese, continuing to mix well until completely incorporated and smooth.
- Add the blue food coloring and vanilla extract to the cream cheese mixture. Stir gently until the color is uniform and vibrant, making sure no streaks remain.
- Carefully fold the graham cracker and coconut mixture into the cream cheese mixture using a spatula, ensuring everything is well combined and no dry ingredients are visible.
- Once the mixtures are combined, cover the bowl with plastic wrap and refrigerate for about 30 minutes. This chilling time will make the mixture easier to handle.
- After the chilling period, use a small cookie scoop or your hands to take out portions of the mixture, forming them into approximately 1-inch diameter balls.
- In a microwave-safe bowl, melt the white chocolate chips by heating in 30-second intervals, stirring after each interval until the chocolate is completely smooth and melted.
- Dip each truffle into the melted white chocolate, ensuring it is fully coated. Use a fork to allow excess chocolate to drip off before placing the truffles on a parchment-lined baking sheet.
- While the white chocolate coating is still wet, sprinkle edible glitter generously on top for that extra festive sparkle.
- Return the truffles to the refrigerator for an additional 30 minutes, allowing the chocolate coating to set firmly.


![- 1 cup pumpkin puree - 1/2 cup unsalted butter, softened - 1 cup brown sugar and 1/2 cup granulated sugar These ingredients form the base of your chewy pumpkin spice cookies. Pumpkin puree provides moisture and flavor. Softened butter helps create that melt-in-your-mouth texture. Mixing brown and granulated sugar gives sweetness and a lovely depth. - 1/2 cup chocolate chips - 1/2 cup chopped pecans or walnuts If you want to elevate your cookies, consider adding chocolate chips. They bring a rich sweetness that pairs well with pumpkin spice. Chopped pecans or walnuts add a nice crunch and nutty flavor. Feel free to mix and match based on your taste. - 2 cups all-purpose flour - 1 teaspoon baking soda, baking powder, pumpkin spice, and sea salt All-purpose flour is your main structure builder. Baking soda and baking powder help the cookies rise and stay soft. Pumpkin spice adds warmth and that classic fall flavor. Sea salt enhances the sweetness and balances the spices. For the full recipe, check out the details above. Each ingredient plays a key role in creating these irresistibly soft treats! - Preheat your oven to 350°F (175°C). This step ensures even baking. - Line a baking sheet with parchment paper. This helps the cookies not stick. - In a large bowl, cream together softened butter and both sugars. - Use an electric mixer for the best results. Mix until light and fluffy. - Next, add the pumpkin puree, egg, and vanilla extract. - Beat well until everything is smooth and combined. - In a separate bowl, whisk together the flour, baking soda, baking powder, pumpkin spice, and salt. - Gradually add this dry mix to the wet ingredients. Stir gently and avoid overmixing. - Use a tablespoon or cookie scoop to portion the dough onto the lined baking sheet. - Leave enough space between each cookie to allow for spreading. - Bake in the preheated oven for 10-12 minutes. The edges should be golden brown. - The centers might look a bit soft but will set as they cool. For the full recipe, refer to the earlier sections. Enjoy the process! To make your cookies chewy, do not overmix the dough. Mix just until the flour disappears. Overmixing makes cookies tough. The right baking time and temperature are key. Bake at 350°F (175°C) for 10-12 minutes. Watch for golden edges and soft centers. They will harden as they cool. You can use homemade pumpkin puree or canned. Homemade puree adds a fresh taste. Canned options are quick and easy. Also, try different spices. While pumpkin spice is great, adding a pinch of cardamom or allspice can elevate the flavor. Experiment until you find your favorite blend. For a stunning display, stack your cookies on a rustic platter. This adds charm to your table. To make them look even nicer, dust with powdered sugar. Add some cinnamon sticks beside the cookies for a cozy touch. These small details impress guests and enhance enjoyment. For the full recipe, check the complete instructions above. {{image_4}} You can make fun swaps for your chewy pumpkin spice cookies. One easy change is to use coconut oil instead of butter. This makes the cookies dairy-free and adds a light coconut flavor. If you want a vegan option, replace the egg with flax eggs. To make a flax egg, mix one tablespoon of ground flaxseed with three tablespoons of water. Let it sit for five minutes to thicken. This keeps your cookies soft and chewy, just like the original recipe. Want to add more flavor? Try adding dried fruits like cranberries or raisins. They bring a sweet chewiness that pairs well with pumpkin spice. For a fresh twist, you can also add a hint of citrus zest. A little orange or lemon zest brightens the cookies and gives them a fun taste. These small changes can make your cookies stand out during the fall season. Frosting can take your cookies to another level. Cream cheese frosting pairs perfectly with the warm spices in these cookies. To make it, mix cream cheese with powdered sugar and a splash of vanilla. If you want something lighter, consider a simple glaze. Just mix powdered sugar with a bit of milk until smooth. Drizzle it over the cookies for added sweetness. These frosting options make each bite even more delightful. To keep your chewy pumpkin spice cookies fresh, use an airtight container. This helps lock in moisture. Store them at room temperature, away from sunlight. A cool, dry place works best. To maintain their soft and chewy texture, place a slice of bread in the container. The cookies absorb moisture from the bread, keeping them soft. You can also wrap each cookie in plastic wrap for extra protection. Freezing cookies is easy and a great way to save them for later. First, let the cookies cool completely. Then, arrange them in a single layer on a baking sheet. Freeze them for about one hour. This step prevents them from sticking together. After freezing, transfer the cookies to a freezer-safe bag. Remove as much air as possible before sealing. They can last for up to three months in the freezer. When you're ready to eat them, thaw cookies at room temperature. For a warm treat, pop them in the microwave for about 10-15 seconds. Chewy pumpkin spice cookies last about a week at room temperature. Store them in an airtight container to keep them fresh. Look out for signs of spoilage. If they become hard or dry, they may be past their prime. Also, check for any off smells or mold. If you see or smell anything unusual, it’s best to throw them away. These tips will help you enjoy your chewy pumpkin spice cookies even longer! For the full recipe, check out the [Full Recipe]. You can use pumpkin pie filling, but it is not the same. Pumpkin puree is pure pumpkin with no added sugar or spices. Pumpkin pie filling has sugar and spices mixed in. If you use it, cut back on the sugar in your recipe. It may make your cookies sweeter than you want. To reduce sweetness, cut down on the sugar. You can use 3/4 cup of brown sugar instead of 1 cup. You can also skip the granulated sugar. Another option is to add more pumpkin puree. This can balance the sweetness while keeping the texture. To reheat your cookies, use the oven for the best results. Preheat your oven to 350°F (175°C). Place the cookies on a baking sheet. Heat them for about 5 minutes. This keeps them soft and chewy. You can also use the microwave. Heat them for 10-15 seconds. This works, but they may not be as chewy. Enjoy your chewy pumpkin spice cookies warm! These chewy pumpkin spice cookies are simple to make with the right ingredients. Start with pumpkin puree, butter, and sugars for the best taste. Follow the steps to create a delightful treat and use my tips for the perfect chewy texture. Experiment with flavors to make your cookies unique. Store them well to keep that freshness. Enjoy sharing these cookies, as they are sure to impress!](https://fastmealmate.com/wp-content/uploads/2025/07/8de16806-55b5-45ec-964c-13b68a3ec1a0-768x768.webp)


