Best Crockpot Chicken and Gravy Flavorful Comfort Dish

If you’re craving a hearty meal that’s easy to prepare, let me introduce you to the Best Crockpot Chicken and Gravy. This dish combines tender chicken with rich, creamy gravy that warms the soul. With just a few simple ingredients and minimal prep, you can enjoy a comforting dinner that the whole family will love. Ready to dive into this flavor-packed recipe? Let’s get cooking!
Ingredients
Cooking a warm bowl of crockpot chicken and gravy is simple and delightful. Here’s what you need:
– 4 boneless, skinless chicken breasts
– 1 can (10.5 oz) cream of chicken soup
– 1 packet (1 oz) ranch dressing mix
– 1 cup low-sodium chicken broth
– 1/2 cup sour cream
– 1 teaspoon garlic powder
– 1/2 teaspoon onion powder
– Salt and pepper, to taste
– Fresh parsley, chopped (for garnish)
– Cooked rice or creamy mashed potatoes (for serving)
Each ingredient plays a key role in creating a rich and creamy dish. The chicken breasts are the star, providing a lean protein base. The cream of chicken soup adds a smooth texture and depth. The ranch dressing mix brings a unique flavor twist that makes this dish stand out. Using low-sodium chicken broth ensures the dish isn’t overly salty.
Sour cream adds creaminess and tang, while garlic and onion powders enhance the taste. Don’t forget to adjust salt and pepper to suit your liking. A sprinkle of fresh parsley not only brightens up the dish but also adds a pop of color.
Serve this savory mix over rice or mashed potatoes for a comforting meal. This dish can feed four people, making it perfect for family dinners.
Step-by-Step Instructions
Preparation of Ingredients
First, gather your ingredients. You need four boneless, skinless chicken breasts, one can of cream of chicken soup, and ranch dressing mix. You’ll also need chicken broth, sour cream, garlic powder, onion powder, salt, and pepper.
In a medium bowl, whisk together the cream of chicken soup, ranch dressing mix, chicken broth, sour cream, garlic powder, onion powder, salt, and pepper. Mix until smooth. This sauce is key to flavor.
Next, arrange the chicken breasts in a single layer at the bottom of your crockpot. Pour the creamy sauce over the chicken. Make sure every piece is covered. This helps the chicken soak up all the great flavors.
Cooking Process
Now it’s time to cook. Secure the lid on the crockpot. Set it to cook on low for 6-7 hours or on high for 3-4 hours. The chicken is done when it reaches an internal temperature of 165°F.
Check for doneness after the time is up. The chicken should be tender and easy to shred. If it is not done, cook for an extra 30 minutes.
Serving Instructions
When the chicken is ready, remove it from the crockpot. Place it on a plate and use two forks to shred it into bite-sized pieces.
Return the shredded chicken to the crockpot. Stir it into the creamy gravy until well mixed. Taste and adjust the seasoning if needed.
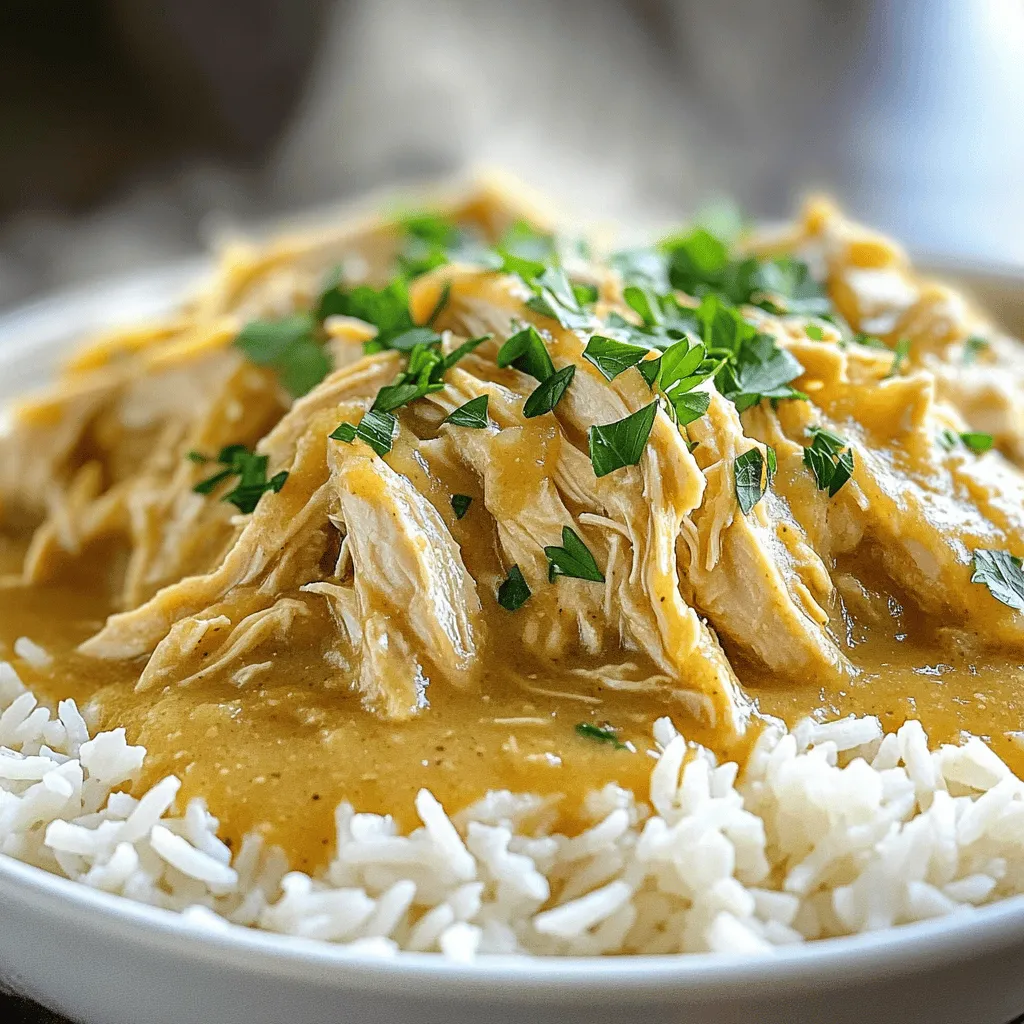
Serve this dish over cooked rice or creamy mashed potatoes. For a nice touch, sprinkle fresh parsley on top. This adds color and freshness to your plate. Use a white plate to make the creamy chicken stand out. Enjoy your comforting meal!
Tips & Tricks
Ensuring Perfect Results
To get the best results, adjust your cooking time based on your crockpot settings. If you cook on low, expect 6-7 hours. On high, it takes about 3-4 hours. Always check the chicken’s internal temperature. It should reach 165°F (75°C). This ensures it’s safe to eat and super tender.
For the ideal chicken texture, remember to coat each breast well with the creamy sauce. This helps keep the chicken moist as it cooks. Shredding the chicken after cooking makes it soak up even more flavor from the gravy.
Enhancing Flavor
To boost the flavor, you might want to add a pinch of paprika or some thyme. These spices give the dish a nice depth. You can also swap the cream of chicken soup for cream of mushroom for a different taste.
For sides, serve this dish over cooked rice or creamy mashed potatoes. You can also add some steamed green beans or carrots. They add color and crunch to your meal.
Presentation Suggestions
For a beautiful presentation, use a white plate. It showcases the creamy chicken and gravy well. You can drizzle some extra gravy on top for a rich look.
Garnish with chopped parsley for a fresh touch. This adds color and a hint of flavor. You could also add lemon slices on the side. They bring brightness to the plate and balance the dish.

Variations
Flavor Variants
You can change the flavor of this dish easily. Instead of cream of chicken soup, try cream of mushroom soup. This adds a rich, earthy taste. If you want a kick, add spices like paprika or cayenne pepper. A little heat can elevate the meal.
You can also experiment with herbs. Try adding thyme or rosemary for a fresh touch. These flavors blend well with chicken and make it more aromatic. Don’t be afraid to mix and match your favorites.
Dietary Modifications
To make this dish lighter, swap out sour cream for Greek yogurt. This keeps it creamy while cutting fat. You can also use low-fat cream of chicken soup, which reduces calories.
If you need gluten-free options, ensure the ranch dressing mix is gluten-free. You can find many brands that cater to this need. These swaps keep the dish tasty and friendly for different diets.
Ingredient Swaps
Using chicken thighs can add more flavor. Thighs are juicier and can handle longer cooking times. This change makes the dish even more delicious.
For a vegetarian option, replace chicken with chickpeas or tofu. These ingredients soak up the gravy well. They provide protein and texture, making a satisfying meal for all.
Storage Info
Refrigeration Guidelines
After enjoying your meal, store leftovers safely. Let the chicken and gravy cool down before putting it in the fridge. Use airtight containers to keep the dish fresh. Glass or plastic containers work well. Make sure to keep the lid tightly closed. This helps prevent spills and keeps out odors.
Freezing Instructions
To freeze your chicken and gravy, first, let it cool completely. Transfer the dish into freezer-safe bags or containers. Remove as much air as possible. This helps avoid freezer burn. Label the bags with the date. When ready to eat, thaw it overnight in the fridge. Reheat in the microwave or on the stove until hot.
Shelf Life
In the fridge, your chicken and gravy last 3 to 4 days. If frozen, it stays good for up to 3 months. For best taste, eat it sooner rather than later. Always check for any off smells or changes in color before consuming.
FAQs
What is the best way to reheat Crockpot chicken and gravy?
The best way to reheat this dish is on the stove. Place the chicken and gravy in a pot. Heat it over low to medium heat. Stir it often to avoid sticking. You can also use the microwave. Just place it in a safe dish and cover it. Heat in short bursts, stirring in between. This keeps the chicken moist and tasty.
Can I make this recipe ahead of time?
Yes, you can make this dish ahead of time. Prepare the chicken and gravy as directed. Once cooked, let it cool. Store it in an airtight container in the fridge. It will stay fresh for up to three days. You can also freeze it for longer storage. Just thaw it in the fridge before reheating.
What can I serve with Crockpot chicken and gravy?
You can serve this dish with several sides. Cooked rice or creamy mashed potatoes are both great choices. They soak up the gravy well. Steamed vegetables add color and nutrition. You can also serve it with a salad for a fresh crunch. Feel free to mix and match your favorites.
Is it possible to cook on high if I’m short on time?
Yes, you can cook on high if you’re short on time. Set your crockpot to high and cook for about 3 to 4 hours. Make sure the chicken reaches 165°F (75°C) for safety. The chicken will still be tender and flavorful. Just keep an eye on it as it cooks.
Can I use frozen chicken breasts in the recipe?
You can use frozen chicken breasts, but not directly. It’s best to thaw them first. Thaw the chicken in the fridge overnight. This helps the chicken cook evenly. If you’re in a hurry, you can use the microwave. Just follow the microwave instructions for thawing. Once thawed, you can follow the recipe as usual.
This guide to making Crockpot chicken and gravy covers everything you need. From ingredients to cooking tips, each step ensures success. You have options to modify flavors and make it your own. Remember to follow storage tips for leftovers. With these insights, your dish will be tasty and satisfying. Enjoy this comforting meal with your favorite sides. I hope you feel inspired to create this dish at home!


![- 1 cup unsalted butter, melted - 1 ½ cups brown sugar - 2 large eggs - 1 teaspoon vanilla extract - Zest and juice of 1 lemon To make these strawberry lemon blondies, we start with some key players. The butter gives a rich base, while brown sugar adds sweetness and depth. Eggs bind everything together, and vanilla extract enhances flavor. The zest and juice of one lemon bring a bright, zesty punch to the mix. - 2 cups all-purpose flour - 1 teaspoon baking powder - ½ teaspoon salt Next, we mix in our dry ingredients. All-purpose flour provides structure. Baking powder helps the blondies rise, making them light and fluffy. A little salt balances the sweetness. - 1 cup fresh strawberries, diced - Optional: Powdered sugar for dusting Finally, we fold in the star of the show: fresh strawberries! Their juicy sweetness pairs perfectly with the lemon. If you want a touch of elegance, consider dusting the blondies with powdered sugar before serving. This simple step adds a nice visual touch and a hint of extra sweetness. For the complete recipe, refer to the [Full Recipe]. First, set your oven to preheat at 350°F (175°C). This step is key to getting that perfect bake. Next, grab a 9x9 inch baking pan. Grease it well and line it with parchment paper. Leave some paper hanging over the edges. This will help you lift the blondies out later. You will need a few mixing bowls. One should be large enough for the wet ingredients. Another bowl should be used for the dry ingredients. Also, keep a whisk and spatula nearby. They make mixing easier. In your large bowl, pour in 1 cup of melted butter. Add 1 ½ cups of brown sugar to it. Stir well until it looks smooth. Next, crack in 2 large eggs. Add 1 teaspoon of vanilla extract, the zest of 1 lemon, and 1 tablespoon of fresh lemon juice. Whisk until everything is mixed well and smooth. Now, take your second bowl. In it, whisk together 2 cups of all-purpose flour, 1 teaspoon of baking powder, and ½ teaspoon of salt. Mix these dry ingredients well. Gradually add them to your wet mixture. Stir gently until you see no dry flour. Be careful not to overmix here. Next, fold in 1 cup of diced strawberries using a spatula. Do this gently to keep the fruit pieces whole. Pour the batter into your prepared pan. Use your spatula to spread it evenly. Then, place the pan in your preheated oven. Bake for 25 to 30 minutes. Keep an eye on the edges; they should turn lightly golden brown. To check for doneness, insert a toothpick in the center. It should come out with a few moist crumbs. After baking, let the blondies cool completely in the pan. A wire rack works great for this. Once they are cool, use the parchment overhang to lift them out. Transfer them to a cutting board and cut them into squares. If you like, lightly dust the tops with powdered sugar before serving. This adds a nice touch and makes them look pretty. Enjoy your strawberry lemon blondies! For the full recipe, check out the details above. To get perfect strawberry lemon blondies, avoid overmixing the batter. Overmixing can make your blondies tough. Mix just until you don’t see dry flour anymore. This keeps them soft and chewy. Also, ensure you measure your ingredients correctly. Use dry measuring cups for flour and sugar. Level them off with a knife for accuracy. This small step helps your blondies turn out just right. To enhance the lemon flavor, use fresh lemon juice and zest. Fresh ingredients make a big difference. The zest gives a bright, bold taste. For an extra kick, add a bit more lemon juice if you like it zesty. When using fresh strawberries, choose ripe ones. Look for bright red berries with no soft spots. Cut them into small, even pieces. This way, they mix evenly into the batter, spreading flavor throughout. To ensure even baking, rotate your pan halfway through. Ovens can have hot spots, so this helps. Keep an eye on the edges. They should look golden brown but not burnt. For storage, use an airtight container. A metal or glass container works best. This keeps your blondies fresh for days. If you have extra, you can freeze them. Wrap them well in plastic wrap before placing them in the freezer. This way, you’ll enjoy them later. For the full recipe, check out the full recipe section. {{image_4}} You can easily adapt the strawberry lemon blondies to fit different diets. For a vegan or dairy-free option, replace the butter with coconut oil or a vegan butter substitute. Instead of eggs, use flax eggs or applesauce. This keeps the texture while making it plant-based. For gluten-free alternatives, swap out the all-purpose flour with a gluten-free blend. Many brands offer mixes that work well in baking. Just make sure your baking powder is gluten-free, too, to keep everything safe for those with allergies. To add more fruit flavors, consider mixing in blueberries or raspberries for a twist. These berries pair nicely with lemon and add vibrant colors. You can also try adding different extracts, like almond or coconut, to change the taste. Cinnamon or nutmeg can give a warm touch to your blondies. Pairing your blondies with a scoop of vanilla ice cream makes for a delightful treat. The cold ice cream complements the warm blondies beautifully. For a fun twist, create a blondie sundae by stacking a blondie with ice cream and drizzling it with chocolate or caramel sauce. You can also serve them with whipped cream and fresh strawberries on top. This not only looks appealing but also enhances the flavors. For the full recipe, check out the Sweet & Zesty Strawberry Lemon Blondies. To store strawberry lemon blondies at room temperature, place them in a cool, dry area. Use a plate or a baking dish. Cover them lightly with foil or wax paper. This keeps them fresh for about three days. Avoid direct sunlight to prevent them from drying out. For long-term storage, you can freeze the blondies. First, let them cool completely. Then, cut them into squares. Wrap each square tightly in plastic wrap. Place the wrapped blondies in a freezer bag or airtight container. They can last up to three months in the freezer. When you want to enjoy them, you can thaw them. For the best texture, place the blondies in the fridge overnight. If you're in a hurry, let them sit at room temperature for a few hours. This way, they stay soft and tasty. To keep your blondies fresh, always use airtight containers. This prevents air from drying them out. If you don't have one, use plastic wrap tightly. Keep blondies away from strong odors, as they can absorb them. Enjoy your strawberry lemon blondies at their best! For the full recipe, check out the detailed instructions above. To cut blondies neatly, first let them cool. Use a sharp knife for clean cuts. Warm the knife in hot water, then wipe it dry. This helps slice through the soft blondies. Cut in straight lines for even squares. For a nice finish, dust the top with powdered sugar after cutting. Yes, you can make these blondies ahead of time. Bake and cool them completely. Wrap them tightly in plastic wrap. Store them in an airtight container at room temperature. They stay fresh for a few days. For longer storage, freeze them in an airtight container. Thaw at room temperature before serving. Strawberry lemon blondies last about 3 to 5 days at room temperature. Keep them in an airtight container to maintain freshness. If you store them in the fridge, they may last up to a week. For best taste, enjoy them within a few days of baking. Yes, you can use frozen strawberries in this recipe. Thaw and drain them before adding to the batter. This prevents excess moisture in the blondies. While fresh strawberries taste great, frozen ones work well too. They still provide that sweet and tart flavor we love. You now have a complete guide to making delicious strawberry lemon blondies. We covered key ingredients, step-by-step instructions, and helpful tips. Remember to avoid overmixing for the best texture and to store them properly. Feel free to customize with different fruits or flavors to make this treat your own. Enjoy your baking and share these delights with friends and family. The joy of homemade desserts is unbeatable!](https://fastmealmate.com/wp-content/uploads/2025/06/d01b8b31-fd8b-4a7a-a702-50bce4a43ad8-768x768.webp)

![Fresh figs are the star of this jam. Choose ripe, sweet figs for the best taste. Look for figs that are soft to the touch and have a deep color. First, wash the figs under cold water. Then, remove the stems and cut them into quarters. This helps them break down easily while cooking. You should have about 2 pounds of prepared figs for this recipe. Sugar is key in making fig jam thick and sweet. It not only adds sweetness but also helps the jam set. As the figs cook, they release their natural juices. The sugar dissolves and mixes with these juices, forming a syrup. This syrup thickens as it cooks, giving your jam that perfect spreadable texture. Use 1 cup of granulated sugar for this recipe. Adding lemon juice brightens the flavor. It helps balance the sweetness of the figs. You’ll need the juice of one lemon, which is about 2 tablespoons. Vanilla extract adds a warm, sweet note. Use just 1/2 teaspoon for a subtle hint. A pinch of sea salt (1/4 teaspoon) enhances all the flavors. Together, these ingredients create a delightful taste in your fig jam. For the full recipe, check out the Sweet Fig Bliss Jam. First, gather your fresh figs. You need 2 lbs of ripe figs. Remove the stems and cut them into quarters. Place them in a large bowl. Add 1 cup of granulated sugar. Squeeze the juice of one lemon into the bowl. This adds a nice zing to the jam. Pour in 1/2 teaspoon of vanilla extract and 1/4 teaspoon of sea salt. Toss everything together gently. Let it sit for about 30 minutes. This resting time helps the figs release their juices, making a sweet syrup. Now, transfer your fig mixture to a medium pot. Place the pot on medium heat. Stir the mixture often. You want the sugar to dissolve fully and the figs to soften. This should take around 10 minutes. Once everything is mixed well, turn the heat to medium-high. Bring the mixture to a gentle boil. Keep stirring regularly for 20 to 30 minutes. Watch closely as it thickens. It’s ready when it looks spreadable and thick. To check the jam's thickness, take a spoonful and place it on a chilled plate. Let it cool for a minute. Run your finger through the jam. If it holds its shape, it’s done. If it’s too runny, cook it a few more minutes. Once it’s just right, take the pot off the heat. Let it cool for about 10 minutes. Then, ladle the warm jam into clean jars. Seal them tightly while they are warm. This helps create a vacuum seal. Allow the jars to cool completely at room temperature. Enjoy your homemade fig jam! To make your fig jam shine, try adding a bit of spice. A dash of cinnamon can bring warmth. You can also add fresh herbs like rosemary for an earthy twist. Another great tip is to let your figs sit with sugar for 30 minutes. This helps to draw out the juices. The more juice, the better the flavor. Don't skip the lemon juice; it balances the sweetness and brightens the taste. If your jam is too runny, don’t worry! Just cook it a bit longer. Keep stirring to prevent burning. Test the consistency by spooning some onto a chilled plate. If it runs, give it more time. If you overcooked it and it’s too thick, you can fix it! Add a little water and reheat gently, stirring to combine. This will bring back some moisture without losing flavor. Sterilizing jars is key to keeping your jam fresh. Start by washing them in hot, soapy water. Rinse well and place them in a large pot of boiling water. Let them boil for 10 minutes. This kills any germs. You can also use your oven. Preheat it to 225°F (110°C) and place clean jars inside for 10-15 minutes. Always fill jars with warm jam to create a good seal. This keeps your fig jam safe and tasty for weeks! Don’t forget to check the [Full Recipe] for all the details! {{image_4}} You can spice up your fig jam easily. Adding a touch of cinnamon gives warmth. Just a pinch can change the flavor. Try adding rosemary for a fresh twist. This herb adds a nice depth. Experimenting with spices makes your jam unique. Mixing figs with other fruits offers fun flavors. You can try adding apples or pears. Their sweetness pairs well with figs. Another option is to use berries. Blueberries or raspberries create a bright taste. This mix can surprise your taste buds. You get more variety and fun in every jar. You can adjust sweetness based on your taste. If granulated sugar is not your choice, try honey or maple syrup. They give a different flavor and health benefits. For lower sugar, use stevia or monk fruit. These options keep the jam sweet without extra calories. Just remember to balance the flavors as you go. You can find the full recipe [here](#). Store your fig jam in clean, sterilized jars. Make sure to seal the jars tightly. I recommend using glass jars, as they help keep the jam fresh. Place the jars in the refrigerator right after they cool down. This keeps your jam tasty and safe to eat. Fig jam lasts about 2-3 weeks in the fridge. If you want to keep it longer, consider freezing it. When frozen, fig jam can last for up to a year. Just remember to label the jars with the date. This way, you’ll know exactly when you made it. Look for signs of spoilage before using your fig jam. If you see mold on the surface, throw it away. If the jam smells off or has an unusual color, it’s best not to eat it. Another sign is if the jam has a change in texture or consistency. Always trust your senses. If something seems off, it’s better to be safe. Yes, you can use frozen figs. Thaw them first and drain any excess liquid. Frozen figs can still taste great. They might be softer, but they will work well in your jam. Just follow the same steps as with fresh figs. Making jam without pectin lets the fruit shine. You get a pure fig flavor. It’s also a simple process. You only need figs, sugar, and a few extras. Plus, you can control the sweetness better. This method gives a lovely, spreadable texture. Leftover fig jam has many uses. Spread it on toast or pancakes for a sweet treat. You can swirl it into yogurt or oatmeal. Use it as a filling for pastries. It also pairs well with cheese on a charcuterie board. The options are endless! For more ideas, check out the Full Recipe for inspiration. This guide shows you how to make fig jam from start to finish. We explored ingredients like fresh figs, sugar, and flavor enhancers. Step-by-step, you learned to prepare and cook the mixture. Tips helped you fix issues and enhance texture. Variations allowed you to play with spices and fruits. Remember to store your jam safely for the best shelf life. Making fig jam can be fun and rewarding. Enjoy sharing your delicious creation with friends and family!](https://fastmealmate.com/wp-content/uploads/2025/06/9fb41919-1a88-423c-ae1c-6a52e554671e-768x768.webp)
![To make Minute Cajun Shrimp and Corn Chowder, you need some key ingredients: - 1 lb large shrimp, peeled and deveined - 2 cups corn kernels (fresh or frozen) - 1 medium onion, diced - 2 cloves garlic, minced - 1 red bell pepper, diced - 2 medium potatoes, peeled and diced These ingredients form the base of your chowder. The shrimp give it a nice protein punch. The corn adds sweetness, while the onion and garlic bring out savory flavors. Next, we need our liquids to make this chowder rich and tasty: - 4 cups chicken or vegetable broth - 1 cup coconut milk The broth adds depth, while coconut milk gives creaminess. You can use chicken broth for a richer taste, or vegetable broth if you want a lighter option. Now, let's spice things up! - 2 tablespoons Cajun seasoning - 1 teaspoon smoked paprika - Salt and fresh cracked pepper to taste - 2 tablespoons olive oil - Fresh parsley, chopped (for garnish) Cajun seasoning brings the heat and flavor. Smoked paprika adds a nice touch, giving a warm, smoky flavor. Salt and pepper are essential for balance. Olive oil helps to sauté the veggies, and parsley makes it pretty. For the full recipe, check out [Full Recipe]. 1. Heat 2 tablespoons of olive oil in a large pot over medium heat. 2. Once the oil shimmers, add 1 diced onion, 2 minced garlic cloves, and 1 diced red bell pepper. 3. Sauté these ingredients for about 4-5 minutes until the onions are soft and fragrant. 4. Next, add 2 diced potatoes to the pot. Cook for another 5 minutes, stirring often. 1. Sprinkle in 2 tablespoons of Cajun seasoning and 1 teaspoon of smoked paprika. 2. Stir well to coat the vegetables with the spices. 3. Pour in 4 cups of chicken or vegetable broth and bring the mixture to a gentle simmer. 4. Cook for 10-15 minutes until the potatoes are fork-tender. 1. Add 2 cups of corn and 1 pound of peeled shrimp to the pot. 2. Gradually stir in 1 cup of coconut milk until blended. 3. Cook for an additional 5 minutes until the shrimp turn pink and opaque. 4. Taste the chowder and adjust the seasoning with salt and fresh cracked pepper as needed. 5. Let it rest for a few minutes to thicken before serving. This process ensures you create a delicious and comforting chowder that captures the essence of Cajun cooking. For the full recipe, check the earlier section. For this chowder, I recommend sautéing the vegetables rather than boiling them. Sautéing brings out the sweet flavors in the onion and red bell pepper. Use medium heat and keep an eye on them. Avoid letting them brown too much, as this can change the taste. To avoid overcooking the shrimp, add them near the end of cooking. They only need about five minutes to cook through. When they turn pink and opaque, they are done. Remove them from the heat right away to keep them tender. To boost the taste, consider adding a pinch of cayenne pepper or paprika. Both will add depth without overwhelming the dish. Fresh herbs like thyme or cilantro can also brighten the chowder. If you want a different creamy texture, you can swap coconut milk for heavy cream or even Greek yogurt. Each option adds richness while changing the flavor slightly. Serve the chowder in deep bowls for a cozy feel. A sprinkle of fresh parsley on top adds color and freshness. You could also add a dash of extra Cajun seasoning for a nice touch. Pair your chowder with crusty bread or cornbread. Both make great sides for dipping. They also complement the rich flavors of the chowder. For a refreshing twist, serve with a light salad on the side. {{image_4}} You can easily make this chowder fit your diet. - Gluten-free options: Use gluten-free broth and check labels on your seasonings. They should not have gluten. - Dairy alternatives: Swap coconut milk with almond milk or oat milk. This keeps it creamy without dairy. Feeling creative? Here are some fun swaps. - Other seafood options: You can use crab or lobster instead of shrimp. Both add a rich flavor. - Additional vegetables to include: Try adding diced carrots or celery. They add crunch and more flavor. Adjusting the flavors can make this dish your own. - Changing the spice level: If you like it mild, use less Cajun seasoning. For a spicy kick, add more! - Using different types of broth for variations: Chicken broth gives a warm taste, but vegetable broth offers a lighter flavor. Try both to see which you prefer. For the full recipe, refer to the original instructions to get started! To store leftovers, let the chowder cool first. Pour it into an airtight container. This keeps it fresh longer. I recommend using glass or BPA-free plastic containers. They seal well and do not absorb odors. If you want to freeze the chowder, follow these steps: 1. Cool the chowder completely. 2. Divide it into portions in freezer-safe bags or containers. 3. Remove as much air as possible before sealing. For reheating frozen chowder, thaw it in the fridge overnight. Heat it gently on the stove over low heat. Stir often to prevent sticking. In the fridge, you can keep the chowder for about 3 to 4 days. If you freeze it, it lasts for up to 3 months. Always check for freshness before eating. Making Minute Cajun shrimp and corn chowder takes just 30 minutes. You spend about 10 minutes prepping the ingredients. Then, you cook everything for 20 minutes. It's a quick meal for busy days. Yes, you can use frozen shrimp. Just make sure to thaw them first. Frozen shrimp are often easier to find and save time. They cook just as well in the chowder. If you don't have Cajun seasoning, you can use a mix of spices. Try paprika, cayenne pepper, garlic powder, and onion powder. You can also make a simple blend at home. This helps you customize the flavors to your taste. For a milder chowder, reduce the cayenne pepper. This blog post shared a simple recipe for Cajun shrimp and corn chowder. You learned about the main ingredients, broths, and seasonings that bring flavor. I also outlined step-by-step instructions for perfect results. Helpful tips and dietary variations enhance your chowder experience. In the end, this chowder is flexible and easy to make. Enjoy experimenting with flavors and ingredients your way. Make it your own, and savor every bite.](https://fastmealmate.com/wp-content/uploads/2025/07/c6449679-e116-43ab-bcba-93cf12d2671e-768x768.webp)

