Caramel Apple Pie Butter Board Irresistible Delight
. Prepare to impress your friends and family! - In a medium saucepan, combine diced Granny Smith apples, brown sugar, ground cinnamon, ground nutmeg, and fresh lemon juice. - Cook over medium heat for 5-7 minutes. Stir occasionally until the apples are tender and caramelized. Cooking the apples is key. The sugar helps them become sweet, while the spices add warmth. The lemon juice brightens the flavor, making it pop. You want the apples to be soft but not mushy. The perfect mix will smell heavenly! - Take a large serving board and spread softened butter evenly across the surface. - Carefully layer the warm caramelized apples over the butter. The butter acts as a rich base. It helps the apples stick and adds creaminess. Make sure to cover the board well. This step sets the stage for the sweet treats to come. - Generously drizzle caramel sauce over the apples. - If you like, sprinkle chopped pecans or walnuts on top. Finish with a pinch of flaky sea salt. The caramel sauce enhances the sweetness and creates a lovely glossy finish. The nuts give a nice crunch, while the sea salt balances the flavor. This dish looks amazing and tastes even better! You can serve it with toasted crostini or crisp apple slices. Don't forget to check out the Full Recipe for more details! For this recipe, I recommend using tart apple varieties. Granny Smith apples work great. Their tartness balances the sweet caramel. Honeycrisp apples are another excellent choice. They add a nice crunch and flavor. Make sure your butter is at room temperature. Softened butter spreads easily on the board. This creates a smooth base for the apples. If the butter is too cold, it will not spread well. Feel free to experiment with spices. Add a pinch of cloves for warmth. You could also try vanilla extract for extra depth. These little tweaks can elevate the taste. Each bite can become even more delightful. {{image_4}} You can easily add a twist to your butter board. Incorporate chocolate chips. Just sprinkle them over the caramelized apples. You can also drizzle melted chocolate on top. This adds rich flavor and a fun look. Do you have nut allergies? No problem! Replace the nuts with seeds like pumpkin or sunflower seeds. If you prefer, you can skip the nuts entirely. Your butter board will still taste amazing! Feel free to switch up the flavors! Use different nut butters, like almond or cashew. You can also try flavored butter spreads. Each variation brings a new taste and experience. Keep your Caramel Apple Pie Butter Board in the refrigerator. Use an airtight container to keep it fresh. This helps to maintain the flavors and textures. For the best taste, enjoy this treat within 2-3 days. After that, the apples may lose their crispness. If you want to serve it warm, gently warm it in the microwave. Heat it in short bursts to avoid cooking the apples again. This helps to bring back the cozy, warm flavors that make this dish so special. A butter board is a fun and tasty way to serve butter. You take a large board and spread softened butter across it. Then, you add delicious toppings. It’s like a charcuterie board, but with butter! You can use sweet or savory toppings. The Caramel Apple Pie Butter Board uses caramelized apples, cinnamon, and nuts for a sweet treat. It’s perfect for sharing at parties or family gatherings. Yes, you can prep this butter board ahead! Make the caramelized apples and store them in the fridge. Just keep them in an airtight container. You can spread the butter on the board when you are ready to serve. Then, layer the apples and drizzle the caramel sauce. This way, you save time and still enjoy a fresh dish. Yes, you can make a vegan version! For the butter, use coconut oil or vegan butter. You can also make your own caramel using coconut milk and brown sugar. This way, you keep the same flavors but make it vegan-friendly. Enjoy the same delicious taste while being kind to dietary needs! This butter board recipe is simple, fun, and full of flavor. We started with caramelized apples and buttery goodness, then added our favorite toppings. You can adjust the recipe to fit your taste. Use different apples, add nuts, or go nut-free. Remember, store leftovers well to keep them fresh. This dish is perfect for sharing and can fit any diet with easy swaps. Enjoy making your own version of this tasty treat!](https://fastmealmate.com/wp-content/uploads/2025/07/ddf5207e-0125-4d49-a59c-c6b722e82f52.webp)
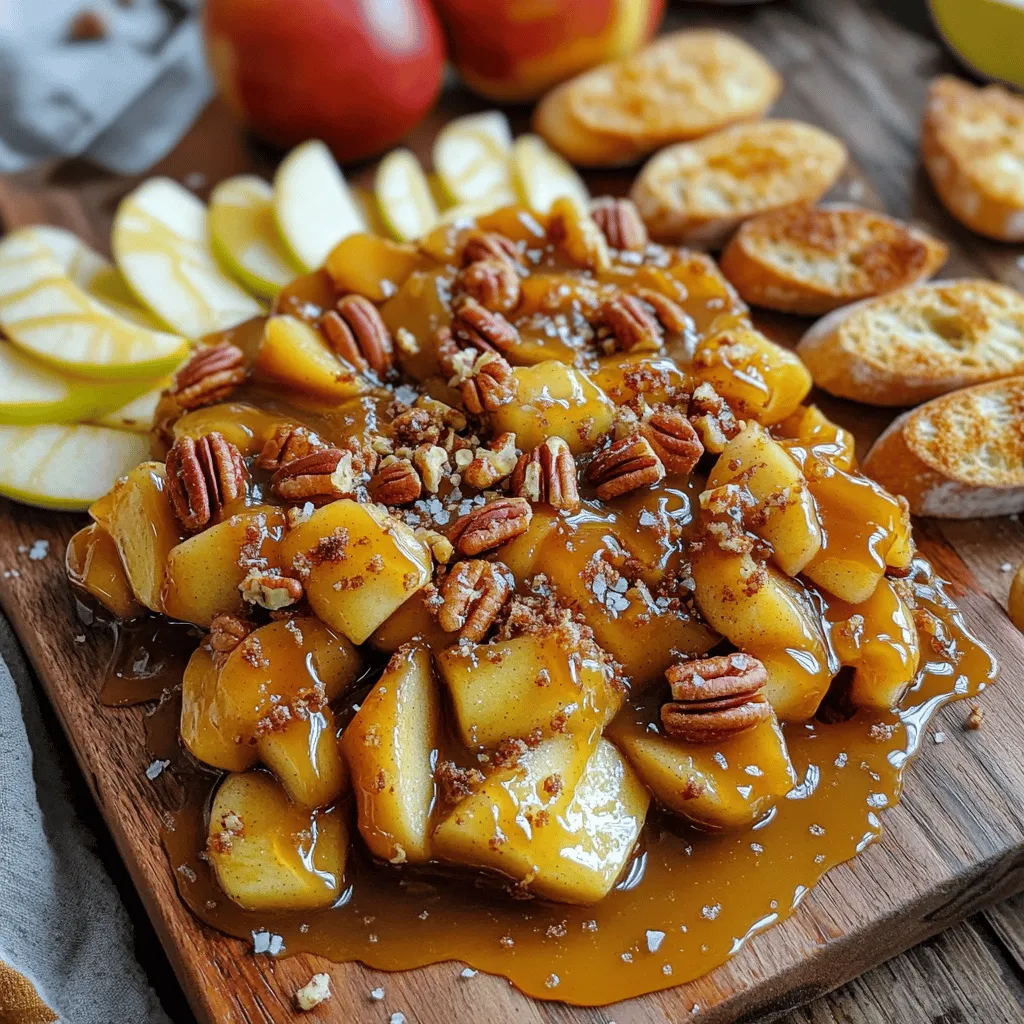
Get ready to experience a whole new way to enjoy dessert with my Caramel Apple Pie Butter Board! It combines creamy butter, caramelized apples, and a drizzle of rich caramel, all served atop delicious crostini or crisp apple slices. This fun and easy dish is perfect for gatherings or a cozy night in. Let’s dive into the ingredients and see how simple it is to create this irresistible delight!
Ingredients
The Caramel Apple Pie Butter Board needs simple yet rich ingredients. Here’s what you will need:
– 1 cup unsalted butter, softened
– 2 cups Granny Smith apples, peeled & diced
– 1/2 cup packed brown sugar
– 1 teaspoon ground cinnamon
– 1/4 teaspoon ground nutmeg
– 1 tablespoon fresh lemon juice
– 1/2 cup caramel sauce
– 1/2 cup chopped pecans or walnuts (optional)
– 1-2 cups toasted crostini or crisp apple slices
– Flaky sea salt for garnish
Each ingredient plays a role in creating that warm, comforting taste. The Granny Smith apples bring tartness, which balances the sweet caramel. Brown sugar adds depth, while cinnamon and nutmeg give warmth. Lemon juice brightens the mix.
When you melt the butter, it forms a creamy base. The caramel sauce drizzled over the apples adds a gooey sweetness. If you choose to add nuts, they will give a nice crunch. Finally, flaky sea salt enhances all these flavors.Prepare to impress your friends and family!
Step-by-Step Instructions
Cooking the Apples
– In a medium saucepan, combine diced Granny Smith apples, brown sugar, ground cinnamon, ground nutmeg, and fresh lemon juice.
– Cook over medium heat for 5-7 minutes. Stir occasionally until the apples are tender and caramelized.
Cooking the apples is key. The sugar helps them become sweet, while the spices add warmth. The lemon juice brightens the flavor, making it pop. You want the apples to be soft but not mushy. The perfect mix will smell heavenly!
Preparing the Butter Board
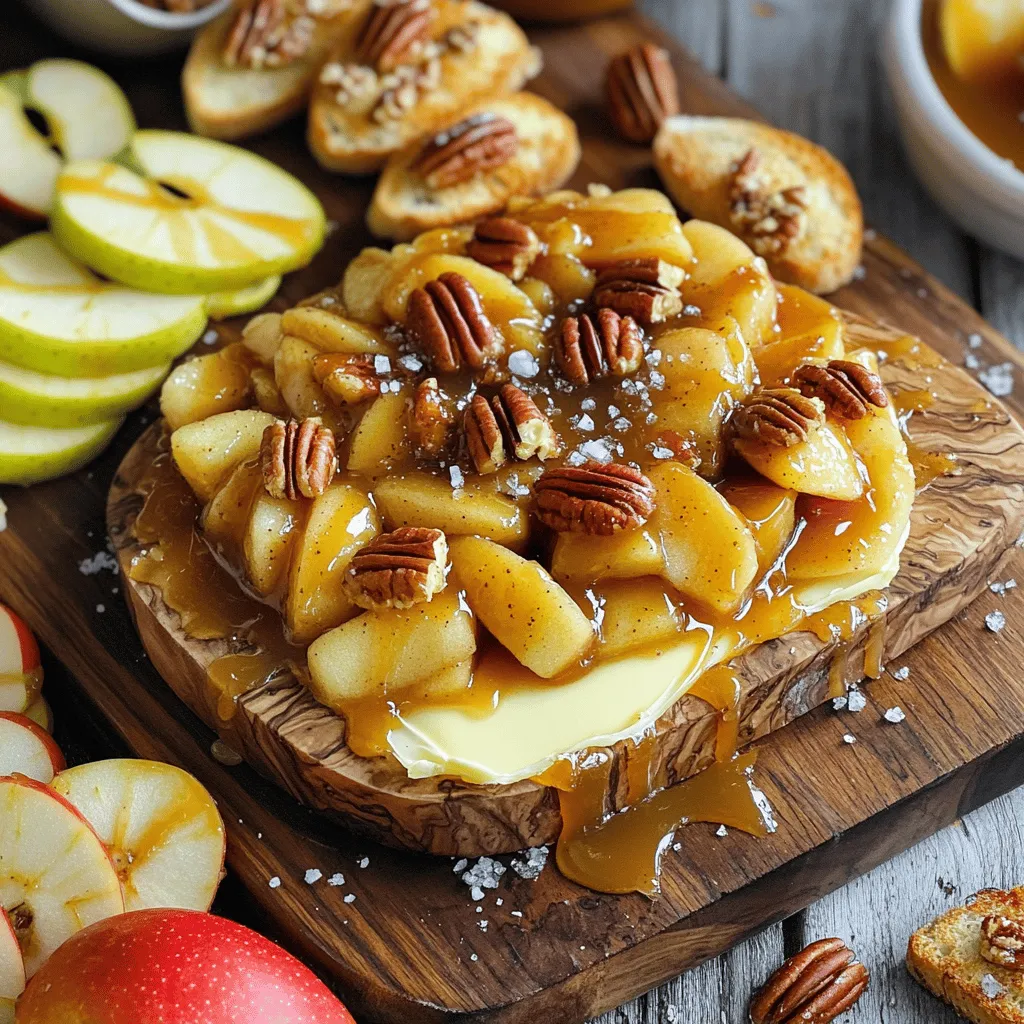
– Take a large serving board and spread softened butter evenly across the surface.
– Carefully layer the warm caramelized apples over the butter.
The butter acts as a rich base. It helps the apples stick and adds creaminess. Make sure to cover the board well. This step sets the stage for the sweet treats to come.
Final Touches
– Generously drizzle caramel sauce over the apples.
– If you like, sprinkle chopped pecans or walnuts on top. Finish with a pinch of flaky sea salt.
The caramel sauce enhances the sweetness and creates a lovely glossy finish. The nuts give a nice crunch, while the sea salt balances the flavor. This dish looks amazing and tastes even better! You can serve it with toasted crostini or crisp apple slices.
Tips & Tricks
Choosing the Best Apples
For this recipe, I recommend using tart apple varieties. Granny Smith apples work great. Their tartness balances the sweet caramel. Honeycrisp apples are another excellent choice. They add a nice crunch and flavor.
Perfecting the Butter Consistency
Make sure your butter is at room temperature. Softened butter spreads easily on the board. This creates a smooth base for the apples. If the butter is too cold, it will not spread well.
Enhancing Flavor
Feel free to experiment with spices. Add a pinch of cloves for warmth. You could also try vanilla extract for extra depth. These little tweaks can elevate the taste. Each bite can become even more delightful.

Variations
Add Chocolate
You can easily add a twist to your butter board. Incorporate chocolate chips. Just sprinkle them over the caramelized apples. You can also drizzle melted chocolate on top. This adds rich flavor and a fun look.
Nut-Free Version
Do you have nut allergies? No problem! Replace the nuts with seeds like pumpkin or sunflower seeds. If you prefer, you can skip the nuts entirely. Your butter board will still taste amazing!
Swapping Ingredients
Feel free to switch up the flavors! Use different nut butters, like almond or cashew. You can also try flavored butter spreads. Each variation brings a new taste and experience.
Storage Info
Storing Leftovers
Keep your Caramel Apple Pie Butter Board in the refrigerator. Use an airtight container to keep it fresh. This helps to maintain the flavors and textures.
Best Before
For the best taste, enjoy this treat within 2-3 days. After that, the apples may lose their crispness.
Reheating Recommendations
If you want to serve it warm, gently warm it in the microwave. Heat it in short bursts to avoid cooking the apples again. This helps to bring back the cozy, warm flavors that make this dish so special.
FAQs
What is a butter board?
A butter board is a fun and tasty way to serve butter. You take a large board and spread softened butter across it. Then, you add delicious toppings. It’s like a charcuterie board, but with butter! You can use sweet or savory toppings. The Caramel Apple Pie Butter Board uses caramelized apples, cinnamon, and nuts for a sweet treat. It’s perfect for sharing at parties or family gatherings.
Can I make this ahead of time?
Yes, you can prep this butter board ahead! Make the caramelized apples and store them in the fridge. Just keep them in an airtight container. You can spread the butter on the board when you are ready to serve. Then, layer the apples and drizzle the caramel sauce. This way, you save time and still enjoy a fresh dish.
Is the Caramel Apple Pie Butter Board suitable for vegan diets?
Yes, you can make a vegan version! For the butter, use coconut oil or vegan butter. You can also make your own caramel using coconut milk and brown sugar. This way, you keep the same flavors but make it vegan-friendly. Enjoy the same delicious taste while being kind to dietary needs!
This butter board recipe is simple, fun, and full of flavor. We started with caramelized apples and buttery goodness, then added our favorite toppings. You can adjust the recipe to fit your taste. Use different apples, add nuts, or go nut-free. Remember, store leftovers well to keep them fresh.
This dish is perfect for sharing and can fit any diet with easy swaps. Enjoy making your own version of this tasty treat!
. Prepare to impress your friends and family! - In a medium saucepan, combine diced Granny Smith apples, brown sugar, ground cinnamon, ground nutmeg, and fresh lemon juice. - Cook over medium heat for 5-7 minutes. Stir occasionally until the apples are tender and caramelized. Cooking the apples is key. The sugar helps them become sweet, while the spices add warmth. The lemon juice brightens the flavor, making it pop. You want the apples to be soft but not mushy. The perfect mix will smell heavenly! - Take a large serving board and spread softened butter evenly across the surface. - Carefully layer the warm caramelized apples over the butter. The butter acts as a rich base. It helps the apples stick and adds creaminess. Make sure to cover the board well. This step sets the stage for the sweet treats to come. - Generously drizzle caramel sauce over the apples. - If you like, sprinkle chopped pecans or walnuts on top. Finish with a pinch of flaky sea salt. The caramel sauce enhances the sweetness and creates a lovely glossy finish. The nuts give a nice crunch, while the sea salt balances the flavor. This dish looks amazing and tastes even better! You can serve it with toasted crostini or crisp apple slices. Don't forget to check out the Full Recipe for more details! For this recipe, I recommend using tart apple varieties. Granny Smith apples work great. Their tartness balances the sweet caramel. Honeycrisp apples are another excellent choice. They add a nice crunch and flavor. Make sure your butter is at room temperature. Softened butter spreads easily on the board. This creates a smooth base for the apples. If the butter is too cold, it will not spread well. Feel free to experiment with spices. Add a pinch of cloves for warmth. You could also try vanilla extract for extra depth. These little tweaks can elevate the taste. Each bite can become even more delightful. {{image_4}} You can easily add a twist to your butter board. Incorporate chocolate chips. Just sprinkle them over the caramelized apples. You can also drizzle melted chocolate on top. This adds rich flavor and a fun look. Do you have nut allergies? No problem! Replace the nuts with seeds like pumpkin or sunflower seeds. If you prefer, you can skip the nuts entirely. Your butter board will still taste amazing! Feel free to switch up the flavors! Use different nut butters, like almond or cashew. You can also try flavored butter spreads. Each variation brings a new taste and experience. Keep your Caramel Apple Pie Butter Board in the refrigerator. Use an airtight container to keep it fresh. This helps to maintain the flavors and textures. For the best taste, enjoy this treat within 2-3 days. After that, the apples may lose their crispness. If you want to serve it warm, gently warm it in the microwave. Heat it in short bursts to avoid cooking the apples again. This helps to bring back the cozy, warm flavors that make this dish so special. A butter board is a fun and tasty way to serve butter. You take a large board and spread softened butter across it. Then, you add delicious toppings. It’s like a charcuterie board, but with butter! You can use sweet or savory toppings. The Caramel Apple Pie Butter Board uses caramelized apples, cinnamon, and nuts for a sweet treat. It’s perfect for sharing at parties or family gatherings. Yes, you can prep this butter board ahead! Make the caramelized apples and store them in the fridge. Just keep them in an airtight container. You can spread the butter on the board when you are ready to serve. Then, layer the apples and drizzle the caramel sauce. This way, you save time and still enjoy a fresh dish. Yes, you can make a vegan version! For the butter, use coconut oil or vegan butter. You can also make your own caramel using coconut milk and brown sugar. This way, you keep the same flavors but make it vegan-friendly. Enjoy the same delicious taste while being kind to dietary needs! This butter board recipe is simple, fun, and full of flavor. We started with caramelized apples and buttery goodness, then added our favorite toppings. You can adjust the recipe to fit your taste. Use different apples, add nuts, or go nut-free. Remember, store leftovers well to keep them fresh. This dish is perfect for sharing and can fit any diet with easy swaps. Enjoy making your own version of this tasty treat!](https://fastmealmate.com/wp-content/uploads/2025/07/ddf5207e-0125-4d49-a59c-c6b722e82f52-300x300.webp)


![- 3 medium-sized beets, thoroughly scrubbed to remove dirt - 4 cups of mixed salad greens (a blend of arugula, spinach, and romaine for texture) - 1/2 cup goat cheese, crumbled into small pieces - 1/4 cup walnuts, toasted and roughly chopped for a crunchy contrast - 1/4 cup dried cranberries for a sweet burst of flavor - 2 tablespoons extra virgin olive oil - 1 tablespoon aged balsamic vinegar for depth - 1 teaspoon Dijon mustard to add tang - Salt and freshly ground black pepper to taste - Fresh herbs for garnish (such as chopped parsley or finely sliced chives) When measuring, use a dry measuring cup for solid ingredients like walnuts and cranberries. For liquids, a liquid measuring cup works best. Make sure to level off dry ingredients for accuracy. This helps you get the right taste and texture. Choose fresh, firm beets. Look for greens that are vibrant and crisp. For goat cheese, select a soft, creamy variety. Fresh herbs should be fragrant and bright. High-quality olive oil and balsamic vinegar make a big difference in flavor. This salad shines when you use the best ingredients. For the full recipe, check out the details above. To start, preheat your oven to 400°F (200°C). This heat helps the beets cook well. Take 3 medium-sized beets and scrub them clean to remove dirt. Wrap each beet in aluminum foil. This keeps them moist while roasting. Place the wrapped beets on a baking sheet. Roast them for 45 to 60 minutes. They are done when a fork can pierce them easily. After roasting, let them cool for a few minutes. Unwrap, peel off the skin, and cut them into wedges. In a large bowl, mix the roasted beet wedges with 4 cups of mixed salad greens. I love using arugula, spinach, and romaine for varied texture. Next, add 1/2 cup of crumbled goat cheese for creaminess. For crunch, toss in 1/4 cup of toasted walnuts. Finally, sprinkle in 1/4 cup of dried cranberries for a sweet touch. This mixture looks colorful and inviting. In a small bowl, whisk together 2 tablespoons of extra virgin olive oil and 1 tablespoon of aged balsamic vinegar. Add 1 teaspoon of Dijon mustard to give it a nice tang. Season it with salt and freshly ground black pepper to taste. Mix until all ingredients blend well. Drizzle the dressing over the salad. Toss gently so that the beets and cheese stay intact. Taste and adjust the seasoning if needed. Serve on a platter or individual plates, and garnish with fresh herbs for a beautiful finish. Enjoy this delicious and healthy dish! For the complete recipe, refer to the Full Recipe. Roasting beets is easy. Start by preheating your oven to 400°F. Wrap each beet in foil. This helps them cook evenly. Roast for 45 to 60 minutes until they’re soft. A fork should slide in with ease. Let them cool before peeling. The skin comes off easily when they are warm. This salad is great as a meal or a side. Serve it with grilled chicken or fish for protein. You can even add chickpeas for a plant-based option. Pair it with crusty bread for a complete meal. This dish shines at dinner parties or casual lunches. Presentation matters in cooking. Use a shallow bowl or a large platter for a stunning look. Start with greens, then add beet wedges. Sprinkle goat cheese and walnuts on top. Add a few dried cranberries for color. Finish with fresh herbs, like parsley or chives. This creates a bright and inviting dish that everyone will love. Check out the Full Recipe for more details on making this delightful salad! {{image_4}} To make your roasted beet goat cheese salad even more filling, you can add protein. Grilled chicken is an easy choice. It adds flavor and heartiness. You can also use chickpeas for a plant-based option. They add great texture and nutrition. If you like seafood, try adding shrimp or smoked salmon. Each protein brings a new twist to your dish. While the balsamic dressing is delicious, you can mix things up. A honey mustard dressing pairs well with the sweet beets. For a creamier option, try a yogurt-based dressing. You could even use a simple lemon vinaigrette for a fresh taste. Each dressing will change the flavor profile and keep things exciting. This salad is versatile! In spring, you might add fresh peas or asparagus. In summer, ripe tomatoes or cucumbers can brighten the dish. Fall brings apples or pears, adding sweetness and crunch. In winter, consider using roasted squash or pomegranate seeds for color and flavor. These swaps keep your salad fresh and aligned with the season. To keep your roasted beet goat cheese salad fresh, store it in an airtight container. Make sure to separate the dressing from the salad to prevent sogginess. You can keep the salad in the fridge for up to three days. If you want to enjoy it later, store the leftovers without the dressing. This way, the flavors stay bright and fresh. Understanding how long your ingredients last can help prevent waste. Here’s a quick guide: - Roasted Beets: Last about 5 days in the fridge when stored properly. - Mixed Greens: Usually stay fresh for 3 to 5 days if kept cool and dry. - Goat Cheese: Can last up to a week after opening, but check for any signs of spoilage. - Walnuts: Store in an airtight container. They stay fresh for about 1 month. - Dried Cranberries: These can last up to a year if kept in a cool, dry place. Typically, you won’t need to reheat this salad. It tastes best cold. If you do want to warm it slightly, use a microwave. Heat on low for about 10-15 seconds. Be careful not to overdo it, as it may change the texture and flavor. Enjoy your salad fresh for the best experience! For the full recipe, check out the section above. Yes, you can use canned beets. They save time and are easy to find. However, fresh roasted beets give a better taste and texture. Canned beets may be softer and less vibrant. If you choose canned beets, rinse them under cold water to remove excess brine. Slice them into wedges and add them directly to your salad. If you need a substitute for goat cheese, try feta or ricotta cheese. Feta has a similar tangy flavor. Ricotta is creamier and milder. You can also use dairy-free cheese for a different taste. Cream cheese can work too, but it is denser. Choose based on your flavor preference and dietary needs. To make this salad vegan, skip the goat cheese. Replace it with vegan cheese or avocado for creaminess. Use maple syrup or agave in the dressing instead of honey. Check that your balsamic vinegar is vegan, as some brands may add honey. This way, you keep all the flavors while making it plant-based. You can find the full recipe here: [Full Recipe]. In this post, I covered how to create a delicious beet salad. We explored the best ingredients, measuring tips, and quality recommendations. You learned step-by-step instructions for prepping beets, assembling the salad, and making the dressing. I shared tips for perfect roasting, serving, and presentation. We also discussed variations like protein options and seasonal swaps. Lastly, I provided storage info and answered common questions. Enjoy crafting your own unique beet salad, and let your creativity shine!](https://fastmealmate.com/wp-content/uploads/2025/06/466f3db8-9be5-4235-af51-29d034f8c92e-768x768.webp)

![Fresh figs are the star of this jam. Choose ripe, sweet figs for the best taste. Look for figs that are soft to the touch and have a deep color. First, wash the figs under cold water. Then, remove the stems and cut them into quarters. This helps them break down easily while cooking. You should have about 2 pounds of prepared figs for this recipe. Sugar is key in making fig jam thick and sweet. It not only adds sweetness but also helps the jam set. As the figs cook, they release their natural juices. The sugar dissolves and mixes with these juices, forming a syrup. This syrup thickens as it cooks, giving your jam that perfect spreadable texture. Use 1 cup of granulated sugar for this recipe. Adding lemon juice brightens the flavor. It helps balance the sweetness of the figs. You’ll need the juice of one lemon, which is about 2 tablespoons. Vanilla extract adds a warm, sweet note. Use just 1/2 teaspoon for a subtle hint. A pinch of sea salt (1/4 teaspoon) enhances all the flavors. Together, these ingredients create a delightful taste in your fig jam. For the full recipe, check out the Sweet Fig Bliss Jam. First, gather your fresh figs. You need 2 lbs of ripe figs. Remove the stems and cut them into quarters. Place them in a large bowl. Add 1 cup of granulated sugar. Squeeze the juice of one lemon into the bowl. This adds a nice zing to the jam. Pour in 1/2 teaspoon of vanilla extract and 1/4 teaspoon of sea salt. Toss everything together gently. Let it sit for about 30 minutes. This resting time helps the figs release their juices, making a sweet syrup. Now, transfer your fig mixture to a medium pot. Place the pot on medium heat. Stir the mixture often. You want the sugar to dissolve fully and the figs to soften. This should take around 10 minutes. Once everything is mixed well, turn the heat to medium-high. Bring the mixture to a gentle boil. Keep stirring regularly for 20 to 30 minutes. Watch closely as it thickens. It’s ready when it looks spreadable and thick. To check the jam's thickness, take a spoonful and place it on a chilled plate. Let it cool for a minute. Run your finger through the jam. If it holds its shape, it’s done. If it’s too runny, cook it a few more minutes. Once it’s just right, take the pot off the heat. Let it cool for about 10 minutes. Then, ladle the warm jam into clean jars. Seal them tightly while they are warm. This helps create a vacuum seal. Allow the jars to cool completely at room temperature. Enjoy your homemade fig jam! To make your fig jam shine, try adding a bit of spice. A dash of cinnamon can bring warmth. You can also add fresh herbs like rosemary for an earthy twist. Another great tip is to let your figs sit with sugar for 30 minutes. This helps to draw out the juices. The more juice, the better the flavor. Don't skip the lemon juice; it balances the sweetness and brightens the taste. If your jam is too runny, don’t worry! Just cook it a bit longer. Keep stirring to prevent burning. Test the consistency by spooning some onto a chilled plate. If it runs, give it more time. If you overcooked it and it’s too thick, you can fix it! Add a little water and reheat gently, stirring to combine. This will bring back some moisture without losing flavor. Sterilizing jars is key to keeping your jam fresh. Start by washing them in hot, soapy water. Rinse well and place them in a large pot of boiling water. Let them boil for 10 minutes. This kills any germs. You can also use your oven. Preheat it to 225°F (110°C) and place clean jars inside for 10-15 minutes. Always fill jars with warm jam to create a good seal. This keeps your fig jam safe and tasty for weeks! Don’t forget to check the [Full Recipe] for all the details! {{image_4}} You can spice up your fig jam easily. Adding a touch of cinnamon gives warmth. Just a pinch can change the flavor. Try adding rosemary for a fresh twist. This herb adds a nice depth. Experimenting with spices makes your jam unique. Mixing figs with other fruits offers fun flavors. You can try adding apples or pears. Their sweetness pairs well with figs. Another option is to use berries. Blueberries or raspberries create a bright taste. This mix can surprise your taste buds. You get more variety and fun in every jar. You can adjust sweetness based on your taste. If granulated sugar is not your choice, try honey or maple syrup. They give a different flavor and health benefits. For lower sugar, use stevia or monk fruit. These options keep the jam sweet without extra calories. Just remember to balance the flavors as you go. You can find the full recipe [here](#). Store your fig jam in clean, sterilized jars. Make sure to seal the jars tightly. I recommend using glass jars, as they help keep the jam fresh. Place the jars in the refrigerator right after they cool down. This keeps your jam tasty and safe to eat. Fig jam lasts about 2-3 weeks in the fridge. If you want to keep it longer, consider freezing it. When frozen, fig jam can last for up to a year. Just remember to label the jars with the date. This way, you’ll know exactly when you made it. Look for signs of spoilage before using your fig jam. If you see mold on the surface, throw it away. If the jam smells off or has an unusual color, it’s best not to eat it. Another sign is if the jam has a change in texture or consistency. Always trust your senses. If something seems off, it’s better to be safe. Yes, you can use frozen figs. Thaw them first and drain any excess liquid. Frozen figs can still taste great. They might be softer, but they will work well in your jam. Just follow the same steps as with fresh figs. Making jam without pectin lets the fruit shine. You get a pure fig flavor. It’s also a simple process. You only need figs, sugar, and a few extras. Plus, you can control the sweetness better. This method gives a lovely, spreadable texture. Leftover fig jam has many uses. Spread it on toast or pancakes for a sweet treat. You can swirl it into yogurt or oatmeal. Use it as a filling for pastries. It also pairs well with cheese on a charcuterie board. The options are endless! For more ideas, check out the Full Recipe for inspiration. This guide shows you how to make fig jam from start to finish. We explored ingredients like fresh figs, sugar, and flavor enhancers. Step-by-step, you learned to prepare and cook the mixture. Tips helped you fix issues and enhance texture. Variations allowed you to play with spices and fruits. Remember to store your jam safely for the best shelf life. Making fig jam can be fun and rewarding. Enjoy sharing your delicious creation with friends and family!](https://fastmealmate.com/wp-content/uploads/2025/06/9fb41919-1a88-423c-ae1c-6a52e554671e-768x768.webp)
