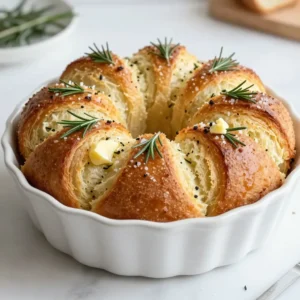
Rosemary Garlic Pull-Apart Bread Irresistible Delight


If you’re craving a warm, flavorful bread that pulls apart effortlessly, you’ve come to the right place! My Rosemary Garlic Pull-Apart Bread is a delicious treat that will wow your family and friends. With its fragrant rosemary and rich garlic flavor, each bite is an irresistible delight. Let’s dive into this simple recipe that not only satisfies your taste buds but also fills your home with an amazing aroma. Are you ready to bake?
Why I Love This Recipe
- Homemade Goodness: This pull-apart bread is made from scratch, filling your kitchen with the delightful aroma of fresh garlic and rosemary.
- Perfect for Sharing: Its design encourages guests to pull apart pieces, making it a fun and interactive addition to any meal or gathering.
- Versatile Flavors: Customize it with additional herbs or toppings, allowing you to tailor the taste to suit your preferences or seasonal ingredients.
- Easy to Make: With straightforward steps, even beginner bakers can create a stunning bread that looks and tastes impressive.
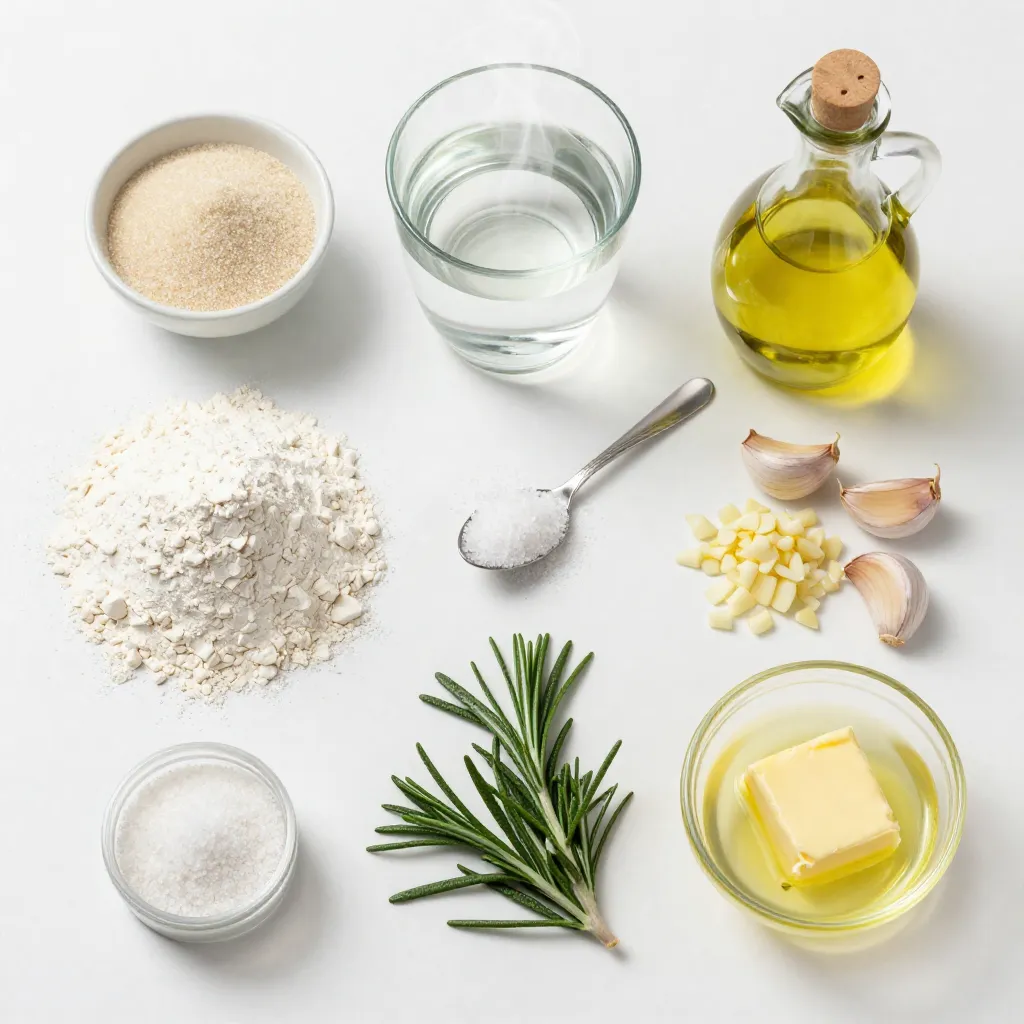
Ingredients
To make Rosemary Garlic Pull-Apart Bread, you need simple, fresh ingredients. Each item plays a key role in the flavor and texture of the bread. Here’s the complete list of what you will need:
– 2 teaspoons active dry yeast
– 1 cup warm water (110°F or 43°C)
– 3 tablespoons granulated sugar
– 2 tablespoons extra virgin olive oil
– 3 cups all-purpose flour, plus extra for dusting
– 1 teaspoon fine sea salt
– 4 cloves garlic, finely minced
– 2 tablespoons fresh rosemary, finely chopped (or 1 tablespoon dried)
– 1 tablespoon melted unsalted butter
– ½ teaspoon garlic powder (optional, for extra flavor)
– Flaky sea salt for finishing
These ingredients work together to create a fluffy, aromatic bread. The garlic and rosemary add depth, while the yeast helps the dough rise. Each bite gives you a warm, savory flavor that pairs well with many meals.
Feel free to play with the amounts a little. If you love garlic, add more! If you want a stronger rosemary flavor, go for it. Cooking should be fun and personal. Enjoy the process and share this delightful bread with friends and family!
Step-by-Step Instructions
Preparing the Yeast Mixture
– Combine warm water, sugar, and yeast in a bowl.
– Allow to sit until frothy. This shows the yeast is active and ready.
Mixing the Dough
– Add olive oil, flour, salt, garlic, and rosemary to the yeast mixture.
– Stir until a shaggy dough forms. It should feel slightly sticky but manageable.
Kneading and First Rise
– Transfer the dough to a floured surface.
– Knead until smooth and elastic, about 5-7 minutes.
– Place the dough in a greased bowl. Cover it and let it rise until it doubles, around 1 hour.
Shaping the Bread
– Preheat your oven to 375°F (190°C).
– Punch down the risen dough gently.
– Divide the dough into balls, about 1-2 inches in size, and dip them in melted butter.
– Arrange the balls snugly in a greased bundt or cake pan.
Second Rise and Baking
– Let the dough balls rise again, about 30 minutes.
– Bake until golden brown and sounds hollow when tapped, about 25-30 minutes.
Tips & Tricks
Achieving the Perfect Dough Texture
How do you know when the dough is ready?
The dough is ready when it is smooth and elastic. You should not feel any stickiness. After kneading, it should spring back when you poke it.
How can you adjust flour for humidity?
In humid weather, you may need less flour. Start with the recommended amount and add more only if the dough feels too sticky. Always measure flour correctly for best results.
Enhancing Flavor
What are some additional herbs and spices?
You can use thyme, oregano, or basil for extra taste. Each herb adds a unique twist to the bread. Experiment with your favorites to find the best mix.
Should you use fresh vs. dried ingredients?
Fresh ingredients offer a stronger flavor. Dried herbs are convenient and can work well, but fresh rosemary gives the best aroma. Use what you have, but fresh is often best for this bread.
Presentation Tips
What are some serving suggestions?
Serve the bread warm on a rustic wooden board. This makes it look inviting. Add a small bowl of olive oil and balsamic vinegar for dipping. It adds flavor and style to your meal.
What dipping sauces can you use?
Pair your bread with garlic butter or herbed olive oil. These sauces enhance the bread’s taste. You can also try a simple marinara or a spicy aioli for a fun twist.
Pro Tips
- Use Fresh Ingredients: Whenever possible, opt for fresh rosemary and garlic for a more vibrant flavor in your bread.
- Let the Dough Rise Properly: Ensure your dough rises in a warm, draft-free area to achieve the best texture and volume.
- Experiment with Flavors: Feel free to add other herbs or spices to the dough for a unique twist, such as thyme or oregano.
- Serve Warm: For the best experience, serve the bread warm right out of the oven, paired with olive oil and balsamic vinegar for dipping.
Variations
Herb Variations
You can use many herbs in this bread. Think about using thyme or oregano. Fresh herbs give a bright taste. Dried herbs can work too, but fresh is best. Mixing flavors can create a unique twist. Combine rosemary with sage for a warm flavor. Each herb brings its own magic to the bread.
Cheese Addition
Adding cheese can make this bread even better. Great choices are mozzarella or cheddar. You can also try feta for a salty kick. To add cheese, cut it into small pieces. Mix it into the dough when you combine the garlic and herbs. You can also sprinkle cheese on top before baking for a cheesy crust.
Gluten-Free Option
If you need a gluten-free bread, use gluten-free flour blends. Look for blends that have a mix of flours, like rice and almond. You may need to add more liquid for the right dough texture. Rising times may also change. The dough might need an extra 10-15 minutes to rise. Keep an eye on the dough; it should double in size.
Storage Info
Storing Leftovers
To keep your Rosemary Garlic Pull-Apart Bread fresh, wrap it tightly in plastic wrap. This method helps keep moisture in and air out. You can also place the wrapped bread in a zip-top bag. For best results, store it at room temperature. Avoid the fridge, as it can dry out the bread. If you have a lot left, consider freezing it.
Reheating Instructions
When you want to enjoy the bread again, reheat it in the oven. Preheat your oven to 350°F (175°C). Place the bread on a baking sheet and cover it with foil. Heat for about 10-15 minutes. This method keeps the bread warm and soft. You can also flash freeze the pull-apart bread if you want to store it longer. Slice the bread, wrap each piece tightly, and freeze. This way, you can enjoy a quick treat later.
Serving After Storage
Leftover bread can be great for many things. You can slice it and make garlic bread. Just spread some butter and herbs on each slice. You can also use it to create delicious sandwiches. The flavors from the rosemary and garlic will add a tasty twist. If you’re feeling creative, turn it into croutons for salads or soups.
FAQs
How long does it take to make Rosemary Garlic Pull-Apart Bread?
It takes about 1 hour and 55 minutes to make this bread. The prep time is 15 minutes. The rest of the time is for rising and baking. The dough needs to rise for 1 hour, and then it rises again for 30 minutes. Finally, bake it for 25 to 30 minutes until golden brown.
Can I make the dough in advance?
Yes, you can make the dough in advance. For an overnight rise, mix the dough and let it rise in the fridge. This slows the rise but adds flavor. Just cover it well to prevent it from drying out. When ready, let it sit at room temperature for about 30 minutes before shaping.
What can I serve with Rosemary Garlic Pull-Apart Bread?
This bread pairs well with many meals. Serve it with a bowl of olive oil and balsamic vinegar for dipping. It goes great with soups, salads, or as a side for pasta. You can also enjoy it as a snack on its own.
Can I substitute ingredients if I don’t have them?
Yes, you can substitute some ingredients. Use honey instead of sugar. You can swap fresh rosemary for dried, using less. If you don’t have all-purpose flour, bread flour works too. For garlic, use garlic powder in a pinch. Just keep the same amounts for best results.
This article covers how to make delicious Rosemary Garlic Pull-Apart Bread. We explored all the key ingredients, step-by-step instructions, and valuable tips for perfecting your dough. You learned various ways to add flavor and texture. Remember, you can always customize the recipe to fit your tastes. Enjoy your bread fresh or store it for later. Finding enjoyment in baking can turn a simple recipe into a delightful experience. Dive in, get creative, and enjoy every bit
Rosemary Garlic Pull-Apart Bread
Ingredients
- 2 teaspoons active dry yeast
- 1 cup warm water (110°F or 43°C)
- 3 tablespoons granulated sugar
- 2 tablespoons extra virgin olive oil
- 3 cups all-purpose flour, plus extra for dusting
- 1 teaspoon fine sea salt
- 4 cloves garlic, finely minced
- 2 tablespoons fresh rosemary, finely chopped (or 1 tablespoon dried)
- 1 tablespoon melted unsalted butter
- 0.5 teaspoon garlic powder (optional, for extra flavor)
- 1 pinch flaky sea salt for finishing
Instructions
- In a medium mixing bowl, combine the warm water, sugar, and active dry yeast. Stir gently to dissolve, then let the mixture sit undisturbed for 5-10 minutes until it becomes frothy and bubbly, indicating that the yeast is active.
- Add the olive oil, all-purpose flour, fine sea salt, minced garlic, and chopped rosemary to the yeast mixture. Using a wooden spoon or spatula, stir the ingredients until a shaggy dough begins to form.
- Lightly flour a clean work surface and transfer the dough onto it. Knead the dough for about 5-7 minutes, until it is smooth and elastic. You may need to add a little extra flour if the dough is too sticky.
- Place the kneaded dough in a bowl lightly greased with olive oil. Cover it with a damp cloth or plastic wrap, and let it rise in a warm, draft-free area for about 1 hour, or until it has doubled in size.
- While the dough is rising, preheat your oven to 375°F (190°C).
- Once the dough has risen, punch it down gently to release the air. Divide the dough into equal-sized pieces, rolling each piece into a ball approximately 1-2 inches in diameter.
- In a small bowl, melt the unsalted butter. Dip each dough ball in the melted butter, ensuring they are coated, then arrange them snugly in a greased bundt pan or a round cake pan, creating layers.
- Sprinkle garlic powder (if using) and flaky sea salt over the arranged dough balls. Optionally, add a sprinkle of extra chopped rosemary on top for added aroma and flavor.
- Cover the pan with a clean kitchen towel and allow the dough to rise again for about 30 minutes, or until they puff up slightly.
- Bake the pull-apart bread in the preheated oven for 25-30 minutes, or until the top is golden brown and the bread sounds hollow when tapped gently.
- Allow the bread to cool in the pan for about 5 minutes before gently removing it. Serve warm, inviting guests to pull apart the fluffy, herb-infused pieces and enjoy.

. To store leftover stuffed shells, let them cool first. Place them in an airtight container. Make sure to separate layers with parchment paper to avoid sticking. You can keep them in the fridge for up to three days. You can freeze these stuffed shells for later enjoyment. Follow these steps: - Cool Completely: Allow the cooked shells to cool fully. - Wrap Well: Use plastic wrap or aluminum foil to wrap the shells tightly. - Use a Freezer Bag: Place the wrapped shells in a freezer-safe bag. Remove as much air as possible. - Label and Date: Write the date on the bag. This helps you track how long they’ve been frozen. To thaw, move the shells from the freezer to the fridge. Let them thaw overnight. For quicker thawing, place them in cold water for about two hours. Reheating stuffed shells is easy. Here are a few methods: - Oven: Preheat your oven to 350°F (175°C). Place the shells in a baking dish, cover with foil, and heat for 20 minutes. Remove the foil for the last five minutes to crisp the cheese. - Microwave: Place a few shells on a microwave-safe plate. Cover them with a damp paper towel. Heat in short bursts of 30 seconds until warm. - Skillet: Heat a skillet over medium heat. Add a splash of water and place the shells in the skillet. Cover with a lid and steam for about 5 minutes. These methods keep the flavors strong and the cheese melty. Enjoy your tasty leftovers! You can serve Philly Cheesesteak Stuffed Shells with a crisp salad. A simple green salad works well. You can also add a side of garlic bread. Garlic bread pairs nicely with the rich flavors of the shells. Marinara sauce makes a tasty dip for the shells too. Try adding pickles or roasted vegetables for a crunchy side. Yes, you can make these stuffed shells ahead of time. Prepare them fully and store in the fridge. Cover the baking dish tightly with plastic wrap. You can also freeze them before baking. Just thaw them in the fridge overnight before baking. This saves time and is great for busy days. The stuffed shells are done when the cheese is bubbly. You should see a golden brown color on top. Use a food thermometer; the center should reach 165°F. If you want to be sure, cut one open. The filling should be hot and melted. Keep an eye on them during the last 10 minutes of baking. In this blog post, I shared how to make Philly Cheesesteak Stuffed Shells. We covered the ingredients, cooking steps, and tips for perfect results. I also included storage info and answered common questions. Making these stuffed shells is easy and fun. You can tweak the recipe to fit your taste. Don’t be afraid to try new flavors. Enjoy your delicious creation and share it with others!](https://fastmealmate.com/wp-content/uploads/2025/06/11767e89-6c0f-469f-be11-885f6dce3423-768x768.webp)

 for more details and tips! Cooling your sauce is key before storing it. If you skip this step, you risk spoilage. Let your sauce cool to room temperature for about 30 minutes. This helps keep bacteria away. For storage, use airtight containers. Glass jars or plastic containers work well. Fill them, leaving some space at the top. This room allows for expansion during freezing. You can keep your tomato sauce in the fridge for about one week. After that, it may lose flavor and freshness. Always check for signs of spoilage. If you see mold or notice off smells, toss it out. Safety first! Freezing is a great option for long-term storage. You can pour your cooled sauce into freezer bags or containers. Make sure to label them with the date. This keeps your freezer organized. Aim to use your sauce within six months for the best taste. After this time, it may lose flavor. When ready to use, thaw it overnight in the fridge or heat it directly from the freezer on low heat. For homestyle canned tomato sauce, I recommend using Roma tomatoes. They have fewer seeds and thicker flesh, which gives you a rich sauce. Heirloom tomatoes are also great. They offer unique flavors, but they can be juicier. Choose what you like best! Yes, you can use canned tomatoes. They are convenient and save time. Canned tomatoes are often picked at peak ripeness, giving you good flavor. However, they may contain added salt or preservatives. This can change the taste of your sauce. Always check the label before using! If your sauce is too thin, there are easy ways to fix it. First, let it simmer longer. This allows excess water to evaporate. You can also add tomato paste. It thickens the sauce and adds more flavor. Another option is to use a blender for a smoother texture. Try these methods to get the right thickness! In this blog post, I shared how to make homestyle canned tomato sauce. We covered key ingredients like ripe tomatoes, onion, and olive oil. I provided step-by-step instructions for preparing, sautéing, and simmering. You learned tips for perfecting the sauce and several tasty variations. Finally, I gave guidelines for storage and answered common questions. Making your sauce allows for creativity and customization. Enjoy the process and the flavors you create!](https://fastmealmate.com/wp-content/uploads/2025/07/d3d80814-eb56-4e2c-a9cc-6b13653587fc-768x768.webp)