
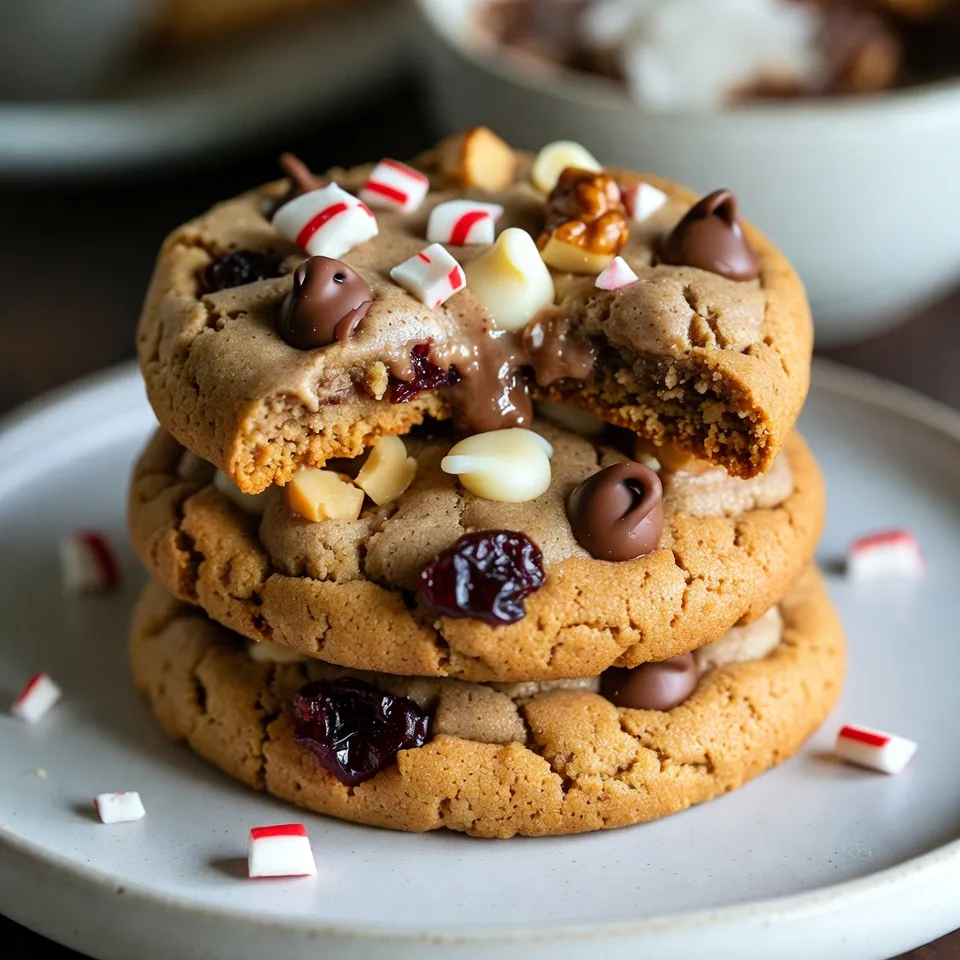
Christmas Kitchen Sink Cookies Delightful Holiday Treat


Get ready to bake the most festive treat of the season: Christmas Kitchen Sink Cookies! These cookies combine all your favorite flavors into one delicious bite. Packed with oats, chocolate, peppermint, and nuts, they are perfect for holiday gatherings or cozy nights in. Join me as we explore simple steps to create these delightful bites and tips for making them even better. Your holiday cookie game will never be the same!
Why I Love This Recipe
- Festive Flavor Explosion: These cookies combine the best holiday flavors, from rich chocolate to refreshing peppermint, making every bite a seasonal delight.
- Texture Galore: The mix of oats, nuts, and dried fruit creates a delightful texture, ensuring each cookie is satisfying to munch on.
- Customizable Treats: With the versatility to swap in your favorite mix-ins, these cookies can be tailored to suit any taste preference or dietary need.
- Perfect for Sharing: These cookies make a great gift or party treat, spreading joy and sweetness during the holiday season.
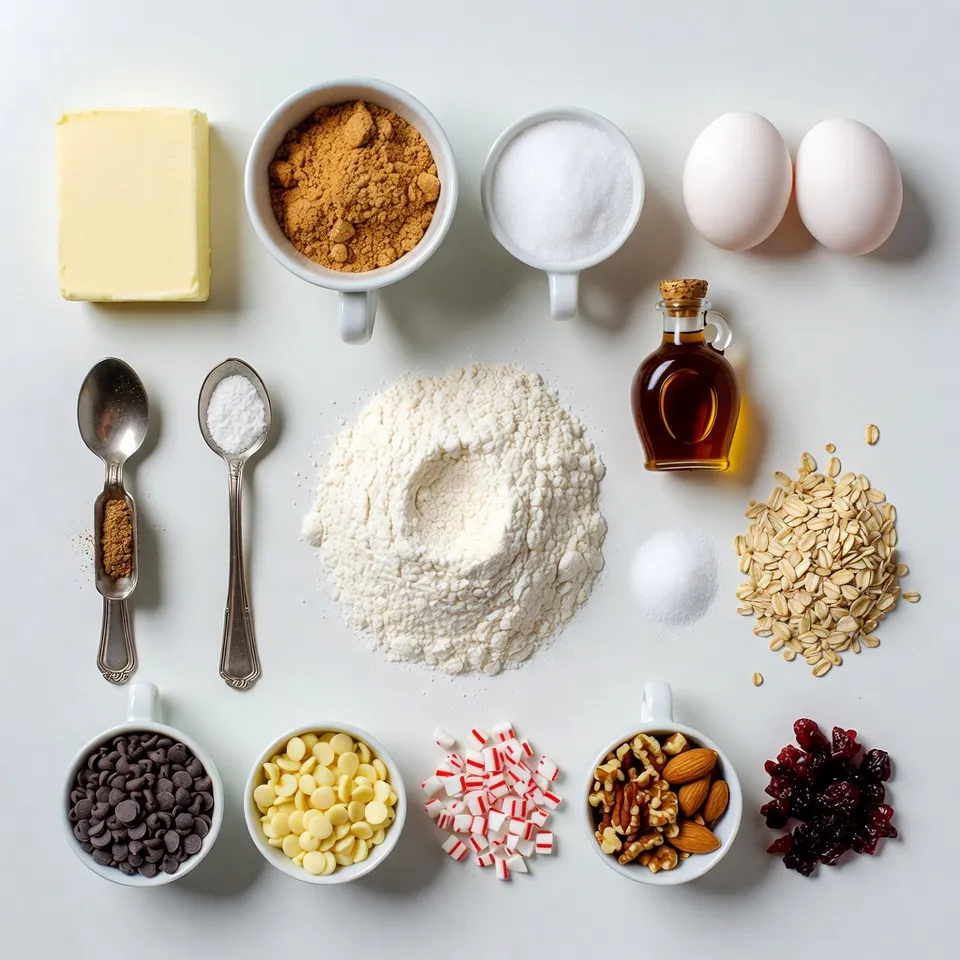
Ingredients
Essential Ingredients
– 1 cup unsalted butter
– 1 cup packed brown sugar
– 1/2 cup granulated sugar
– 2 large eggs
– 2 teaspoons pure vanilla extract
For these Christmas Kitchen Sink Cookies, you need a mix of essential items. Butter is key to making the cookies soft and rich. Use unsalted butter for better control over the saltiness. Brown sugar and granulated sugar add sweetness, while the eggs help bind everything. Vanilla extract gives a warm flavor that makes each bite special.
Dry Ingredients
– 3 cups all-purpose flour
– 1 teaspoon baking soda
– 1/2 teaspoon fine sea salt
Next, gather your dry ingredients. All-purpose flour is the base of the dough. Baking soda helps the cookies rise. Fine sea salt balances the sweetness. Be sure to whisk these together well. This step ensures even mixing and helps avoid clumps.
Fun Add-ins
– 1 cup rolled oats
– 1 cup semi-sweet chocolate chips
– 1/2 cup creamy white chocolate chips
– 1/2 cup crushed peppermint candies
– 1 cup mixed nuts
– 1/2 cup dried cranberries
Now comes the fun part! Add-ins make these cookies unique. Rolled oats give a nice texture. Semi-sweet and white chocolate chips add sweet bursts. Crushed peppermint candies bring a festive crunch. Mixed nuts provide a lovely nutty flavor. Dried cranberries add a hint of tartness. Mix these carefully into your dough. This step is where the magic happens! Each bite will be different and delicious.
Step-by-Step Instructions
Preheat the Oven and Prepare Baking Sheet
– Set the oven to 350°F (175°C).
– Line a baking sheet with parchment paper.
Cream the Butter and Sugars
Start with softened butter. In a large bowl, mix it with brown sugar and granulated sugar. Use an electric mixer on medium speed. Beat it until light and fluffy, about 3-5 minutes.
Add Eggs and Vanilla
Next, crack in the eggs. Add them one at a time, mixing after each. Then stir in the pure vanilla extract. This adds a nice sweetness.
Mix Dry Ingredients
In a separate bowl, whisk together the all-purpose flour, baking soda, and fine sea salt. This step ensures even mixing of the dry ingredients.
Combine Wet and Dry Mixtures
Slowly add the dry mixture to your wet mixture. Stir gently until just combined. Be careful not to overmix. This keeps your cookies tender and soft.
Fold in the Add-ins
Now, it’s time for the fun part! Carefully fold in the rolled oats, semi-sweet chocolate chips, creamy white chocolate chips, crushed peppermint candies, mixed nuts, and dried cranberries. Make sure everything is evenly mixed. This gives the cookies their delightful ‘kitchen sink’ texture.
Shape and Bake
Using a tablespoon or cookie scoop, drop rounded dollops of dough onto your prepared baking sheet. Leave about 2 inches between each mound. This allows them to spread while baking.
Cool and Serve
Bake the cookies in the oven for 10-12 minutes. Once they are lightly golden on the edges and the center is soft, remove them from the oven. Let them cool on the baking sheet for 5 minutes. After that, transfer the cookies to a wire rack to cool completely. This helps them set perfectly!
Tips & Tricks
Baking Tips for Perfect Cookies
To make the best Christmas Kitchen Sink Cookies, avoid overmixing the dough. When you mix the wet and dry ingredients, do it just until combined. This helps keep the cookies soft and chewy. Monitor baking time closely for soft centers. Bake until the edges are lightly golden, but the middle should look slightly underbaked. This will ensure a nice, gooey texture.
Serving Suggestions
These cookies pair well with hot cocoa or a glass of milk. The warm drinks complement the sweetness of the cookies. For an extra festive touch, garnish with crushed peppermint candies on top. This adds color and a delightful crunch.
Varying Your Recipe
Feel free to experiment with different nuts or dried fruits in the mix. You can use walnuts, pecans, or even hazelnuts. For dried fruits, consider using raisins or cherries. Each combination brings a new flavor and keeps things interesting.
Pro Tips
- Chill the Dough: If you have time, refrigerate the cookie dough for about 30 minutes before baking. This helps the flavors meld and results in thicker cookies that hold their shape better.
- Experiment with Mix-Ins: Feel free to customize the mix-ins based on your preferences. Substitute the nuts for your favorite seeds or add in different types of dried fruits for a unique twist!
- Use a Cookie Scoop: For uniform cookies, use a cookie scoop. This ensures even baking and gives your cookies a professional look.
- Check for Doneness: Remember that cookies will continue to cook on the baking sheet after being removed from the oven. Aim for a slightly underbaked center for the ultimate chewy texture.
Variations
Alternative Ingredients
You can switch up the chocolate chips in your cookies. Use butterscotch chips or dark chocolate if you like. For a fun twist, try adding peanut butter chips. If you need a gluten-free option, use almond flour or a gluten-free flour blend. This keeps the cookies soft and tasty.
Seasonal Variations
To make your cookies even more festive, toss in holiday spices. A pinch of cinnamon or nutmeg adds warmth and cheer. You can also add seasonal fruits like diced apples or chopped dates. These will give your cookies a unique twist and burst of flavor.
Cookie Size Options
You can make mini cookies for cute bites. Use a teaspoon to scoop small amounts of dough. Bake them for about 8-10 minutes. If you want larger cookies, use a larger scoop. Just be ready to bake them a bit longer, around 12-15 minutes. Keep an eye on them so they don’t overbake.
Storage Info
How to Store Cookies
To keep your Christmas Kitchen Sink Cookies fresh, use an airtight container. I recommend placing parchment paper between layers of cookies. This keeps them soft and prevents them from sticking. Store your cookies at room temperature for the best taste. They will stay fresh for several days this way.
Freezing Instructions
Freezing your cookies is a great option if you want to save some for later. Start by letting the cookies cool completely. Then, place them in a single layer on a baking sheet. Freeze them for about an hour. After that, transfer the cookies to a freezer-safe bag or container. They can last for up to three months in the freezer. To thaw, remove them from the freezer and let them sit at room temperature for about 30 minutes.
Shelf Life
At room temperature, these cookies last about five to seven days. Keep them stored in an airtight container for the best results. If you notice they are getting hard, a slice of bread in the container can help keep them soft. This is a simple trick to maintain their chewy texture!
FAQs
What are Kitchen Sink Cookies?
Kitchen sink cookies are a fun mix of many ingredients. They include different types of chocolate, nuts, and even dried fruits. You can add anything you like! This cookie style gets its name because you can toss in whatever you have on hand, just like a kitchen sink. The result? A chewy, sweet cookie that has a little bit of everything.
Can I make these cookies ahead of time?
Yes, you can! You can prepare the dough and store it in the fridge for up to three days. Just cover it tightly with plastic wrap. When you’re ready to bake, scoop the dough onto a tray and bake as usual. If you want to make them even earlier, you can freeze the dough for up to three months. Just thaw it in the fridge before baking.
What variations can I try for Kitchen Sink Cookies?
You can get creative with kitchen sink cookies! Here are some ideas:
– Swap semi-sweet chocolate chips for dark chocolate or butterscotch chips.
– Use different nuts like pecans or cashews.
– Try adding dried fruits like raisins or apricots.
– Mix in spices like cinnamon for a warm flavor.
The options are endless, so feel free to experiment with your favorites!
How do I prevent cookies from spreading too much?
To keep your cookies from spreading too much, try these tips:
– Make sure your butter is softened, but not melted.
– Chill the dough for at least 30 minutes before baking.
– Use parchment paper to line your baking sheet.
– Space the cookies at least two inches apart on the tray.
These steps can help the cookies hold their shape while baking.
Are these cookies suitable for gifting?
Absolutely! These cookies make great gifts. To present them nicely, stack them in a festive tin or a decorative box. You can also wrap them in cellophane tied with a ribbon. Add a little note for a personal touch. These treats not only look good but taste great too, making them perfect for sharing during the holidays!
This guide covered every step to make delicious Kitchen Sink Cookies. We reviewed the essential ingredients, drying methods, and fun add-ins you can try. Remember, the best cookies come from mixing creativity with care. Don’t be afraid to switch things up with flavors or sizes. You now have the tips to bake perfect cookies every time. Enjoy sharing your tasty treats with family and friends. Baking is about fun and love. Happy bakin
Christmas Kitchen Sink Cookies
Ingredients
- 1 cup unsalted butter, softened to room temperature
- 1 cup brown sugar, packed tightly
- 0.5 cup granulated sugar
- 2 large eggs
- 2 teaspoons pure vanilla extract
- 3 cups all-purpose flour
- 1 teaspoon baking soda
- 0.5 teaspoon fine sea salt
- 1 cup rolled oats
- 1 cup semi-sweet chocolate chips
- 0.5 cup creamy white chocolate chips
- 0.5 cup crushed peppermint candies
- 1 cup mixed nuts, coarsely chopped
- 0.5 cup dried cranberries
Instructions
- Preheat the Oven: Begin by preheating your oven to 350°F (175°C). Line a large baking sheet with parchment paper to prevent sticking.
- Cream the Butters: In a large mixing bowl, use an electric mixer to cream together the softened butter, packed brown sugar, and granulated sugar. Beat on medium speed until the mixture is light and fluffy, about 3-5 minutes.
- Incorporate Eggs and Vanilla: Crack the eggs into the bowl one at a time, mixing thoroughly after each addition to ensure they’re well combined. Then, stir in the pure vanilla extract to infuse sweetness.
- Combine Dry Ingredients: In a separate bowl, whisk together the all-purpose flour, baking soda, and fine sea salt. Gradually, add the dry mixture to the wet mixture, stirring gently until the flour is just incorporated. Avoid overmixing to keep the cookies tender.
- Add the Fun Ingredients: Carefully fold in the rolled oats, semi-sweet chocolate chips, creamy white chocolate chips, crushed peppermint candies, mixed nuts, and dried cranberries. Ensure everything is evenly distributed for that perfect ‘kitchen sink’ texture!
- Shape the Cookies: Using a tablespoon or a cookie scoop, drop rounded dollops of dough onto the prepared baking sheet, leaving space (about 2 inches) between each mound to allow for spreading during baking.
- Bake to Perfection: Place the baking sheet in the preheated oven and bake for 10-12 minutes. Keep an eye on them; you want the edges to be lightly golden while the center remains soft and slightly underbaked.
- Cool and Enjoy: Once baked, remove the cookies from the oven and let them cool on the baking sheet for 5 minutes. Afterward, transfer them to a wire rack to cool completely—this will help them set to the perfect texture.

![- 2 cups all-purpose flour - 1 teaspoon baking powder - 1/2 teaspoon baking soda - 1/2 teaspoon salt - 1 teaspoon ground cinnamon - 3/4 cup granulated sugar - 1/2 cup packed brown sugar - 1/2 cup unsalted butter, melted - 2 large eggs, at room temperature - 1 teaspoon pure vanilla extract - 1 cup plain yogurt (or sour cream) - 2 cups apples, peeled and diced (approximately 2 medium apples) - 1/2 cup old-fashioned rolled oats When you measure your ingredients, use proper tools. For dry ingredients, a dry measuring cup is best. Press flour down slightly to avoid gaps. For liquids, use a liquid measuring cup and check at eye level. This ensures you get the right amounts for recipes. Accurate measurements lead to better results. You can switch some ingredients if needed. Use whole wheat flour for a healthier option. If you want a dairy-free muffin, try almond or coconut yogurt instead. Apples are key, but you can use pears or peaches too. For a nutty touch, add chopped walnuts or pecans. Always feel free to adjust! Make sure to check the [Full Recipe] for detailed instructions and baking times! Preheating the Oven Start by preheating your oven to 350°F (175°C). This step is key for even baking. Preparing the Muffin Tin Line a standard muffin tin with paper liners. You can also spray each cup with non-stick cooking spray. This helps the muffins release easily after baking. Dry Mixture Preparation In a large bowl, whisk together 2 cups of all-purpose flour, 1 teaspoon of baking powder, 1/2 teaspoon of baking soda, 1/2 teaspoon of salt, and 1 teaspoon of ground cinnamon. Mix well and set it aside. Sugar and Butter Mixture In another bowl, combine 3/4 cup of granulated sugar, 1/2 cup of packed brown sugar, and 1/2 cup of melted butter. Stir until this mixture is smooth and creamy. Wet and Dry Ingredient Integration Gently pour the sugar-butter mixture into the bowl with the dry ingredients. Use a spatula to mix just until combined. Be careful not to overmix, as this keeps the muffins light and fluffy. Folding in Apples Next, fold in 2 cups of peeled and diced apples. Use a spatula to distribute them evenly without overmixing the batter. Preparing the Crumb Topping In a small bowl, mix 1/2 cup of old-fashioned rolled oats with 1/4 cup of flour, 1/4 cup of brown sugar, and 1/4 cup of melted butter. Blend until it becomes crumbly. This topping adds a nice crunch. Filling Muffin Liners Spoon the muffin batter into the lined muffin cups. Fill each about two-thirds full. This allows room for the muffins to rise while baking. Baking Instructions Place the muffin tin in your preheated oven. Bake for 20 to 25 minutes. To check if they are done, insert a toothpick into the center of a muffin. It should come out clean. These steps will guide you to make delicious apple crumb muffins. For more details, check the Full Recipe. Preventing Overmixing To keep your muffins light, mix gently. After adding the wet ingredients to the dry, stir just until combined. If you see some flour lumps, that’s okay. Overmixing can make your muffins dense, not fluffy. Ensuring Proper Baking Time Baking time is key. Set your timer for 20 minutes. Check doneness by inserting a toothpick in the center. If it comes out clean, they’re ready. If not, check every minute. Be careful not to open the oven too often, as it can affect the rise. Adding a pinch of nutmeg can boost flavor. You might also try mixing in some chopped walnuts or pecans. They add a nice crunch and depth. If you love spice, a dash of ginger pairs well with apple too. Presentation makes your muffins shine. Arrange them on a rustic wooden platter. A light dusting of powdered sugar adds charm. For an extra touch, place slices of fresh apples around the muffins. This creates a warm and inviting look. {{image_4}} Choosing the right apple makes a big difference. Sweet apples like Fuji or Honeycrisp work well. They add a nice balance of flavor. Tart apples like Granny Smith give a refreshing zing. You can mix different apples for a unique taste. This adds layers of flavor to your muffins. Adding nuts or dried fruits can enhance your muffins. Chopped walnuts or pecans add a nice crunch. Dried cranberries or raisins bring a burst of sweetness. Just fold them in with the apples to keep it simple. Consider adding spices for extra flavor. A pinch of nutmeg gives warmth. You can also try cardamom for a unique twist. Just remember to balance the spices so they don’t overpower the apples. You can make these muffins gluten-free. Substitute all-purpose flour with a gluten-free blend. This works well and keeps the texture light. Just ensure your baking powder is gluten-free too. If you want to cut back on sugar, try using applesauce. It keeps the muffins moist and sweet. You can also use less butter or switch to a lighter oil. This way, you enjoy a tasty treat without the guilt. For the complete recipe, check out the Full Recipe section. Store your leftover muffins in an airtight container. This keeps them fresh for up to four days. If you want to keep them longer, consider freezing them. To freeze muffins, let them cool completely. Wrap each muffin in plastic wrap and place them in a freezer bag. They can last up to three months in the freezer. When you're ready to enjoy, just take them out and let them thaw at room temperature. Reheat muffins in the oven for the best taste. Preheat your oven to 350°F (175°C). Place the muffins on a baking sheet and warm them for about 10 minutes. You can also use the microwave. Heat each muffin for about 20-30 seconds. Enjoy them warm for the best flavor! For more details on making these muffins, check out the Full Recipe. You can use sour cream instead of yogurt. It gives a similar texture and flavor. Another option is to use buttermilk, which makes the muffins moist. Yes, you can make mini muffins. Just adjust the baking time to 12-15 minutes. Keep an eye on them, so they don’t overbake. Check for doneness by inserting a toothpick into the center of a muffin. If it comes out clean, they are ready. You can also lightly press the top; it should spring back. These muffins stay fresh for about 3 days at room temperature. Store them in an airtight container to keep them soft. Yes, you can prepare the batter the night before. Cover it and store it in the fridge. When you're ready, bake them fresh in the morning. For the full recipe, check the earlier section. You’ll find all the steps and ingredients needed to make these tasty Apple Crumb Muffins. You now have all the key steps to make delicious Apple Crumb Muffins. We covered ingredients, preparation, and baking instructions to ensure your muffins turn out great. Remember to follow the tips for flavor and presentation. With these easy instructions, you can enjoy warm muffins at home. Whether you share them or keep them all, they are sure to impress. Happy baking!](https://fastmealmate.com/wp-content/uploads/2025/07/c8d25f82-9d23-458d-8a15-e1a22d6eabb0-768x768.webp)
![For this no-bake strawberry cheesecake cups, you will need: - 1 cup graham cracker crumbs - 2 tablespoons granulated sugar - 1/2 cup unsalted butter, melted - 1 cup cream cheese, softened - 1/2 cup powdered sugar - 1 teaspoon pure vanilla extract - 1 cup heavy whipping cream - 1 cup fresh strawberries, diced - Additional fresh strawberries, sliced for topping You can swap some ingredients if needed: - Use chocolate cookies instead of graham crackers for a twist. - Swap granulated sugar with brown sugar for a deeper flavor. - Low-fat cream cheese works well if you're watching calories. - Coconut cream can replace heavy cream for a dairy-free option. - If fresh strawberries are not available, try using raspberries or blueberries. When using fresh strawberries, choose ripe ones for the best taste. Look for bright red berries without any green spots. Wash them gently and pat them dry before dicing. If you want to enhance their flavor, sprinkle a little sugar on the diced strawberries and let them sit for about 10 minutes. This draws out the juices and creates a sweet syrup, making your cheesecake cups even more delicious. For the full recipe and step-by-step instructions, check out the [Full Recipe]. To make the crust, start with a mixing bowl. Add 1 cup of graham cracker crumbs and 2 tablespoons of granulated sugar. Pour in 1/2 cup of melted unsalted butter. Mix it well until the crumbs look like wet sand. This will give your crust a great flavor and texture. Next, take about two tablespoons of this crumb mixture and spoon it into each cup. Use your fingers or the back of a spoon to press it down gently. This step helps form a solid base for your cheesecake. For the cream cheese filling, grab another bowl. Beat 1 cup of softened cream cheese with an electric mixer. Keep mixing until it is smooth and creamy. Once it looks good, add 1/2 cup of powdered sugar and 1 teaspoon of pure vanilla extract. Mix until everything is silky and combined. In a separate bowl, whip 1 cup of heavy cream. Use the mixer until stiff peaks form. Be careful not to over-whip it. You want the cream to be light and fluffy. Now, gently fold the whipped cream into the cream cheese mixture. Use a spatula and mix until just combined. This folding keeps the mixture airy. Spoon the cream cheese filling over the crust in each cup. Fill them about three-quarters full. Use the spatula to smooth the tops. Next, top each cup with diced strawberries. Press them gently into the cream cheese layer. This step spreads their flavor throughout the dessert. For the final touch, add a dollop of remaining cream cheese mixture on top. Garnish each cup with a fresh strawberry slice. Now, place the cups in the refrigerator. Chill them for at least 2 hours. This step lets the layers set and enhances the flavors. Enjoy your no-bake strawberry cheesecake cups! For the full recipe, refer to the section above. To get a smooth and creamy filling, make sure your cream cheese is at room temperature. If it’s too cold, it will clump. Use an electric mixer to beat the cream cheese until it is silky. Slowly add in the powdered sugar and vanilla while mixing. This step helps blend everything perfectly. When whipping the heavy cream, stop when you see stiff peaks. Over-whipping makes it grainy. Finally, gently fold the whipped cream into the cream cheese mixture. This keeps it light and fluffy. Serve these cheesecake cups in clear glass dishes. This way, everyone can see the beautiful layers. For a fun twist, try adding a layer of chocolate sauce or a fruit puree. You can also sprinkle crushed graham crackers on top for added crunch. If you want to impress your guests, use fresh mint leaves as a garnish. It adds a nice pop of color and flavor. You’ll need a few basic tools. A mixing bowl is key for combining ingredients. An electric mixer is best for whipping the cream and mixing the filling. Use a spatula to gently fold mixtures together. For serving, small glass cups or jars work wonderfully. They show off the layers and make for a pretty presentation. Lastly, have a measuring cup and spoons on hand for accuracy. Don't forget to check out the Full Recipe to perfect your technique! {{image_4}} You can switch up the flavor of your no-bake cheesecake cups. Try chocolate by adding cocoa powder to the cream cheese mix. For mango, blend fresh mango into the cream cheese before mixing. You can even use lemon zest for a bright, citrusy kick. These simple changes keep your dessert fun and fresh. Want a lighter cheesecake? Use low-fat cream cheese instead of regular cream cheese. You can also swap out heavy cream for Greek yogurt. This keeps the taste rich but lowers the fat. Using honey or agave syrup instead of sugar can add sweetness without the extra calories. Layering is key to a stunning dessert. Start with a crust layer, then add your creamy filling. You can add a layer of fruit between the cream cheese and whipped cream. This adds texture and flavor. For a fun twist, try layering different fillings. You could alternate between plain and flavored mixes. This creates a beautiful, colorful effect in your cups. For the full recipe, check out the [Full Recipe]. To store your no-bake strawberry cheesecake cups, use airtight containers. Place the cups in the fridge right after they set. This keeps them fresh and tasty. If you make them ahead of time, cover each cup with plastic wrap or a lid. This helps avoid any weird smells from other foods in the fridge. These cheesecake cups last in the fridge for about 3 to 5 days. After that, the texture may change. You want to enjoy them when they are at their best. Always check for any signs of spoilage before serving. If you see any mold or the smell seems off, it’s best to throw them away. You can freeze these cheesecake cups if you want to save them for later. First, let them chill in the fridge for at least 2 hours. After that, cover each cup tightly with plastic wrap and foil. This extra layer helps prevent freezer burn. You can freeze them for up to 2 months. When you’re ready to enjoy, take them out and let them thaw in the fridge overnight. Remember, the texture may change a bit after thawing. For the full recipe, check back for more details! No-Bake Strawberry Cheesecake Cups last about three days in the fridge. Store them in an airtight container to keep them fresh. You want to enjoy the creamy texture and berry flavor at their best. After three days, the strawberries may lose their crispness and the filling might not be as fresh. Yes, you can use frozen strawberries. Just make sure to thaw and drain them first. This helps avoid extra moisture in your cups. Frozen strawberries can still taste great and add sweetness. However, fresh strawberries give a better texture and brightness to the dish. If you need a substitute for heavy cream, you can use coconut cream or Greek yogurt. Coconut cream adds a rich flavor, while Greek yogurt keeps it light. You may also mix milk with butter for a quick fix. Use a 3:1 ratio of milk to butter for a creamy texture. Just remember, these swaps may change the overall taste slightly. You learned how to make no-bake strawberry cheesecake cups. We covered ingredients, tips, and storage methods. Remember to choose fresh berries for the best taste. Use my tips for a creamy texture and fun flavor twists. Store them right to enjoy later. With these steps, you can craft a delicious treat easily. Embrace your creativity, and have fun making these cheesecake cups!](https://fastmealmate.com/wp-content/uploads/2025/06/462f42fe-2b9d-4e42-aace-05b4fd02c510-768x768.webp)