
Easy Mocha Fudge Quick and Decadent Sweet Treat


Love coffee and chocolate? Then you’ll adore this Easy Mocha Fudge! This quick treat blends rich chocolate, strong coffee, and soft cream for a dessert that’s both simple and decadent. With just a few ingredients, you can whip up this sweet snack in no time. Let’s dive into the steps to create this delightful fudge that will impress everyone. Get ready to indulge!
Why I Love This Recipe
- Decadent Flavor: This fudge combines the rich taste of chocolate with a delightful coffee kick, making it a perfect treat for both chocolate and coffee lovers.
- Quick and Easy: With just a few ingredients and minimal prep time, this fudge is a hassle-free dessert that anyone can make.
- Customizable: Feel free to add your favorite nuts or even a sprinkle of sea salt for an extra layer of flavor!
- Perfect for Gifting: This fudge makes a lovely homemade gift, especially when wrapped beautifully, adding a personal touch to any occasion.
Ingredients
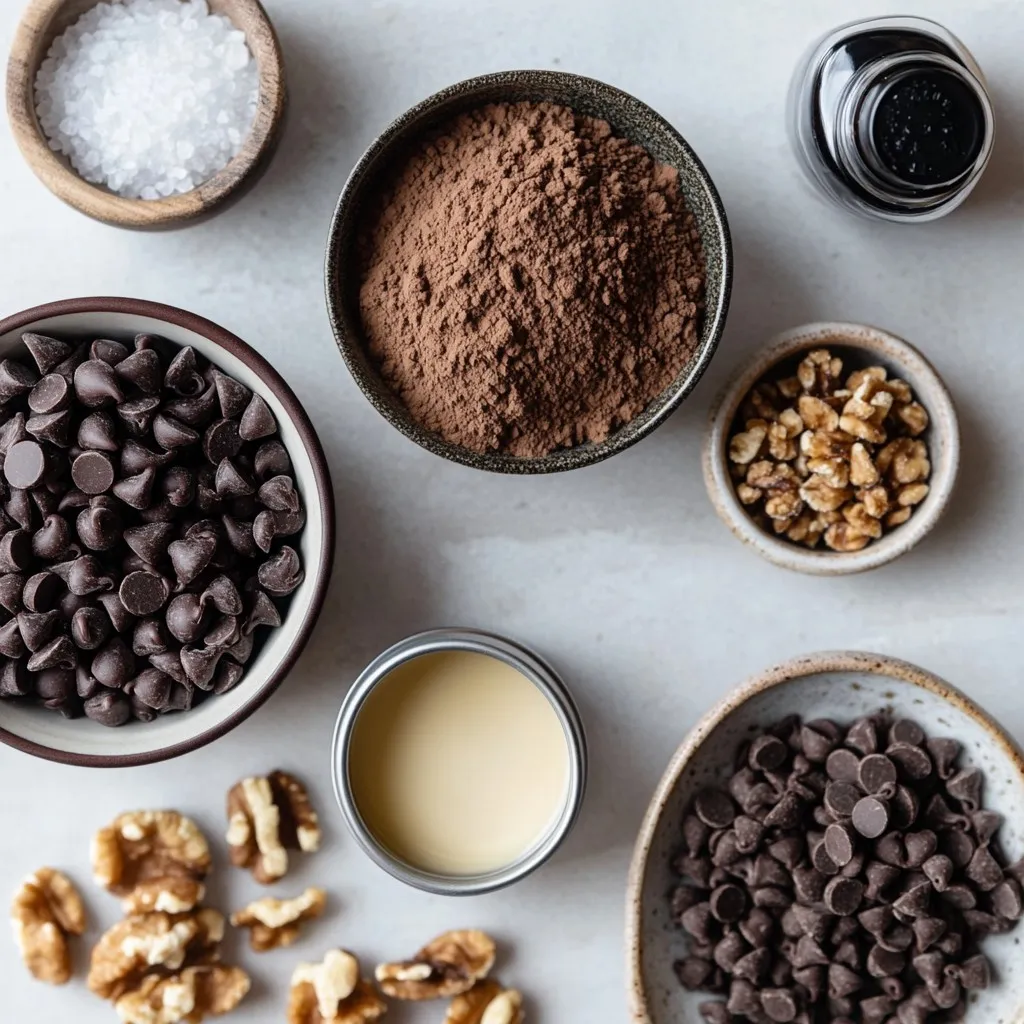
To create Easy Mocha Fudge, you need a few simple ingredients. Here’s what you will need:
– 1 cup semi-sweet chocolate chips
– 1 cup sweetened condensed milk
– 2 tablespoons unsweetened cocoa powder
– 1 tablespoon instant coffee granules
– 1 teaspoon pure vanilla extract
– 1/4 teaspoon salt
– 1/2 cup walnuts or pecans, chopped (optional)
These ingredients blend together to make a rich and creamy fudge. The chocolate chips give it a sweet, smooth base. Sweetened condensed milk adds the perfect creamy texture. Cocoa powder boosts the chocolate flavor, while coffee granules enhance the mocha taste. Vanilla extract adds warmth and depth. The salt balances the sweetness, making each bite perfect. You can add nuts for crunch if you like.
Equipment Needed
You will also need a few tools to make this fudge:
– 8×8 inch square baking pan
– Parchment paper
– Medium-sized saucepan
– Spatula
– Sharp knife
Make sure you have everything ready before you start. This will help you whip up your fudge in no time!
Step-by-Step Instructions
Preparing the Baking Pan
Start by taking an 8×8 inch baking pan. Line it with parchment paper. Let some paper hang over the edges. This helps you lift the fudge out later. Make sure the paper covers the bottom completely.
Melting the Ingredients
Next, grab a medium saucepan. Add the semi-sweet chocolate chips, sweetened condensed milk, cocoa powder, instant coffee, vanilla extract, and salt. Place the pan over low heat. Stir the mix all the time. This stops it from burning. Keep stirring until the chocolate melts and the mix looks smooth. This should take about 5 to 7 minutes.
Incorporating Nuts and Pouring Mixture
If you like nuts, chop up walnuts or pecans. Once the fudge mix is smooth, fold in the nuts gently. Make sure they spread evenly in the mix. Now, carefully pour the fudge into your prepared baking pan. Use a spatula to spread it out flat.
Chilling the Fudge
Put the pan in the fridge now. Let it chill for at least 2 hours. This time helps the fudge set completely. If you want, you can leave it longer for a firmer texture.
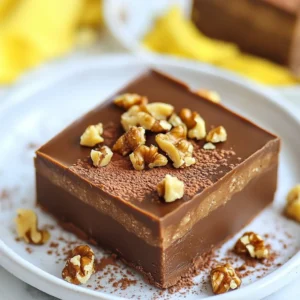
Cutting and Serving
Once the fudge has set, lift it out using the parchment paper. Place it on a cutting board. Use a sharp knife to cut it into neat squares. You can serve it right away or store it for later.
Tips & Tricks
Perfecting Texture and Consistency
To make sure your mocha fudge is creamy, use good chocolate chips. Semi-sweet chips melt well and add a nice shine. Stir the mixture often as it heats up. This keeps it from getting lumpy or burnt. Aim for a smooth blend that flows easily. If you want a softer fudge, reduce the cooking time slightly. If you prefer a firmer bite, chill it longer after pouring.
Flavor Enhancements
You can boost the taste of your fudge in fun ways. Try adding a pinch of cinnamon or a dash of nutmeg. These spices bring warmth and depth to the mocha flavor. For a twist, use flavored coffee granules, like hazelnut or vanilla. You can also mix in a bit of espresso powder for a stronger coffee taste. Each addition changes the fudge in a special way.
Presentation Tips
Make your fudge look as good as it tastes. Serve it on a pretty plate or a stylish stand. You can dust the top with cocoa powder or sprinkle chocolate shavings for a fancy touch. For gifts, wrap each square in shiny foil. This not only looks nice but also makes a sweet present. A little effort in presentation makes your treat stand out, whether at a party or for a special friend.
Pro Tips
- Use Quality Chocolate: The flavor of your fudge largely depends on the quality of the chocolate chips you choose. Opt for high-quality semi-sweet chocolate for the best results.
- Customize Your Nuts: Feel free to experiment with different types of nuts in your fudge. Pecans and almonds also make delicious alternatives to walnuts.
- Chill for Perfect Texture: Allowing the fudge to chill for a full 2 hours will ensure it sets properly and achieves that perfect fudgy texture.
- Creative Presentation: Elevate your fudge presentation by serving it on a decorative platter and garnishing with a sprinkle of sea salt or a drizzle of caramel sauce.

Variations
Nut-Free Option
If you want to skip the nuts, that’s perfectly fine! You can leave them out without losing flavor. This makes the fudge safe for people with nut allergies. Just follow the original recipe as is, and enjoy a smooth texture that everyone can love.
Different Flavor Profiles
Get creative with flavors! You can swap the instant coffee for espresso powder for a stronger kick. Want something sweeter? Use milk chocolate chips instead of semi-sweet. Add a pinch of cinnamon for warmth or even a dash of peppermint extract for a festive twist. The choices are endless!
Chocolate Swirls or Add-Ins
For a fun twist, try adding chocolate swirls. Melt some extra chocolate and drizzle it over the fudge mixture before it sets. Use a toothpick to swirl it into the fudge. You could also mix in dried fruit or even crushed cookies for extra texture. These fun add-ins make your fudge even more special!
Storage Info
Best Storage Practices
To keep your mocha fudge fresh, store it in an airtight container. Line the container with parchment paper for easy removal. Place a piece of wax paper between layers if stacking. This helps keep the squares from sticking together.
Shelf Life of Mocha Fudge
When stored correctly, mocha fudge lasts for up to two weeks at room temperature. If you place it in the fridge, it can last for about three weeks. Just remember, the fudge may become a bit firmer in the cold.
Freezing Instructions
If you want to save some for later, freezing is a great option. Cut the fudge into squares and wrap each piece in plastic wrap. Then place the wrapped squares in a freezer-safe bag or container. They can stay good for up to three months in the freezer. To enjoy, simply thaw them in the fridge overnight before serving.
FAQs
Can I use milk chocolate instead of semi-sweet?
Yes, you can use milk chocolate. It will make the fudge sweeter and creamier. The taste will change, but it’s still delicious. If you enjoy sweeter treats, give it a try!
How do I know when the fudge is set?
You will know the fudge is set after it chills for at least 2 hours. It should feel firm to the touch. If you press gently, it shouldn’t leave a dent. If it feels soft, let it chill longer.
Can I add other ingredients, like dried fruit?
Absolutely! Dried fruit can add a nice chew and extra flavor. Try adding chopped dried cherries or cranberries. Just make sure to keep the total mix-ins balanced so the fudge stays smooth.
What’s the best way to cut fudge?
To cut fudge neatly, use a sharp knife. Run the knife under hot water first, then wipe it dry. This helps the knife slice through without sticking. Cut into small squares for easy serving.
How do I make this recipe vegan-friendly?
To make this fudge vegan, swap the sweetened condensed milk for a plant-based version. Use dairy-free chocolate chips, and check that your cocoa powder is vegan. This way, you can enjoy the fudge without animal products!
This blog post covered how to make delicious mocha fudge. We discussed the key ingredients, step-by-step instructions, and helpful tips for great texture. You learned about flavor variations and proper storage for lasting freshness.
Now you can impress your friends and family with tasty fudge. Enjoy making this treat and explore different flavor options. Your homemade fudge will delight everyon
Mocha Magic Fudge
Ingredients
- 1 cup semi-sweet chocolate chips
- 1 cup sweetened condensed milk
- 2 tablespoons unsweetened cocoa powder
- 1 tablespoon instant coffee granules
- 1 teaspoon pure vanilla extract
- 1 quarter teaspoon salt
- 0.5 cup walnuts or pecans, chopped (optional)
Instructions
- Begin by lining an 8x8 inch square baking pan with parchment paper, leaving some overhanging on the sides to facilitate easy removal after the fudge has set.
- In a medium-sized saucepan, combine the semi-sweet chocolate chips, sweetened condensed milk, unsweetened cocoa powder, instant coffee granules, pure vanilla extract, and salt. Place the saucepan over low heat.
- Stir the mixture continuously to ensure even heating and to prevent burning, until the chocolate chips are completely melted and the mixture has transformed into a smooth, glossy consistency. This should take about 5-7 minutes.
- If you are using chopped walnuts or pecans, gently fold them into the fudge mixture at this stage, making sure they are evenly distributed throughout the mixture.
- Carefully pour the luscious fudge mixture into the prepared baking pan, smoothing it out evenly with a spatula to ensure a flat surface.
- Place the pan in the refrigerator and allow the fudge to chill for at least 2 hours, or until it has firmed up completely.
- Once set, use the parchment overhang to lift the fudge out of the pan. Cut it into neat squares with a sharp knife for serving.
![This Chocolate Tres Leches Cake uses simple ingredients. Each one works together to create a rich flavor. - 1 cup all-purpose flour - 1/2 cup unsweetened cocoa powder - 1 1/2 teaspoons baking powder - 1/2 teaspoon baking soda - 1/4 teaspoon salt - 1/2 cup unsalted butter, softened - 1 cup granulated sugar - 3 large eggs, at room temperature - 1 teaspoon vanilla extract - 1/2 cup buttermilk, at room temperature - 1 cup sweetened condensed milk - 1 cup evaporated milk - 1 cup whole milk - 1 cup heavy cream, chilled - 2 tablespoons powdered sugar (for whipped cream) - Chocolate shavings or cocoa powder for garnish (optional) These ingredients create a soft cake soaked in a sweet milk mixture. The heavy cream topping adds a light and airy touch. Using room temperature ingredients helps everything mix well. I recommend using fresh milk for the best taste. For a unique twist, sprinkle chocolate shavings on top before serving. Enjoy making this delicious treat! For the complete recipe, check the [Full Recipe]. Start by preheating your oven to 350°F (175°C). Grab a 9x13 inch baking pan. Grease it with butter to make sure your cake won’t stick. Dust the pan lightly with flour. This quick step helps the cake come out clean and perfect. In a medium bowl, sift together the all-purpose flour, cocoa powder, baking powder, baking soda, and salt. This helps mix everything well. In a large bowl, use an electric mixer to beat the softened butter and sugar until it is light and fluffy. This takes about 3-5 minutes. Then, add the eggs one at a time. Mix well after each egg. Finally, stir in the vanilla extract. Slowly fold the dry ingredients into the wet mixture. Alternate with the buttermilk. Start and finish with the dry mix. Be gentle; mix until you see no flour streaks. Pour the batter into your prepared pan. Smooth the top with a spatula. Bake for 30-35 minutes. Check if it’s done by inserting a toothpick into the center; it should come out clean. Let it cool for 10 minutes, then turn it out onto a wire rack. In a separate bowl, mix the sweetened condensed milk, evaporated milk, and whole milk. Whisk this mixture until blended. This will soak into your cake, making it rich and moist. Once the cake is cool, poke holes in the top with a fork. Pour the tres leches mixture evenly over the cake. This helps the cake absorb the milk. Cover it with plastic wrap and let it soak for at least one hour. This step is key for flavor. In a large bowl, beat the chilled heavy cream with powdered sugar until stiff peaks form. Spread this whipped cream over the soaked cake. For a nice touch, sprinkle chocolate shavings or cocoa powder on top. Refrigerate the cake for at least 2 hours before serving. This waiting time mixes the flavors and makes each bite delicious. For the full recipe, check the details in the earlier sections. To get a moist cake, follow a few simple steps. Start by using room temperature ingredients. This helps the batter mix well. Next, do not overmix the batter. Mix until just combined. Overmixing adds air, which can dry the cake out. Finally, bake the cake just until a toothpick comes out clean. If you bake too long, the cake will dry out. Soaking the cake properly is key. First, let the cake cool completely before soaking it. This helps the cake absorb the milk mixture better. Use a fork to poke holes all over the top of the cake. This allows the milk to seep in. Then, pour the tres leches mixture evenly over the cake. Let it sit for at least one hour. For best results, cover it with plastic wrap and refrigerate. This ensures the cake soaks up all the flavor. Whipped cream adds a light touch to the cake. Start by chilling your mixing bowl and beaters. This keeps the cream cold and helps it whip better. Beat the heavy cream until it forms stiff peaks. This means it should hold its shape when you lift the whisk. Add the powdered sugar gradually for sweetness. Spread the whipped cream gently over the soaked cake. For a fun twist, add chocolate shavings or a sprinkle of cocoa powder on top. For the complete recipe, check the Full Recipe section. {{image_4}} You can make a gluten-free version of this cake easily. Just swap the all-purpose flour for a gluten-free flour blend. Look for a blend that works well for baking. This change keeps the cake moist and delicious. You may also add a pinch of xanthan gum to help the texture. To create a vegan chocolate tres leches cake, replace the eggs with flax eggs. Mix 1 tablespoon of ground flaxseed with 2.5 tablespoons of water for each egg. For the milk mixture, use coconut milk, almond milk, or any plant-based milk. Use coconut cream instead of heavy cream for topping. This way, you keep the rich flavor while going dairy-free. You can also play with flavors to make this cake unique. For a minty twist, add mint extract to the batter and whipping cream. Just a teaspoon will do. If you love coffee, add espresso powder to the batter for a rich, coffee flavor. You can also fold in chocolate chips for more texture and taste. Each variation brings a new fun experience to this classic dessert. For the full recipe, check the source to get all the details you need. To keep your Chocolate Tres Leches Cake fresh, always store it in the fridge. Use an airtight container to prevent it from drying out. If you have not yet topped it with whipped cream, store the cream separately. This keeps the cake moist and the cream fluffy. When stored properly, the cake lasts about 3 to 5 days in the fridge. The flavors will continue to blend, making each bite even better. Always check for any signs of spoilage, like a strange smell or changes in texture. You can freeze the cake if you want to keep it longer. Wrap it tightly in plastic wrap, then place it in a freezer-safe bag. This way, it can last up to 3 months in the freezer. When you're ready to enjoy it, let it thaw in the fridge overnight. Add the whipped cream topping just before serving for the freshest taste. For the complete recipe, you can refer to the Full Recipe section. Yes, you can! This cake is great for planning ahead. You can bake the cake, soak it, and then chill it in the fridge. It tastes even better after a day. Just cover it well so it stays fresh. Tres leches cake is soaked in three types of milk. Regular cake usually has no soaking. Tres leches is moist and rich. Regular cake is often lighter. The extra milk makes tres leches creamy and sweet. To keep the cake from being too soggy, let it cool completely first. After soaking, cover the cake and chill it. Serve it within a few days. This way, it stays moist without getting overly wet. Yes, you can use cake mix. Just follow the package instructions for baking. Make sure to adjust the milk mixture. This way, you get the rich flavor of tres leches without starting from scratch. You can use sweetened condensed milk, evaporated milk, and whole milk. If you want, you can try alternatives like almond milk or oat milk. Each choice will give a different taste, but they will still work well. For the full recipe, check out the Heavenly Chocolate Tres Leches Cake recipe above! In this post, we covered the essential steps to make a Chocolate Tres Leches Cake. You learned about the key ingredients and how to mix them. We detailed how to bake the cake and prepare the soaking mix. You got tips on keeping your cake moist and explored tasty variations. Finally, we discussed storing leftovers to enjoy later. Baking is fun and rewarding. Try this recipe to impress friends and family. Enjoy every delicious bite!](https://fastmealmate.com/wp-content/uploads/2025/06/83784e58-e7f6-4d4b-aebc-0bf8177d26de-768x768.webp)

![- 1 cup unsalted butter, melted - 1 ½ cups brown sugar - 2 large eggs - 1 teaspoon vanilla extract - Zest and juice of 1 lemon To make these strawberry lemon blondies, we start with some key players. The butter gives a rich base, while brown sugar adds sweetness and depth. Eggs bind everything together, and vanilla extract enhances flavor. The zest and juice of one lemon bring a bright, zesty punch to the mix. - 2 cups all-purpose flour - 1 teaspoon baking powder - ½ teaspoon salt Next, we mix in our dry ingredients. All-purpose flour provides structure. Baking powder helps the blondies rise, making them light and fluffy. A little salt balances the sweetness. - 1 cup fresh strawberries, diced - Optional: Powdered sugar for dusting Finally, we fold in the star of the show: fresh strawberries! Their juicy sweetness pairs perfectly with the lemon. If you want a touch of elegance, consider dusting the blondies with powdered sugar before serving. This simple step adds a nice visual touch and a hint of extra sweetness. For the complete recipe, refer to the [Full Recipe]. First, set your oven to preheat at 350°F (175°C). This step is key to getting that perfect bake. Next, grab a 9x9 inch baking pan. Grease it well and line it with parchment paper. Leave some paper hanging over the edges. This will help you lift the blondies out later. You will need a few mixing bowls. One should be large enough for the wet ingredients. Another bowl should be used for the dry ingredients. Also, keep a whisk and spatula nearby. They make mixing easier. In your large bowl, pour in 1 cup of melted butter. Add 1 ½ cups of brown sugar to it. Stir well until it looks smooth. Next, crack in 2 large eggs. Add 1 teaspoon of vanilla extract, the zest of 1 lemon, and 1 tablespoon of fresh lemon juice. Whisk until everything is mixed well and smooth. Now, take your second bowl. In it, whisk together 2 cups of all-purpose flour, 1 teaspoon of baking powder, and ½ teaspoon of salt. Mix these dry ingredients well. Gradually add them to your wet mixture. Stir gently until you see no dry flour. Be careful not to overmix here. Next, fold in 1 cup of diced strawberries using a spatula. Do this gently to keep the fruit pieces whole. Pour the batter into your prepared pan. Use your spatula to spread it evenly. Then, place the pan in your preheated oven. Bake for 25 to 30 minutes. Keep an eye on the edges; they should turn lightly golden brown. To check for doneness, insert a toothpick in the center. It should come out with a few moist crumbs. After baking, let the blondies cool completely in the pan. A wire rack works great for this. Once they are cool, use the parchment overhang to lift them out. Transfer them to a cutting board and cut them into squares. If you like, lightly dust the tops with powdered sugar before serving. This adds a nice touch and makes them look pretty. Enjoy your strawberry lemon blondies! For the full recipe, check out the details above. To get perfect strawberry lemon blondies, avoid overmixing the batter. Overmixing can make your blondies tough. Mix just until you don’t see dry flour anymore. This keeps them soft and chewy. Also, ensure you measure your ingredients correctly. Use dry measuring cups for flour and sugar. Level them off with a knife for accuracy. This small step helps your blondies turn out just right. To enhance the lemon flavor, use fresh lemon juice and zest. Fresh ingredients make a big difference. The zest gives a bright, bold taste. For an extra kick, add a bit more lemon juice if you like it zesty. When using fresh strawberries, choose ripe ones. Look for bright red berries with no soft spots. Cut them into small, even pieces. This way, they mix evenly into the batter, spreading flavor throughout. To ensure even baking, rotate your pan halfway through. Ovens can have hot spots, so this helps. Keep an eye on the edges. They should look golden brown but not burnt. For storage, use an airtight container. A metal or glass container works best. This keeps your blondies fresh for days. If you have extra, you can freeze them. Wrap them well in plastic wrap before placing them in the freezer. This way, you’ll enjoy them later. For the full recipe, check out the full recipe section. {{image_4}} You can easily adapt the strawberry lemon blondies to fit different diets. For a vegan or dairy-free option, replace the butter with coconut oil or a vegan butter substitute. Instead of eggs, use flax eggs or applesauce. This keeps the texture while making it plant-based. For gluten-free alternatives, swap out the all-purpose flour with a gluten-free blend. Many brands offer mixes that work well in baking. Just make sure your baking powder is gluten-free, too, to keep everything safe for those with allergies. To add more fruit flavors, consider mixing in blueberries or raspberries for a twist. These berries pair nicely with lemon and add vibrant colors. You can also try adding different extracts, like almond or coconut, to change the taste. Cinnamon or nutmeg can give a warm touch to your blondies. Pairing your blondies with a scoop of vanilla ice cream makes for a delightful treat. The cold ice cream complements the warm blondies beautifully. For a fun twist, create a blondie sundae by stacking a blondie with ice cream and drizzling it with chocolate or caramel sauce. You can also serve them with whipped cream and fresh strawberries on top. This not only looks appealing but also enhances the flavors. For the full recipe, check out the Sweet & Zesty Strawberry Lemon Blondies. To store strawberry lemon blondies at room temperature, place them in a cool, dry area. Use a plate or a baking dish. Cover them lightly with foil or wax paper. This keeps them fresh for about three days. Avoid direct sunlight to prevent them from drying out. For long-term storage, you can freeze the blondies. First, let them cool completely. Then, cut them into squares. Wrap each square tightly in plastic wrap. Place the wrapped blondies in a freezer bag or airtight container. They can last up to three months in the freezer. When you want to enjoy them, you can thaw them. For the best texture, place the blondies in the fridge overnight. If you're in a hurry, let them sit at room temperature for a few hours. This way, they stay soft and tasty. To keep your blondies fresh, always use airtight containers. This prevents air from drying them out. If you don't have one, use plastic wrap tightly. Keep blondies away from strong odors, as they can absorb them. Enjoy your strawberry lemon blondies at their best! For the full recipe, check out the detailed instructions above. To cut blondies neatly, first let them cool. Use a sharp knife for clean cuts. Warm the knife in hot water, then wipe it dry. This helps slice through the soft blondies. Cut in straight lines for even squares. For a nice finish, dust the top with powdered sugar after cutting. Yes, you can make these blondies ahead of time. Bake and cool them completely. Wrap them tightly in plastic wrap. Store them in an airtight container at room temperature. They stay fresh for a few days. For longer storage, freeze them in an airtight container. Thaw at room temperature before serving. Strawberry lemon blondies last about 3 to 5 days at room temperature. Keep them in an airtight container to maintain freshness. If you store them in the fridge, they may last up to a week. For best taste, enjoy them within a few days of baking. Yes, you can use frozen strawberries in this recipe. Thaw and drain them before adding to the batter. This prevents excess moisture in the blondies. While fresh strawberries taste great, frozen ones work well too. They still provide that sweet and tart flavor we love. You now have a complete guide to making delicious strawberry lemon blondies. We covered key ingredients, step-by-step instructions, and helpful tips. Remember to avoid overmixing for the best texture and to store them properly. Feel free to customize with different fruits or flavors to make this treat your own. Enjoy your baking and share these delights with friends and family. The joy of homemade desserts is unbeatable!](https://fastmealmate.com/wp-content/uploads/2025/06/d01b8b31-fd8b-4a7a-a702-50bce4a43ad8-768x768.webp)