Fluffy Make-Ahead Breakfast Rolls Easy and Tasty Treat

If you love warm, fluffy breakfast rolls but lack time in the morning, then this recipe is for you! These make-ahead breakfast rolls are not just easy to make; they are also packed with flavor. With options for savory or sweet fillings, you can customize them to fit your taste. Let’s dive in and discover how to whip up these delightful treats, so you can wake up to a perfect start!
Why I Love This Recipe
- Easy to Make: This recipe is straightforward, perfect for beginners and can be prepared in just a few simple steps.
- Make-Ahead Convenience: These rolls can be prepared in advance, allowing for a stress-free morning breakfast.
- Customizable Flavors: You can easily modify this recipe with your favorite cheeses or add-ins like sausage or spinach.
- Deliciously Fluffy: The result is incredibly soft and fluffy rolls that are irresistible straight from the oven.
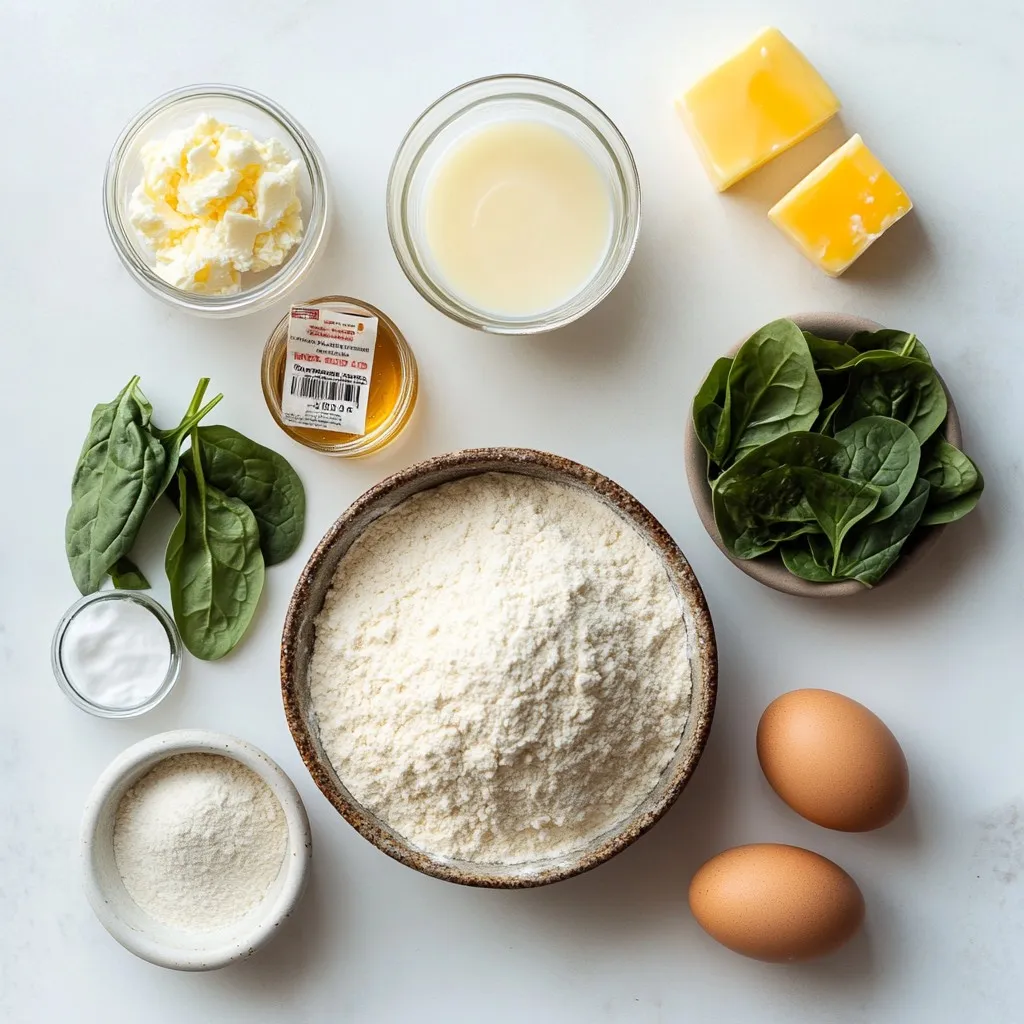
Ingredients
List of Ingredients
– 4 cups all-purpose flour
– 1/4 cup granulated sugar
– 1 packet (2 1/4 teaspoons) instant yeast
– 1 teaspoon fine sea salt
– 1 cup warm milk (about 110°F)
– 1/2 cup unsalted butter, melted and cooled to room temperature
– 3 large eggs, at room temperature
– 1 teaspoon pure vanilla extract
– 1 cup shredded cheddar cheese (optional, for a savory twist)
– 1/2 cup cooked and crumbled sausage or 1/2 cup cooked spinach (optional, for an added hearty flavor)
– 1/4 cup honey or maple syrup (for glazing)
I use these simple ingredients to make breakfast rolls that are soft and tasty. The flour gives the rolls their structure. Sugar adds a hint of sweetness. Yeast helps the rolls rise and become fluffy. Salt brings out the flavors. Warm milk activates the yeast, and butter adds richness. Eggs make the dough smooth, while vanilla gives a lovely flavor.
For a savory twist, consider adding shredded cheddar cheese. You can also mix in cooked sausage or spinach for extra flavor. If you have allergies, you can substitute some ingredients. Use gluten-free flour for a gluten-free option. Almond or oat milk can replace regular milk. For those avoiding eggs, try a flaxseed meal or applesauce instead.
With these ingredients, you can create breakfast rolls that everyone will love.
Step-by-Step Instructions
Preparation Steps
1. Mixing Dry Ingredients: Start by taking a large mixing bowl. Add 4 cups of all-purpose flour, 1/4 cup of granulated sugar, 1 packet of instant yeast, and 1 teaspoon of fine sea salt. Whisk these together until they blend well.
2. Combining Wet Ingredients: In another bowl, combine 1 cup of warm milk, 1/2 cup of melted butter, 3 large eggs, and 1 teaspoon of pure vanilla extract. Whisk until the mix is smooth and even.
3. Forming the Dough: Slowly add the wet mix to the dry ingredients. Use a wooden spoon or spatula to stir. Keep mixing until you see a soft dough forming.
4. Adding Flavor: If you want a tasty twist, gently fold in 1 cup of shredded cheddar cheese. You can also add 1/2 cup of cooked sausage or spinach for more flavor. Mix well until evenly combined.
Rising and Shaping
1. First Rise: After kneading the dough, place it in a greased bowl. Cover it with plastic wrap or a towel. Let it rise in a warm area for about 1 hour, or until it doubles in size.
2. Portioning the Dough: Once the dough has risen, gently punch it down to remove air. Divide it into 12 equal pieces. Roll each piece into a smooth ball.
3. Second Rise: Place the dough balls in a greased 9×13-inch baking dish. Cover them lightly with plastic wrap or a damp cloth. Let them rise again for 30-40 minutes until they puff up.
Baking Process
1. Preheat the Oven: While the rolls rise, preheat your oven to 350°F (175°C). This ensures even baking.
2. Baking Time and Color Indication: Bake the rolls for 20-25 minutes. They should be golden brown on top when ready.
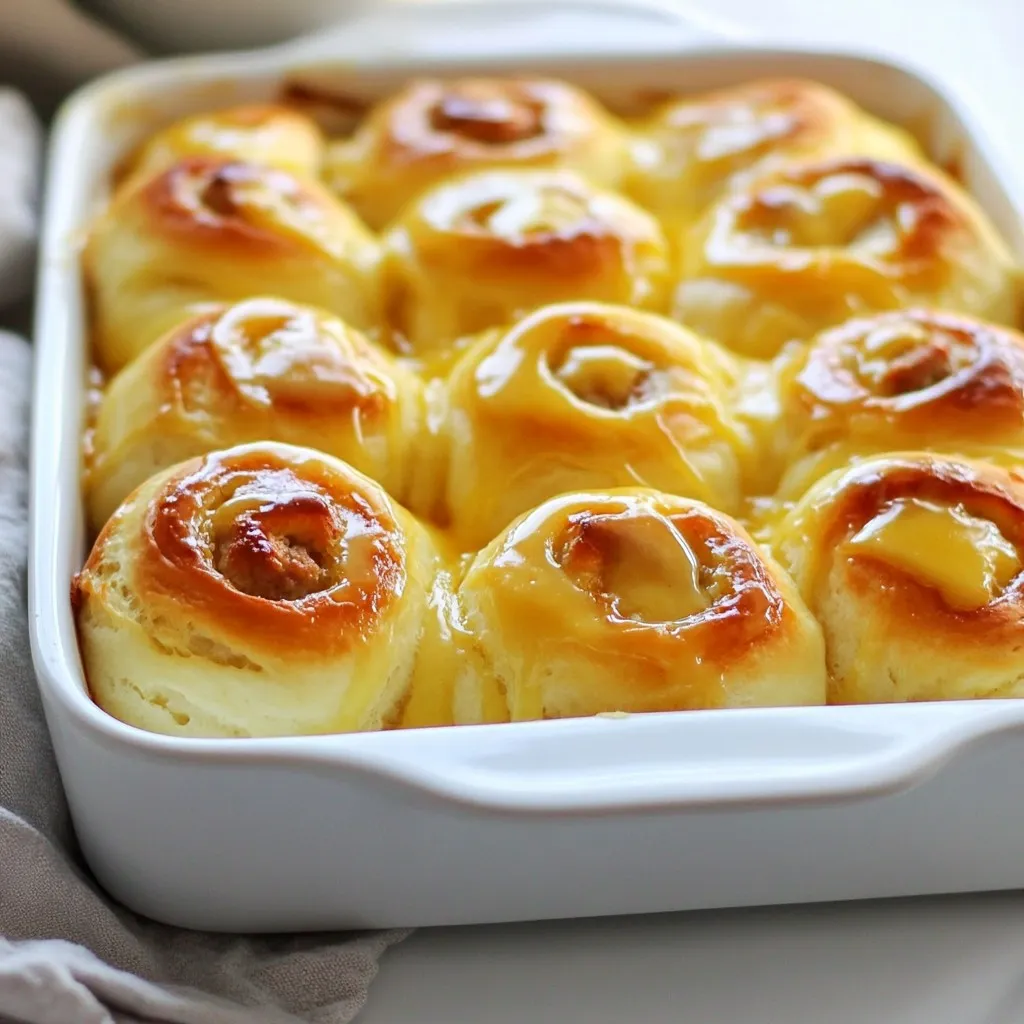
3. Glazing the Rolls: After baking, make a glaze by mixing 1/4 cup of honey or maple syrup with about 1 tablespoon of melted butter. Brush this glaze over the warm rolls for a sweet finish.
Tips & Tricks
Achieving Fluffiness
To make your breakfast rolls fluffy, kneading is key. Knead the dough for 5-7 minutes. This helps develop gluten, which gives the rolls structure. If you skip this step, the rolls may turn out dense.
Next, let the dough rise in a warm spot. A warm environment helps the yeast work well. Cover the bowl with plastic wrap or a towel to keep warmth in. You should see the dough double in size in about an hour.
The temperature of your ingredients matters, too. Use warm milk, about 110°F. It helps activate the yeast. If the milk is too hot, it may kill the yeast. If it is too cold, the rolls won’t rise well.
Serving Suggestions
For a pretty presentation, serve the rolls on a large platter. You can line the platter with a clean linen cloth. This adds a nice touch. For extra flair, sprinkle some fresh herbs or powdered sugar on top before serving.
Pair these rolls with tasty spreads like butter, jam, or cream cheese. They also go well with coffee, tea, or fresh fruit juice. Enjoy them for breakfast, brunch, or even as a snack. They are perfect anytime you crave something warm and comforting.
Pro Tips
- Use Fresh Yeast: Always check the expiration date on your yeast for the best rise and fluffiness in your rolls.
- Room Temperature Ingredients: Ensure your eggs and butter are at room temperature for a smoother dough consistency.
- Cover the Dough: Keep the dough covered during rises to prevent it from drying out and forming a crust.
- Experiment with Fillings: Try different cheeses, herbs, or vegetables to customize your rolls to your taste.

Variations
Sweet Variations
You can make these breakfast rolls even sweeter. Here are some fun ideas:
– Chocolate Filling: Try adding chocolate chips or chunks. They melt and make the rolls rich and sweet.
– Fruit Filling: Use fruit preserves, like raspberry or peach. Spread it in the dough before rolling.
For glazes, you have options:
– Vanilla Glaze: Mix powdered sugar with a splash of vanilla and milk. Drizzle it on top.
– Cinnamon Sugar: Combine sugar and cinnamon. Sprinkle it on the rolls after glazing for a sweet crunch.
Savory Variations
If you prefer savory flavors, there are many ways to enhance these rolls:
– Spices and Herbs: Add garlic powder, rosemary, or thyme to the dough. These flavors add warmth and depth.
– Veggies and Cheese: Mix in cooked spinach or diced peppers. You can also fold in shredded cheese, like cheddar or mozzarella, for a cheesy twist.
These variations let you customize the rolls to your taste. Enjoy experimenting with flavors!
Storage Info
Short-Term Storage
To keep your fluffy rolls fresh, store them in a sealed container. You can also wrap them in plastic wrap. Avoid leaving them out uncovered, as air can dry them out. If you plan to eat them within a few days, this method works well.
Long-Term Storage
For longer storage, freeze the rolls. Allow them to cool completely after baking. Then, place them in a freezer-safe bag. Remove as much air as possible before sealing. They can last up to three months in the freezer. When you’re ready to enjoy them, just take out what you need.
Reheating Suggestions
To restore fluffiness, reheat the rolls in the oven. Preheat your oven to 350°F. Place the rolls on a baking sheet and cover them with foil. Heat for about 10-15 minutes. You can also use a microwave, but they may lose some of their fluffiness. If using a microwave, heat for a short time—about 20 seconds works well. Enjoy your warm, fluffy breakfast rolls!
FAQs
Common Questions
How can I make these rolls without yeast?
You can use baking powder instead of yeast. Mix 4 cups of flour with 1 tablespoon of baking powder. This will help the dough rise without waiting. Your rolls will be fluffy but not as airy.
Can I prepare the dough a day in advance?
Yes, you can! Make the dough and let it rise once. Then, cover it and put it in the fridge. The next day, shape the rolls and let them rise again. This way, you save time in the morning.
What can I use instead of milk?
You can use almond milk, soy milk, or even water. Each option will change the flavor a bit. Choose what you like best or what you have at home.
Troubleshooting
What to do if rolls don’t rise properly?
Check if your yeast is fresh. Old yeast will not work well. Also, ensure your dough is in a warm place. If it’s too cold, it will not rise.
Tips for dough that is too sticky or dry
If the dough is sticky, add a bit more flour. Do this slowly, about a tablespoon at a time. If it’s too dry, add a tiny bit of warm water or milk. Mix it well until it’s just right.
How to adjust the recipe for altitude
If you live at a high altitude, reduce the flour by 1-2 tablespoons. You may need more liquid too. This helps the rolls rise better in thinner air.
To create delicious rolls, you need the right ingredients and methods. We covered how to mix and knead the dough for the best results. Rising, shaping, and baking are key to perfect rolls. Don’t forget tips for fluffiness and great serving ideas. We shared sweet and savory variations to suit any taste. Finally, storing and reheating the rolls properly will keep them fresh longer. Enjoy baking these rolls and sharing them with other
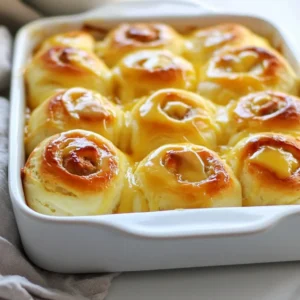
Fluffy Make-Ahead Breakfast Rolls
Ingredients
- 4 cups all-purpose flour
- 0.25 cup granulated sugar
- 1 packet instant yeast (2 1/4 teaspoons)
- 1 teaspoon fine sea salt
- 1 cup warm milk (about 110°F)
- 0.5 cup unsalted butter, melted and cooled to room temperature
- 3 large eggs, at room temperature
- 1 teaspoon pure vanilla extract
- 1 cup shredded cheddar cheese (optional)
- 0.5 cup cooked and crumbled sausage or cooked spinach (optional)
- 0.25 cup honey or maple syrup (for glazing)
Instructions
- In a large mixing bowl, whisk together the all-purpose flour, granulated sugar, instant yeast, and sea salt until well combined.
- In a separate bowl, whisk together the warm milk, cooled melted butter, eggs, and vanilla extract until the mixture is smooth and uniform.
- Gradually pour the wet mixture into the bowl with the dry ingredients, stirring gently with a wooden spoon or spatula until a soft, cohesive dough begins to form.
- If desired, gently fold in the shredded cheddar cheese and either the crumbled sausage or cooked spinach until evenly distributed throughout the dough.
- Transfer the dough to a lightly floured surface. Knead the dough by hand for about 5-7 minutes until it is smooth, elastic, and slightly tacky.
- Place the kneaded dough in a lightly greased bowl. Cover the bowl with plastic wrap or a clean kitchen towel, and set it in a warm, draft-free area to rise until doubled in size, about 1 hour.
- After the first rise, gently punch down the dough to release any air bubbles. Divide the dough into 12 equal portions. Shape each portion into a smooth ball.
- Arrange the dough balls in a greased 9x13-inch baking dish, placing them close together but not touching.
- Lightly cover the dish with plastic wrap or a damp cloth, allowing the rolls to rise again for 30-40 minutes until they are puffed and slightly expanded.
- Preheat your oven to 350°F (175°C) while the rolls are completing their second rise.
- Once preheated, bake the rolls in the oven for 20-25 minutes or until they are golden brown on top.
- In a small saucepan over low heat, mix together the honey or maple syrup with approximately 1 tablespoon of melted butter. Heat until warm but not boiling.
- As soon as the rolls are out of the oven, brush the warm honey mixture generously over the top, adding a delightful sweetness.
- Allow the rolls to cool for a few minutes in the baking dish before serving warm, to enjoy their soft and fluffy texture.
![- 4 boneless, skinless chicken breasts - 1 cup coconut milk (preferably full-fat for creaminess) - 2 tablespoons freshly squeezed lime juice - Zest of 1 lime - 2 tablespoons honey - 2 cloves garlic, minced - 1 teaspoon fresh ginger, grated - 1 teaspoon ground cumin - Salt and pepper to taste - 1 tablespoon olive oil The main ingredients in Coconut Lime Chicken create a perfect balance of flavors. The chicken breasts are the star, providing a solid base. Coconut milk adds creaminess and richness. Lime juice brings bright acidity and zest. Honey balances the tanginess. Garlic and ginger enhance depth, while cumin adds warmth. - Fresh cilantro leaves - Lime wedges for serving Garnishes can elevate your dish. Fresh cilantro adds a pop of color and freshness. Lime wedges provide an extra burst of citrus when served. - Grill or skillet - Resealable plastic bag for marinating A grill or skillet works great for cooking the chicken. The resealable bag is perfect for marinating. It helps the chicken soak up all those delicious flavors. For the Full Recipe, check out the detailed instructions that guide you through the steps to make this delicious Coconut Lime Chicken. To start, gather your ingredients. Combine 1 cup of coconut milk, 2 tablespoons of lime juice, lime zest, 2 tablespoons of honey, 2 minced garlic cloves, 1 teaspoon of grated ginger, and 1 teaspoon of ground cumin in a medium bowl. Add a pinch of salt and pepper to boost the flavor. Whisk these ingredients together until they blend well. This creates a creamy and fragrant marinade. - Tip: Use a sturdy whisk to mix. It helps create a smooth consistency without clumps. Next, it's time to marinate the chicken. Place 4 boneless, skinless chicken breasts into a large resealable plastic bag. Pour the marinade over the chicken. Make sure each piece is coated evenly. Seal the bag tightly and press out any air. For the best flavor, marinate in the fridge for at least 30 minutes. You can marinate for up to 4 hours for a richer taste. - Tip: Flip the bag halfway through marinating. This ensures all sides soak up the flavor. Now, let’s cook the chicken. Preheat your grill or a large skillet over medium-high heat. If using a skillet, drizzle in 1 tablespoon of olive oil. Let it heat until it shimmers but does not smoke. Carefully remove the chicken from the marinade. Allow any excess marinade to drip off. Place the chicken on the grill or in the skillet. Cook each piece for about 6-7 minutes on each side. The chicken is done when it is no longer pink inside and reaches an internal temperature of 165°F. - Tip: If using a skillet, turn the chicken often for even cooking. Once cooked, transfer the chicken to a plate. Let it rest for about 5 minutes. Resting helps the juices stay inside. Finally, slice the chicken and serve it with leftover marinade, fresh cilantro, and lime wedges. For the Full Recipe, check the complete details in the earlier section. Enjoy your Coconut Lime Chicken! Marinating your chicken is key for great taste. I recommend marinating for at least 30 minutes. For deeper flavors, let it sit for up to 4 hours. The coconut milk and lime juice work wonders together. You can also add spices like paprika or herbs like thyme. These will give your dish a unique twist. Resting your chicken after cooking is crucial. Let it sit for 5 minutes before slicing. This helps the juices stay inside. The ideal internal temperature for fully cooked chicken is 165°F (75°C). Use a meat thermometer to check. This step ensures your chicken stays juicy and tender. A great plate makes your meal more inviting. Arrange the sliced chicken on a bright platter. Sprinkle fresh cilantro over the top for color. Serve lime wedges on the side for extra zest. You can also add a side of coconut rice or a fresh salad. These choices elevate your dish, making it visually appealing and delicious. For the full recipe, check out the Coconut Lime Chicken recipe. {{image_4}} You can change the protein in this dish. Try shrimp or tofu for a fun twist. Each option offers a unique taste while soaking up the coconut and lime flavors. If you want to switch up the marinade, use pineapple juice instead of lime juice. This swap adds a sweet touch that works well. You can cook Coconut Lime Chicken in different ways. Oven-baking gives a nice, even cook. Set the oven to 375°F and bake for 25-30 minutes. Slow-cooking is great for busy days. Just put the marinated chicken in a slow cooker for 4-6 hours on low. Grilling adds a smoky flavor that many people love. It gives nice grill marks and a bit of char. Pan-searing is quick and keeps the chicken juicy. Use medium-high heat and watch it closely for great results. Coconut Lime Chicken pairs well with many sides. Coconut rice is a perfect fit. The creaminess of the rice matches the chicken's flavors. A fresh garden salad with lime vinaigrette adds brightness. You can also serve it with roasted vegetables for a colorful plate. For drinks, try a light white wine like Sauvignon Blanc. It complements the lime well. Coconut water is also refreshing and ties in with the meal. If you want a fun twist, mix a tropical cocktail with rum and pineapple juice. For the full recipe, check the earlier section. Enjoy your cooking adventure! To keep your Coconut Lime Chicken fresh, follow these simple steps. First, let the chicken cool completely after cooking. Place any leftover chicken in an airtight container. You can store it in the fridge for up to four days. If you want to keep it longer, freeze the chicken. Wrap it tightly in plastic wrap, then place it in a freezer bag. This helps prevent freezer burn. It can last up to three months in the freezer. When you're ready to eat, remember to label your container with the date. This will help you track how long it's been stored. Reheating your Coconut Lime Chicken is easy, but do it carefully. To keep it moist, I suggest using the oven. Preheat it to 350°F (175°C). Place the chicken in a baking dish, cover it with foil, and heat for about 15 to 20 minutes. Make sure it reaches an internal temperature of 165°F (75°C). You can also reheat in the microwave. Use a microwave-safe dish and cover it with a damp paper towel. Heat for one minute, then check if it's warm. If not, heat in 30-second bursts until hot. Avoid overheating, as this can dry out the chicken. If you want to enjoy your leftovers, consider adding them to salads or wraps for a tasty twist. I recommend marinating the chicken for at least 30 minutes. This time gives the chicken a nice flavor boost. If you have more time, you can marinate it for up to 4 hours. Longer marinating allows the flavors to soak in deeper. Just remember, do not marinate for more than 4 hours. The acid in lime juice can make the chicken tough if left too long. Yes, you can use canned coconut milk for this recipe. I suggest using full-fat coconut milk for the best results. Full-fat coconut milk adds creaminess and richness to the dish. It also helps create a smooth marinade that clings well to the chicken. Low-fat coconut milk can work, but it may not have the same depth of flavor. Coconut Lime Chicken pairs well with many side dishes. Here are some great options: - Coconut rice: It complements the flavor beautifully. - Fresh garden salad: A light salad adds crispness. - Grilled vegetables: They add color and nutrition. - Quinoa: A healthy grain that absorbs flavors well. You can also serve it with lime wedges for an extra citrus kick! For a refreshing drink, consider coconut water or a light mojito. For the full recipe, check out the [Full Recipe]. This blog post covered the key ingredients and steps for making Coconut Lime Chicken. We discussed the main ingredients, marinade tips, and cooking techniques. I shared ways to enhance flavor and ensure juicy chicken, plus creative serving ideas. You can explore variations and proper storage tips for leftovers. Remember, using quality ingredients and following these steps leads to tasty meals. Enjoy experimenting with this recipe to create your perfect dish!](https://fastmealmate.com/wp-content/uploads/2025/06/fb549dd5-9e1c-4fac-867b-0fcc137097f2-768x768.webp)