Mediterranean Steak Power Bowls Healthy and Flavorful

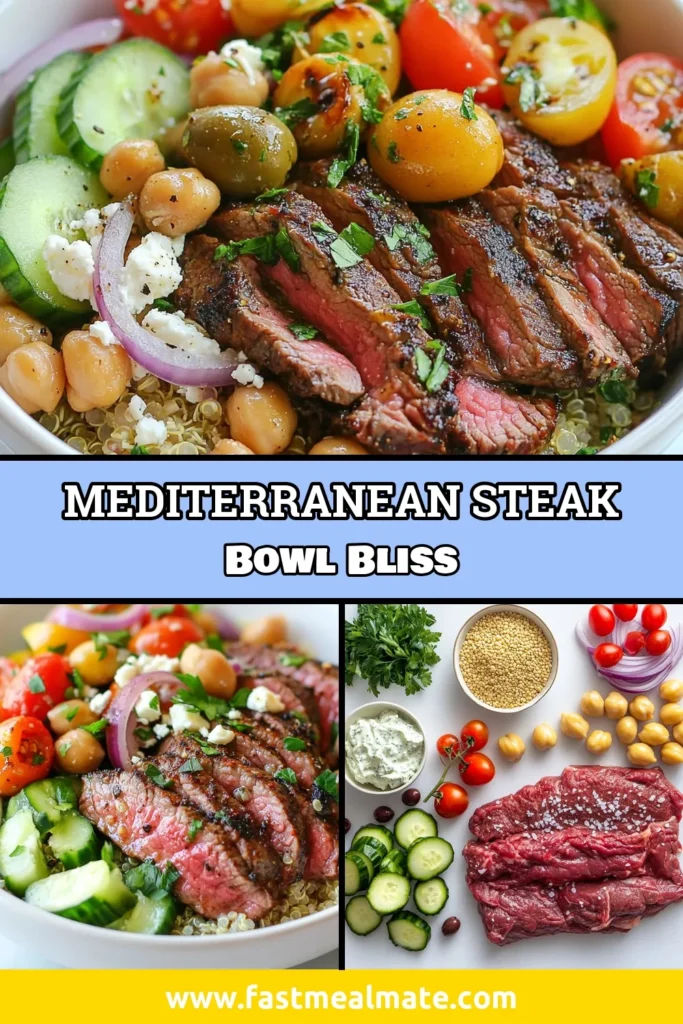
Are you ready to elevate your meal game? Mediterranean Steak Power Bowls are the answer! Packed with juicy flank steak, fresh vegetables, and hearty quinoa, these bowls are both healthy and flavorful. Whether you’re meal prepping for the week or enjoying a vibrant dinner, this recipe is easy to follow and customizable. Let’s dive into the ingredients and steps to create a power bowl that bursts with taste and nutrition!
Why I Love This Recipe
- Flavorful Marinade: The combination of garlic powder and smoked paprika creates a wonderfully rich flavor that infuses the steak beautifully.
- Nutritious Base: Quinoa serves as a perfect foundation, providing protein and fiber while absorbing all the delicious juices from the steak.
- Vibrant Veggies: The fresh ingredients like cherry tomatoes and cucumber add brightness and crunch, making each bite refreshing.
- Customizable: This power bowl is versatile, allowing you to mix and match ingredients or add your favorite toppings for a personal touch.
Ingredients
Main Ingredients
– 1 lb flank steak
– 1 tablespoon extra virgin olive oil
– 1 teaspoon garlic powder
– 1 teaspoon smoked paprika
– Salt and freshly ground black pepper to taste
– 2 cups cooked quinoa (preferably cooled)
– 1 cup cherry tomatoes, halved
– 1 medium cucumber, diced
– ½ medium red onion, thinly sliced
– 1 cup canned chickpeas, rinsed and drained
– ½ cup feta cheese, crumbled
– ¼ cup kalamata olives, pitted and sliced
– ¼ cup fresh parsley, chopped
– 2 tablespoons fresh lemon juice
Optional Ingredients
– Tzatziki sauce for drizzling
– Additional toppings or garnishes
The main ingredients bring a lot of flavor and texture to your bowl. The flank steak offers a rich taste and pairs well with other fresh veggies. Olive oil, garlic powder, and smoked paprika create a tasty marinade. Quinoa serves as a great base. It adds protein and fiber.
You can mix in colorful veggies like cherry tomatoes and cucumbers for freshness. Chickpeas make the dish even heartier. Feta cheese and kalamata olives add a salty bite. Fresh parsley brightens the dish with color and flavor.
For extra creaminess, try adding tzatziki sauce. You can also get creative with other toppings. The options are endless! Enjoy making these Mediterranean steak power bowls with fresh and wholesome ingredients.

Step-by-Step Instructions
Marinating the Steak
To start, you need to prepare the marinade. In a bowl, mix together:
– 1 tablespoon extra virgin olive oil
– 1 teaspoon garlic powder
– 1 teaspoon smoked paprika
– Salt and freshly ground black pepper to taste
Rub this mixture all over the flank steak. Make sure every side gets coated. For the best flavor, let it marinate. You can leave it at room temperature for 30 minutes or refrigerate it for up to 2 hours. The longer it sits, the more flavor it soaks in.
Cooking the Steak
Now it’s time to cook the steak. You can grill it or use a skillet. Preheat your grill or skillet over medium-high heat. When hot, place the marinated steak on it. Cook for 4-5 minutes on each side for medium-rare. If the steak is thicker, adjust the time. After cooking, remove it from heat and let it rest for 5 minutes. This helps keep the juices in. Slice the steak thinly against the grain to make it tender.
Assembling the Power Bowls
Let’s build your power bowls now. Start with a base layer of quinoa. Use about 2 cups of cooked quinoa, preferably cooled. Next, add some fresh veggies. Top the quinoa with:
– 1 cup cherry tomatoes, halved
– 1 medium cucumber, diced
– ½ medium red onion, thinly sliced
– 1 cup canned chickpeas, rinsed and drained
Now, layer the sliced steak on top of the veggies. For extra flavor, sprinkle:
– ½ cup feta cheese, crumbled
– ¼ cup kalamata olives, pitted and sliced
Finish with a drizzle of fresh lemon juice for zest. You can also add a sprinkle of chopped parsley for color. If you like, add a dollop of tzatziki sauce for a creamy touch. Serve your Mediterranean steak power bowls right away to enjoy the fresh flavors!
Tips & Tricks
Steak Cooking Tips
To achieve perfect doneness, aim for medium-rare. Cook flank steak for 4-5 minutes on each side. Use a meat thermometer to check the internal temperature. It should read 130-135°F for medium-rare. This method keeps the steak juicy and tender.
Resting the meat is key. Let the steak rest for 5 minutes after cooking. This helps it retain juices, making every slice flavorful and moist. Always slice against the grain for the best texture.
Flavor Enhancements
You can customize seasonings to suit your taste. Try adding cumin or oregano for a different twist. Experiment with smoked paprika for a deeper flavor. If you love heat, add a pinch of cayenne.
Pair your steak with different sauces for extra flavor. Tzatziki sauce adds creaminess and freshness. A drizzle of balsamic glaze can enhance sweetness. Each sauce brings a unique taste to the bowl.
Presentation Tips
Arranging ingredients well makes a big difference. Start with a scoop of quinoa in the bowl. Then layer on the fresh veggies and sliced steak. This creates a colorful and inviting meal.
Using bowls instead of plates gives a cozy feel. Bowls help keep the ingredients together. Plus, they make serving easier. You can create lovely layers that showcase all the flavors.
Pro Tips
- Marinate Longer for Flavor: For even more depth of flavor, consider marinating the flank steak overnight. This allows the spices to fully penetrate the meat, resulting in a richer taste.
- Slice Against the Grain: To ensure your steak is tender, always slice it against the grain. This breaks up the muscle fibers and makes each bite easier to chew.
- Customize Your Bowl: Feel free to add or substitute any of your favorite Mediterranean ingredients, such as roasted red peppers or artichoke hearts, to make the dish your own.
- Serve Fresh: For optimal flavor and freshness, assemble the bowls just before serving. This keeps the vegetables crisp and enhances the overall presentation of the dish.

Variations
Protein Alternatives
You can switch up the protein in your Mediterranean steak power bowls. Chicken is a great choice. It cooks quickly and takes on flavors well. Simply marinate chicken breasts using the same olive oil and spices. Grill or pan-fry until cooked through. Shrimp is another tasty option. Just season and cook them for a few minutes until they turn pink.
If you want a vegetarian option, try using tofu or tempeh. Marinate them just like the steak, then grill or sauté until crispy. Chickpeas can also be the star, providing protein and fiber.
Grain Substitutions
Not a fan of quinoa? Brown rice is a hearty choice. It has a nice nutty flavor and pairs well with the other ingredients. Couscous is another quick option. It cooks in just a few minutes and provides a light texture.
If you need gluten-free grains, consider using millet or cauliflower rice. Both are great alternatives that still offer wonderful taste and texture.
Seasonal Vegetables
You can change the vegetables based on the season. In fall or winter, use roasted sweet potatoes or Brussels sprouts. They add warmth and depth to your bowl.
For spring or summer, fresh asparagus or bell peppers bring brightness. You can even add zucchini or snap peas for a crunchy bite. The key is to use what’s fresh and in season for the best flavor!
Storage Info
Storing Leftovers
After enjoying your Mediterranean steak power bowls, store leftovers properly. First, let the food cool to room temperature. This helps prevent condensation in the container. Use airtight containers for storage. This keeps the flavors fresh. Refrigerate leftovers within two hours. They can last for up to three days in the fridge. For longer storage, consider freezing.
To freeze, portion the steak and quinoa separately to keep textures intact. Use freezer-safe bags or containers. Write the date on the bag. This helps you track how long they stay frozen. You can freeze leftovers for up to three months.
Reheating Recommendations
When it’s time to enjoy leftovers, reheating is key. For steak, use a skillet or grill. Heat it on low to medium heat. This keeps the meat tender. You can add a splash of broth or water to help. Cover it to trap steam and avoid dryness.
For quinoa, microwave it with a splash of water. This keeps it moist. Heat in short bursts, stirring in between. This way, you maintain flavor and texture. Enjoy your power bowls just as delicious as when you first made them!
FAQs
How can I customize my Mediterranean Steak Power Bowl?
You can change the ingredients to fit your taste. Here are some swaps:
– Steak: Use chicken or shrimp for different protein.
– Grain: Swap quinoa for brown rice or couscous.
– Veggies: Add bell peppers or spinach for more color.
– Cheese: Try goat cheese instead of feta for a creamy twist.
– Beans: Use black beans or lentils for added protein.
Can I make these bowls ahead of time?
Yes, you can prep these bowls in advance. Here are my tips:
– Cook the steak: Grill or pan-sear it, then slice it.
– Store the steak: Keep it in an airtight container in the fridge.
– Prepare quinoa: Make it ahead and let it cool before storing.
– Chop veggies: Cut them up and store in separate containers.
– Assemble when ready: Combine ingredients just before serving for freshness.
What are the best sides to serve with Mediterranean Steak Power Bowls?
These bowls shine with great sides. Here are some ideas:
– Pita bread: Soft pita pairs well and adds fun.
– Hummus: A creamy dip for added flavor.
– Tzatziki: This yogurt sauce brings a cool touch.
– Greek salad: A fresh salad complements the bowl nicely.
– Roasted veggies: Add some roasted eggplant or zucchini for a warm side.
This article detailed how to create delicious Mediterranean Steak Power Bowls. We covered key ingredients, cooking methods, and tips for perfecting your dish. Remember, you can customize your bowls with different proteins and grains. Always store leftovers properly and reheat them to keep flavor. Explore new variations based on the season. Enjoy crafting tasty, healthy meals. Cooking should be fun and easy, so get creativ

Mediterranean Steak Power Bowls
Ingredients
- 1 lb flank steak
- 1 tablespoon extra virgin olive oil
- 1 teaspoon garlic powder
- 1 teaspoon smoked paprika
- to taste Salt and freshly ground black pepper
- 2 cups cooked quinoa (preferably cooled)
- 1 cup cherry tomatoes, halved
- 1 medium cucumber, diced
- 0.5 medium red onion, thinly sliced
- 1 cup canned chickpeas, rinsed and drained
- 0.5 cup feta cheese, crumbled
- 0.25 cup kalamata olives, pitted and sliced
- 0.25 cup fresh parsley, chopped
- 2 tablespoons fresh lemon juice
- 1 serving tzatziki sauce (optional for drizzling)
Instructions
- In a small mixing bowl, combine the olive oil, garlic powder, smoked paprika, salt, and pepper. Rub this mixture evenly over the flank steak and marinate for at least 30 minutes.
- Preheat a grill or heavy skillet over medium-high heat. Cook the marinated flank steak for 4-5 minutes on each side for medium-rare. Let it rest for 5 minutes before slicing thinly against the grain.
- Place a generous scoop of cooled quinoa in each serving bowl as the base.
- Top the quinoa with halved cherry tomatoes, diced cucumber, and thinly sliced red onion. Distribute the rinsed chickpeas over the top.
- Layer the sliced steak over the fresh vegetables, then sprinkle with crumbled feta cheese and sliced kalamata olives.
- Drizzle fresh lemon juice over the bowls and garnish with chopped parsley. Optionally, add a dollop of tzatziki sauce on top.
- Serve immediately to enjoy the combination of flavors and textures.
![- 1 lb lobster tails, halved lengthwise - 1 lb fresh sea scallops - 4 tablespoons unsalted butter, divided - 4 cloves garlic, finely minced - 1 lemon, juiced (about 2 tablespoons) - 2 tablespoons fresh parsley, finely chopped - Salt and freshly ground black pepper, to taste - Lemon wedges, for serving When I prepare Easy Garlic Butter Lobster Scallops, I love how fresh ingredients shine. The lobster tails and scallops are the stars of this dish. Using fresh seafood makes all the difference. Each bite bursts with flavor. Butter brings richness to the dish. I use unsalted butter to control the saltiness. Garlic adds a lovely aroma and taste. It’s important to finely mince the garlic. This helps to spread its flavor evenly. I always squeeze fresh lemon juice for brightness. The juice balances the rich butter. Chopped parsley adds a nice touch. It gives the dish a pop of color and freshness. Don’t forget about seasoning! Salt and black pepper enhance the seafood’s natural flavor. I like to season both the lobster and scallops well before cooking. Lastly, lemon wedges are a must. They add a fresh hit of citrus when served. I find that a squeeze of lemon elevates the whole meal. For the full recipe, check out the details above. Enjoy creating this flavorful delight! First, take the lobster tails and scallops out of the package. Gently pat them dry with a paper towel. This step is key for a nice sear later. Next, season them with salt and black pepper. Make sure to cover all sides for even flavor. Now, let’s get cooking! In a large skillet, melt 2 tablespoons of unsalted butter over medium heat. Once the butter is melted and bubbly, add the minced garlic. Sauté the garlic for about one minute until it is fragrant. Be careful not to let it burn. Next, add the lobster tails to the skillet. Place them cut-side down first. Sear the tails for about 3-4 minutes until they turn golden brown. Then, carefully flip them over and cook for another 2-3 minutes. They should look opaque and fully cooked. Remove them and set aside. Now, it’s time for the scallops. Add them to the same skillet, making sure not to overcrowd them. Sear each side for about 2-3 minutes until they get a beautiful golden crust. Once done, remove the scallops and place them with the lobster. Return the cooked lobster to the skillet. Squeeze in the fresh lemon juice and sprinkle the chopped parsley over everything. Gently toss the lobster and scallops in the garlic butter sauce. This will help all the flavors blend nicely. Finally, serve the lobster and scallops on a large platter. Drizzle any remaining garlic butter sauce over the seafood. Garnish with more parsley and add lemon wedges on the side. For the full recipe, check the detailed instructions above. Enjoy your tasty dish! To make your lobster and scallops shine, start with good searing. Searing gives seafood a nice crust. Heat your skillet until it's hot. Add butter and let it melt before placing the seafood in. This helps lock in flavors and moisture. Drying your seafood before cooking is very important. Use paper towels to pat the lobster tails and scallops dry. Removing excess moisture helps achieve that perfect golden sear. Wet seafood will steam instead of sear. Adding herbs and spices can elevate your dish. Fresh thyme or basil can add great flavor. A pinch of red pepper flakes can give it a nice kick. Don't be afraid to experiment with flavors you love. For sauces, consider making a light citrus sauce. A mix of lemon juice and olive oil works well. You can also add a splash of white wine for depth. These additions can enhance the overall taste of your seafood. Presentation matters when serving seafood. Arrange the lobster tails and scallops on a large platter. Place them in a way that looks inviting. You can stack the scallops for a layered look. Garnishing makes your dish pop. Use chopped parsley for a fresh touch. Lemon wedges add color and a burst of flavor. A well-presented dish makes a great impression, so take your time with this step. Want to try this delicious dish? Check out the [Full Recipe]. {{image_4}} If you cannot find lobster or scallops, you have options. You can use shrimp instead of lobster. Shrimp cooks fast and adds great flavor. For scallops, try using firm fish like cod or halibut. Both will work well in this dish. For dairy-free butter, consider using olive oil or coconut oil. Both options will give a nice taste. You can also find plant-based butter in stores. Just make sure it melts well for your sauce. You can cook your seafood in different ways. Grilling is a fun option. It gives a smoky flavor that pairs well with garlic. Just brush the lobster and scallops with butter before grilling. Sautéing is great for a quick meal. It lets the garlic and butter shine through. Broiling is another method to try. It cooks the seafood from above. This method creates a crispy top while keeping the inside juicy. You will get a different flavor profile that is equally delicious. For side dishes, consider a fresh salad or garlic bread. A light pasta with lemon pairs well, too. These sides will balance the rich flavors of the seafood. As for drinks, a crisp white wine like Sauvignon Blanc is perfect. It cuts through the richness of the butter. If you prefer non-alcoholic drinks, try sparkling water with lemon. It refreshes the palate nicely. For the full recipe, check the Easy Garlic Butter Lobster Scallops 🦞🧄 section. To keep your Easy Garlic Butter Lobster Scallops fresh, place them in an airtight container. This helps avoid any unwanted smells in your fridge. Make sure to refrigerate them within two hours of cooking. They can last up to three days in the fridge. If you notice any off smell or discoloration, it's best to toss them out. When you want to enjoy your leftovers, the best way to reheat is on the stove. Use low heat to warm them gently. This keeps the seafood tender. You can also use the microwave, but do it in short bursts to avoid overcooking. Cover the dish with a damp paper towel to keep moisture in. Remember, seafood can dry out quickly. Yes, you can freeze lobster scallops! However, freezing may change their texture. To freeze, place them in a freezer-safe bag or container. Remove as much air as possible before sealing. They can stay frozen for up to three months. When you're ready to use them, thaw in the fridge overnight. Avoid thawing at room temperature to keep them safe. If you're looking for the full recipe, check out the Easy Garlic Butter Lobster Scallops recipe above! You can tell when scallops are done by their color and texture. They should be opaque and firm. A golden crust on the outside shows they are well-seared. Avoid cooking them too long. Overcooked scallops become rubbery and tough. Common mistakes include overcrowding the pan and not drying them well. Always dry scallops with paper towels. This helps them sear nicely and not steam. Yes, you can use frozen lobster tails and scallops. Just make sure to choose high-quality seafood. Look for ones that are flash-frozen for best taste. To thaw, place them in the fridge overnight. If you're in a hurry, seal them in a bag and submerge in cold water for about 30 minutes. Cook them right after thawing for the best flavor. Pair your dish with light sides. A fresh salad with lemon vinaigrette works well. Roasted asparagus or green beans add great color and flavor. For a complete meal, serve with garlic bread and a glass of white wine. This combination enhances the rich flavors of the lobster and scallops. You can find the full recipe for Easy Garlic Butter Lobster Scallops and create a delightful feast! This blog post highlighted key ingredients for an easy garlic butter lobster and scallops dish. I walked you through preparation, cooking, tips for perfect seafood, and variations to keep meals exciting. You now have practical storage info and answers to common questions. No matter how you serve this dish, it promises flavor. Enjoy crafting a meal that impresses everyone at your table. Happy cooking!](https://fastmealmate.com/wp-content/uploads/2025/06/dfec37c8-f7d2-4a99-9114-2c33cea5f0b3-768x768.webp)
![To make garlic butter shrimp, gather these simple ingredients: - 1 lb large shrimp, deveined and peeled - 6 tablespoons unsalted butter - 5 cloves garlic, finely minced - 1 teaspoon red pepper flakes - 1 lemon, zested and juiced - 2 tablespoons fresh parsley, finely chopped - Salt and freshly ground black pepper, to taste - Optional: 1 tablespoon extra virgin olive oil These ingredients create a dish full of flavor. The shrimp give a sweet and briny taste. The garlic brings a warm, earthy aroma. Butter adds richness and a smooth texture. Lemon juice brightens the dish and balances the flavors. Fresh parsley gives a pop of color and freshness. Feel free to adjust the red pepper flakes. If you like heat, add more! If you prefer a milder flavor, use less. The optional olive oil helps prevent butter from burning. It adds depth to the dish. Once you gather these ingredients, you're ready to dive into the world of garlic butter shrimp. For a full recipe, check out the section above. To start, heat a large skillet over medium heat. Add 3 tablespoons of unsalted butter and, if you like, 1 tablespoon of extra virgin olive oil. This oil helps keep the butter from burning and adds flavor. Once the butter melts, add 5 cloves of minced garlic along with 1 teaspoon of red pepper flakes. Sauté for about 1-2 minutes. Stir often until the garlic smells great and turns light golden brown. Watch closely, so the garlic doesn’t burn. Now, it’s time for the shrimp. Carefully add 1 pound of peeled and deveined shrimp to the skillet. Spread them out in a single layer. Season with salt and freshly ground black pepper. Let the shrimp cook for about 2-3 minutes without stirring. You will see them change color to pink and opaque. When they look good, gently flip the shrimp over. Add the zest and juice from 1 lemon along with the remaining 3 tablespoons of butter. Cook for another 2-3 minutes until the shrimp are fully cooked and coated in the buttery sauce. When the shrimp are done, take the skillet off the heat. Stir in 2 tablespoons of finely chopped parsley. Taste the dish and adjust seasoning by adding more salt or pepper if needed. Serve the garlic butter shrimp hot to enjoy the best flavor. For more details, check the Full Recipe. To make your garlic butter shrimp shine, focus on two key areas: garlic and seasoning. - Avoid burning garlic: Garlic burns fast. Keep your heat at medium. Stir it often. You want it golden, not dark. Burnt garlic tastes bad. - Adjust seasoning to preference: Taste is personal. Start with salt and pepper. Add more to match your liking. You can also play with red pepper flakes for heat. Now, let’s talk about how to serve your dish. Presentation matters, and there are tasty ways to enjoy it. - Pairing with rice or bread: Serve your shrimp over fluffy rice. Jasmine or basmati works great. If you prefer, slice some warm bread. It soaks up the sauce well. - Garnishing ideas: Fresh parsley adds color. A few lemon wedges brighten your plate. A sprinkle of extra red pepper flakes adds a kick. Need more help? Here are some useful tools. - Suggested video tutorial or high-quality images: Look for a video that shows the steps in action. It helps to see the cooking process. - Nutritional information: Check out the calories and nutrients in this dish. It’s good to know what you're eating. For the full recipe, click [Full Recipe]. Enjoy cooking! {{image_4}} You can play with the flavors in garlic butter shrimp. For a kick, try Spicy Garlic Butter Shrimp. Just add more red pepper flakes. Adjust the heat to your taste. This gives the dish a nice kick that many love. Another great option is Lemon Herb Garlic Shrimp. Add fresh herbs like thyme or basil for a fresh twist. You can also squeeze extra lemon juice for more brightness. This variation makes the dish feel light and refreshing. You can swap some ingredients for different flavors. Instead of butter, try using olive oil. This gives a different taste and is a healthier choice. You can also use ghee for a rich flavor. Adding vegetables can change the dish too. Toss in asparagus or cherry tomatoes. These add color and nutrients. They cook quickly and soak up the garlic butter sauce. If you need gluten-free options, this recipe is easy. Just make sure your red pepper flakes and any other spices are gluten-free. For a dairy-free option, use olive oil instead of butter. You can also try vegan butter. This keeps the flavor while making it suitable for those avoiding dairy. By making these small adjustments, you can enjoy garlic butter shrimp in many ways. For the full recipe, check out the details above. To store leftovers, place the garlic butter shrimp in an airtight container. Ensure the shrimp cool down first. This keeps them fresh and tasty. You should eat the leftovers within 2 days. The flavors stay best within this time. For reheating, I suggest using a skillet. Heat it on low and add a little butter. This method keeps the shrimp moist. Stir gently to avoid overcooked shrimp. If you use the microwave, heat in short bursts. Check every 30 seconds until warm. You can freeze cooked shrimp for later use. Place them in a freezer-safe bag and remove as much air as possible. They can last up to 3 months in the freezer. To defrost, place the shrimp in the fridge overnight. For a faster method, submerge the bag in cold water. This way, you can enjoy your garlic butter shrimp whenever you want. For the full recipe, check out the [Full Recipe]. Cook shrimp for about 2-3 minutes on each side. They turn pink and opaque. This short time keeps them tender and juicy. Overcooking makes them tough. Always check their texture before serving. Yes, you can use frozen shrimp. Thaw them first in cold water. It takes about 15-20 minutes. Pat them dry before cooking. This helps them sear nicely in the pan. Cooking frozen shrimp directly may not give the best results. You can pair garlic butter shrimp with many sides. Rice is a great choice, like jasmine or basmati. You can also serve it with crusty bread. A fresh salad or steamed veggies work well too. They balance the rich flavors of the shrimp. This recipe is very flexible. You can adjust the spice level by adding more or less red pepper flakes. Want a different flavor? Try adding fresh herbs like basil or cilantro. You can even add veggies like asparagus or bell peppers. The choice is yours! For the full recipe, check the earlier section. This blog post covered a simple garlic butter shrimp recipe with step-by-step instructions. You learned about key ingredients, cooking tips, and variations for flavor. Storing and reheating shrimp was also discussed. This dish is not only easy to make, but it’s also delicious too. Experiment with the ingredients or try new sides to make it your own. Enjoy your cooking, and have fun exploring different flavors and options!](https://fastmealmate.com/wp-content/uploads/2025/05/4326bcb2-842f-4d6f-96a8-35ed43fbf561-768x768.webp)