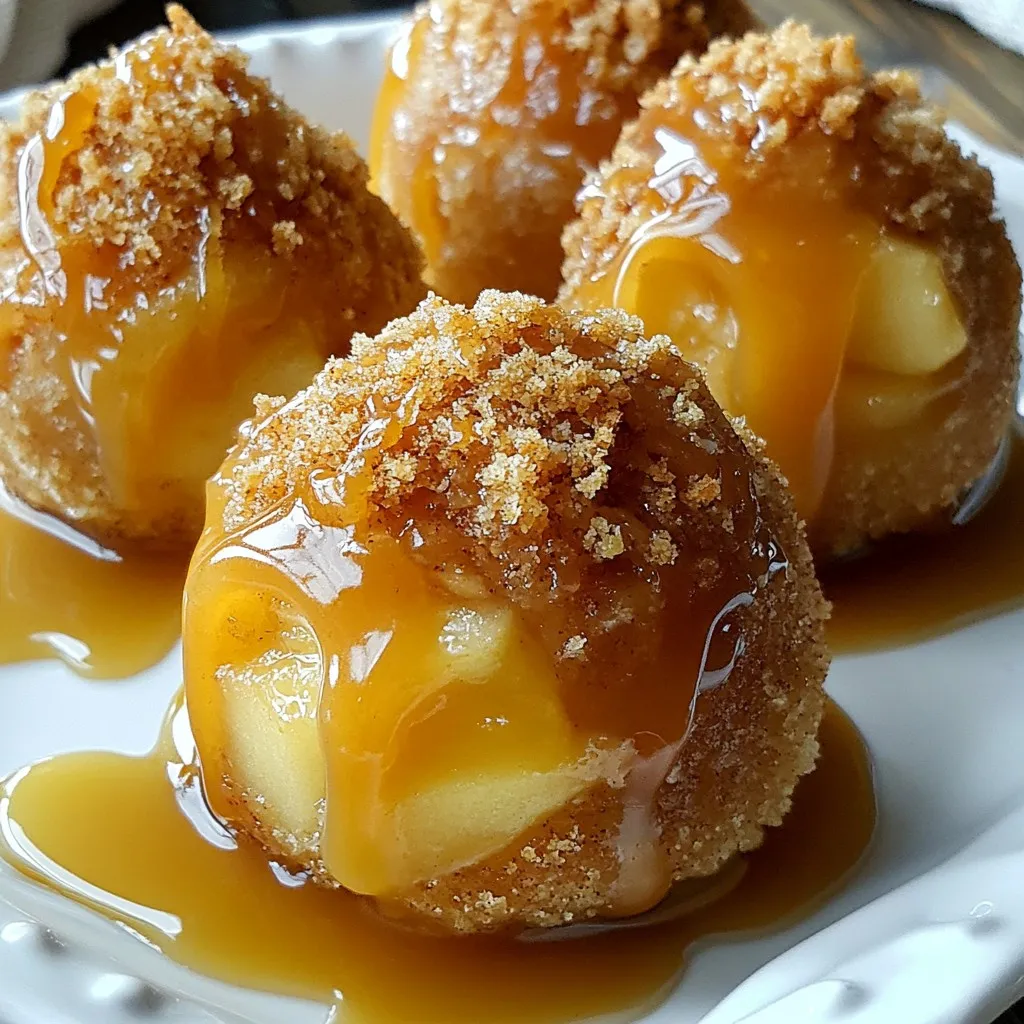
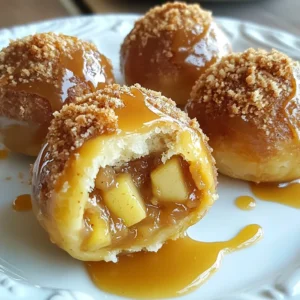
Caramel Apple Pie Bombs Irresistible Sweet Treats


If you’re craving a dessert that combines gooey caramel and spiced apples, you’re in the right place! Caramel Apple Pie Bombs are sweet bites of joy that will impress your family and friends. With a few simple ingredients, you can create these delightful treats in no time. Follow me as I take you through the easy steps, tips, and variations to make your caramel apple dreams come true!
Why I Love This Recipe
- Delicious Flavor Combination: The blend of sweet apple pie filling and rich caramel creates a mouthwatering treat that’s hard to resist.
- Easy to Make: With just a few ingredients and simple steps, these caramel apple pie bombs come together quickly, making them perfect for any occasion.
- Fun to Share: These bite-sized desserts are great for parties or gatherings, allowing everyone to enjoy a little taste of fall in every bite.
- Customizable Treat: You can easily adapt the recipe by adding nuts, spices, or even swapping the apple filling for another fruit filling of your choice.
Ingredients
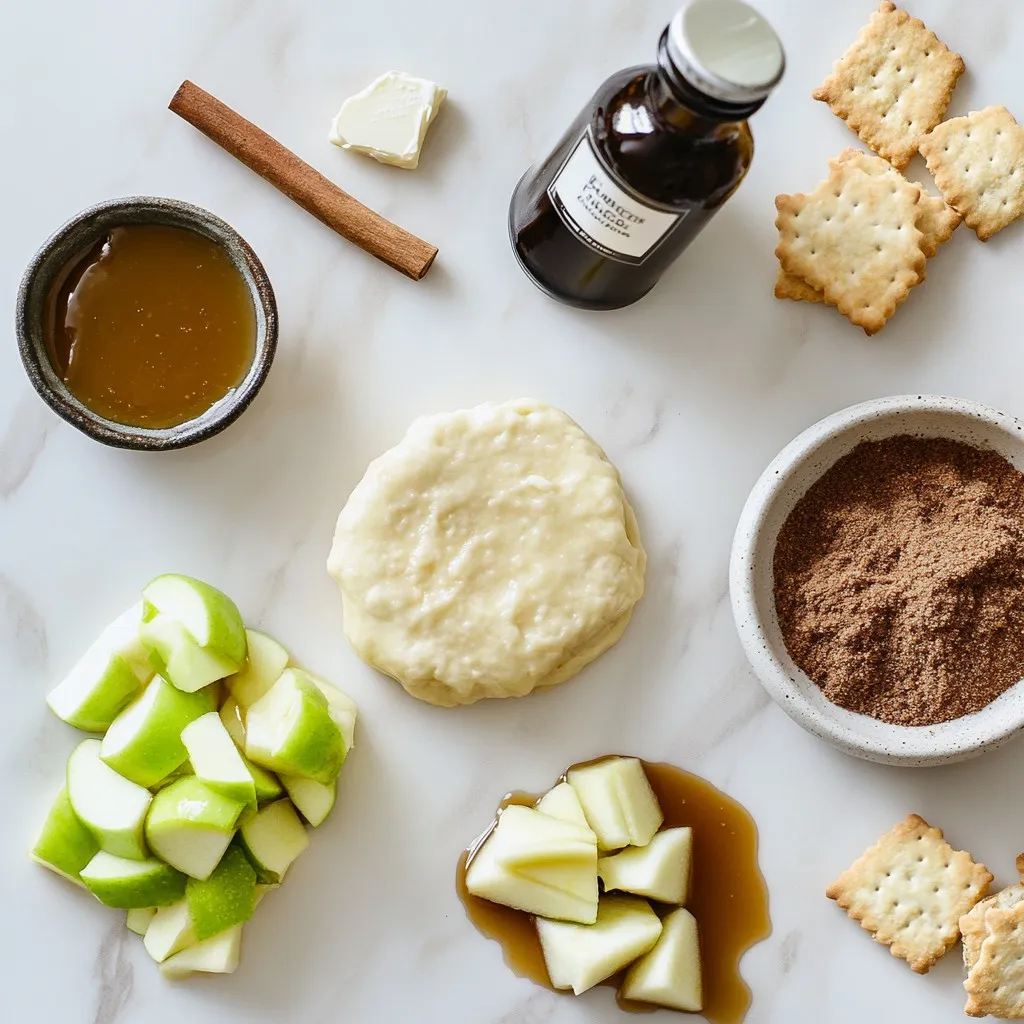
Essential Ingredients for Caramel Apple Pie Bombs
To make these tasty treats, gather the following ingredients:
– 2 cups apple pie filling (store-bought or homemade)
– 1 teaspoon ground cinnamon
– 1 tablespoon packed brown sugar
– 1 can (16 oz) refrigerated biscuit dough
– 1 cup caramel sauce (store-bought)
– 1 tablespoon melted unsalted butter
– 1 teaspoon pure vanilla extract
– 1 cup crushed graham crackers (for coating)
These ingredients form the base of our caramel apple pie bombs. The apple pie filling gives the sweet and fruity taste. The ground cinnamon adds warmth, while the brown sugar enhances the flavor. The biscuit dough wraps around everything, creating a lovely bite-sized treat.
Optional Ingredients for Serving
You can also enhance your caramel apple pie bombs with these optional ingredients:
– Whipped cream
– Vanilla ice cream
Serving these bombs with whipped cream or ice cream adds a creamy texture. It also balances the sweetness of the caramel. You can customize your dessert to suit your taste.
Ingredient Substitutions
If you need to swap ingredients, here are some ideas:
– Use homemade apple pie filling if you prefer a fresher taste.
– Replace the biscuit dough with puff pastry for a flakier treat.
– Try using a different type of sauce, like chocolate, for a new twist.
These substitutions can change the flavor and texture of your bombs, making them your own. Don’t hesitate to experiment and find what you love best!
Step-by-Step Instructions
Prepping the Baking Sheet and Oven
First, heat your oven to 375°F (190°C). This step helps the bombs bake evenly. Next, grab a baking sheet and line it with parchment paper. This makes clean-up easy and keeps the bombs from sticking.
Making the Apple Pie Filling Mixture
In a medium bowl, combine 2 cups of apple pie filling, 1 teaspoon of ground cinnamon, and 1 tablespoon of packed brown sugar. Mix these ingredients well until they are fully blended. The cinnamon and sugar will enhance the apple flavor, making it even more delicious.
Assembling the Apple Pie Bombs
Open your can of refrigerated biscuit dough. Separate the dough into 12 biscuits. Flatten each biscuit with your hands or a rolling pin into a small disk. Place about 1 tablespoon of the apple filling in the center of each disk. Fold the edges over the filling and pinch them to seal. Shape each filled dough into a ball and place it seam-side down on the baking sheet.
Baking and Final Touches
Using a pastry brush, lightly coat the tops of each bomb with 1 tablespoon of melted unsalted butter. Then, drizzle a small amount of caramel sauce over them. Roll each bomb in 1 cup of crushed graham crackers to coat them fully. Bake for 12-15 minutes until they are golden brown. After baking, let them cool for a few minutes. For extra sweetness, drizzle more caramel sauce on top before serving warm.
Tips & Tricks
How to Achieve the Perfect Bake
To get the best bake, follow these steps:
– Preheat your oven to 375°F (190°C) for even cooking.
– Use parchment paper on your baking sheet to prevent sticking.
– Bake your bombs for 12-15 minutes. Look for a golden brown color.
– Let them cool for a few minutes to set before serving.
Flavor Enhancements for Your Apple Pie Bombs
Add even more flavor with these ideas:
– Mix in a pinch of nutmeg with your apple filling. It adds warmth.
– Try adding chopped nuts to the filling for crunch.
– For a fun twist, add a splash of bourbon to the caramel sauce. It adds depth.
Gluten-Free or Vegan Variations
You can easily make these treats fit your diet:
– For gluten-free, swap the biscuit dough with gluten-free dough.
– Use almond milk or coconut milk in place of regular milk in caramel.
– Substitute the butter with coconut oil for a vegan option.
– Choose a dairy-free caramel sauce to keep it vegan-friendly.
Pro Tips
- Use Fresh Apples: For an even more flavorful filling, consider using fresh apples instead of pre-made apple pie filling. Chop them into small pieces and sauté with cinnamon and brown sugar until tender.
- Experiment with Spices: Feel free to add additional spices like nutmeg or allspice to the apple filling for a unique twist on flavor.
- Seal Properly: Ensure the edges of the biscuit dough are tightly sealed to prevent the filling from leaking during baking. Pinch the seams well and shape into a ball.
- Serve Hot: These caramel apple pie bombs taste best when served warm. Consider warming them up in the oven briefly before serving for that fresh-out-of-the-oven taste.
Variations
Different Fillings to Experiment With
You can switch up the apple filling for a fun twist. Try cherry pie filling for a burst of tartness. You can also use pumpkin filling to give a fall vibe. If you’re feeling adventurous, mix in some cream cheese for a rich layer. This adds a nice creamy touch to every bite. Don’t be afraid to mix flavors. You could even blend apple and berry fillings for a fruity surprise.
Alternative Coatings Ideas
Instead of graham crackers, try crushed nuts for a crunchier texture. Pecans or almonds work great and add a nutty flavor. For a sweeter twist, roll the bombs in cinnamon sugar. This gives a lovely sweet crust that pairs well with the filling. You could also drizzle melted chocolate on top for a decadent finish. This adds a rich layer of flavor that delights the senses.
Creative Serving Suggestions
These treats shine when served warm. Pair them with a scoop of vanilla ice cream to balance the sweetness. Add a drizzle of caramel sauce over the top for extra indulgence. You can also serve them with whipped cream for a fluffy touch. For a fun twist, add a sprinkle of sea salt to bring out the flavors. This contrast enhances the sweetness and makes each bite even more enjoyable.
Storage Info
Best Practices for Storage
To keep your Caramel Apple Pie Bombs fresh, store them in an airtight container. Let them cool completely before placing them inside. This helps avoid moisture buildup, which can make them soggy. If you have leftovers, you can store them at room temperature for a day or two. For longer storage, put them in the fridge.
Reheating Instructions
To reheat your Caramel Apple Pie Bombs, preheat your oven to 350°F (175°C). Place the bombs on a baking sheet. Heat them for about 10 minutes. This will warm them up nicely and keep them crisp. If you’re in a hurry, you can use the microwave. Heat them for 15-20 seconds, but this may make them soft.
Shelf Life of Caramel Apple Pie Bombs
Caramel Apple Pie Bombs last up to 3 days in the fridge. If you freeze them, they can last for up to 2 months. To freeze, wrap each bomb in plastic wrap and place them in a freezer bag. When you’re ready to enjoy, just thaw them in the fridge overnight before reheating.
FAQs
Can I use homemade apple pie filling?
Yes, you can use homemade apple pie filling. It will taste fresh and delicious. Just make sure it is well-seasoned with cinnamon and sugar. This adds warmth to your Caramel Apple Pie Bombs. If you prefer a chunkier texture, chop your apples into small pieces. This will give each bite a nice crunch.
How do I make these ahead of time?
To make Caramel Apple Pie Bombs ahead of time, follow these steps. You can prepare the apple filling and dough separately. Assemble the bombs, but don’t bake them yet. Place the unbaked bombs on a baking sheet and cover them with plastic wrap. Keep them in the fridge for up to 24 hours. When you’re ready, just bake them straight from the fridge. You might need to add a few extra minutes to the baking time.
What can I serve with Caramel Apple Pie Bombs?
Caramel Apple Pie Bombs are tasty on their own. You can serve them with whipped cream or vanilla ice cream for extra creaminess. A drizzle of extra caramel sauce adds a nice touch, too. For a fun twist, sprinkle some crushed nuts on top. This adds crunch and flavor, making your dessert even better!
You’ve learned how to make delicious Caramel Apple Pie Bombs from scratch. We covered essential and optional ingredients, step-by-step baking, and tips for great results. You can even try different fillings and coatings to make your bombs unique. Remember to store them right for the best taste and use simple reheating methods. I hope you feel inspired to create your own tasty treats that friends and family will love. Enjoy your baking adventure and share these delicious bites with those you care abou
Caramel Apple Pie Bombs
Ingredients
- 2 cups apple pie filling
- 1 teaspoon ground cinnamon
- 1 tablespoon packed brown sugar
- 1 can (16 oz) refrigerated biscuit dough
- 1 cup caramel sauce
- 1 tablespoon melted unsalted butter
- 1 teaspoon pure vanilla extract
- 1 cup crushed graham crackers
- whipped cream or vanilla ice cream (optional)
Instructions
- Begin by preheating your oven to 375°F (190°C). Prepare a baking sheet by lining it with parchment paper and set it aside for later use.
- In a medium mixing bowl, combine the apple pie filling, ground cinnamon, and packed brown sugar. Stir the mixture thoroughly until all ingredients are evenly incorporated.
- Open the can of refrigerated biscuit dough and separate the dough into individual biscuits, placing them on a clean surface.
- Take one biscuit and gently flatten it with your hands or a rolling pin, creating a small disk. In the center of the disk, add approximately 1 tablespoon of the apple pie filling mixture.
- Carefully fold the edges of the biscuit dough over the filling, pinching the seams together to create a secure seal. Shape the filled dough into a ball and place it seam-side down on the prepared baking sheet. Repeat this process for the remaining biscuits and filling.
- Using a pastry brush, lightly brush the tops of each apple pie bomb with the melted unsalted butter, then drizzle a small amount of caramel sauce over each one.
- Roll each filled biscuit ball in the crushed graham crackers until they are evenly coated, then return them to the baking sheet.
- Place the baking sheet in the preheated oven and bake for 12-15 minutes or until the bombs turn a lovely golden brown.
- Once baked, remove the bombs from the oven and allow them to cool for a few minutes. For an extra touch of sweetness, drizzle more caramel sauce over the warm bombs before serving.
- Serve these delightful treats warm, optionally accompanied by whipped cream or a scoop of vanilla ice cream for an indulgent dessert experience!
![For the dry mix, gather these items: - 1 ½ cups all-purpose flour - 1 teaspoon baking powder - 1 teaspoon baking soda - ½ teaspoon salt - 1 teaspoon ground cinnamon - ½ teaspoon ground nutmeg - ¼ teaspoon ground ginger These ingredients help create the loaf's structure and flavor. The spices add warmth and depth. Next, collect these wet items: - 1 cup granulated sugar - ½ cup packed brown sugar - 1 cup vegetable oil - 3 large eggs - 1 teaspoon vanilla extract These components bring moisture and sweetness. The combination of sugars gives a rich taste. Now, let's spice it up with these add-ins: - 2 cups finely shredded carrots (approximately 4 medium carrots) - ½ cup crushed pineapple, well-drained - ½ cup chopped walnuts (optional) These add-ins bring texture and flavor. The carrots keep the loaf moist, while the pineapple adds a touch of sweetness. If you like crunch, toss in the walnuts. For the full recipe, you can explore the step-by-step instructions in [Full Recipe]. - Preheat the oven to 350°F (175°C). - Prepare your 9x5-inch loaf pan. Use non-stick spray or line it with parchment paper. This helps the loaf come out easily after baking. - In a medium bowl, combine the dry ingredients. Whisk together the flour, baking powder, baking soda, salt, and spices. Set this mixture aside for later. - In a large bowl, mix the sugars and oil. Beat them together until smooth. - Add the eggs one at a time to the sugar mixture. Mix well after each addition. Stir in the vanilla extract. - Gradually blend the dry ingredients with the wet ingredients. Stir gently until just combined. Avoid overmixing to keep your loaf tender. - Carefully fold in the finely shredded carrots, well-drained crushed pineapple, and chopped walnuts if you’re using them. Make sure they are evenly spread throughout the batter. - Pour the batter into your prepared loaf pan. Use a spatula to smooth the top. - Place the loaf pan in the oven. Bake for 50-60 minutes. Check for doneness by inserting a toothpick in the center. It should come out clean. If the top browns too fast, cover it loosely with aluminum foil. Use freshly grated carrots for the best flavor and moisture. Fresh carrots add a sweet crunch. You can also adjust the sugar based on your taste. If you prefer a sweeter cake, add a bit more sugar. If you want it less sweet, cut back. Mixing just until combined keeps the cake tender and moist. If you overmix, the loaf can turn out dense. When you add dry ingredients to the wet mix, stir gently. The batter should look slightly lumpy; that’s okay! To get a smooth cream cheese frosting, start with room temperature cheese and butter. Cold ingredients can lead to lumps. Beat the cream cheese and butter until creamy. Gradually add powdered sugar to avoid a cloud of sugar. Remember to mix until smooth, and then add a pinch of salt for flavor. For the full recipe, check out the [Full Recipe]. {{image_4}} You can easily change the flavor of your carrot cake loaf with different add-ins. If you want to swap nuts, try using raisins or shredded coconut instead. Both options add a sweet, chewy texture that pairs well with the spices. You can also adjust spices for a unique flavor. Add a little more cinnamon for warmth or some cardamom for a fragrant twist. This way, you can create a taste that fits your mood. If you need gluten-free options, consider almond or oat flour. Both flours work well and keep the loaf moist. For vegan substitutions, use flax eggs instead of regular eggs. Just mix one tablespoon of ground flaxseed with three tablespoons of water for each egg. You can also replace the cream cheese with a vegan cream cheese spread. These small changes keep the cake delicious while meeting your dietary needs. Pair your carrot cake loaf with a warm cup of coffee or tea. The rich flavors balance perfectly with a hot drink. To make your loaf look fancy, arrange slices on a beautiful platter. You can sprinkle chopped walnuts on top and add edible flowers for color. This makes your dessert not just tasty but also a feast for the eyes. For a fun touch, serve it with a scoop of vanilla ice cream for a delightful contrast. Make sure to check out the Full Recipe for more details on creating this delicious treat! To keep your carrot cake loaf fresh, store it in the fridge. Place it in an airtight container. This helps keep moisture in and prevents it from drying out. The cream cheese frosting also needs special care. To keep the frosting fresh, cover it with plastic wrap. This stops air from making it hard or crusty. You can freeze the carrot cake loaf both ways. First, freeze it before frosting. Wrap it in plastic wrap and then foil. This helps keep the cake moist. If you already frosted it, freeze the loaf on a plate. Once frozen, wrap it tightly. To thaw the loaf, place it in the fridge overnight. This helps keep the texture nice and soft. The carrot cake loaf can last about three days at room temperature. Keep it in a cool, dry place. If you see any mold or smell a sour scent, it’s best to throw it away. Always trust your senses when checking if food is safe to eat. Enjoy your delicious treat while it's fresh! For the full recipe, check the complete guide. Baking a carrot cake loaf takes about 50-60 minutes at 350°F (175°C). To test for doneness, insert a toothpick into the center. If it comes out clean, your loaf is ready. If the top browns too quickly, cover it with foil. This tip helps keep the top soft and moist. Yes, you can prepare this loaf ahead of time. You can mix the dry ingredients and store them in an airtight container. The wet ingredients can also be combined a day before. Just keep them in the fridge. Bake the loaf when you are ready. It keeps well and tastes fresh. If you need a dairy-free option, use vegan cream cheese. Another choice is to blend silken tofu with a bit of vanilla and powdered sugar. This gives you a smooth frosting that still tastes great. You can also try coconut cream for a tropical twist. Yes, this carrot cake loaf is great for kids. It contains nutritious carrots and pineapple, which add vitamins. The loaf is moist and flavorful, making it appealing to young eaters. Just be sure to watch for any nut allergies if you use walnuts. To check if the loaf is done, look for a golden brown top. You can also gently press the top; it should spring back. Use a toothpick to test the center. If it comes out clean, your carrot cake loaf is perfect. These cues help ensure a delicious result. This blog post covered all the essential steps to make a delicious carrot cake loaf. We explored the key ingredients, from dry and wet components to tasty add-ins. I shared tips to keep your cake moist and flavorful, along with ways to customize your loaf. Lastly, we discussed storage and FAQs to help you perfect your baking. Embrace your baking journey and enjoy each slice of your creation!](https://fastmealmate.com/wp-content/uploads/2025/06/8b09a955-a057-4b29-b3fd-380f10cea1b9-768x768.webp)