
No-Bake Peanut Butter Bars Quick and Simple Recipe
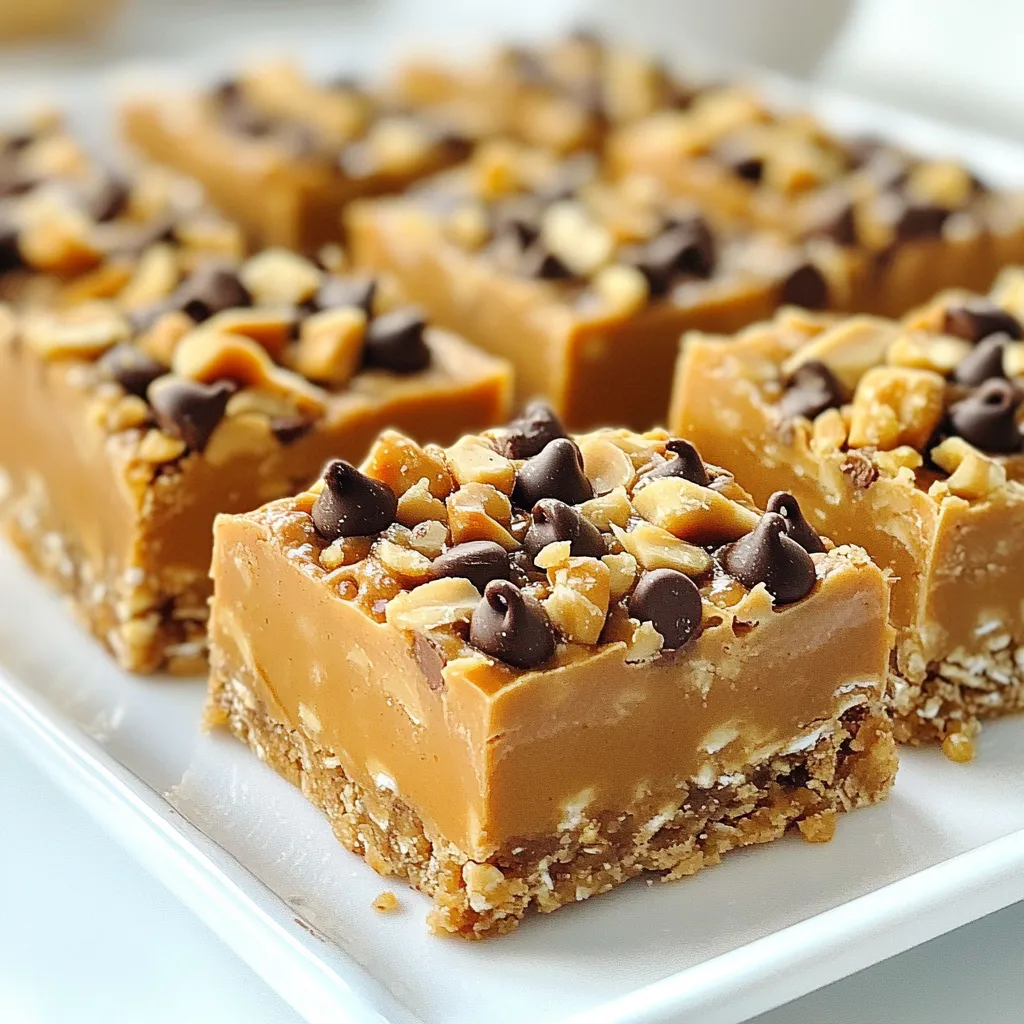
Craving a sweet treat that’s quick and easy? These No-Bake Peanut Butter Bars are just the answer! With simple ingredients like creamy peanut butter, rolled oats, and chocolate chips, you’ll whip up this delicious snack in no time. Whether you’re busy or just want a yummy dessert, this recipe is a must-try. Let me guide you through making the perfect bars that everyone will love!
Why I Love This Recipe
- Quick and Easy: This recipe requires no baking, making it a fast and convenient option for a delicious treat.
- Nutritious Ingredients: With wholesome ingredients like oats and almond flour, these bars offer a satisfying and healthy snack.
- Customizable: You can easily adjust the recipe by adding your favorite nuts or using different sweeteners to suit your taste.
- Perfect for Meal Prep: These bars store well in the fridge, making them an ideal option for meal prep and on-the-go snacking.
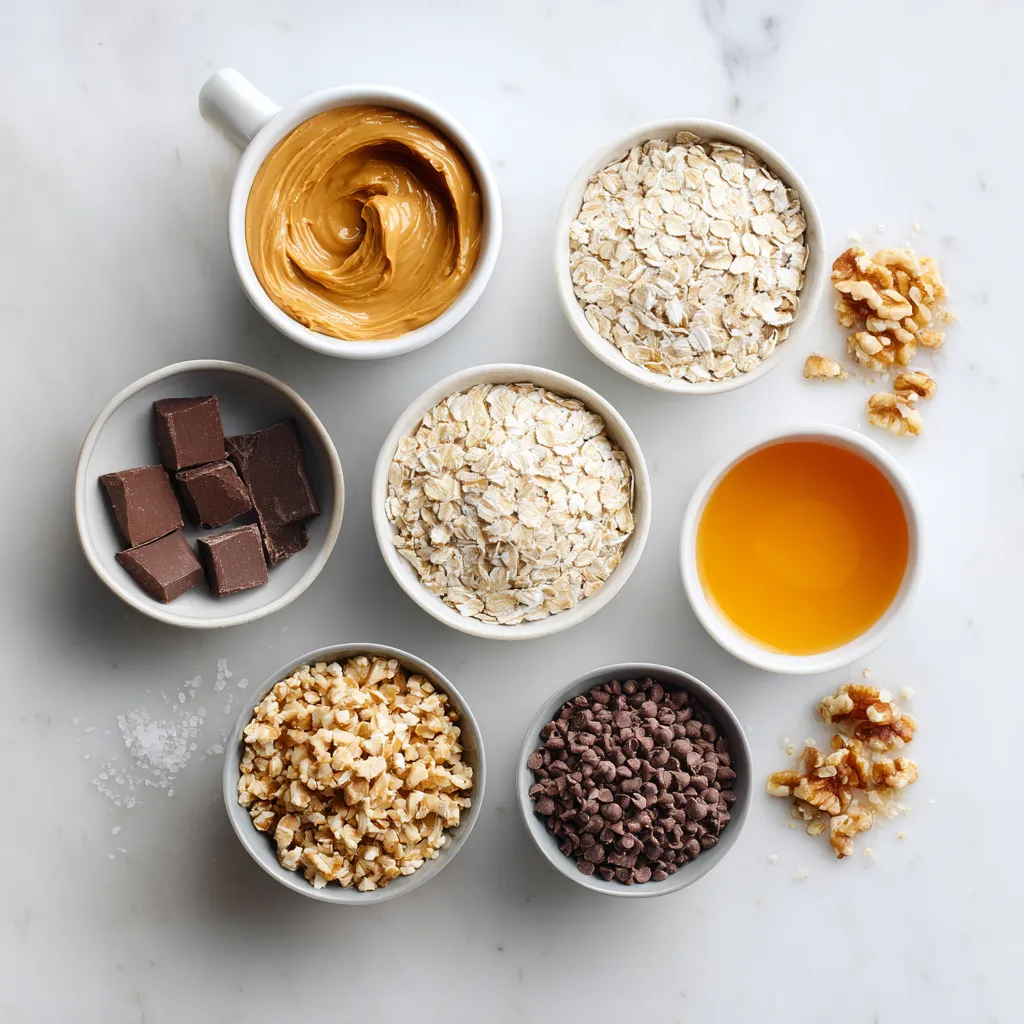
Ingredients
Essential ingredients for No-Bake Peanut Butter Bars
– 1 cup creamy peanut butter
– 1/2 cup honey or maple syrup
– 2 cups rolled oats
– 1/2 cup almond flour
– 1/2 cup dark chocolate chips
– 1/4 teaspoon salt
– 1 teaspoon vanilla extract
– Optional: 1/4 cup chopped nuts
To make these tasty bars, you need simple ingredients. Creamy peanut butter gives them their rich flavor. Honey or maple syrup adds sweetness. Use rolled oats for a chewy texture and almond flour for a nutty base. Dark chocolate chips offer a sweet finish, while salt balances all the flavors. Vanilla extract enhances the taste. If you want a crunch, add chopped nuts like almonds or walnuts.
These ingredients are easy to find. Most stores carry them. You can even swap honey for maple syrup based on your taste. The bars are quick to make. With just a few steps, you’ll have a delicious treat ready to chill.
Step-by-Step Instructions
Preparing the Peanut Butter Mixture
1. Start by melting the creamy peanut butter and honey together.
2. Use a medium saucepan on low heat.
3. Stir continuously until the mixture is smooth and creamy.
4. Remove from heat and add the vanilla extract and salt.
5. Mix well to blend all the flavors together.
Combining Dry Ingredients
1. In a large bowl, combine the rolled oats and almond flour.
2. Stir them together until they are well mixed.
3. Make sure there are no clumps in the dry mix.
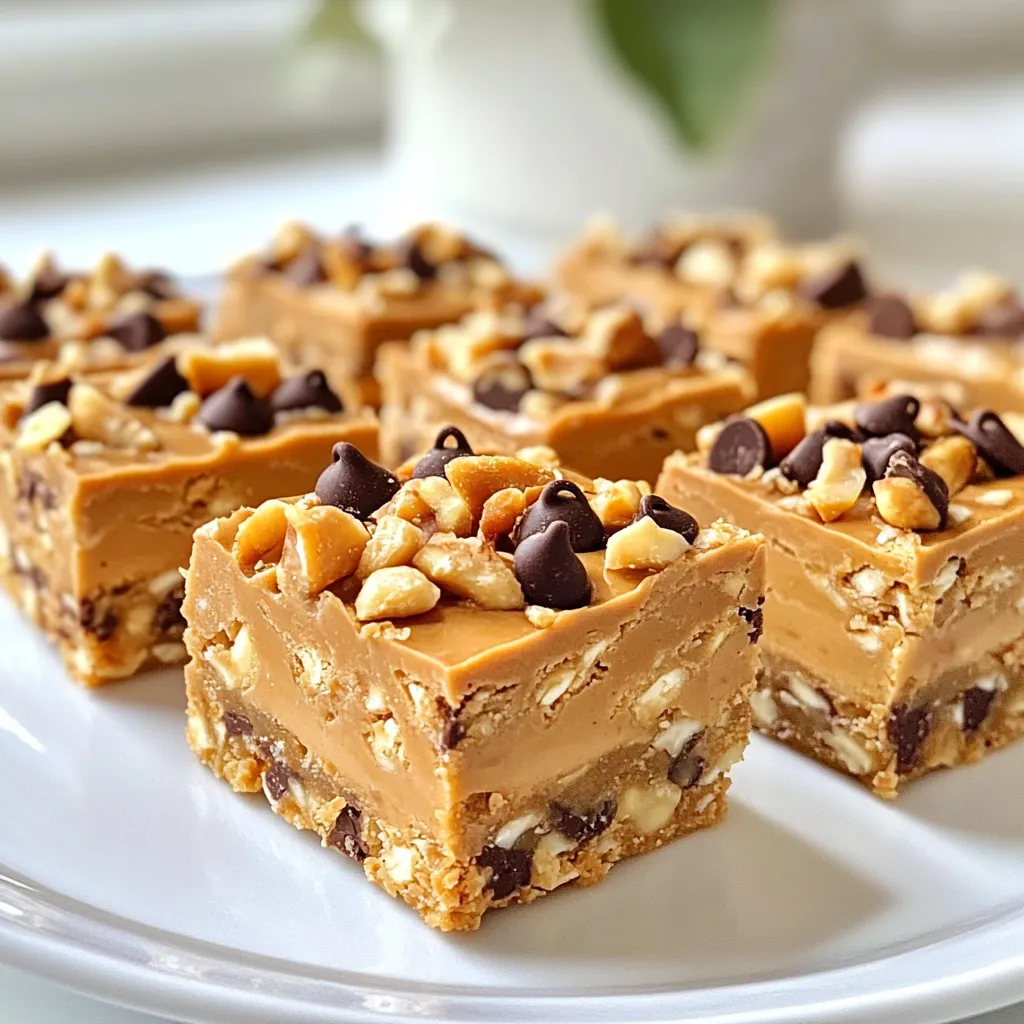
Forming the Bars
1. Pour the warm peanut butter mixture over the dry ingredients.
2. Mix thoroughly until everything is well coated.
3. If you want, fold in the dark chocolate chips and chopped nuts.
4. Prepare an 8×8 inch baking dish by lining it with parchment paper.
5. Leave some paper hanging over the edges for easy removal later.
6. Transfer the mixture into the dish.
7. Use a spatula or your hands to press it down firmly.
8. Make sure it is evenly spread and compacted.
9. Place the dish in the refrigerator for at least 1 hour to set.
10. Once firm, lift the bars out using the parchment edges.
11. Cut them into squares or rectangles.
12. Store leftovers in an airtight container in the fridge.
Tips & Tricks
Common mistakes to avoid
– Overheating the peanut butter mixture: Heat the peanut butter and honey gently. If it gets too hot, the bars might not set well.
– Not pressing the mixture firmly: Use your hands or a spatula to press down hard. This step is key for a sturdy bar.
How to achieve the best texture
– Tips for compacting the bars: After mixing, pack the mixture tightly in the baking dish. This ensures every bite holds together.
– Suggestions for variations: You can swap almond flour for oats or use different nut butters. Play around for new tastes!
Enhancing flavor and presentation
– Drizzling melted chocolate: Melt some dark chocolate and drizzle it over the bars before they set. This adds a sweet touch.
– Adding toppings before setting: Sprinkle chopped nuts or coconut flakes on top. This not only looks great but adds crunch too.
Pro Tips
- Use Natural Ingredients: Opt for organic peanut butter and pure maple syrup to enhance the flavor and health benefits of your bars.
- Chill Thoroughly: Make sure to refrigerate the bars for a full hour to ensure they set properly and maintain their shape when cut.
- Customize Your Mix-ins: Feel free to add other ingredients like dried fruits, seeds, or coconut flakes for added flavor and texture.
- Perfect Storage: Store the bars in an airtight container in the fridge to maintain freshness and prevent them from becoming too soft.
Variations
Flavor variations
You can switch up flavors by using different nut butters. Almond butter or cashew butter works great. Each choice gives a new taste. You can also try sweeteners like agave or coconut sugar. They add unique sweetness to your bars.
Add-ins for extra crunch
For extra crunch, consider adding more nuts or seeds. Chopped almonds, walnuts, or pumpkin seeds are all good options. You can also mix in dried fruits. Raisins or cranberries give a sweet and chewy texture.
Dietary modifications
If you need gluten-free bars, use certified gluten-free oats. This keeps your recipe safe for a gluten-free diet. For vegan options, substitute honey with maple syrup. Both choices keep your bars delicious while meeting dietary needs.
Storage Info
How to store No-Bake Peanut Butter Bars
To keep your bars fresh, use an airtight container. This prevents moisture and keeps them tasty. Line the container with parchment paper for easy removal. Place the bars in a single layer if you can. If not, separate layers with parchment to avoid sticking.
Shelf life
These bars last about one week in the refrigerator. You will know they are spoiled if they smell off or have a change in texture. Always check for any mold or odd colors before eating.
Freezing options
To freeze leftover bars, wrap them tightly in plastic wrap, then place them in a freezer bag. This keeps out air and prevents freezer burn. For thawing, move the bars to the fridge overnight. You can serve them cold or let them sit at room temperature for a bit.
FAQs
Can I make No-Bake Peanut Butter Bars ahead of time?
Yes, you can make these bars ahead of time. They store well in the fridge. I often prepare them the night before a gathering. Just keep them in an airtight container. They taste great after chilling for a few hours.
What can I substitute for almond flour?
If you need a substitute for almond flour, try oat flour or coconut flour. Both work well in this recipe. Just keep in mind that the texture might change slightly. Oat flour gives a nice flavor and is easy to make at home.
Are these bars gluten-free?
Yes, these bars are gluten-free if you use gluten-free oats. Be sure to check the label on your oats. Most rolled oats are gluten-free, but some can be processed in facilities with gluten. Always look for certified gluten-free oats to be safe.
How do I know when the bars are set properly?
The bars are set when they feel firm to the touch. After one hour in the fridge, they should hold their shape. If they still feel soft, give them a bit more time. You can also stick a toothpick in the center; if it comes out clean, they are ready.
Can I make these bars nut-free?
Yes, you can make these bars nut-free. Use sun butter or soy nut butter instead of peanut butter. These alternatives provide a similar texture and flavor. Just ensure that your chocolate chips are also nut-free if you add them.
No-Bake Peanut Butter Bars are simple and fun to make. We’ve covered essential ingredients like creamy peanut butter, rolled oats, and dark chocolate chips. You learned step-by-step instructions, tips to avoid mistakes, and how to store your bars for freshness. Enjoy experimenting with variations to suit your taste. Remember, these bars are a healthy treat that can fit into many diets. Try them today, and you’ll enjoy a delicious snack that’s easy to make and shar

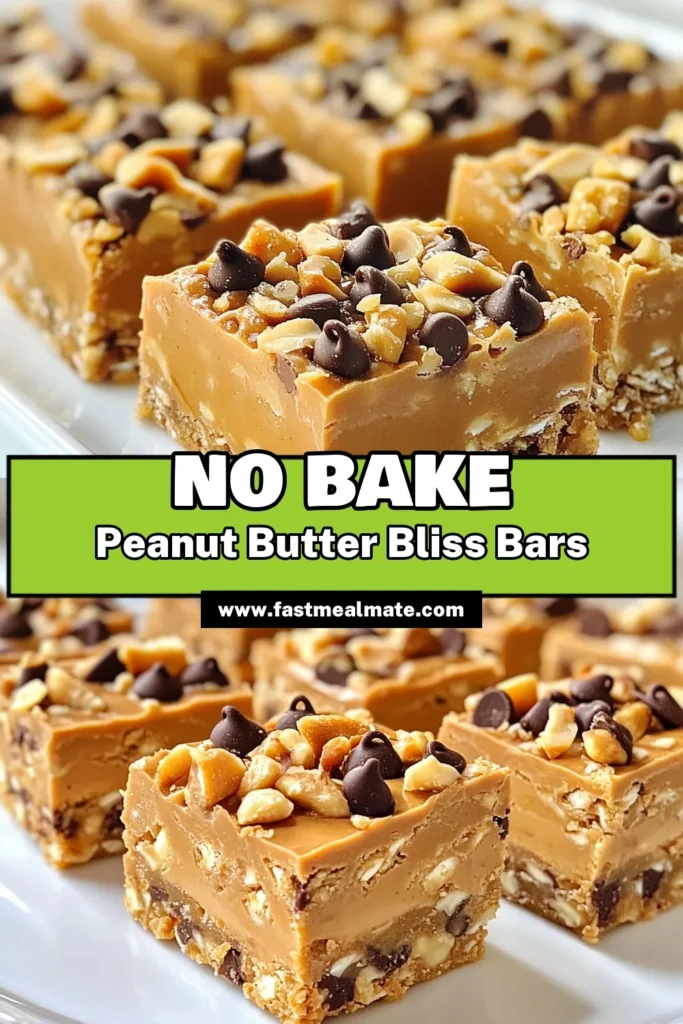
No-Bake Peanut Butter Bliss Bars
Ingredients
- 1 cup creamy peanut butter
- 1 2 cup honey or maple syrup
- 2 cups rolled oats
- 1 2 cup almond flour
- 1 2 cup dark chocolate chips
- 1 4 teaspoon salt
- 1 teaspoon vanilla extract
- 1 4 cup chopped nuts (optional)
Instructions
- In a medium saucepan, combine the creamy peanut butter and honey (or maple syrup) over low heat. Stir continuously until the mixture is completely melted and smooth in texture.
- Once melted, remove the saucepan from heat. Add the vanilla extract and salt, stirring well to ensure an even distribution of flavor.
- In a separate large bowl, combine the rolled oats and almond flour. Pour the warm peanut butter mixture over the dry ingredients, and mix thoroughly until everything is fully incorporated.
- If you’re adding them, gently fold in the dark chocolate chips and the chopped nuts, ensuring they are evenly dispersed throughout the mixture for added crunch.
- Prepare a square baking dish (8x8 inches) by lining it with parchment paper. Allow a bit of paper to hang over the sides for easier removal later.
- Transfer the mixture into the lined baking dish, and use a spatula or your hands to firmly press it down. Ensure the mixture is evenly spread and compacted for the best texture.
- Refrigerate the dish for at least 1 hour to allow the bars to set and firm up. Once they are sufficiently chilled and solid, lift them out of the dish using the parchment overhang.
- Cut the block into evenly sized bars and store any leftovers in an airtight container in the refrigerator. They will stay fresh for up to a week.
![- 2 cups all-purpose flour - 1 ½ cups granulated sugar - ½ cup unsalted butter, softened - 1 cup creamy ricotta cheese - 3 large eggs, at room temperature - 1 tsp pure vanilla extract - 1 tsp baking powder - ½ tsp baking soda - ½ tsp salt - 1 tsp ground cinnamon - 1 cup mini chocolate chips - ½ cup crushed pistachios (for topping) - Powdered sugar (for dusting) To create a Cannoli Cake, use fresh ingredients. Fresh items bring out the best taste. Quality ricotta makes the cake creamy and rich. Fresh eggs help the cake rise well. I always suggest using high-quality vanilla extract. It enhances the flavor. You can make some substitutions if needed. For a dairy-free option, try almond or coconut milk yogurt instead of ricotta. You can also use dairy-free butter. These swaps keep the taste close to the original. Another option is to switch out regular flour for gluten-free flour. This helps those with gluten sensitivities enjoy the cake too. Whatever you choose, keep it fresh to ensure the best Cannoli Cake experience. Check the [Full Recipe] for more details. 1. Preheat the Oven: Start by preheating your oven to 350°F (175°C). 2. Prepare Cake Pans: Grease two 9-inch round cake pans with butter. Dust them with flour to help the cakes come out easily. 3. Cream the Butter and Sugar: In a large bowl, mix the softened butter and granulated sugar. Use an electric mixer for about 3-4 minutes until light and fluffy. 4. Incorporate Ricotta: Add the ricotta cheese to this mixture. Blend until it is smooth and free of lumps. 5. Mix in Eggs and Vanilla: Crack three large eggs into the bowl, mixing well after each. Add in the pure vanilla extract and combine. 6. Combine Dry Ingredients: In a separate bowl, whisk together the flour, baking powder, baking soda, salt, and cinnamon. 7. Combine Wet and Dry Mixtures: Gradually add the dry mix to the ricotta mix. Stir gently until just combined. Don’t overmix; some lumps are fine! 8. Fold in Chocolate Chips: With a spatula, fold in mini chocolate chips until they are spread throughout the batter. 9. Divide the Batter: Pour the batter evenly into the prepared pans. Smooth the tops with a spatula. - Baking Time and Temperature: Place the pans in the oven and bake for 25-30 minutes. - Check Doneness: To check if the cakes are done, insert a toothpick in the center. It should come out clean. 1. Cool the Cakes: After baking, take the cakes out and let them cool in the pans for about 10 minutes. Then, invert them onto wire racks to cool completely. 2. Layer the Cakes: Once cool, put one cake layer on a serving plate. Spread a layer of ricotta filling on top. You can mix powdered sugar with ricotta for sweetness. Place the second layer on top. 3. Frost: Use any leftover ricotta filling or whipped cream to frost the top and sides of the cake. 4. Garnish: For a lovely finish, sprinkle crushed pistachios on top. Dust it with powdered sugar before serving. For more details on the ingredients and the full recipe, check the [Full Recipe]. To get the best texture in your Cannoli Cake, avoid overmixing. Mix until the wet and dry ingredients just come together. You want some lumps to keep it light. Using room temperature ingredients is key. It helps everything blend smoothly, which gives the cake a fluffy texture. You can add spices or extracts for a unique twist. Try adding a pinch of nutmeg or almond extract for extra flavor. These small changes can make your cake stand out. For serving, consider pairing it with fresh berries or a scoop of vanilla ice cream. These sides brighten the cake and add freshness. For the full flavor experience, try my Full Recipe for Cannoli Cake. {{image_4}} You can have fun with Cannoli Cake by changing the filling. While the classic ricotta is great, try adding chocolate or fruit. - Chocolate Filling: Mix in cocoa powder or melted chocolate for a rich taste. - Fruit Filling: Use pureed strawberries or raspberries for a fresh twist. You can also switch up the cake flavors. A lemon or almond cake base adds a new layer of taste. Want to mix up the frosting? Use whipped cream, cream cheese, or even a flavored buttercream. If you want a gluten-free version, swap regular flour for almond or coconut flour. You can also find gluten-free cake mixes. For a vegan Cannoli Cake, replace eggs with flax eggs and use vegan butter. Substitute ricotta with cashew cream or a store-bought vegan alternative. If you're cutting back on sugar, reduce the granulated sugar by half. You can also use natural sweeteners like honey or maple syrup. Just keep in mind that these may change the cake's texture. These variations help you enjoy Cannoli Cake while meeting different dietary needs. For the full recipe, check out the Cannoli Cake Delight section. To keep your Cannoli Cake fresh, store it in an airtight container. This will help prevent it from drying out and losing flavor. If you have leftovers, place them in the fridge. It is best to wrap each slice in plastic wrap before putting it in the container. For freezing, slice the cake first. Wrap each slice tightly in plastic wrap, then place them in a freezer-safe bag. This way, you can take out one slice at a time. When you want to enjoy a slice, let it thaw in the fridge overnight. Cannoli Cake can stay fresh in the fridge for about 4 to 5 days. If frozen, it can last up to 3 months. Always look for signs of spoilage. If the cake smells off or has a change in texture, it's best to toss it. Mold is a clear sign that the cake is no longer safe to eat. Enjoy your Cannoli Cake while it's fresh for the best taste! What is Cannoli Cake? Cannoli cake is a delightful dessert inspired by the classic Italian cannoli. It features layers of moist cake filled with a rich ricotta mixture. The cake often includes mini chocolate chips and hints of cinnamon, giving it a sweet and creamy flavor. Can I make Cannoli Cake ahead of time? Yes! You can make cannoli cake a day or two in advance. Just store it in the fridge. Keep it covered to maintain freshness. This also allows the flavors to blend nicely. How long does Cannoli Cake last in the refrigerator? Cannoli cake lasts about 3 to 5 days in the refrigerator. Make sure to cover it well. Check for any signs of spoilage before serving. Can I use other cheeses instead of ricotta? You can use mascarpone cheese if you want a richer taste. Cream cheese is another option for a different flavor. However, ricotta provides the classic cannoli texture you crave. Pairing Cannoli Cake with beverages Cannoli cake pairs well with coffee or espresso. A glass of sweet dessert wine also complements its flavors. For a non-alcoholic option, try a chilled almond milk or vanilla soda. Ideal occasions for serving Cannoli Cake Serve cannoli cake at birthday parties, family gatherings, or holidays. It's perfect for any celebration. You can also enjoy it as a special treat on a cozy night in. Making a Cannoli Cake is fun and rewarding. You learned about fresh ingredients, step-by-step baking, and cooling tips. We explored variations and storage methods, too. Remember, fresh tastes best, and small changes can make a big difference. You can adapt this cake to fit any diet or preference. Now it’s time to gather your ingredients and start baking. Enjoy each bite of your tasty creation! This cake is a treat everyone will love.](https://fastmealmate.com/wp-content/uploads/2025/06/6e5f8d9a-9791-42a1-9598-f56c39528743-768x768.webp)
![This Chocolate Tres Leches Cake uses simple ingredients. Each one works together to create a rich flavor. - 1 cup all-purpose flour - 1/2 cup unsweetened cocoa powder - 1 1/2 teaspoons baking powder - 1/2 teaspoon baking soda - 1/4 teaspoon salt - 1/2 cup unsalted butter, softened - 1 cup granulated sugar - 3 large eggs, at room temperature - 1 teaspoon vanilla extract - 1/2 cup buttermilk, at room temperature - 1 cup sweetened condensed milk - 1 cup evaporated milk - 1 cup whole milk - 1 cup heavy cream, chilled - 2 tablespoons powdered sugar (for whipped cream) - Chocolate shavings or cocoa powder for garnish (optional) These ingredients create a soft cake soaked in a sweet milk mixture. The heavy cream topping adds a light and airy touch. Using room temperature ingredients helps everything mix well. I recommend using fresh milk for the best taste. For a unique twist, sprinkle chocolate shavings on top before serving. Enjoy making this delicious treat! For the complete recipe, check the [Full Recipe]. Start by preheating your oven to 350°F (175°C). Grab a 9x13 inch baking pan. Grease it with butter to make sure your cake won’t stick. Dust the pan lightly with flour. This quick step helps the cake come out clean and perfect. In a medium bowl, sift together the all-purpose flour, cocoa powder, baking powder, baking soda, and salt. This helps mix everything well. In a large bowl, use an electric mixer to beat the softened butter and sugar until it is light and fluffy. This takes about 3-5 minutes. Then, add the eggs one at a time. Mix well after each egg. Finally, stir in the vanilla extract. Slowly fold the dry ingredients into the wet mixture. Alternate with the buttermilk. Start and finish with the dry mix. Be gentle; mix until you see no flour streaks. Pour the batter into your prepared pan. Smooth the top with a spatula. Bake for 30-35 minutes. Check if it’s done by inserting a toothpick into the center; it should come out clean. Let it cool for 10 minutes, then turn it out onto a wire rack. In a separate bowl, mix the sweetened condensed milk, evaporated milk, and whole milk. Whisk this mixture until blended. This will soak into your cake, making it rich and moist. Once the cake is cool, poke holes in the top with a fork. Pour the tres leches mixture evenly over the cake. This helps the cake absorb the milk. Cover it with plastic wrap and let it soak for at least one hour. This step is key for flavor. In a large bowl, beat the chilled heavy cream with powdered sugar until stiff peaks form. Spread this whipped cream over the soaked cake. For a nice touch, sprinkle chocolate shavings or cocoa powder on top. Refrigerate the cake for at least 2 hours before serving. This waiting time mixes the flavors and makes each bite delicious. For the full recipe, check the details in the earlier sections. To get a moist cake, follow a few simple steps. Start by using room temperature ingredients. This helps the batter mix well. Next, do not overmix the batter. Mix until just combined. Overmixing adds air, which can dry the cake out. Finally, bake the cake just until a toothpick comes out clean. If you bake too long, the cake will dry out. Soaking the cake properly is key. First, let the cake cool completely before soaking it. This helps the cake absorb the milk mixture better. Use a fork to poke holes all over the top of the cake. This allows the milk to seep in. Then, pour the tres leches mixture evenly over the cake. Let it sit for at least one hour. For best results, cover it with plastic wrap and refrigerate. This ensures the cake soaks up all the flavor. Whipped cream adds a light touch to the cake. Start by chilling your mixing bowl and beaters. This keeps the cream cold and helps it whip better. Beat the heavy cream until it forms stiff peaks. This means it should hold its shape when you lift the whisk. Add the powdered sugar gradually for sweetness. Spread the whipped cream gently over the soaked cake. For a fun twist, add chocolate shavings or a sprinkle of cocoa powder on top. For the complete recipe, check the Full Recipe section. {{image_4}} You can make a gluten-free version of this cake easily. Just swap the all-purpose flour for a gluten-free flour blend. Look for a blend that works well for baking. This change keeps the cake moist and delicious. You may also add a pinch of xanthan gum to help the texture. To create a vegan chocolate tres leches cake, replace the eggs with flax eggs. Mix 1 tablespoon of ground flaxseed with 2.5 tablespoons of water for each egg. For the milk mixture, use coconut milk, almond milk, or any plant-based milk. Use coconut cream instead of heavy cream for topping. This way, you keep the rich flavor while going dairy-free. You can also play with flavors to make this cake unique. For a minty twist, add mint extract to the batter and whipping cream. Just a teaspoon will do. If you love coffee, add espresso powder to the batter for a rich, coffee flavor. You can also fold in chocolate chips for more texture and taste. Each variation brings a new fun experience to this classic dessert. For the full recipe, check the source to get all the details you need. To keep your Chocolate Tres Leches Cake fresh, always store it in the fridge. Use an airtight container to prevent it from drying out. If you have not yet topped it with whipped cream, store the cream separately. This keeps the cake moist and the cream fluffy. When stored properly, the cake lasts about 3 to 5 days in the fridge. The flavors will continue to blend, making each bite even better. Always check for any signs of spoilage, like a strange smell or changes in texture. You can freeze the cake if you want to keep it longer. Wrap it tightly in plastic wrap, then place it in a freezer-safe bag. This way, it can last up to 3 months in the freezer. When you're ready to enjoy it, let it thaw in the fridge overnight. Add the whipped cream topping just before serving for the freshest taste. For the complete recipe, you can refer to the Full Recipe section. Yes, you can! This cake is great for planning ahead. You can bake the cake, soak it, and then chill it in the fridge. It tastes even better after a day. Just cover it well so it stays fresh. Tres leches cake is soaked in three types of milk. Regular cake usually has no soaking. Tres leches is moist and rich. Regular cake is often lighter. The extra milk makes tres leches creamy and sweet. To keep the cake from being too soggy, let it cool completely first. After soaking, cover the cake and chill it. Serve it within a few days. This way, it stays moist without getting overly wet. Yes, you can use cake mix. Just follow the package instructions for baking. Make sure to adjust the milk mixture. This way, you get the rich flavor of tres leches without starting from scratch. You can use sweetened condensed milk, evaporated milk, and whole milk. If you want, you can try alternatives like almond milk or oat milk. Each choice will give a different taste, but they will still work well. For the full recipe, check out the Heavenly Chocolate Tres Leches Cake recipe above! In this post, we covered the essential steps to make a Chocolate Tres Leches Cake. You learned about the key ingredients and how to mix them. We detailed how to bake the cake and prepare the soaking mix. You got tips on keeping your cake moist and explored tasty variations. Finally, we discussed storing leftovers to enjoy later. Baking is fun and rewarding. Try this recipe to impress friends and family. Enjoy every delicious bite!](https://fastmealmate.com/wp-content/uploads/2025/06/83784e58-e7f6-4d4b-aebc-0bf8177d26de-768x768.webp)
![- 1 ½ cups graham cracker crumbs - ½ cup unsalted butter, melted - 2 tablespoons granulated sugar - 8 oz cream cheese, softened - ½ cup powdered sugar - ½ cup heavy whipping cream - Zest and juice of 1 lemon - 1 teaspoon pure vanilla extract - Assorted fresh berries (for topping) - Fresh mint leaves (for garnish) Gathering the right ingredients is key. The graham cracker crumbs form a sweet and crunchy crust. Unsalted butter adds richness, while granulated sugar gives a touch of sweetness. Cream cheese provides that classic cheesecake texture. Powdered sugar balances the filling's flavor. Next, I add heavy whipping cream for lightness. The zest and juice from the lemon bring bright flavor. Pure vanilla extract adds depth. For garnishing, I use fresh berries on top for color and mint leaves for a fresh touch. These ingredients come together to create a treat that is light, creamy, and bursting with flavor. You can find the detailed steps in the Full Recipe. - Combine 1 ½ cups of graham cracker crumbs, ½ cup melted unsalted butter, and 2 tablespoons granulated sugar in a bowl. - Press this mixture firmly into mini tart molds. Ensure it is even and tight. - Chill the crusts in the refrigerator for 10-15 minutes to help them set. - In a large bowl, beat 8 oz of softened cream cheese until it is smooth. - Mix in ½ cup powdered sugar, zest and juice of 1 lemon, and 1 teaspoon vanilla extract. Blend until there are no lumps. - In a separate bowl, whip ½ cup heavy cream with an electric mixer until stiff peaks form. - Gently fold the whipped cream into the cream cheese mixture using a spatula. Be careful not to deflate the whipped cream. - Take the chilled crusts out of the refrigerator. - Fill each crust with the lemon cheesecake filling, smoothing the tops evenly. - Place the filled tarts back in the refrigerator. Chill for at least 2 hours to let the filling set. - Gently remove the tarts from their pans. - Top each tart with fresh berries and a mint leaf for a lovely touch. For the full recipe, please refer to the earlier section. Enjoy making these delightful mini no-bake lemon cheesecake tarts! To make the crust strong, pack the mixture tightly. This helps keep the shape. You can also try different cookies. For example, use chocolate cookies or gingersnaps. Each cookie gives a unique flavor. For a smooth filling, use cream cheese at room temperature. Cold cream cheese can make lumps. You can adjust the lemon juice to find your perfect tartness. If you love tart, add more lemon. For a milder taste, use less juice. To fill the tarts neatly, use a piping bag. This gives a professional look. You can also sprinkle extra lemon zest on the plate. It adds color and makes your dessert pop. For a fun touch, place fresh mint leaves around the tarts. It looks great and adds freshness! You can find the Full Recipe for these delightful tarts to explore more tips. {{image_4}} You can change up the taste of these mini tarts easily. Swap lemon for lime for a zesty twist. The tartness from lime adds a fresh kick. If you want something rich, use chocolate or fruit purees for a unique filling. Chocolate brings sweet indulgence, while fruit purees add a fruity burst. Not everyone can eat the same way. You can make a gluten-free crust with gluten-free crumbs. This way, everyone can enjoy these tarts. For those avoiding dairy, substitute with vegan cream cheese and coconut cream. These options keep the creamy texture while being dairy-free. Garnishing can elevate your dessert. Top your tarts with seasonal fruits like strawberries or raspberries. The colors and flavors will pop! You can also use edible flowers for an elegant presentation. They add a touch of beauty and whimsy to your tarts. For the full recipe, check out the [Full Recipe]. You can store the mini no-bake lemon cheesecake tarts in the refrigerator. They will last for up to three days if covered. To keep them fresh, make sure to cover them well. It’s best to keep the tarts separate from any garnishes until you are ready to serve them. This way, they stay fresh and look great. If you want to save some for later, you can freeze the unfilled crusts. This is a great option if you plan to make them ahead of time. The filled tarts can also be frozen for up to a month. Just remember to thaw them before serving. This will help keep their creamy texture. To prevent the tarts from drying out, use airtight containers. This keeps them fresh and tasty. It’s also smart to label your containers with dates. This way, you can easily track how long they have been stored. Yes, you can prepare these tarts a day in advance and chill them. This makes them great for parties or busy days. Just keep them in the fridge until you are ready to serve. Lightly grease the tart pans before filling them. You can also use silicone molds. Both methods help the tarts pop out without breaking. You can use bottled lemon juice in a pinch. However, fresh lemons give the best flavor. The zest adds a bright taste that makes these tarts stand out. Yes, Greek yogurt or vegan cream cheese works well as substitutes. These options can change the flavor slightly, but they still taste great. This recipe yields 12 mini tarts. Perfect for sharing or enjoying over a few days! Pair your mini tarts with coffee or tea. This makes for a delightful dessert experience that everyone will love. For the full recipe, check out the details above! This blog post covers how to make delicious mini lemon cheesecake tarts. We discussed each ingredient, from the crust to the creamy filling, and shared tips for a perfect dessert. You can customize flavors and garnishes to suit your taste. Remember, storage is key for keeping them fresh. Enjoy making these tarts for any occasion. Your friends and family will love them!](https://fastmealmate.com/wp-content/uploads/2025/06/a8bd9651-0c39-4151-9790-24600a8eb0ea-768x768.webp)