Garlic Butter Chicken Potato Skillet Flavorful Dish
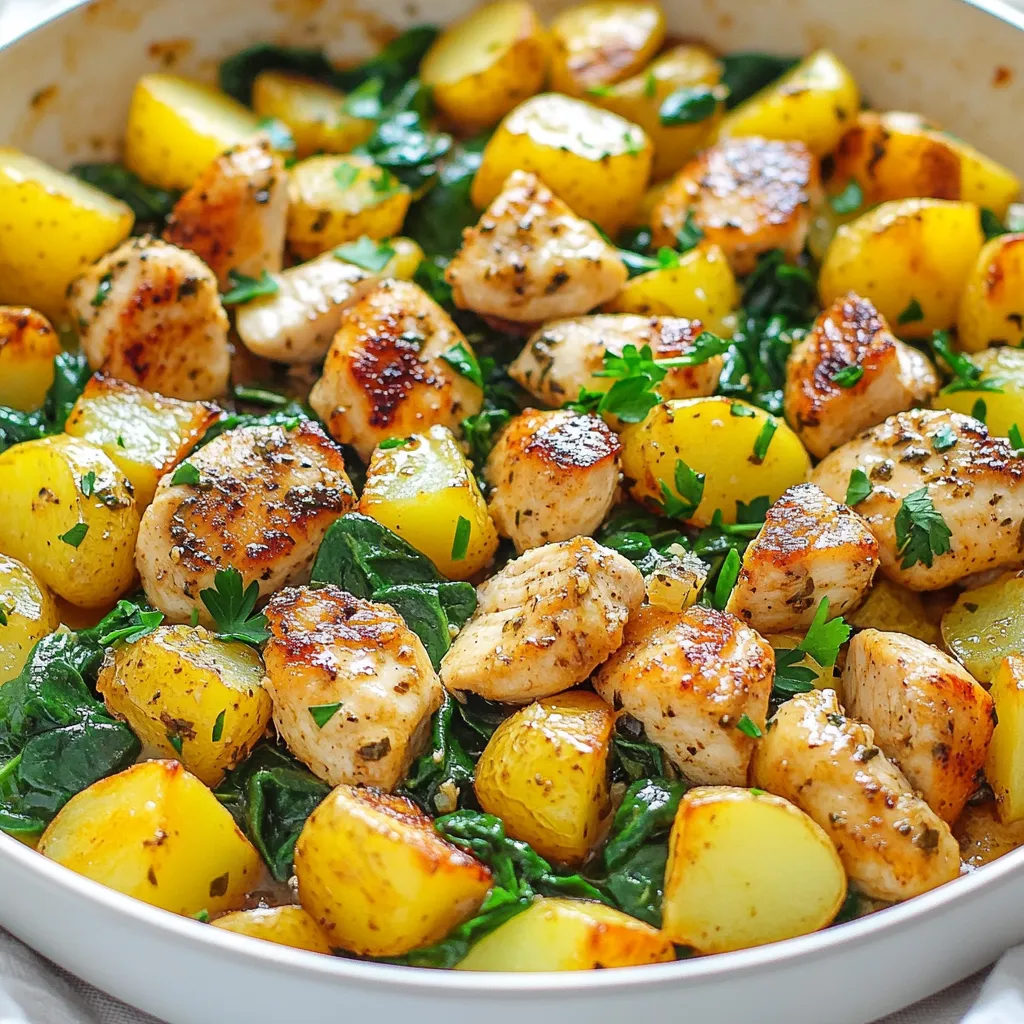

Are you ready for a tasty dish that’s quick to make and packed with flavor? My Garlic Butter Chicken Potato Skillet is a winning recipe that combines tender chicken, golden potatoes, and fresh spinach in one skillet. It’s simple, satisfying, and perfect for busy weeknights. Let’s dive into the ingredients and then I’ll guide you step-by-step to create this delicious meal! You won’t want to miss this!
Why I Love This Recipe
- Quick and Easy: This recipe comes together in just 30 minutes, making it perfect for busy weeknights.
- One-Pan Wonder: Cooking everything in one skillet means less cleanup, and the flavors meld beautifully.
- Flavorful Ingredients: The combination of garlic, butter, and spices creates a deliciously rich dish that everyone will love.
- Customizable: You can easily swap in your favorite vegetables or proteins to make this dish your own.
Ingredients
To make the garlic butter chicken potato skillet, you’ll need a few key ingredients that pack a lot of flavor. Here’s what you’ll need:
– 2 boneless, skinless chicken breasts, diced into bite-sized pieces
– 4 medium potatoes, peeled and cut into small cubes
– 4 tablespoons unsalted butter, divided
– 4 cloves garlic, finely minced
– 1 teaspoon smoked paprika for a hint of smokiness
– 1 teaspoon dried thyme, or 1 tablespoon fresh thyme if available
– ½ teaspoon salt, or to taste
– ½ teaspoon freshly ground black pepper, or to taste
– ½ cup low-sodium chicken broth to enhance flavor
– 1 cup fresh spinach leaves, rinsed and drained
– Fresh parsley, chopped for garnish
Each ingredient plays a role in making this dish tasty. The chicken gives you protein, while the potatoes add heartiness. The garlic and butter create a rich sauce that ties it all together. You’ll love how the smoked paprika and thyme add depth. The spinach brings a fresh touch, and the parsley is a lovely garnish.
When you gather these ingredients, you set the stage for a meal that will impress anyone. Plus, it’s a great way to enjoy home-cooked comfort food.

Step-by-Step Instructions
Preparing the Potatoes
– Melt 2 tablespoons of butter in a large skillet over medium heat.
– Add 4 medium potatoes, cut into small cubes, into the skillet.
– Season the potatoes with a pinch of salt.
– Cook the potatoes for about 10-12 minutes. Stir them often.
– They should turn golden brown and become tender inside.
Cooking the Chicken
– Remove the potatoes using a slotted spoon and set them aside.
– In the same skillet, add the remaining 2 tablespoons of butter.
– Once melted, toss in 2 boneless, skinless chicken breasts, diced into bite-sized pieces.
– Season the chicken with 1 teaspoon smoked paprika, 1 teaspoon dried thyme, ½ teaspoon salt, and ½ teaspoon black pepper.
– Cook the chicken for 6-8 minutes. Stir it often to brown evenly.
– Add 4 cloves of minced garlic to the skillet. Cook for 1-2 minutes until fragrant.
Combining Ingredients
– Pour in ½ cup of low-sodium chicken broth. Scrape the bottom of the skillet.
– Bring the mixture to a gentle simmer for 3-5 minutes.
– Return the sautéed potatoes to the skillet. Mix them well with the chicken and broth.
– Gently fold in 1 cup of fresh spinach leaves. Cook for 1-2 minutes until just wilted.
– Taste the dish and adjust seasoning if needed.
Tips & Tricks
Cooking Tips
– Always use a heavy-bottom skillet. This helps cook your food evenly.
– Timing is key for tender potatoes and chicken. Cook potatoes first, then chicken.
Flavor Enhancements
– Try adding more spices like oregano or chili flakes for a kick.
– Taste as you go. Adjust salt and pepper to make it just right.
Presentation Ideas
– Serve right from the skillet for a cozy feel.
– For a neat touch, plate servings and sprinkle with parsley.
Pro Tips
- Use Fresh Herbs: Fresh thyme can elevate the flavor of your dish significantly compared to dried. If you have access to fresh herbs, use them for a more vibrant taste.
- Perfectly Cooked Potatoes: To ensure even cooking, cut the potatoes into uniform sizes. This helps them cook evenly and achieve that golden-brown exterior.
- Don’t Rush the Garlic: Adding garlic too early can lead to burning. Always add it just before the end of cooking to preserve its flavor and aroma.
- Enhance with Lemon: A squeeze of fresh lemon juice just before serving can brighten the flavors of the garlic butter chicken, adding a refreshing contrast to the richness.

Variations
Ingredient Swaps
You can easily swap out the chicken in this dish. Try using turkey for a lighter option. If you want a plant-based meal, use tofu instead.
For vegetables, potatoes are great, but you can add bell peppers or carrots. These will add color and crunch. You can even mix different veggies. This makes the dish fun and keeps it fresh.
Dietary Adjustments
If you need a gluten-free option, use gluten-free chicken broth. Check labels to ensure all ingredients meet your needs. This dish can still taste amazing without gluten.
For a dairy-free version, replace the butter with olive oil or a dairy-free spread. This keeps the flavors rich without the dairy.
Cooking Method Alternatives
You can make this dish in the oven. Start by cooking the potatoes in a baking dish. Add the chicken, broth, and seasonings, then bake until everything is cooked through.
You can also use a slow cooker or Instant Pot. Just add all the ingredients and let it cook. This method saves time and makes cleanup easier. The flavors will still shine through, no matter how you cook it!
Storage Info
Refrigeration Guidelines
To store leftovers, let the dish cool first. Then, place it in an airtight container. This helps keep the flavor fresh. You can store it in the fridge for up to three days. Be sure to check for any strange smells before eating.
Freezing Instructions
To freeze the dish, let it cool completely. Next, use a freezer-safe container or a resealable bag. Make sure to remove as much air as possible. This will help prevent freezer burn. You can keep it in the freezer for up to three months. When you’re ready to eat it, thaw it overnight in the fridge.
Reheating Methods
The best way to reheat this dish is on the stove. Use low heat and add a splash of chicken broth to keep it moist. Stir often to avoid burning. You can also reheat it in the microwave. Just cover it with a microwave-safe lid. Heat it in short bursts, stirring in between. Avoid reheating on high, as this can dry it out.
FAQs
How long does it take to prepare Garlic Butter Chicken Potato Skillet?
This dish takes about 10 minutes to prep and 20 minutes to cook. So, in total, you need just 30 minutes. This makes it a great option for a quick weeknight meal.
Can I use frozen chicken or potatoes?
Yes, you can use frozen chicken or potatoes. However, you will need to add extra cooking time. Frozen chicken may take longer to cook through, and frozen potatoes might not get as crispy. Always check that the chicken reaches 165°F for safe eating.
What can I serve with Garlic Butter Chicken Potato Skillet?
This dish pairs well with a fresh salad or steamed vegetables. You can also serve it with crusty bread to soak up the garlic butter sauce. For a lighter side, consider a creamy coleslaw or some roasted asparagus.
Is this recipe suitable for meal prep?
Yes, this recipe is perfect for meal prep. You can make it ahead and store it in the fridge for up to four days. Just reheat it on the stove or in the microwave before serving. For longer storage, freeze individual portions for up to three months.
This blog post covered a tasty Garlic Butter Chicken Potato Skillet recipe. You learned about the key ingredients and easy step-by-step instructions. I shared tips for cooking and ways to change the dish to fit your needs. Storing and reheating advice helps you enjoy leftovers, too. Overall, this dish is simple, versatile, and great for any meal. Enjoy cooking and sharing this delicious meal with friends and famil

Garlic Butter Chicken Potato Skillet
Ingredients
- 2 pieces boneless, skinless chicken breasts, diced into bite-sized pieces
- 4 medium potatoes, peeled and cut into small cubes
- 4 tablespoons unsalted butter, divided
- 4 cloves garlic, finely minced
- 1 teaspoon smoked paprika
- 1 teaspoon dried thyme
- 0.5 teaspoon salt, or to taste
- 0.5 teaspoon freshly ground black pepper, or to taste
- 0.5 cup low-sodium chicken broth
- 1 cup fresh spinach leaves, rinsed and drained
- to taste fresh parsley, chopped for garnish
Instructions
- In a large, heavy-bottom skillet, melt 2 tablespoons of the butter over medium heat. Once melted and bubbling, add the diced potatoes in a single layer. Season with a pinch of salt and sauté for about 10-12 minutes, stirring occasionally, until they are golden brown on the outside and tender on the inside.
- After the potatoes are cooked, carefully remove them from the skillet using a slotted spoon, and set them aside on a plate.
- In the same skillet, add the remaining 2 tablespoons of butter. Once it’s melted, add the diced chicken breasts along with smoked paprika, dried thyme, salt, and black pepper. Cook for about 6-8 minutes, stirring occasionally, until the chicken is nicely browned and fully cooked through.
- Incorporate the minced garlic into the skillet with the chicken and sauté for an additional 1-2 minutes until fragrant, being careful not to let the garlic burn.
- Pour in the chicken broth, scraping up any bits from the bottom of the skillet to enhance the flavor. Bring this mixture to a gentle simmer, allowing the ingredients to meld together for about 3-5 minutes.
- Carefully return the sautéed potatoes back into the skillet, mixing them well with the chicken and broth. Stir to ensure everything is evenly coated and heated through.
- Gently fold in the fresh spinach, cooking for an additional 1-2 minutes until the spinach is just wilted and vibrant.
- Taste the dish and adjust the seasoning with additional salt or pepper if desired before removing from heat.
- Serve the garlic butter chicken and potatoes hot, garnished with a sprinkle of freshly chopped parsley for added color and freshness.

![To make garlic butter shrimp, gather these simple ingredients: - 1 lb large shrimp, deveined and peeled - 6 tablespoons unsalted butter - 5 cloves garlic, finely minced - 1 teaspoon red pepper flakes - 1 lemon, zested and juiced - 2 tablespoons fresh parsley, finely chopped - Salt and freshly ground black pepper, to taste - Optional: 1 tablespoon extra virgin olive oil These ingredients create a dish full of flavor. The shrimp give a sweet and briny taste. The garlic brings a warm, earthy aroma. Butter adds richness and a smooth texture. Lemon juice brightens the dish and balances the flavors. Fresh parsley gives a pop of color and freshness. Feel free to adjust the red pepper flakes. If you like heat, add more! If you prefer a milder flavor, use less. The optional olive oil helps prevent butter from burning. It adds depth to the dish. Once you gather these ingredients, you're ready to dive into the world of garlic butter shrimp. For a full recipe, check out the section above. To start, heat a large skillet over medium heat. Add 3 tablespoons of unsalted butter and, if you like, 1 tablespoon of extra virgin olive oil. This oil helps keep the butter from burning and adds flavor. Once the butter melts, add 5 cloves of minced garlic along with 1 teaspoon of red pepper flakes. Sauté for about 1-2 minutes. Stir often until the garlic smells great and turns light golden brown. Watch closely, so the garlic doesn’t burn. Now, it’s time for the shrimp. Carefully add 1 pound of peeled and deveined shrimp to the skillet. Spread them out in a single layer. Season with salt and freshly ground black pepper. Let the shrimp cook for about 2-3 minutes without stirring. You will see them change color to pink and opaque. When they look good, gently flip the shrimp over. Add the zest and juice from 1 lemon along with the remaining 3 tablespoons of butter. Cook for another 2-3 minutes until the shrimp are fully cooked and coated in the buttery sauce. When the shrimp are done, take the skillet off the heat. Stir in 2 tablespoons of finely chopped parsley. Taste the dish and adjust seasoning by adding more salt or pepper if needed. Serve the garlic butter shrimp hot to enjoy the best flavor. For more details, check the Full Recipe. To make your garlic butter shrimp shine, focus on two key areas: garlic and seasoning. - Avoid burning garlic: Garlic burns fast. Keep your heat at medium. Stir it often. You want it golden, not dark. Burnt garlic tastes bad. - Adjust seasoning to preference: Taste is personal. Start with salt and pepper. Add more to match your liking. You can also play with red pepper flakes for heat. Now, let’s talk about how to serve your dish. Presentation matters, and there are tasty ways to enjoy it. - Pairing with rice or bread: Serve your shrimp over fluffy rice. Jasmine or basmati works great. If you prefer, slice some warm bread. It soaks up the sauce well. - Garnishing ideas: Fresh parsley adds color. A few lemon wedges brighten your plate. A sprinkle of extra red pepper flakes adds a kick. Need more help? Here are some useful tools. - Suggested video tutorial or high-quality images: Look for a video that shows the steps in action. It helps to see the cooking process. - Nutritional information: Check out the calories and nutrients in this dish. It’s good to know what you're eating. For the full recipe, click [Full Recipe]. Enjoy cooking! {{image_4}} You can play with the flavors in garlic butter shrimp. For a kick, try Spicy Garlic Butter Shrimp. Just add more red pepper flakes. Adjust the heat to your taste. This gives the dish a nice kick that many love. Another great option is Lemon Herb Garlic Shrimp. Add fresh herbs like thyme or basil for a fresh twist. You can also squeeze extra lemon juice for more brightness. This variation makes the dish feel light and refreshing. You can swap some ingredients for different flavors. Instead of butter, try using olive oil. This gives a different taste and is a healthier choice. You can also use ghee for a rich flavor. Adding vegetables can change the dish too. Toss in asparagus or cherry tomatoes. These add color and nutrients. They cook quickly and soak up the garlic butter sauce. If you need gluten-free options, this recipe is easy. Just make sure your red pepper flakes and any other spices are gluten-free. For a dairy-free option, use olive oil instead of butter. You can also try vegan butter. This keeps the flavor while making it suitable for those avoiding dairy. By making these small adjustments, you can enjoy garlic butter shrimp in many ways. For the full recipe, check out the details above. To store leftovers, place the garlic butter shrimp in an airtight container. Ensure the shrimp cool down first. This keeps them fresh and tasty. You should eat the leftovers within 2 days. The flavors stay best within this time. For reheating, I suggest using a skillet. Heat it on low and add a little butter. This method keeps the shrimp moist. Stir gently to avoid overcooked shrimp. If you use the microwave, heat in short bursts. Check every 30 seconds until warm. You can freeze cooked shrimp for later use. Place them in a freezer-safe bag and remove as much air as possible. They can last up to 3 months in the freezer. To defrost, place the shrimp in the fridge overnight. For a faster method, submerge the bag in cold water. This way, you can enjoy your garlic butter shrimp whenever you want. For the full recipe, check out the [Full Recipe]. Cook shrimp for about 2-3 minutes on each side. They turn pink and opaque. This short time keeps them tender and juicy. Overcooking makes them tough. Always check their texture before serving. Yes, you can use frozen shrimp. Thaw them first in cold water. It takes about 15-20 minutes. Pat them dry before cooking. This helps them sear nicely in the pan. Cooking frozen shrimp directly may not give the best results. You can pair garlic butter shrimp with many sides. Rice is a great choice, like jasmine or basmati. You can also serve it with crusty bread. A fresh salad or steamed veggies work well too. They balance the rich flavors of the shrimp. This recipe is very flexible. You can adjust the spice level by adding more or less red pepper flakes. Want a different flavor? Try adding fresh herbs like basil or cilantro. You can even add veggies like asparagus or bell peppers. The choice is yours! For the full recipe, check the earlier section. This blog post covered a simple garlic butter shrimp recipe with step-by-step instructions. You learned about key ingredients, cooking tips, and variations for flavor. Storing and reheating shrimp was also discussed. This dish is not only easy to make, but it’s also delicious too. Experiment with the ingredients or try new sides to make it your own. Enjoy your cooking, and have fun exploring different flavors and options!](https://fastmealmate.com/wp-content/uploads/2025/05/4326bcb2-842f-4d6f-96a8-35ed43fbf561-768x768.webp)
![For a great crispy tofu panini, you need: - 1 block firm tofu, well-pressed and sliced into 1/2 inch slabs - 1 tablespoon soy sauce - 1 tablespoon sesame oil - 1 tablespoon cornstarch - 1 large round ciabatta or focaccia bread, sliced in half horizontally - 1/2 cup fresh spinach leaves, washed and dried - 1/2 red bell pepper, roasted, peeled, and sliced thin - 1 small ripe avocado, sliced - 2 tablespoons hummus or vegan mayonnaise - Salt and freshly ground black pepper to taste - Olive oil, for grilling These ingredients work together to create a crispy, tasty panini that is both filling and healthy. You can add some extra flavor with these ingredients: - Sliced tomatoes for freshness - Red onion for a bit of bite - Fresh herbs like basil or cilantro - A dash of hot sauce for heat If you want to mix things up, these optional ingredients can make your panini even better. To make your meal complete, consider these sides: - A light salad with lemon vinaigrette - Sweet potato fries for crunch - A bowl of soup, like tomato or lentil These sides balance the flavors and add variety to your meal. Plus, they are easy to prepare! For the full recipe, check out the detailed steps to bring your crispy tofu panini to life. To start, we need to prepare the tofu. First, press the block of firm tofu. Use a clean kitchen towel or tofu press. This step removes excess moisture. Removing moisture is key for achieving crispiness later. Once pressed, slice the tofu into even slabs, each about 1/2 inch thick. This ensures even cooking and crispiness. Next, we will marinate the tofu. In a mixing bowl, whisk together soy sauce, sesame oil, and a pinch of salt and pepper. Then, add your tofu slices to this mixture. Make sure each piece gets coated well. Let the tofu soak in the marinade for about 15 minutes. This allows the tofu to absorb all those tasty flavors. Now, it’s time to cook the tofu. After marinating, take the slices out and sprinkle cornstarch on both sides. This coating is crucial for that nice, crispy texture. Heat a non-stick skillet over medium heat. Add a drizzle of olive oil to the pan. When the oil shimmers, carefully lay the coated tofu slices in the skillet. Cook each slice for about 4-5 minutes on each side. Look for a golden brown color and a crispy texture. Once done, transfer the tofu to a plate and set it aside. Let’s move on to assembling the panini. Take your ciabatta or focaccia bread and cut it in half horizontally. Spread hummus or vegan mayo on the inside of both halves. This adds moisture and flavor to the sandwich. On the bottom half, layer fresh spinach leaves first. Then add the crispy tofu slices, followed by roasted red bell pepper slices. Finally, place avocado slices on top. Now, close the sandwich with the top half of the bread. Press it down gently to hold everything in place. Next, we grill the panini. Preheat your panini press or another skillet over medium heat. Brush the outside of the sandwich with olive oil. This helps to create a crunchy crust while grilling. If using a skillet, place a heavy pan on top of the sandwich. This presses it down as it cooks. Grill for about 3-4 minutes on each side. Look for a beautiful golden brown color and a crispy texture. Once grilled to perfection, remove the panini from the heat. Slice it in half with a sharp knife and serve warm for the best taste. Enjoy your crispy tofu panini, a flavorful and satisfying delight! For the full recipe, check out the earlier sections. To make your tofu crispy, follow these tips: - Press the tofu well: Remove as much water as possible. This helps the tofu absorb flavors better. - Use cornstarch: Coat both sides of the tofu slices with cornstarch. This creates a crunchy crust. - Heat your skillet properly: Use medium heat and wait for the oil to shimmer before adding the tofu. - Do not overcrowd the pan: Cook in batches if needed. This allows each piece to get crisp. Here are some mistakes to watch out for: - Skipping the marination: Marinating adds flavor. Don’t rush this step. - Using too little oil: A light drizzle helps achieve that golden color and crisp texture. - Not slicing evenly: Make sure your tofu slabs are even. This ensures consistent cooking. - Opening the panini too soon: Let it grill fully to get the best texture. Having the right tools makes a big difference. Here are my top picks: - Panini press: This tool cooks evenly and gives perfect grill marks. - Non-stick skillet: If you don’t have a press, a good skillet works too. - Heavy pan: Use it to press down the sandwich while it cooks in a skillet. - Sharp knife: A sharp knife helps slice your panini without squishing it. Using these tips and tools, you can create a delicious crispy tofu panini. For the full recipe, check out the earlier sections. {{image_4}} When making a crispy tofu panini, you can switch up the ingredients to match your taste. This adds fun and keeps things interesting. You can use different sauces or spreads. Try using pesto or spicy mustard instead of hummus. Swap spinach for kale or arugula for a bolder flavor. For added crunch, add sliced cucumbers or pickles. You can also replace the red bell pepper with grilled zucchini or eggplant. Each swap brings a new twist to your panini. To keep this dish vegan, stick with plant-based ingredients. Use gluten-free bread to make it gluten-free. Many brands offer delicious options that taste great. Check labels to ensure they have no animal products. This allows everyone to enjoy the crispy tofu panini without worry. Fresh produce can change with the seasons. In spring, try adding fresh asparagus or sprouts. In summer, include ripe tomatoes or zucchini. In fall, swap in roasted butternut squash for a sweet flavor. Winter might call for roasted root vegetables like carrots or sweet potatoes. These seasonal swaps help you enjoy fresh tastes all year long. This recipe offers endless possibilities for creativity. Use the [Full Recipe] as your base, and let your imagination run wild with variations! To keep your crispy tofu panini fresh, wrap it tightly. Use plastic wrap or foil for best results. Store it in the fridge for up to three days. Avoid leaving it out at room temperature. This helps prevent sogginess and keeps the flavors intact. To reheat, use a skillet over medium heat. Place the panini in the skillet and cover it. Heat for about 4-5 minutes on each side. This method helps restore the crispiness. You can also use a toaster oven for a similar effect. Avoid the microwave, as it can make the bread soft. If you want to freeze your panini, wrap it well in plastic wrap and foil. It can last for up to a month in the freezer. When you’re ready to eat, thaw it in the fridge overnight. Reheat it in a skillet for the best texture. This way, you can enjoy a quick meal without losing flavor. To make tofu extra crispy, start with firm tofu. Press it well to remove water. Slice it into even slabs. Marinate the slices in soy sauce and sesame oil. Let them soak for at least 15 minutes. After marinating, coat each slice with cornstarch. This coating helps create that crunchy texture you want. Cook the tofu in a hot skillet with olive oil. Flip it until golden brown on both sides. Yes, you can use many types of bread. Ciabatta and focaccia work great, but others can too. Try sourdough or whole grain for a different taste. Each bread type adds its own flavor and texture. Choose one that you love, and enjoy your panini in a new way. Dipping sauces can enhance your panini experience. Hummus is a classic choice. It adds creaminess and flavor. Vegan mayo also works well for a smooth dip. You can try spicy salsa for a kick. Another option is a tangy vinaigrette. Each sauce complements the crispy tofu and adds fun flavors. For more ideas, check out the Full Recipe for inspiration. In summary, we explored how to make a crispy tofu panini. We covered the main and optional ingredients, step-by-step cooking tips, and even some fun variations. Remember to store leftovers well and reheat them correctly for the best taste. Experiment with flavors and enjoy this dish as part of your meals. With a few simple steps, you can have a delicious, crispy tofu panini that satisfies your cravings. Enjoy your cooking journey!](https://fastmealmate.com/wp-content/uploads/2025/06/c0074219-6fc3-4ba3-a1d2-dcd469194d4e-768x768.webp)
 for more details and tips! Cooling your sauce is key before storing it. If you skip this step, you risk spoilage. Let your sauce cool to room temperature for about 30 minutes. This helps keep bacteria away. For storage, use airtight containers. Glass jars or plastic containers work well. Fill them, leaving some space at the top. This room allows for expansion during freezing. You can keep your tomato sauce in the fridge for about one week. After that, it may lose flavor and freshness. Always check for signs of spoilage. If you see mold or notice off smells, toss it out. Safety first! Freezing is a great option for long-term storage. You can pour your cooled sauce into freezer bags or containers. Make sure to label them with the date. This keeps your freezer organized. Aim to use your sauce within six months for the best taste. After this time, it may lose flavor. When ready to use, thaw it overnight in the fridge or heat it directly from the freezer on low heat. For homestyle canned tomato sauce, I recommend using Roma tomatoes. They have fewer seeds and thicker flesh, which gives you a rich sauce. Heirloom tomatoes are also great. They offer unique flavors, but they can be juicier. Choose what you like best! Yes, you can use canned tomatoes. They are convenient and save time. Canned tomatoes are often picked at peak ripeness, giving you good flavor. However, they may contain added salt or preservatives. This can change the taste of your sauce. Always check the label before using! If your sauce is too thin, there are easy ways to fix it. First, let it simmer longer. This allows excess water to evaporate. You can also add tomato paste. It thickens the sauce and adds more flavor. Another option is to use a blender for a smoother texture. Try these methods to get the right thickness! In this blog post, I shared how to make homestyle canned tomato sauce. We covered key ingredients like ripe tomatoes, onion, and olive oil. I provided step-by-step instructions for preparing, sautéing, and simmering. You learned tips for perfecting the sauce and several tasty variations. Finally, I gave guidelines for storage and answered common questions. Making your sauce allows for creativity and customization. Enjoy the process and the flavors you create!](https://fastmealmate.com/wp-content/uploads/2025/07/d3d80814-eb56-4e2c-a9cc-6b13653587fc-768x768.webp)