Instant Pot Beef Stew Flavorful and Hearty Meal

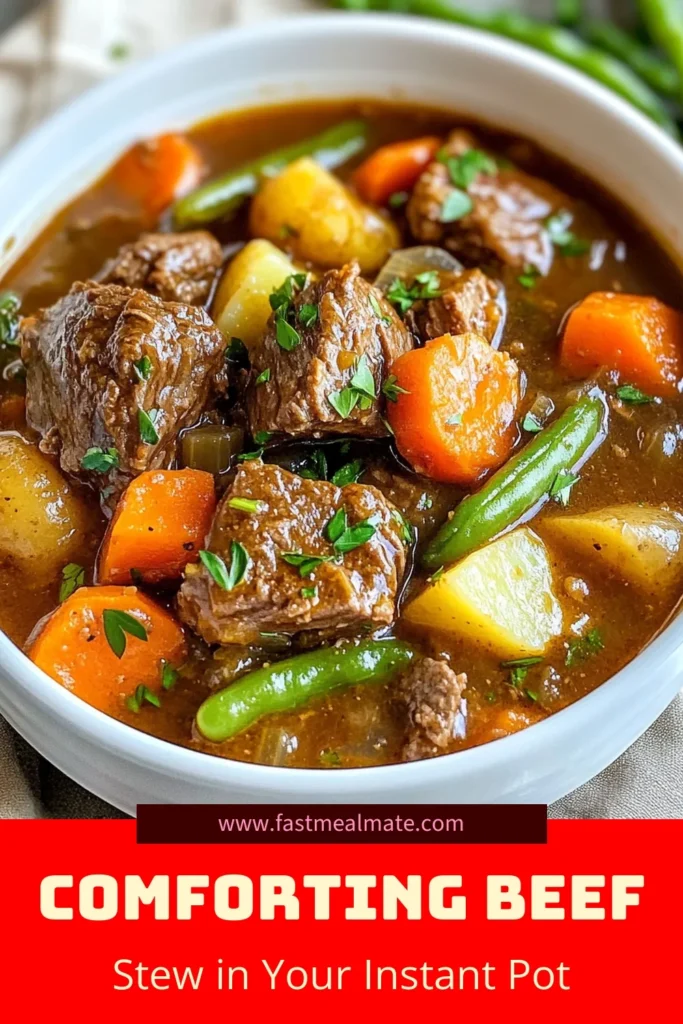
Welcome to a flavor-packed adventure with my Instant Pot Beef Stew! This meal combines tender beef, fresh vegetables, and rich broth, all cooked to perfection in a flash. You won’t need hours in the kitchen to enjoy a hearty dish that warms the soul. Follow my simple recipe, and soon you’ll have a bowl of comfort food that your family will love. Let’s dive in and make your next dinner a hit!
Why I Love This Recipe
- Comforting and Hearty: This beef stew is the epitome of comfort food, perfect for warming up on a chilly day.
- Quick and Easy: Using the Instant Pot significantly reduces cooking time, making it a convenient option for busy weeknights.
- Flavorful Ingredients: The combination of beef, fresh vegetables, and aromatic herbs creates a deliciously rich flavor profile.
- Customizable: You can easily adapt this recipe by swapping in your favorite vegetables or adjusting the seasonings to suit your taste.
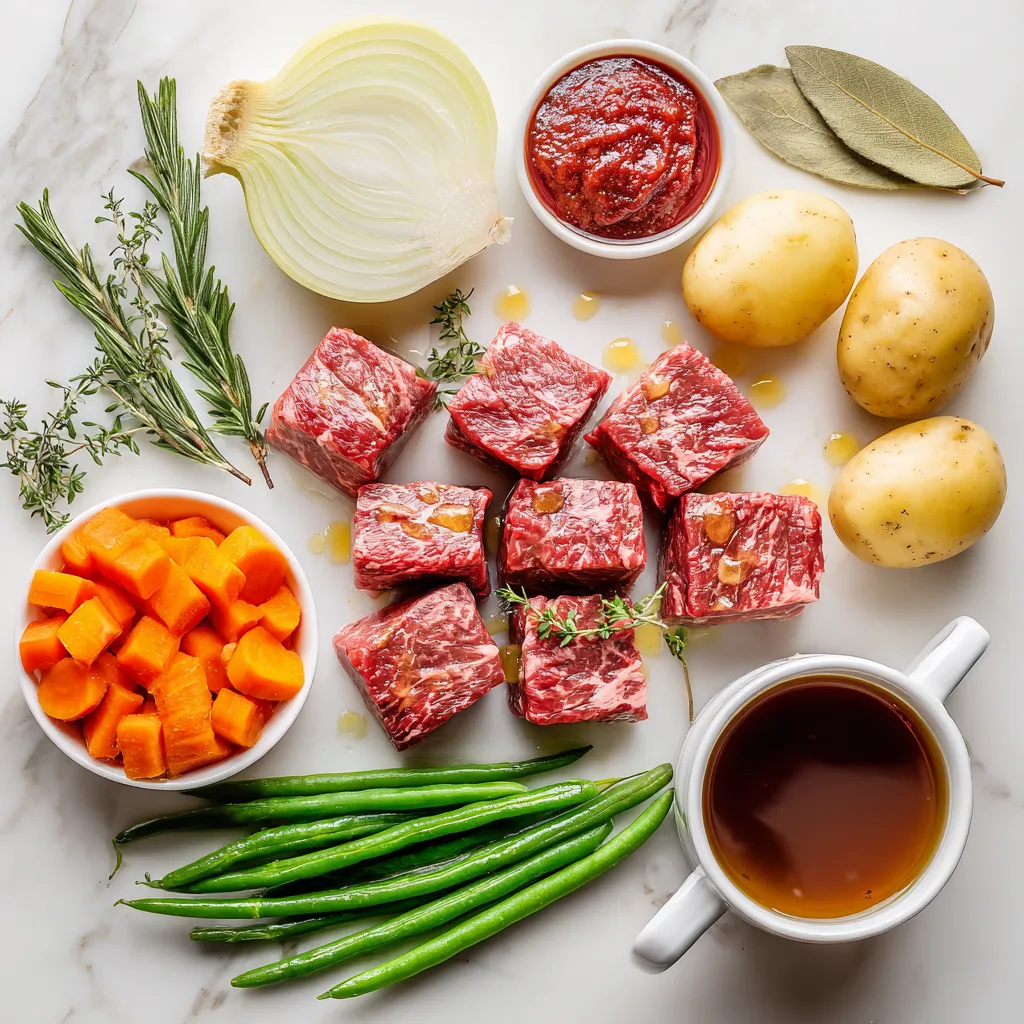
Ingredients
Main Ingredients
– 2 pounds beef chuck
– 2 tablespoons olive oil
– 1 onion
– 3 garlic cloves
Vegetables
– 3 medium carrots
– 3 medium potatoes
– 1 cup green beans
Seasonings & Broth
– 4 cups beef broth
– 2 tablespoons tomato paste
– Dried thyme, rosemary, bay leaf
– Worcestershire sauce, salt, and pepper
Gathering the right ingredients is key for a great beef stew. Start with beef chuck. This cut is juicy and tender. Use about two pounds for a hearty meal.
Next, you’ll need some olive oil. Two tablespoons will help brown the beef. Chop one onion and mince three garlic cloves for flavor. These aromatics are essential.
For the vegetables, I suggest three medium carrots, three medium potatoes, and one cup of green beans. These add color and texture.
Lastly, don’t forget the seasonings. Four cups of beef broth provide depth. Add two tablespoons of tomato paste for richness. Use dried thyme, rosemary, and a bay leaf for aroma. Season with Worcestershire sauce, salt, and pepper to taste.
With these ingredients, you’re ready to craft a flavorful and hearty beef stew!
Step-by-Step Instructions
Preparing the Beef
– Sauté beef cubes until browned
– Remove and set aside
Start by turning your Instant Pot to ‘Sauté’ mode. Add 2 tablespoons of olive oil. Wait for the oil to get hot. Carefully add the beef cubes in batches. Make sure not to crowd them. This helps them brown well. Cook each batch for about 5-7 minutes. You want a nice crust on all sides. Once browned, remove the beef and set it aside on a plate.
Cooking Aromatics
– Sauté onions and garlic in the Instant Pot
With the pot still on ‘Sauté’, add the chopped onion. Stir it for about 3 minutes. You want the onion to become soft and clear. Then, add 3 minced garlic cloves. Stir for another minute. This step builds a strong flavor base for your stew.
Adding Vegetables
– Incorporate carrots, potatoes, and green beans into the pot
Next, add 3 sliced carrots, 3 diced potatoes, and 1 cup of green beans. Stir the mix for about 3-5 minutes. This helps the vegetables to soften a bit. You want them to meld with the onion and garlic flavors.
Pressure Cooking
– Combine all ingredients and set the Instant Pot
– Adjust cooking time
Now it’s time to bring it all together. Return the browned beef to the pot. Pour in 4 cups of robust beef broth. Add 2 tablespoons of tomato paste, 1 teaspoon of dried thyme, 1 teaspoon of dried rosemary, and 1 tablespoon of Worcestershire sauce. Season with salt and pepper to taste. Stir everything well. Secure the lid and set the valve to ‘Sealing’. Select ‘Manual’ or ‘Pressure Cook’ mode and set the time for 35 minutes.
Natural Pressure Release
– Allow steam to release naturally
– Manual release afterwards
When the cooking time is up, let the pressure release naturally for 10 minutes. This step helps keep the meat tender. After 10 minutes, switch the valve to ‘Venting’ to release any remaining steam.
Optional Thickening
– Thicken stew with cornstarch mix
If you like a thicker stew, this step is for you. Remove about 1 cup of the broth from the pot. In a bowl, mix this broth with 1 tablespoon of cornstarch and 2 tablespoons of water. Stir until smooth. Pour the mixture back into the pot while the Instant Pot is on ‘Sauté’. Stir until the stew thickens to your liking.
Tips & Tricks
Searing the Beef
Searing beef is key for great flavor. When you brown the meat, it gets a tasty crust. This crust adds depth to the stew. Follow these steps to sear well:
– Use an Instant Pot set to ‘Sauté’.
– Add olive oil and let it heat up.
– Brown beef in small batches.
– Aim for 5-7 minutes per batch.
Removing the beef helps prevent steaming and keeps it tender.
Selecting Vegetables
Choosing the right vegetables makes your stew shine. Here are the best choices:
– Carrots add sweetness and texture.
– Potatoes soak up flavors and thicken the stew.
– Green beans add freshness.
Keep in mind that hard veggies take longer to cook. Soft vegetables like zucchini cook faster. Cut them bigger to match cooking times.
Adjusting Thickness
The stew’s thickness can change how it feels in your mouth. Here are some ways to adjust it:
– For a thicker stew, mix cornstarch with water.
– Stir this mix back into the pot and heat it.
– Keep stirring until it thickens to your liking.
If you prefer a thinner broth, add more beef broth or water. Adjust based on your taste.
Pro Tips
- Brown the Beef Well: Searing the beef until it’s nicely browned adds depth of flavor to your stew. Don’t rush this step; it’s crucial for a rich taste.
- Use Fresh Herbs: While dried herbs are convenient, using fresh thyme and rosemary can elevate the flavors of your beef stew significantly.
- Cut Vegetables Uniformly: Ensure that your vegetables are cut into similar sizes. This ensures even cooking and a pleasant texture throughout the dish.
- Let It Rest: Allowing the stew to sit for about 10 minutes before serving helps the flavors meld together, making each bite more delicious.
Variations
Meat Alternatives
You can switch the beef for chicken or pork. Each meat brings a unique taste. Chicken gives a lighter flavor, while pork adds a sweet note. Simply follow the same steps as the beef stew. Adjust the cooking time if needed. Chicken cooks faster than beef, so try 25 minutes instead of 35. This change keeps the dish exciting and fresh.
Vegetarian Option
You can make a meatless beef stew using hearty vegetables and beans. Replace the beef with mushrooms for a meaty texture. Use lentils or chickpeas for protein. Add more carrots, potatoes, and other vegetables you love. Use vegetable broth instead of beef broth. Season with the same herbs to keep the flavor rich. This version is filling and perfect for everyone.
Flavor Enhancements
To boost the taste, you can add wine to the stew. A cup of red wine adds depth and richness. Pour it in after the onions and garlic. Let it cook for a few minutes to reduce the alcohol. You can also experiment with different herbs. Try adding fresh parsley or basil for a unique twist. These simple changes can take your stew to the next level.
Storage Info
Refrigeration
You can store leftover beef stew in the fridge for up to four days. Make sure to let it cool before placing it in an airtight container. This keeps it fresh. When you want to enjoy it again, check for any signs of spoilage. If it looks or smells off, it’s best to toss it.
Freezing
Freezing beef stew is a great way to save it for later. Here’s how to do it:
– Let the stew cool completely.
– Portion it into freezer-safe bags or containers.
– Remove as much air as possible to avoid freezer burn.
– Label each bag with the date.
You can freeze the stew for up to three months. When you’re ready to eat it, just thaw it in the fridge overnight.
Reheating Tips
To reheat your beef stew without losing flavor, follow these steps:
– Stovetop Method: Pour the stew into a pot. Heat over medium heat, stirring often until hot. This helps keep the stew’s rich taste.
– Microwave Method: Place the stew in a microwave-safe bowl. Heat in short bursts, stirring in between. This prevents hot spots and ensures even warming.
Always check the temperature before serving. The stew should be hot throughout for the best taste.
FAQs
How long does it take to cook beef stew in an Instant Pot?
It takes about 35 minutes to cook beef stew in an Instant Pot. After cooking, let the pressure release naturally for 10 minutes. This helps the meat stay tender. Then, switch the valve to venting to release the rest of the steam. The total time, including prep, is about 1 hour and 15 minutes.
Can I add more vegetables to the stew?
Yes, you can add more vegetables! Some great options include:
– Peas
– Mushrooms
– Celery
– Turnips
– Sweet potatoes
Adding more vegetables can boost flavor and nutrition. Just be mindful of the cooking time.
What should I serve with beef stew?
Beef stew pairs well with several sides. Consider these options:
– Crusty bread
– Rice
– Mashed potatoes
– Salad
– Biscuits
These sides help soak up the rich broth and add variety to your meal.
Is it necessary to brown the meat first?
Browning the meat is not required but highly recommended. This step adds deep flavor and a nice texture. When you sear the beef, it creates a delicious crust. This enhances the overall taste of the stew. Skipping this step may lead to a less rich flavor.
This guide covered how to make a delicious beef stew in an Instant Pot. We talked about key ingredients like beef, vegetables, and seasonings. I shared step-by-step instructions and helpful tips to enhance flavor and texture. You also learned how to store and reheat your stew for optimal taste.
Remember, cooking can be fun and creative. Don’t hesitate to adjust the recipe. With practice, you’ll make the perfect stew every time. Enjoy your cooking adventur

Hearty Instant Pot Beef Stew
Ingredients
- 2 pounds beef chuck, cut into 1-inch cubes
- 2 tablespoons olive oil
- 1 onion finely chopped
- 3 cloves garlic, minced
- 3 medium carrots, sliced
- 3 medium potatoes, diced
- 1 cup green beans, trimmed and cut in half
- 4 cups robust beef broth
- 2 tablespoons tomato paste
- 1 teaspoon dried thyme
- 1 teaspoon dried rosemary
- 1 leaf bay leaf
- to taste salt and freshly ground pepper
- 1 tablespoon Worcestershire sauce
- 1 tablespoon cornstarch mixed with 2 tablespoons water (optional for thickening)
Instructions
- Begin by setting your Instant Pot to 'Sauté' mode and adding the olive oil. Once the oil is shimmering, carefully place the beef cubes in batches, ensuring not to overcrowd the pot. Sear each piece until it develops a rich brown crust on all sides, which should take about 5-7 minutes per batch. Remove the browned beef from the pot and set aside on a plate.
- Keeping the pot on 'Sauté', add the chopped onion and cook, stirring occasionally, until they turn soft and translucent, about 3 minutes. Add the minced garlic and continue to sauté for an additional minute, allowing the flavors to meld.
- Introduce the sliced carrots, diced potatoes, and halved green beans to the pot. Stir the vegetables together and cook for about 3-5 minutes, ensuring they begin to soften slightly.
- Return the seared beef to the pot and mix well with the vegetables. Pour in the beef broth, followed by the tomato paste, dried thyme, dried rosemary, the bay leaf, and Worcestershire sauce. Season generously with salt and freshly ground pepper. Stir everything together until fully combined.
- Secure the lid of the Instant Pot, ensuring the steam release valve is set to 'Sealing'. Select 'Manual' or 'Pressure Cook' mode, adjusting the cooking time to 35 minutes at high pressure.
- Once the cooking cycle is complete, let the pressure naturally release for 10 minutes. After this time, carefully switch the steam release valve to 'Venting' to manually release any remaining pressure.
- For a thicker stew, remove approximately 1 cup of the stew broth from the pot. Mix this with the cornstarch and water in a separate bowl until smooth, then return this mixture to the pot while switching the Instant Pot back to 'Sauté' mode. Stir continuously until the stew thickens to your desired consistency.
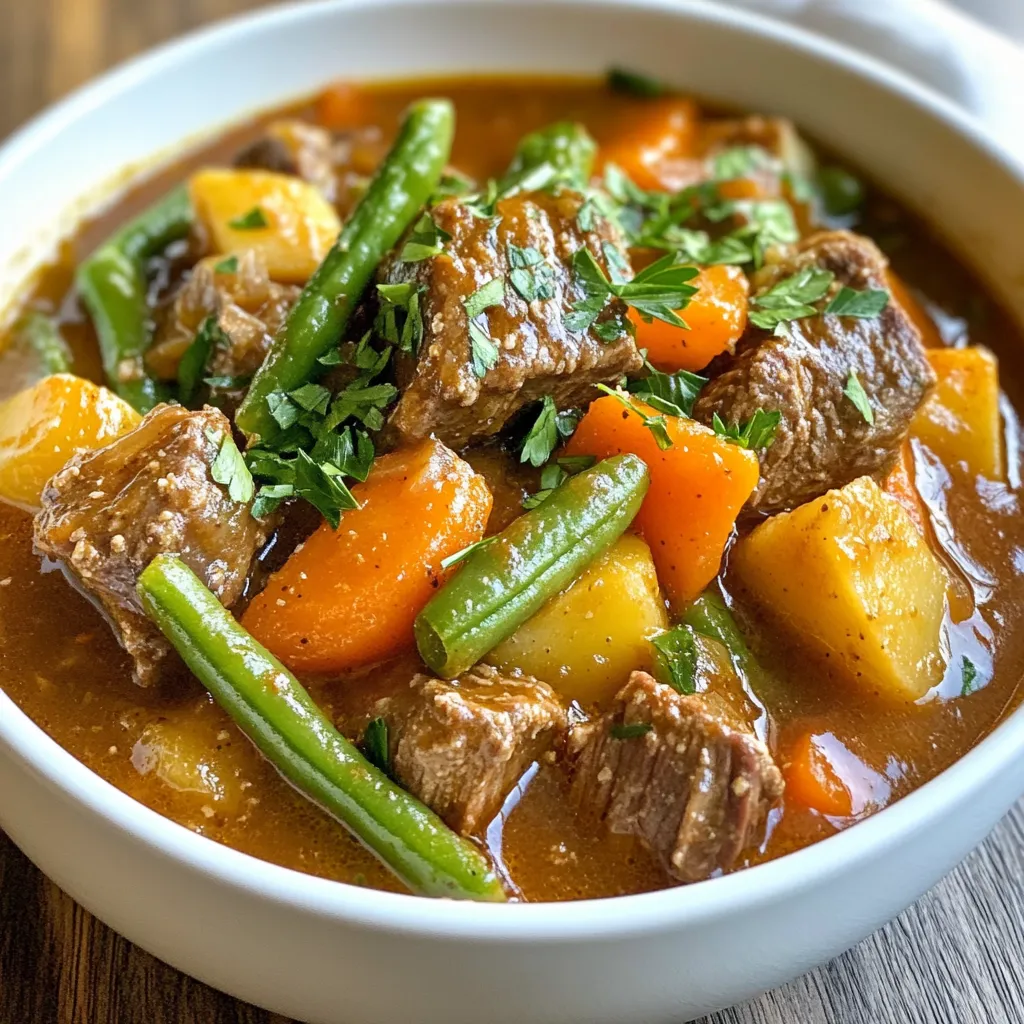
- Finally, remember to remove the bay leaf from the pot. Ladle the hearty beef stew into individual bowls and enjoy!
![For the Chicken Caesar Pasta Salad, you will need these main ingredients: - 8 oz fusilli pasta - 1 cup cooked chicken breast, diced (or rotisserie chicken) - 1 cup romaine lettuce, chopped into bite-sized pieces - 1/2 cup cherry tomatoes, halved - 1/4 cup freshly grated Parmesan cheese - 1/4 cup Caesar dressing - 2 tablespoons freshly squeezed lemon juice - 1 teaspoon garlic powder - Salt and black pepper, to taste - 1/4 cup crunchy croutons (for garnish) - Fresh parsley, finely chopped (for garnish) These ingredients come together to create a vibrant and tasty dish. Feel free to customize your salad with these optional ingredients: - Avocado slices for creaminess - Grilled zucchini or bell peppers for extra veggies - Bacon bits for a smoky flavor - Extra herbs like basil or dill for freshness Adding these extras can make your salad unique and tailored to your taste. This salad not only tastes great but also packs some nutritional value. Here is a rough estimate of what you get per serving: - Calories: About 400 - Protein: 30g - Carbohydrates: 35g - Fat: 20g - Fiber: 3g This Chicken Caesar Pasta Salad is a balanced meal, making it perfect for lunch or dinner. You can find the full recipe at [Full Recipe]. First, grab a large pot and fill it with water. Bring the water to a rolling boil. Add a pinch of salt to the water. Now, add 8 oz of fusilli pasta. Cook it for 8-10 minutes until it's al dente. When the pasta is done, drain it well. Rinse it under cold water to stop cooking. This helps keep the pasta firm and cool. Set the pasta aside in a large bowl. Next, let’s focus on the chicken. If you have leftover cooked chicken, chop it into small pieces. If you’re using fresh chicken, season it with salt, black pepper, and 1 teaspoon of garlic powder. Cook it in a skillet over medium heat for 6-8 minutes. Make sure it’s cooked through and no longer pink. Let the chicken rest for a few minutes, then chop it into bite-sized pieces. Now, it’s time to bring it all together. In the large bowl with the pasta, add the diced chicken. Then, toss in 1 cup of chopped romaine lettuce and 1/2 cup of halved cherry tomatoes. Gently mix everything to keep the lettuce fresh. In a small bowl, whisk together 1/4 cup of Caesar dressing and 2 tablespoons of fresh lemon juice. Pour the dressing over the salad and toss it all together. Sprinkle 1/4 cup of grated Parmesan cheese and 1/4 cup of crunchy croutons on top. For a fresh touch, add some chopped parsley. Enjoy your Chicken Caesar Pasta Salad right away for the best taste! To make the best Caesar dressing, use fresh ingredients. Start with a good Caesar dressing base. Add freshly squeezed lemon juice for a bright taste. This gives your salad a fresh kick. If you like garlic, mix in some minced garlic. This adds depth to the flavor. Taste your dressing before pouring it over the salad. Adjust salt and pepper to your liking. For a creamier texture, whisk in some Greek yogurt or sour cream. This can make the salad richer and more satisfying. Serve this salad in a big bowl to show off its colors. Layer it with extra romaine for a nice crunch. Add more cherry tomatoes for a sweet touch. For a fun twist, sprinkle some bacon bits or chopped olives on top. This adds extra flavor and texture. You can also serve it as a side dish for grilled meats. Pair it with garlic bread for a full meal. For a picnic, pack the salad in a jar. Just layer the ingredients and keep the dressing separate until serving. To save time, use rotisserie chicken. It’s already cooked and ready to go. You can also cook the pasta in advance. Just store it in the fridge until you’re ready to mix the salad. Pre-chop your veggies and store them in airtight containers. This makes assembly quick and easy. If you have leftovers, make sure to keep the dressing separate. This keeps the salad fresh and crunchy. You can enjoy it for lunch the next day, too! Check out the full recipe for more details. {{image_4}} You can add many proteins to your Chicken Caesar Pasta Salad. Grilled shrimp gives a sweet and savory taste. You can use steak for a heartier meal. If you like fish, try adding tuna for a fresh twist. Each protein adds a unique flavor and texture. For a vegetarian version, skip the chicken and use chickpeas. They add protein and a nice bite. To make it vegan, swap the Caesar dressing for a plant-based version. You can also use nutritional yeast instead of Parmesan cheese for a cheesy flavor without dairy. If you have dietary needs, you can make simple swaps. Use gluten-free pasta if you need to avoid gluten. For a lower carb option, try zucchini noodles. If you're watching calories, cut down on the dressing or use a lighter version. Always feel free to adjust this recipe to fit your diet. To store your Chicken Caesar Pasta Salad, place it in an airtight container. This keeps the flavors fresh and prevents it from drying out. Make sure it cools down first before sealing. You can store it in the fridge for up to three days. For meal prep, divide the salad into single-serving containers. This makes it easy to grab and go. Keep the croutons and dressing separate until you're ready to eat. This way, the salad stays crisp, and the flavors blend perfectly when you mix it. The salad tastes best cold. If you want to reheat it, warm the chicken separately, then mix it back in. However, I recommend enjoying it cold for the best flavor. The salad keeps well for about three days, but the croutons may lose their crunch after a day. For the freshest taste, eat it sooner rather than later. For more details, check out the Full Recipe. To make Chicken Caesar Pasta Salad less calorie-dense, you can swap some ingredients. Use whole wheat pasta instead of regular. This change adds fiber and nutrients. You can also replace Caesar dressing with a lighter version or make your own with yogurt. This option cuts down on fat. Reducing the amount of cheese and croutons helps too. You get the flavor without the extra calories. Focus on using more veggies, like cucumbers or bell peppers. They add crunch and volume without many calories. Yes, you can use different types of pasta for this salad. Fusilli is great, but penne, rotini, or even whole wheat pasta works well too. Gluten-free pasta is an option if you need it. Each type brings its unique shape and texture. Just make sure to cook it al dente as per package directions. This ensures it holds up well with the dressing and other ingredients. When looking for the best store-bought Caesar dressings, I recommend a few brands. Look for ones with natural ingredients and low sugar. Some great options include Annie's Organic Caesar, Ken's Steakhouse, and Cardini's. These dressings have a good balance of flavor and creaminess. Always check the label. You want a dressing that fits your taste and dietary needs. If possible, try a few to find your favorite! This post detailed how to make Chicken Caesar Pasta Salad. You learned about main ingredients, tips for making the best dressing, and how to customize your meal. We covered storage, time-saving tricks, and tasty variations. In summary, this salad is easy to make. You can enjoy it fresh or save it for later. Use these tips to make your dish unique. Enjoy your cooking journey!](https://fastmealmate.com/wp-content/uploads/2025/06/c8df564d-281f-4520-b900-ec1f4444fefb-768x768.webp)


![- Cheese tortellini - Flank steak - Provolone cheese The main stars of Cheesesteak Tortellini Bliss are cheese tortellini, flank steak, and provolone cheese. The cheese tortellini adds a rich, creamy texture. Flank steak gives a hearty, meaty flavor. Provolone cheese melts beautifully, making everything delightfully gooey. - Green bell pepper - Onion - Garlic Next, we have the veggies. The green bell pepper adds a nice crunch and sweetness. Onions bring out a savory note when sautéed. Garlic adds a burst of flavor that elevates the dish. Together, they create a great base for our cheesesteak twist. - Beef broth - Worcestershire sauce - Olive oil Now, let’s talk about the liquids. Beef broth adds depth and richness to the sauce. Worcestershire sauce brings umami and a hint of tang. Olive oil helps to sear the steak and sauté the veggies, making everything come together nicely. For the full recipe, check the [Full Recipe]. To start, fill a large pot with water. Add a generous pinch of salt. Bring the water to a rolling boil. Once it boils, gently add the cheese tortellini. Cook according to the package instructions, usually about 3-5 minutes. You want the tortellini to be al dente, not too soft. After cooking, drain the tortellini in a colander. Keep it warm by covering it with a kitchen towel while you prepare the rest. Next, heat a large skillet over medium-high heat. Add one tablespoon of olive oil to the hot skillet. Season the thinly sliced flank steak with salt and pepper. Make sure to coat all sides. Carefully place the steak slices in the skillet. Avoid overcrowding the pan, as this will steam the meat. Sear for about 3-4 minutes on each side. You want a golden-brown crust to form. Once cooked, remove the steak from the skillet and place it on a plate. Cover it loosely with foil to keep it warm. In the same skillet, add the sliced green bell pepper and onion. Don’t clean the skillet; this adds flavor. Sauté the vegetables over medium heat for about 5 minutes. You want them to soften and start to caramelize. Stir occasionally to prevent burning. Once they are soft, add the minced garlic. Cook for another minute, just until fragrant. Be careful not to let the garlic burn, as it can turn bitter. Now, you are ready to move on to combining all the tasty elements! For the complete recipe, check out the Full Recipe. To get the best flavor from your steak, sear it well. Here are my tips: - Heat your skillet: Use a large skillet and heat it to medium-high. This helps create a great crust on the steak. - Don’t overcrowd: Place only a few slices in the pan at once. This keeps the heat high and allows each piece to sear nicely. - Check doneness: For a medium-rare steak, aim for a temperature of 130-135°F. Use a meat thermometer for accuracy. Understanding how you like your steak cooked is key. Here’s a quick guide: - Rare: 120-125°F - Medium-rare: 130-135°F - Medium: 140-145°F - Medium-well: 150-155°F - Well-done: 160°F and above Want to take your cheesesteak tortellini to the next level? Try these flavor tips: - Add spices: A pinch of smoked paprika or crushed red pepper can give it a nice kick. - Experiment with herbs: Fresh thyme or oregano adds a lovely aroma. - Pair with sides: Serve with a fresh salad or garlic bread for a complete meal. The crunch balances the creamy tortellini. Cooking can have its hiccups. Here’s how to avoid common problems: - Overcooked tortellini: Keep an eye on the cooking time. Drain them as soon as they are al dente. This usually takes about 3-5 minutes. - Clumpy cheese: If your cheese gets clumpy, add a splash of milk or broth. This helps it melt evenly. For the full recipe of Cheesesteak Tortellini Bliss, check out the details shared above! {{image_4}} You can change this recipe with different proteins. If you want a lighter option, use chicken or turkey. Ground beef also works well in this dish. For a vegetarian twist, try mushrooms or tofu. These swaps keep the flavor rich and satisfying. Cheese is another area for creativity. Provolone is classic, but you can try cheddar for a sharper taste. Gouda adds a smoky feel, while mozzarella gives a creamy texture. Mix and match to find your favorite combo. Need gluten-free options? You can find gluten-free tortellini at many stores. Just check the package to ensure it fits your needs. Use cornstarch or arrowroot instead of regular flour to thicken the sauce. Dairy-free? Swap provolone for vegan cheese. There are many tasty brands that melt well. You can also use nutritional yeast for a cheesy flavor without the dairy. Want to switch up the presentation? Turn this dish into a baked delight. Transfer everything to a baking dish. Top it with more cheese and bake until golden and bubbly. This makes for a cozy meal perfect for sharing. Looking for a lighter option? Serve the cheesesteak tortellini as a salad. Toss it with greens, tomatoes, and a light dressing. This turns your dish into a fresh and vibrant meal option, perfect for warm days. For the full recipe, check the details above. After you enjoy your cheesesteak tortellini, store leftovers right away. Let the dish cool down for about 30 minutes. Avoid leaving it out longer, as this can cause bacteria to grow. Use airtight containers to keep your meal fresh. Store it in your fridge for up to three days. To freeze the cheesesteak tortellini, first, let it cool completely. Transfer it into freezer-safe containers or bags. Make sure to remove as much air as possible to avoid freezer burn. You can keep it frozen for up to three months. When you're ready to eat, thaw it overnight in the fridge. Reheat it gently on the stove over low heat, adding a splash of beef broth to keep it moist. Stir often to ensure even heating. Enjoy your delicious meal just like the first time! For the complete cooking instructions, check the Full Recipe. To cook tortellini, first, boil a large pot of water. Add salt to the water for flavor. When the water boils, add the cheese tortellini. Cook them according to the package instructions, usually around 3-5 minutes. Make sure they are al dente, which means they should be firm but cooked through. Drain the tortellini in a colander and keep them warm. This step ensures they stay soft and tasty for your dish. You can prepare Cheesesteak Tortellini Bliss ahead of time! Cook the tortellini and steak as directed, then let them cool. Store the dish in an airtight container in the fridge. When you're ready to eat, reheat it on the stove over medium heat. Add a splash of broth to keep it moist. Stir until everything is warm, and enjoy! This makes it easy for busy days. You can easily customize the flavors in this recipe! Try adding different vegetables like mushrooms or spinach for a twist. Swap the flank steak for chicken or shrimp if you want. For a spicier kick, add red pepper flakes or diced jalapeños. You can also mix in different cheeses like cheddar or mozzarella. Get creative and make this dish your own! This blog post covered a delicious recipe combining cheese tortellini and flank steak. You learned about essential ingredients, such as provolone cheese and beef broth. I shared steps for cooking beautiful tortellini and flavor-packed steak with sautéed veggies. Tips for perfecting your dish and creative variations ensured your meal stands out. In conclusion, enjoy the flexibility of this recipe. Please feel free to customize it to fit your tastes. Happy cooking!](https://fastmealmate.com/wp-content/uploads/2025/06/d6ee9c88-ae52-41f7-bd2d-f571c0560d46-768x768.webp)