
Cinnamon Sugar Baked Peaches Delightful Dessert Treat

Looking for a sweet and simple dessert? Try these Cinnamon Sugar Baked Peaches! This delightful treat will impress your family and friends. I’ll show you how to turn ripe peaches into a warm, cinnamon-sugar masterpiece that melts in your mouth. Whether you choose to top them with ice cream or keep it simple, this recipe is easy to follow. Let’s dive into the delicious details and make dessert magic happen!
Ingredients
List of Required Ingredients
– 4 ripe peaches, halved and pitted
– 2 tablespoons unsalted butter, melted
– 1/4 cup brown sugar
– 1 teaspoon ground cinnamon
– 1/2 teaspoon vanilla extract
– Pinch of salt
– 1/2 cup granola (optional, for topping)
– Vanilla ice cream or whipped cream (for serving, optional)
When I make cinnamon sugar baked peaches, I love to use ripe peaches. They should feel slightly soft when you press them. This step ensures they bake well and taste sweet. The unsalted butter gives the dish richness. I always melt it before pouring it over the peaches.
Brown sugar adds a deep sweetness. You can also use light brown sugar if that’s what you have. Ground cinnamon brings warmth and spice, making this dessert so cozy. I mix it with a pinch of salt to balance the sweetness.
For extra flavor, I add vanilla extract. It makes the peaches even more delicious. If you want a crunchy topping, sprinkle granola on top before serving. And, of course, a scoop of vanilla ice cream or a dollop of whipped cream makes this treat even better.
Optional Ingredient Substitutions
– Alternative sweeteners: Use honey or maple syrup instead of brown sugar.
– Butter substitutes: Try coconut oil or margarine if you want a dairy-free option.
– Dairy-free options: Serve with coconut whipped cream instead of regular whipped cream.
Feel free to mix and match these substitutions based on what you have. This flexibility makes the recipe fun and easy to adapt!
Step-by-Step Instructions
Preparation Steps
1. Preheat the oven to 350°F (175°C). This helps the peaches bake evenly.
2. In a small bowl, mix together the brown sugar, cinnamon, and a pinch of salt. This blend adds a sweet and spicy kick.
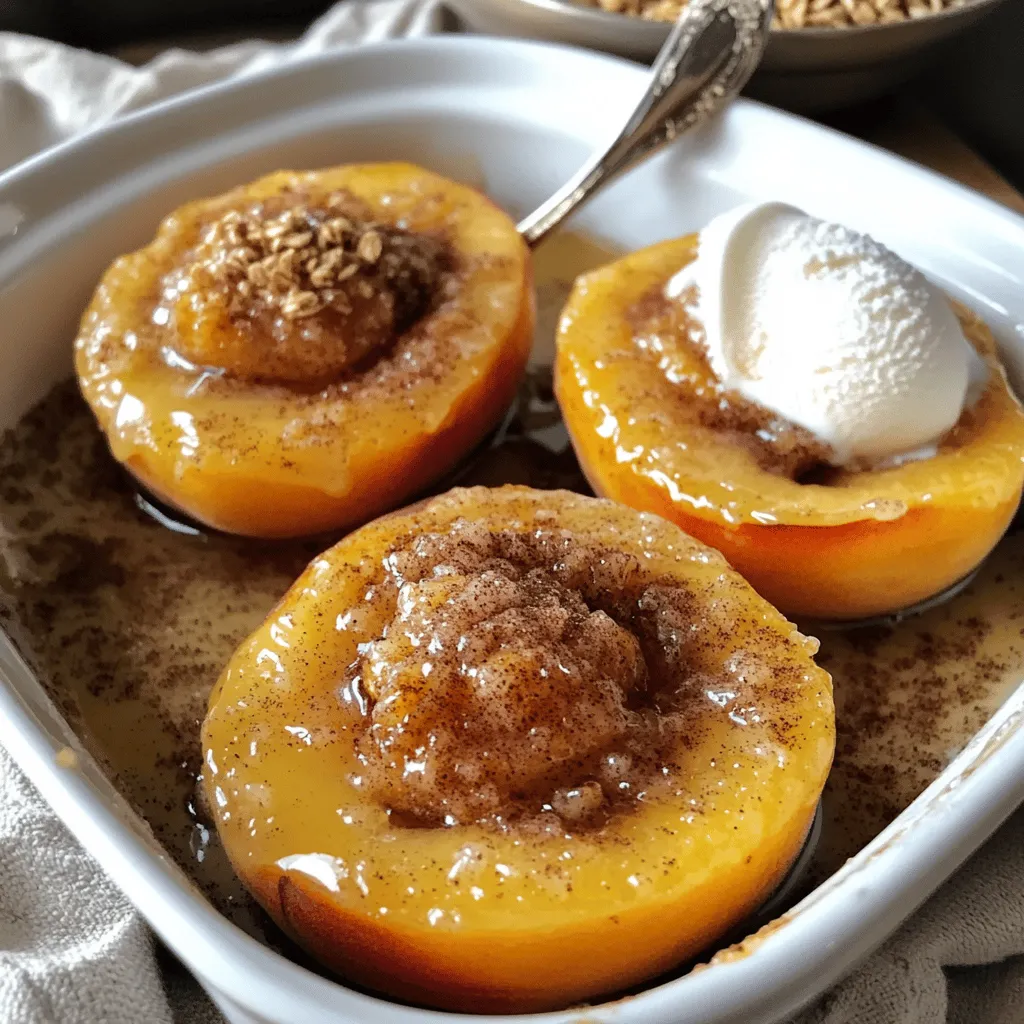
3. Arrange the peach halves in a baking dish. Place them cut side up for a lovely look.
Baking Process
1. Drizzle the melted butter over each peach half. This adds richness and flavor.
2. Generously sprinkle the cinnamon sugar mixture on top of the peaches. Make sure each half is well covered.
3. Add the vanilla extract evenly over the peaches. This will enhance their natural sweetness.
4. Cover the baking dish with foil to keep moisture in. Bake for 20 minutes.
5. After 20 minutes, remove the foil. Bake for another 15 minutes. This allows the peaches to caramelize nicely.
Finishing Touches
1. Let the peaches cool for a few minutes. This helps the flavors settle.
2. If you like some crunch, sprinkle granola over the baked peaches.
3. For an extra treat, add a scoop of vanilla ice cream or a dollop of whipped cream. This makes the dessert even better.Enjoy these warm, delicious baked peaches!
Tips & Tricks
Baking Tips for Perfect Peaches
Choosing the right peaches:
Pick ripe peaches for the best taste. Look for peaches that are slightly soft and fragrant. Firm peaches won’t bake well. They need to be juicy and sweet. A little give when you press them means they are ready.
How to avoid overbaking:
To keep peaches from getting mushy, bake them for the right time. Start with 20 minutes covered. Then, check them. If they feel soft, they are done. If not, bake uncovered for just a bit longer.
Ensuring even flavor distribution:
Sprinkle your cinnamon sugar mix evenly. This helps every bite taste great. Drizzle the butter across the peaches too. Each peach half should get a tasty coating for a balanced flavor.
Serving Suggestions
Presentation styles for serving:
Serve baked peaches in small bowls. Drizzle any sauce from the baking dish on top. Add a mint leaf for color. This simple touch makes the dish look special and inviting.
Pairing beverages with baked peaches:
A scoop of vanilla ice cream complements the warm peaches. You can also serve them with sweet tea or a light white wine. The cool drink pairs well with the warm dessert.
Alternate dessert options to serve alongside:
If you want variety, offer shortbread cookies or a light cake. These desserts add different textures. They work well with the soft peaches and enhance the whole meal.
Variations
Flavor Variations
You can change the taste of baked peaches easily. One fun idea is to add nuts for crunch. Chopped walnuts or pecans sprinkle nicely on top. They give a great texture and flavor.
Another option is to incorporate different spices. Nutmeg and ginger can add warmth. Just a pinch of either spice can elevate your dish. Experiment with what you like best.
You can also infuse flavor with citrus zest. Grating lemon or orange zest adds a fresh touch. This brightens the sweetness of the peaches and makes your dessert pop.
Serving Variations
Serving ideas can take your baked peaches to the next level. You can serve with yogurt or cottage cheese. Both options add creaminess and a nice contrast to the sweet peaches.
If you have leftovers, you can transform them into a breakfast dish. Chop the baked peaches and mix them into oatmeal. This adds a sweet twist to your morning routine.
Another fun idea is using baked peaches as a topping for pancakes or waffles. They make a delicious warm topping that everyone will love. Just drizzle some syrup on top for a treat.
Storage Info
Storing Leftovers
To store baked peaches properly, let them cool first. Place them in an airtight container. This helps keep them fresh for later. You can store them in the fridge for up to three days. If you want to keep them longer, consider freezing. To freeze, wrap the peaches tightly in plastic wrap, then place them in a freezer-safe bag. They can last for about three months in the freezer.
For the best results, use glass or plastic containers with tight lids. These containers prevent air from getting in and keep your baked peaches safe from odors in the fridge.
Reheating Instructions
For reheating, the best method is in the oven. Preheat your oven to 350°F (175°C). Place the baked peaches in a baking dish and cover them with foil. Heat for about 10 to 15 minutes. This method helps maintain their texture and flavor.
You can also use a microwave for quick reheating. Place the peaches on a microwave-safe plate and cover them with a damp paper towel. Heat them for 30 seconds to 1 minute. However, be careful as this method can make them a bit mushy. Always check the peaches to make sure they are warm but not overcooked. Enjoy your delicious Cinnamon Sugar Baked Peaches again!
FAQs
Common Questions About Cinnamon Sugar Baked Peaches
Can I use canned peaches instead of fresh ones?
Yes, you can use canned peaches. Just drain them well and reduce baking time. Fresh peaches give the best flavor, so I recommend them when possible.
What’s the best way to ripen peaches quickly?
Place peaches in a paper bag at room temperature. This traps ethylene gas and speeds up ripening. You can also add a ripe banana to the bag for an extra boost.
Can I make this recipe ahead of time?
Yes, you can prepare everything ahead. Just cover the dish and store it in the fridge. Bake when you are ready to serve for a warm treat.
How do I know when the peaches are done baking?
Peaches are done when they feel soft to the touch. The sugar should caramelize, giving them a golden color.
Related Questions
What other desserts can I make with peaches?
You can make peach cobbler, peach ice cream, or a peach crisp. All are simple and delicious. Try pairing peaches with your favorite doughs or custards for new treats.
Can I freeze baked peaches?
Yes, you can freeze them. Allow them to cool, then pack them in a freezer-safe container. Thaw in the fridge before using in other recipes.
How can I reduce the sugar in this recipe?
You can cut the brown sugar by half. Use a natural sweetener like honey or maple syrup if you prefer. Just remember to adjust the quantity to taste.
Troubleshooting and Tips
What to do if peaches aren’t soft enough after baking?
If they are still firm, cover them and bake a bit longer. Check every few minutes until they reach the desired softness.
How to enhance the flavor if it tastes bland?
Add a pinch of nutmeg or a splash of lemon juice. A little salt can also bring out the peach flavor.
Suggestions for avoiding a soggy bottom
Make sure to pat the peaches dry before baking. You can also bake them uncovered for part of the time to let moisture escape. This helps keep the bottom crisp.
Baked peaches make a sweet, easy dessert. We covered key ingredients, steps, and variations. You learned tips for perfect baking and how to store leftovers. Experiment with flavors and toppings to make this dish your own. Enjoy your baked peaches solo or with ice cream, granola, and more.


![- 1 medium ripe dragonfruit (pitaya) - 1 ripe banana - 1 cup coconut milk - 1/2 cup Greek yogurt - 1/2 cup passion fruit pulp - 1 tablespoon honey or maple syrup - 1/2 cup ice cubes - Fresh mint leaves for garnish The dragonfruit is the star of our smoothie. Its bright pink skin and white flesh make your drink pop. This fruit is sweet and has tiny seeds that add a nice crunch. Bananas bring a creamy texture to the mix. They also add natural sweetness, which balances the tartness of the passion fruit. Coconut milk gives a rich, tropical flavor. It makes the smoothie creamy and smooth. You can switch it with almond milk if you want a nutty touch. Greek yogurt boosts the protein content. It also adds a pleasant tang, making the smoothie thicker. Passion fruit pulp offers a burst of flavor. It has a sweet and tangy taste that brightens the smoothie. You can use fresh or canned pulp, depending on what's available. Honey or maple syrup acts as a sweetener. You can adjust this based on your taste. Ice cubes keep the drink cold and refreshing. They make it perfect for hot days. Finally, fresh mint leaves add a splash of color and a hint of freshness. - Dairy-free options: Use a dairy-free yogurt instead of Greek yogurt. Almond or oat milk can replace coconut milk. - Sweetener variations: Try agave syrup or stevia if you want different sweeteners. - Flavor enhancers: Add vanilla extract or a squeeze of lime for a unique twist. These substitutions help you create a smoothie that fits your diet and taste. You can easily customize this drink to make it your own! For the full recipe, be sure to check the [Full Recipe]. First, gather your ingredients. You need dragonfruit, banana, coconut milk, Greek yogurt, and honey. Cut the dragonfruit in half and scoop out the flesh. In your high-speed blender, add the dragonfruit, banana, coconut milk, Greek yogurt, and honey. Blend on medium-high speed for about 30 seconds. The goal is a smooth and creamy texture. A high-speed blend helps mix everything well. This step is key for a tasty base. Now, let’s make that beautiful swirl. Pour half of the dragonfruit mixture into a tall glass. Make sure you leave some space at the top for the passion fruit pulp. Next, return the rest of the mixture to the blender. Add the passion fruit pulp and blend briefly. You want to mix just enough to create a marbled look. Pour the passion fruit blend over the first layer in the glass. This lets the colors swirl together, making it look stunning. It’s time to make your smoothie look great! Use clear glasses to show off the layers. Top your drink with ice cubes to keep it cool. For a touch of color, add a sprig of fresh mint leaves. This fresh mint not only looks nice but adds a nice aroma too. Enjoy your Dragonfruit Passion Swirl Smoothie! For the full recipe, check the instructions above. To make your smoothie creamy, use a high-speed blender. Start on medium speed, then switch to high. Blend until smooth, which usually takes about 30 seconds. For chilled drinks, ice is key. Use fresh ice cubes, but don’t overdo it. Too much ice can make your smoothie watery. Aim for a balance between ice and liquid. Sweetness is easy to adjust. If you want it sweeter, add more honey or maple syrup. You can also try different fruits like mango or berries. These fruits add layers of flavor and can change the taste profile. Experiment with what you like best! Preparing dragonfruit is simple. Cut it in half, then scoop out the flesh with a spoon. For passion fruit, cut it in half and scoop out the pulp. Make sure to use ripe fruits for the best flavor. If you have leftovers, store them in airtight containers in the fridge. This keeps your ingredients fresh for later use. {{image_4}} Trying different flavors keeps our smoothies exciting. Here are some fun ideas to mix things up. You can create a tropical fruit mix by adding mango or pineapple. These fruits bring sweetness and a sunny flavor. You can also add berries, like strawberries or blueberries. They boost the color and add a tart taste. If you want to add protein, mix in some protein powder. This helps make your smoothie a meal. For those watching calories, use low-calorie sweeteners. This keeps the taste without the extra calories. Change your smoothie with the seasons. In summer, try adding fresh peaches or watermelon for a refreshing twist. In fall, consider adding spices like cinnamon or pumpkin puree. These ingredients bring warm flavors to your drink. Experiment with these variations for a fun smoothie experience. For the full recipe, check out the previous section! You can store your Dragonfruit Passion Swirl Smoothie in the fridge for up to 24 hours. Just keep it in a sealed container to maintain freshness. If you want to prep for the week, pour the smoothie into ice cube trays or small containers. This way, you can easily blend a quick smoothie whenever you want. Frozen portions can last for about three months. To keep fresh dragonfruit and passion fruit at their best, store them at room temperature. Once you cut them, wrap them tightly and put them in the fridge. This helps keep them fresh for up to three days. For coconut milk and yogurt, always check the expiration date. Store them in the fridge and use them within a week after opening for the best taste. Look out for any strange smells or colors in your ingredients. If your dragonfruit turns brown or feels mushy, it’s time to toss it. For passion fruit, if the skin is too wrinkled or hard, it’s past its prime. Always check for mold on yogurt or coconut milk. When in doubt, it’s best to avoid using those ingredients. Freshness is key to enjoying your smoothie to the fullest. Dragonfruit is packed with nutrients. It has a high vitamin C content. This fruit supports your immune system. It contains fiber, which aids digestion. Dragonfruit is low in calories, making it a great snack. It also has antioxidants that help fight free radicals. These properties may lower your risk of chronic diseases. Eating dragonfruit can improve heart health by lowering bad cholesterol. Overall, dragonfruit is a tasty and healthy choice. Yes, you can use frozen fruits! Frozen fruits make the smoothie cold and thick. They are also convenient since they last longer. If you use frozen dragonfruit, thaw it slightly for easier blending. For other fruits, like bananas, you can slice and freeze them in advance. Just remember to adjust the amount of ice. If you want a creamier smoothie, reduce the ice when using frozen fruits. Making this smoothie vegan is easy! Simply swap Greek yogurt with a dairy-free yogurt. Almond or coconut yogurt works well. Replace honey with maple syrup for a vegan sweetener. You can also add a scoop of plant-based protein powder for extra nutrition. These simple swaps keep the smoothie delicious and vegan-friendly. Absolutely! This smoothie is bright and colorful, which kids love. The sweet taste of dragonfruit and banana makes it appealing. It has a creamy texture that is easy to drink. Packed with vitamins, it is a healthy choice for kids. Serve it in fun cups or with a colorful straw to make it exciting. This smoothie is a great way to sneak in some fruit for kids! This blog post laid out all you need for a tasty Dragonfruit Passion Swirl Smoothie. We covered the main ingredients, tips for blending, and fun variations. Remember, you can tweak the recipe to match your taste and needs. Smoothies are great for quick meals or snacks. Enjoy experimenting with flavors and ingredients! Drink it fresh for the best taste and health benefits. Your smoothie journey begins now!](https://fastmealmate.com/wp-content/uploads/2025/06/150b527a-71cf-4bb1-8c82-2935aeae296c-768x768.webp)


![- 1 pound ground beef (80/20 blend) - ½ teaspoon salt - ½ teaspoon black pepper - ½ cup cheddar cheese, shredded - ½ cup mozzarella cheese, shredded - 4 large flour tortillas - 4 tablespoons cream cheese, softened - ¼ cup dill pickles, diced - ¼ cup diced tomatoes - ¼ cup onion, minced - 2 tablespoons ketchup - 2 tablespoons mustard - Olive oil, for cooking Creating Cheeseburger Quesadilla Smash Sliders is a fun way to enjoy flavors. With the right ingredients, your sliders burst with taste. First, let’s start with the beef. I like using an 80/20 blend. This mix gives a juicy bite. Next, season it well with salt and pepper. Don't skip this step; flavor is key. For the cheese, I use both cheddar and mozzarella. The cheddar brings a sharp taste, while mozzarella melts beautifully. You can feel the cheese stretch in every bite. The flour tortillas are the base for these sliders. They hold everything together and crisp up nicely when cooked. I recommend using large tortillas for easier assembly. Cream cheese adds richness. Spread it on the tortillas for a creamy layer. Then, top it off with diced dill pickles, tomatoes, and onions. These toppings add crunch and freshness. Finally, drizzle some ketchup and mustard for that classic burger taste. Use olive oil to cook the quesadillas. It helps create a golden brown crust while keeping everything moist inside. For the full recipe, check the details above. This will guide you step by step to create your own Cheeseburger Quesadilla Smash Sliders. Enjoy the flavor explosion! To start, grab a medium mixing bowl. Add 1 pound of ground beef, ½ teaspoon of salt, ½ teaspoon of black pepper, and 1 teaspoon of garlic powder. Use your hands to mix everything gently. Once mixed, divide the beef into small patties, each about 2-3 ounces. Next, heat a skillet on medium heat. Add a drizzle of olive oil. When the pan is hot, place the patties in the skillet. Cook for 3-4 minutes until they turn brown. Flip them over and cook for another 3-4 minutes. Once done, remove the patties and set them aside on a plate. Now it's time to build your quesadilla! Lower the skillet heat to medium-low. Take 4 large flour tortillas and spread 1 tablespoon of softened cream cheese on one side of each tortilla. Place one tortilla in the skillet with the cream cheese-side facing up. Add a generous amount of cheddar cheese, then stack half of the cooked burger patties on top. Next, sprinkle on the diced pickles, diced tomatoes, and minced onions. Drizzle a bit of ketchup and mustard over this. Finish by adding a layer of shredded mozzarella cheese. Carefully place another tortilla on top, cream cheese-side down. Press it gently with a spatula to hold everything together. Cook the quesadilla for about 2-3 minutes. Look for a golden-brown color on the bottom tortilla and melted cheese. Now, flip the quesadilla gently and cook the other side for another 2-3 minutes. When both sides are browned, take the quesadilla off the heat. Let it cool for a minute, then slice it into quarters or sliders. Repeat this for the rest of your tortillas and filling ingredients. Serve the warm cheeseburger quesadilla sliders on a platter. I like to add extra diced pickles and some ketchup and mustard for dipping on the side. Enjoy this flavor explosion! For the full recipe, check out the [Full Recipe]. To make the best burger texture, use ground beef that is 80/20. This mix provides the right fat content for juicy patties. When you form the patties, handle the meat gently. Overworking it can make the burgers tough. Aim for small patties, about 2-3 ounces, for sliders. For seasoning, keep it simple. A mix of salt, black pepper, and garlic powder works great. These flavors enhance the beef without overpowering it. Be sure to season both sides of each patty before cooking. This will help lock in the taste. To get that perfect cheese melt, use a mix of cheeses. Cheddar and mozzarella are my go-tos. Cheddar adds sharpness, while mozzarella brings stretchiness. Spread cheese evenly, so it melts all the way through. For a fun twist, try pepper jack cheese for a spicy kick. You can also experiment with gouda or fontina. These will add richness and depth. Just remember to slice the cheese thinly for quicker melting. Cooking your quesadillas to a perfect golden brown is key. Use medium-low heat for even cooking. This prevents burning while letting the cheese melt fully. When flipping quesadillas, use a large spatula. Slide it under the quesadilla gently to avoid spills. If you're nervous about flipping, consider using a plate. Simply slide one side onto the plate, then flip it back into the pan. This method keeps your fillings intact. {{image_4}} You can switch up the meat in this dish. Ground turkey or chicken works well. Both have a lighter flavor but still taste great. For a plant-based option, try lentils or black beans. These give you a nice texture and flavor. Using these options can help you cater to different diets. To boost taste, add spices like paprika or cumin. These spices add warmth and depth. You can also mix in sauces, like barbecue or sriracha, for a kick. Experimenting with different cheeses can change the flavor too. Pepper jack adds heat, while gouda brings a smoky taste. Topping with fresh herbs, like cilantro or chives, can brighten each bite. You can serve these quesadilla sliders in many ways. They work as a classic quesadilla or as fun sliders. For parties, cut them into smaller pieces. Arrange them on a colorful platter to impress your guests. You might also serve them with dips, like guacamole or salsa, for extra flavor. Each style can make your meal exciting and unique. To keep your cheeseburger quesadilla sliders fresh, place them in an airtight container. This helps lock in flavor and moisture. Store them in the fridge for up to three days. After that, the taste may decline, and the texture could change. If you want to save them longer, freezing is a good option. Wrap each quesadilla slider tightly in plastic wrap. Then, place them in a freezer-safe bag or container. This keeps them safe from freezer burn. You can freeze them for up to three months. When you're ready to eat, let them thaw overnight in the fridge before reheating. For the best taste, reheat using the oven. Preheat it to 350°F (175°C). Place the quesadilla sliders on a baking sheet. Heat for about 10-15 minutes, until warm and crispy. If you use a microwave, put them on a plate. Heat for 30-60 seconds. This method is faster but may not keep the crunch. To restore crunchiness, consider finishing in a hot pan for a minute. Yes, you can prepare these sliders ahead. Make the patties and cook them. Let them cool. Then, store them in the fridge. When ready to serve, assemble the quesadillas. You can use either fresh tortillas or pre-made ones. If you use pre-made tortillas, spread cream cheese and layer the fillings. Cook them quickly in a hot skillet. This way, they stay crispy and warm. You can serve many tasty sides with these sliders. Consider some crispy fries or sweet potato fries. They pair well with the cheesy sliders. A fresh salad can balance the richness. You might also try dipping sauces like ranch or spicy mayo. These add extra flavor and fun. You could even serve a zesty salsa for a fresh kick. To make these sliders vegetarian, swap out the beef for a meat alternative. You could use black beans or lentils as a base. Another option is to use plant-based burger patties. Just season them like the beef. Add your favorite toppings, like cheese and veggies. You can still enjoy the same great flavors without meat. Just make sure all the other ingredients are vegetarian-friendly. You can make tasty Cheeseburger Quesadilla Smash Sliders easily. Start with classic ingredients and follow straightforward steps for delicious results. Don’t forget to try different proteins and toppings to suit your taste. Storing any leftovers is simple, and reheating them will keep them just as good. With these tips, you can impress guests or enjoy a fun meal at home. Making this dish lets you explore flavors while fitting right into your busy day. Enjoy your cooking adventure!](https://fastmealmate.com/wp-content/uploads/2025/07/3ea5f9d6-0f24-4765-99ee-1beab0673b04-768x768.webp)