One-Pan Chicken Burrito Bowl Flavorful and Easy Meal
Looking for a quick and tasty meal? The One-Pan Chicken Burrito Bowl is your answer! This dish packs flavor and is easy to make, all in one pan. You can enjoy a healthy meal without hours in the kitchen. With simple ingredients and step-by-step guidance, you’ll learn how to prepare, cook, and store this delicious bowl. Let’s dive into this tasty journey together!
Ingredients
Detailed Ingredients List
To make the One-Pan Chicken Burrito Bowl, gather these simple ingredients:
– 1 lb (450g) boneless, skinless chicken thighs, cut into bite-sized pieces
– 1 tablespoon olive oil
– 1 teaspoon chili powder
– 1 teaspoon ground cumin
– 1 teaspoon garlic powder
– 1/2 teaspoon smoked paprika
– Salt and freshly ground black pepper, to taste
– 1 cup uncooked brown rice
– 2 cups chicken broth (low-sodium recommended)
– 1 can (15 oz) black beans, drained and rinsed
– 1 cup corn (fresh, frozen, or canned)
– 1 large bell pepper, diced (any color for a vibrant look)
– 1 cup salsa (your favorite kind)
– 1 cup shredded cheese (cheddar or Mexican blend recommended)
– Fresh cilantro, chopped, for garnish
– Lime wedges, for serving
Substitutions for Key Ingredients
If you have some dietary restrictions or preferences, consider these swaps:
– Chicken thighs can be replaced with chicken breast for a leaner option.
– Use vegetable broth instead of chicken broth for a vegetarian dish.
– Swap black beans for pinto or kidney beans, based on your taste.
– Quinoa can replace brown rice for a gluten-free grain.
– For a dairy-free option, use vegan cheese or skip the cheese entirely.
Cooking Tools Needed
You will need some basic tools to make this dish:
– A large skillet or pan
– A sharp knife for chopping
– A cutting board
– Measuring cups and spoons
– A spatula or wooden spoon for stirring
– A fork for fluffing the rice
These tools help make cooking fun and easy, ensuring you enjoy the process of creating your meal.
Step-by-Step Instructions
Preparing the Chicken and Spices
Start by cutting the chicken thighs into small pieces. This helps them cook evenly and quickly. In a large bowl, mix the chicken with salt, pepper, chili powder, cumin, garlic powder, and smoked paprika. This blend gives the chicken a deep, tasty flavor. Make sure every piece is coated well. This step is key to a flavorful dish.
Cooking and Combining Ingredients
Heat the olive oil in a large skillet over medium heat. When the oil shimmers, add the seasoned chicken. Cook for 5-6 minutes. Stir it often, so it browns evenly. Once the chicken is cooked, add the uncooked brown rice, chicken broth, black beans, corn, diced bell pepper, and salsa. Raise the heat until it gently boils. Then, lower the heat, cover the pan, and let it simmer for about 25-30 minutes. This allows the rice to soak up all the flavors.
Final Touches and Serving Suggestions
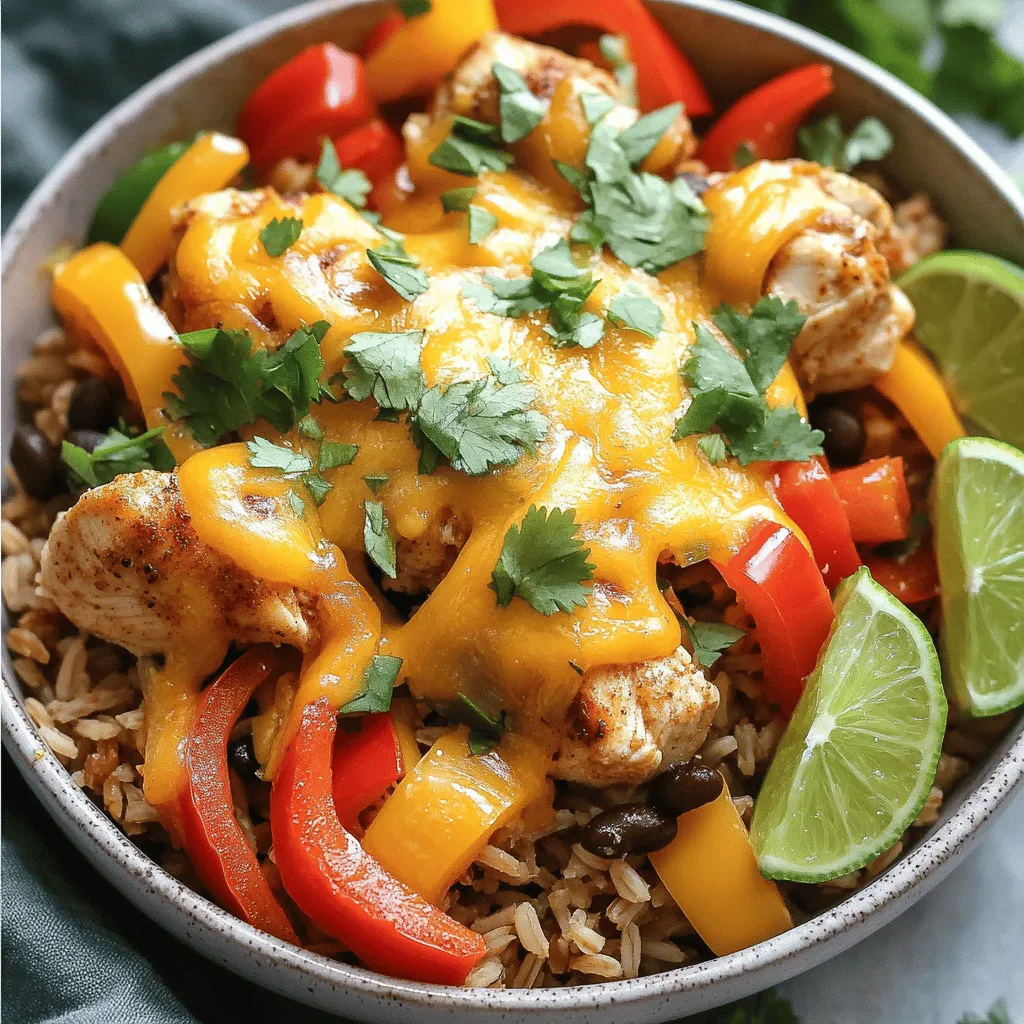
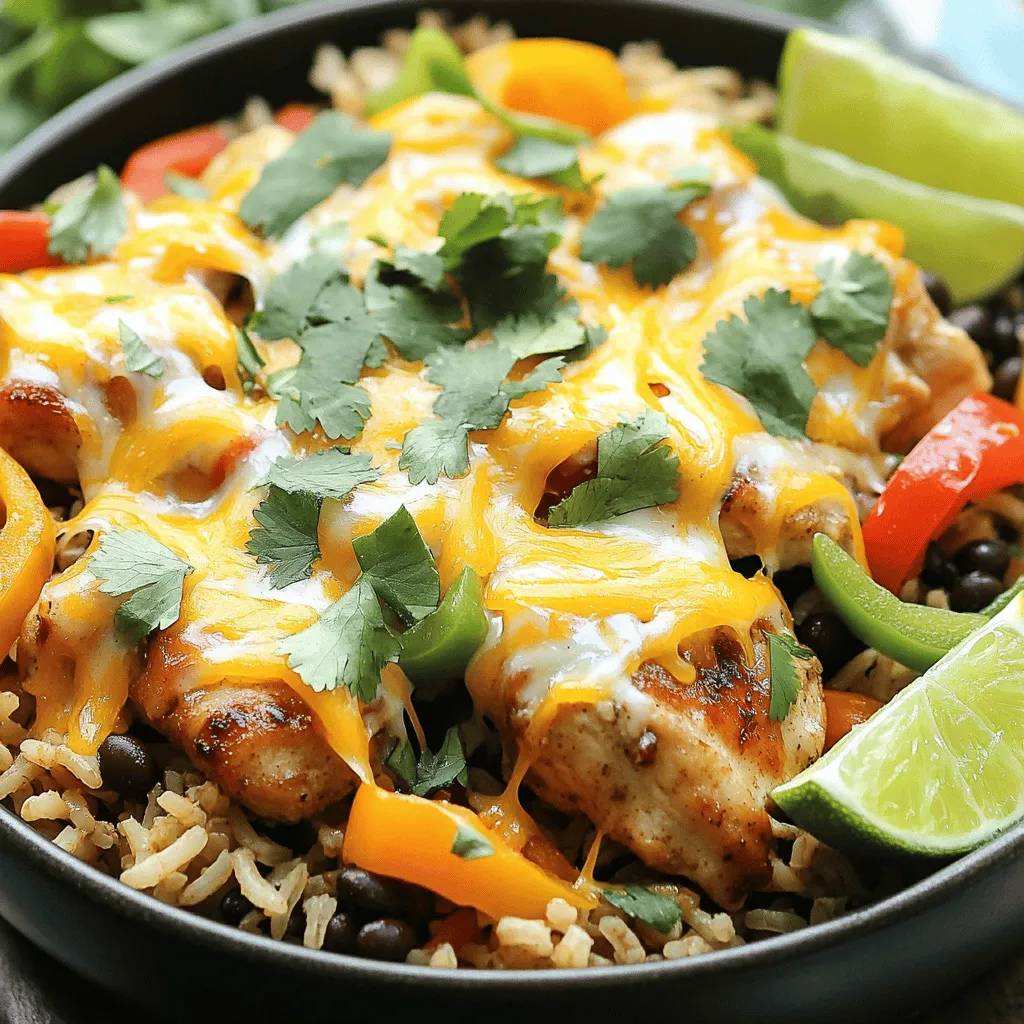
When the rice is tender and the liquid is gone, take the pan off the heat. Sprinkle the shredded cheese over the top and cover it again. Let it sit for a few minutes. This will melt the cheese nicely. Use a fork to fluff the burrito bowl gently. Garnish with fresh cilantro for a bright look. Serve with lime wedges for that extra zest. Display the dish in large, shallow bowls to showcase the colorful layers. Enjoy the burst of flavors in every bite.
Tips & Tricks
Time-Saving Preparation Techniques
To make cooking faster, prep your ingredients first. Chop the bell pepper and measure the spices before you start. You can even cut the chicken into pieces the night before. This way, you save time and feel less rushed while cooking. Use a sharp knife for faster chopping and safer cutting.
How to Enhance Flavors
To boost the taste, try marinating your chicken. A simple mix of lime juice, garlic, and spices works great. Let it sit for 15 minutes or longer. You can also add fresh herbs like cilantro or parsley at the end. For a kick, use a spicy salsa or add jalapeños. These small changes can make a big difference in flavor.
Best Practices for One-Pan Cooking
One-pan cooking is fun and easy. Start with the meat first, as it takes longer to cook. Make sure to stir the mixture well to avoid sticking. Use a lid to trap steam and cook the rice evenly. For a beautiful finish, let the cheese melt without stirring it in. This gives you a nice layer of cheesy goodness on top. Remember, the secret to a great one-pan meal is patience and careful layering.
Variations
Vegetarian Options
You can easily make this dish vegetarian. Swap the chicken for cooked lentils or chickpeas. These options add protein and texture. You can also use tofu for a hearty feel. Just season it the same way as the chicken. This keeps the flavor strong and satisfying. Add extra veggies like zucchini or mushrooms to enhance the mix.
Spicy Ingredients to Try
If you like heat, consider adding jalapeños or diced chipotle peppers. They bring a nice kick to your bowl. You can also use spicy salsa or a dash of hot sauce. For extra flavor, add a sprinkle of cayenne pepper when cooking. Remember, start small, then adjust to your taste!
Alternative Grain Choices
While brown rice is great, you can try other grains too. Quinoa is a wonderful choice. It cooks fast and adds a nutty flavor. Cauliflower rice is another option for a low-carb twist. It’s light and fluffy. Just adjust the cooking time to avoid overcooking. These options keep the dish fresh and exciting.
Storage Info
How to Store Leftovers
After enjoying your One-Pan Chicken Burrito Bowl, let it cool. Use an airtight container to store leftovers. Keep it in the fridge for up to three days. Make sure to separate any toppings, like cheese and cilantro, so they stay fresh.
Reheating Instructions
To reheat, you can use the microwave or stovetop. For the microwave, place the bowl in for one to two minutes, stirring halfway. If you prefer the stovetop, heat on low in a skillet. Stir often until it’s hot. Add a splash of water or broth to keep it moist.
Freezing Guidelines
If you want to freeze it, first cool the dish completely. Transfer it to a freezer-safe container or bag. Remove as much air as possible. It can stay in the freezer for up to three months. To thaw, place it in the fridge overnight before reheating. This way, you’ll have a quick meal ready to go!
FAQs
How Long Does It Take to Cook One-Pan Chicken Burrito Bowl?
It takes about 45 minutes to cook this dish. You spend 10 minutes prepping the ingredients. Then, you cook everything in one pan for about 30 minutes. This makes it a quick and easy meal option for busy days.
Can I Use Different Proteins?
Yes, you can use different proteins in this bowl. Chicken is great, but try beef, pork, or shrimp. For a meatless option, use tofu or tempeh. Just adjust the cooking time based on the protein you choose.
What Sides Pair Well with This Dish?
Many sides go well with a burrito bowl. You can serve it with tortilla chips and guacamole. A simple green salad also works well. If you want something warm, try a side of refried beans or Mexican street corn. These sides add extra flavor and fun to your meal.
You learned about making a great one-pan chicken burrito bowl. We covered key ingredients, cooking steps, and tools. I shared tips to save time and enhance flavors. You can explore tasty variations, store leftovers correctly, and reheat with ease.
Cooking can be fun and simple. With practice, you will impress family and friends with your meals. Enjoy your cooking journey and discover new flavors along the way!


![To make Easy Roasted Tomato Soup, gather these key ingredients: - 2 pounds of ripe, juicy tomatoes, halved - 1 medium onion, cut into quarters - 4 cloves of garlic, left unpeeled - 2 tablespoons of extra virgin olive oil - Sea salt and freshly cracked black pepper, to taste - 1 teaspoon of dried basil - 1 teaspoon of sugar (optional, to counterbalance acidity) - 4 cups of rich vegetable broth - 1/2 cup of heavy cream (optional, for a luscious finish) - Fresh basil leaves, for a lovely garnish These ingredients create a base that bursts with flavor. The tomatoes give the soup its rich taste. The onion adds sweetness, while garlic brings depth. You can add optional ingredients to boost the flavor: - A splash of balsamic vinegar for acidity - A pinch of red pepper flakes for heat - A teaspoon of smoked paprika for a smoky taste These extras can transform the soup into something special. Feel free to experiment and find your favorite combination. To prepare this soup, you’ll need a few handy tools: - A large baking sheet for roasting - A pot for cooking the soup - An immersion blender or a standard countertop blender - A cutting board and sharp knife for prep Having the right tools makes cooking easier. With these, you’ll create a smooth, tasty soup that warms the soul. For the complete recipe, check out the [Full Recipe]. To start, gather all your ingredients. You need: - 2 pounds of ripe, juicy tomatoes, halved - 1 medium onion, cut into quarters - 4 cloves of garlic, left unpeeled - 2 tablespoons of extra virgin olive oil - Sea salt and freshly cracked black pepper, to taste - 1 teaspoon of dried basil - 1 teaspoon of sugar (optional) - 4 cups of rich vegetable broth - 1/2 cup of heavy cream (optional) - Fresh basil leaves for garnish First, wash the tomatoes well. Cut them in half and place them on a baking sheet. Next, quarter the onion and add it to the sheet. Toss in the unpeeled garlic cloves. Now, drizzle the olive oil over the veggies. Sprinkle sea salt, black pepper, and dried basil on top. If you want to balance the soup's acidity, add sugar now. Preheat your oven to 400°F (200°C). Once the oven is ready, slide in your baking sheet. Roast the vegetables for 25-30 minutes. The tomatoes should soften and caramelize. After roasting, take the sheet out and let the veggies cool. Once cool enough to handle, peel off the garlic skins. In a large pot, combine the roasted tomatoes, onion, and garlic. Add the vegetable broth and place the pot over medium heat. Bring the mixture to a gentle simmer. Use an immersion blender to puree the soup until smooth. If you don’t have one, carefully transfer the soup to a blender. Make sure to leave space for steam to escape. If you want a rich finish, stir in the heavy cream now. Taste the soup and adjust the seasoning. Heat until hot throughout. Finally, serve the soup in bowls. Garnish with fresh basil leaves for color and flavor. Enjoy your delicious, comforting bowl of roasted tomato soup! To get a smooth soup, use an immersion blender. It makes blending easy. If you prefer, you can blend in batches with a regular blender. Just leave space for steam. For a thicker texture, add less broth. If you like it thinner, add more broth. You can also stir in heavy cream for extra richness. It adds a nice velvety feel. One mistake is not roasting the tomatoes long enough. They need time to caramelize and develop flavor. Don’t skip the sugar if your tomatoes are very acidic. It balances the taste. Also, remember to peel the garlic after roasting. Skins can affect the smoothness of your soup. Finally, taste your soup before serving. Adjust salt and pepper to match your flavor. Serve your soup hot, garnished with fresh basil leaves. They add color and flavor. Pair it with a grilled cheese sandwich for a classic combo. You can also serve it with crusty bread for dipping. For a twist, add a drizzle of balsamic glaze on top. This adds a sweet tang that enhances the soup. For the full recipe, check the details above. {{image_4}} You can easily make this soup vegan. Just skip the heavy cream. Use more vegetable broth instead. This keeps the soup rich and tasty. The roasted tomatoes give it a great flavor. You won’t miss the cream at all. Add a splash of coconut milk for creaminess if you like. It adds a nice twist! Want to spice things up? Add a pinch of red pepper flakes for heat. A dash of smoked paprika gives a warm flavor. Fresh herbs like thyme or oregano enhance the soup, too. You can also stir in a tablespoon of balsamic vinegar. It adds depth and a little sweetness. Don't forget to taste as you go! This soup is naturally gluten-free. You don’t need any flour or wheat. Just use certified gluten-free vegetable broth. This way, everyone can enjoy it. If you want to thicken the soup, use blended potatoes or a cornstarch slurry. It keeps the soup smooth without gluten. Enjoy this comforting bowl without worries! To store leftover soup, let it cool first. Pour it into an airtight container. Make sure to seal it well. Place it in the fridge. It will stay fresh for about three days. If you want to keep it longer, freezing is better. Freezing is a great way to prepare meals ahead. Use freezer-safe containers or bags. Fill them with soup, leaving some space at the top. This allows for expansion. Label the containers with the date. It can last up to three months in the freezer. When you’re ready to use it, just thaw it in the fridge overnight. To reheat your soup, use a pot on the stove. Heat it gently over medium-low. Stir often to avoid burning. If the soup is too thick, add a splash of broth or water. You can also use a microwave. Heat it in short bursts, stirring in between. Always taste before serving to check the flavor. Adjust seasoning if needed for that perfect bowl of comfort. The best tomatoes for this soup are ripe, juicy varieties. I love using Roma or vine-ripened tomatoes. They have great flavor and are less watery. You can also mix in some heirloom tomatoes for extra depth. Their sweetness adds a lovely touch to the soup. Yes, you can make this soup ahead of time. It keeps well in the fridge for up to four days. Just make sure to cool it completely before storage. You can also freeze it for up to three months. For the best taste, reheat the soup gently on the stove. To make roasted tomato soup without cream, simply skip the heavy cream. Instead, you can add a splash of vegetable broth for richness. For added creaminess, blend in some cooked white beans or cashews. They blend smoothly and give a nice texture without dairy. You’ll still enjoy a flavorful bowl of comfort. For the full recipe, check out the detailed instructions above. In this post, we explored how to make easy roasted tomato soup. We discussed key ingredients, optional flavors, and tools you need. Following the step-by-step instructions ensures success every time. I shared tips for the perfect consistency and common mistakes to avoid. You can even try vegan and gluten-free options. Lastly, I covered storage and reheating for later enjoyment. Enjoy making this warm soup and share it with others.](https://fastmealmate.com/wp-content/uploads/2025/07/8c50acbe-b26b-4fce-9348-24a1062b636d-768x768.webp)