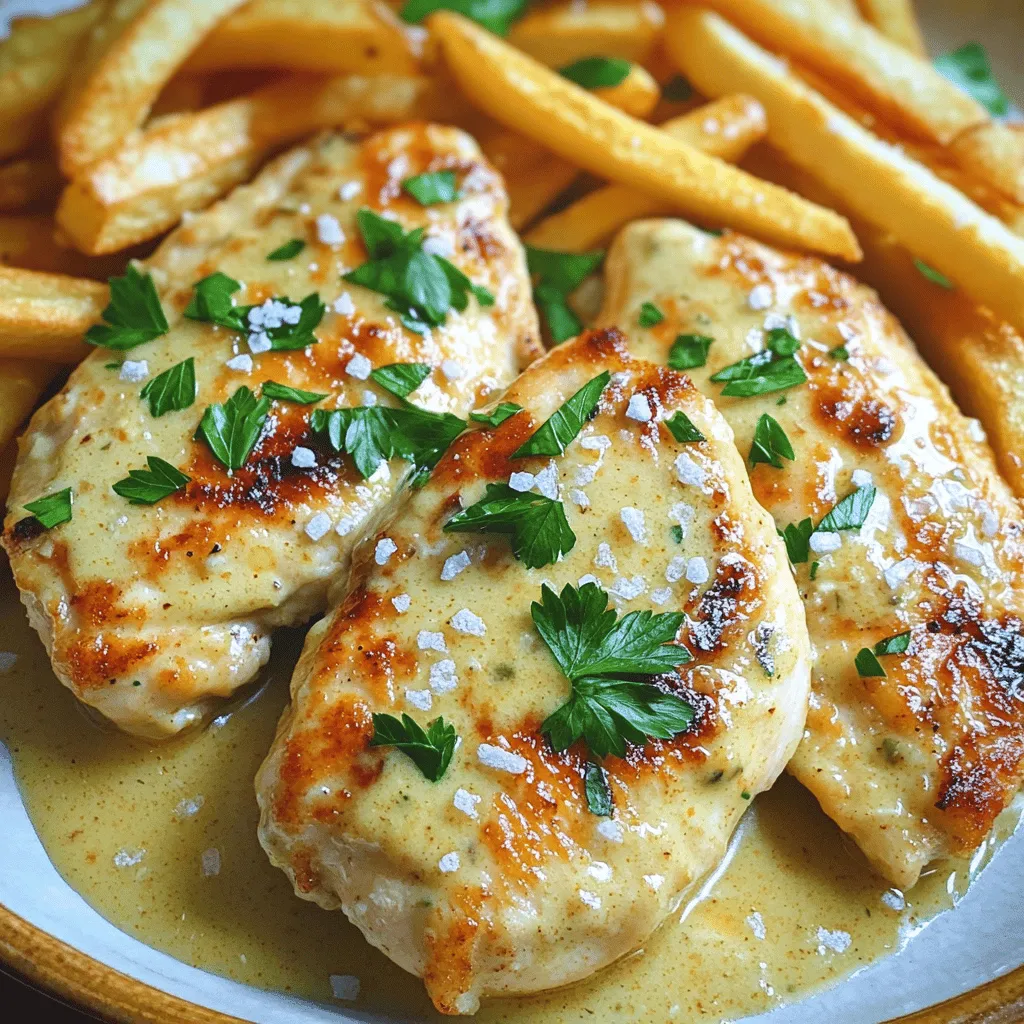
Creamy Garlic Parmesan Chicken Fillets with Fries Delight

Craving a dinner that’s easy, creamy, and oh-so-delicious? Look no further! My Creamy Garlic Parmesan Chicken Fillets with Fries Delight will transform your mealtime. Loaded with flavors from garlic and rich Parmesan, this recipe features crispy fries that you won’t be able to resist. Get ready for a comforting dish that’s sure to please your family or guests. Let’s dive into the step-by-step guide to this scrumptious meal!
Ingredients
Main Ingredients
– 4 boneless chicken fillets
– 1 cup heavy cream
– 1 cup freshly grated Parmesan cheese
Seasoning and Fry Components
– 4 cloves garlic, finely minced
– 2 large russet potatoes, cut into fry shapes
– 1 tablespoon cornstarch
Cooking Essentials
– 2 tablespoons olive oil (divided)
– 1 teaspoon dried oregano
– 1 teaspoon salt
– 1/2 teaspoon freshly cracked black pepper
– Fresh parsley, finely chopped (for garnish)
To make Creamy Garlic Parmesan Chicken Fillets with Fries shine, start with quality ingredients. The chicken fillets must be boneless for easy cooking. Heavy cream is key for a rich sauce. Freshly grated Parmesan cheese adds great flavor and texture.
Next, seasoning is important for both the chicken and fries. Minced garlic gives a nice aroma and taste. Russet potatoes work best for fries; they become crispy on the outside. Cornstarch helps achieve that perfect crisp.
For cooking, olive oil adds richness and helps with browning. Dried oregano gives the dish an herby note. Salt and pepper enhance all flavors. Finally, fresh parsley is perfect for garnish, adding a pop of color.
This combination of ingredients creates a dish that excites the palate.
Step-by-Step Instructions
Preparing the Oven and Fries
– Preheat your oven to 425°F (220°C).
– Coat the potatoes with olive oil, cornstarch, salt, and pepper.
To start, you need to preheat your oven. This step is key for crispy fries. While the oven heats, prepare the potatoes. Cut them into fry shapes. In a bowl, mix the olive oil, cornstarch, salt, and pepper. Make sure every fry gets a good coat. This coating helps the fries turn golden and crunchy.
Baking the Fries
– Spread seasoned fries on a baking sheet.
– Bake for 25-30 minutes, flipping halfway.
Once your fries are ready, spread them on a baking sheet in a single layer. The fries need space to cook evenly. Bake them in your preheated oven for 25 to 30 minutes. Remember to flip them halfway through. This ensures both sides get that nice, crispy texture.
Cooking the Chicken
– Heat remaining olive oil in a skillet.
– Sear chicken fillets until golden brown and cooked through.
While the fries bake, it’s time to cook the chicken. Heat the rest of the olive oil in a skillet over medium heat. Season the chicken fillets with salt and pepper. Sear each fillet for about 5 to 6 minutes on each side. They should turn golden brown and be fully cooked. Once done, set them aside on a plate.
Making the Garlic Parmesan Sauce
– Sauté minced garlic in the skillet.
– Add heavy cream and whisk in Parmesan cheese.
In the same skillet, add your minced garlic. Sauté it for about 1 to 2 minutes until it smells good. Be careful not to burn it! Next, lower the heat and pour in the heavy cream. Whisk in the freshly grated Parmesan cheese. This sauce will become rich and creamy, perfect for your chicken.
Combining Chicken with Sauce
– Return chicken to skillet and simmer in sauce for flavor.
Now, return the chicken fillets to the skillet. Spoon the sauce over them. Let the chicken simmer in the sauce for about 2 to 3 minutes. This step allows the chicken to soak up all that delicious flavor.
Plating the Dish
– Serve chicken fillets with fries and garnish with parsley.
To serve, place the creamy garlic Parmesan chicken fillets on a plate next to the crispy fries. Drizzle any leftover sauce over the chicken. Finally, sprinkle fresh parsley to add color. This will make your dish look as good as it tastes!
Tips & Tricks
Perfecting the Fries
To get the best fries, follow these tips. First, ensure an even coating of cornstarch on the potatoes. This will help them become crispy and golden. Next, use a parchment-lined baking sheet. It makes cleanup a breeze and prevents sticking.
Enhancing the Chicken Flavor
For juicy chicken, let the fillets rest before slicing. This keeps the juices inside. You can also experiment with spices. Try adding a dash of paprika or some herbs. This can give your chicken a unique twist.
Sauce Consistency Tips
Getting the sauce just right can make a big difference. Adjust the cream and cheese amounts for your preferred thickness. If you want a richer flavor, add a splash of chicken broth. This simple step can elevate the taste of your dish.
By using these tips, you can make the Creamy Garlic Parmesan Chicken Fillets with Fries even better.Enjoy cooking!
Variations
Substituting Ingredients
You can switch things up by using chicken thighs instead of fillets. Chicken thighs have more fat, giving them a richer flavor. You can also explore different cheeses. Mozzarella or gouda can add a fun twist to the dish. These choices bring new tastes and textures to your meal.
Alternative Cooking Methods
If you want a smoky flavor, try grilling the chicken instead of searing it. Grilling adds a nice char that enhances the taste. For the fries, consider using an air fryer. It requires less oil and still gives you crispy fries. This method makes for a healthier option without losing crunch.
Serving Suggestions
To make your meal even better, pair the chicken and fries with a side salad. A fresh salad adds color and nutrients. You can also serve garlic bread on the side. The bread complements the creamy sauce and adds a nice touch. These simple additions will elevate your dining experience.
Storage Info
Storing Leftovers
Cool the chicken fillets and fries completely before storing. Place them in airtight containers. This keeps the food fresh. Store in the fridge for up to three days for the best taste.
Reheating Instructions
To reheat, use the oven for crispy fries and warm chicken. Preheat the oven to 375°F (190°C) and bake for about 10-15 minutes. If you want a quicker method, use the microwave. Place the food in a microwave-safe bowl. Cover it with a damp paper towel. This helps keep the chicken moist.
Freezing Options
You can freeze the chicken fillets and sauce separately. This way, they last longer. Wrap them tightly in plastic wrap or foil. Thaw overnight in the refrigerator before reheating. This keeps the food safe and tasty.
FAQs
Can I make this recipe dairy-free?
You can make this recipe dairy-free. Consider using coconut cream instead of heavy cream. Nutritional yeast can replace Parmesan cheese. This way, you keep a creamy texture and delicious flavor.
How can I make the dish spicier?
To add some heat, try adding red pepper flakes or hot sauce to the garlic sauce. This will give your dish a nice kick. Adjust the amount to suit your taste.
What can I substitute for fries?
If you want a healthier option, use sweet potatoes instead of regular fries. You can also try roasted vegetables for a colorful and tasty side. Both options complement the chicken well.
Can I use pre-cooked chicken?
Yes, you can use pre-cooked chicken. Just adjust your cooking time. Heat the sauce and add the chicken to warm it through. This makes the dish quick and easy to prepare.
This recipe combines tender chicken with crispy fries for a tasty meal. You start by preparing the ingredients and cooking the chicken in a rich garlic Parmesan sauce. The fries give a crunchy contrast that enhances the dish.
Feel free to make changes like using different cheeses or cooking methods. Store leftovers properly to enjoy later. This meal is easy and adaptable, ensuring you can impress your family or friends with simple steps. Enjoy your flavorful chicken and fries!

![For this no-bake strawberry cheesecake cups, you will need: - 1 cup graham cracker crumbs - 2 tablespoons granulated sugar - 1/2 cup unsalted butter, melted - 1 cup cream cheese, softened - 1/2 cup powdered sugar - 1 teaspoon pure vanilla extract - 1 cup heavy whipping cream - 1 cup fresh strawberries, diced - Additional fresh strawberries, sliced for topping You can swap some ingredients if needed: - Use chocolate cookies instead of graham crackers for a twist. - Swap granulated sugar with brown sugar for a deeper flavor. - Low-fat cream cheese works well if you're watching calories. - Coconut cream can replace heavy cream for a dairy-free option. - If fresh strawberries are not available, try using raspberries or blueberries. When using fresh strawberries, choose ripe ones for the best taste. Look for bright red berries without any green spots. Wash them gently and pat them dry before dicing. If you want to enhance their flavor, sprinkle a little sugar on the diced strawberries and let them sit for about 10 minutes. This draws out the juices and creates a sweet syrup, making your cheesecake cups even more delicious. For the full recipe and step-by-step instructions, check out the [Full Recipe]. To make the crust, start with a mixing bowl. Add 1 cup of graham cracker crumbs and 2 tablespoons of granulated sugar. Pour in 1/2 cup of melted unsalted butter. Mix it well until the crumbs look like wet sand. This will give your crust a great flavor and texture. Next, take about two tablespoons of this crumb mixture and spoon it into each cup. Use your fingers or the back of a spoon to press it down gently. This step helps form a solid base for your cheesecake. For the cream cheese filling, grab another bowl. Beat 1 cup of softened cream cheese with an electric mixer. Keep mixing until it is smooth and creamy. Once it looks good, add 1/2 cup of powdered sugar and 1 teaspoon of pure vanilla extract. Mix until everything is silky and combined. In a separate bowl, whip 1 cup of heavy cream. Use the mixer until stiff peaks form. Be careful not to over-whip it. You want the cream to be light and fluffy. Now, gently fold the whipped cream into the cream cheese mixture. Use a spatula and mix until just combined. This folding keeps the mixture airy. Spoon the cream cheese filling over the crust in each cup. Fill them about three-quarters full. Use the spatula to smooth the tops. Next, top each cup with diced strawberries. Press them gently into the cream cheese layer. This step spreads their flavor throughout the dessert. For the final touch, add a dollop of remaining cream cheese mixture on top. Garnish each cup with a fresh strawberry slice. Now, place the cups in the refrigerator. Chill them for at least 2 hours. This step lets the layers set and enhances the flavors. Enjoy your no-bake strawberry cheesecake cups! For the full recipe, refer to the section above. To get a smooth and creamy filling, make sure your cream cheese is at room temperature. If it’s too cold, it will clump. Use an electric mixer to beat the cream cheese until it is silky. Slowly add in the powdered sugar and vanilla while mixing. This step helps blend everything perfectly. When whipping the heavy cream, stop when you see stiff peaks. Over-whipping makes it grainy. Finally, gently fold the whipped cream into the cream cheese mixture. This keeps it light and fluffy. Serve these cheesecake cups in clear glass dishes. This way, everyone can see the beautiful layers. For a fun twist, try adding a layer of chocolate sauce or a fruit puree. You can also sprinkle crushed graham crackers on top for added crunch. If you want to impress your guests, use fresh mint leaves as a garnish. It adds a nice pop of color and flavor. You’ll need a few basic tools. A mixing bowl is key for combining ingredients. An electric mixer is best for whipping the cream and mixing the filling. Use a spatula to gently fold mixtures together. For serving, small glass cups or jars work wonderfully. They show off the layers and make for a pretty presentation. Lastly, have a measuring cup and spoons on hand for accuracy. Don't forget to check out the Full Recipe to perfect your technique! {{image_4}} You can switch up the flavor of your no-bake cheesecake cups. Try chocolate by adding cocoa powder to the cream cheese mix. For mango, blend fresh mango into the cream cheese before mixing. You can even use lemon zest for a bright, citrusy kick. These simple changes keep your dessert fun and fresh. Want a lighter cheesecake? Use low-fat cream cheese instead of regular cream cheese. You can also swap out heavy cream for Greek yogurt. This keeps the taste rich but lowers the fat. Using honey or agave syrup instead of sugar can add sweetness without the extra calories. Layering is key to a stunning dessert. Start with a crust layer, then add your creamy filling. You can add a layer of fruit between the cream cheese and whipped cream. This adds texture and flavor. For a fun twist, try layering different fillings. You could alternate between plain and flavored mixes. This creates a beautiful, colorful effect in your cups. For the full recipe, check out the [Full Recipe]. To store your no-bake strawberry cheesecake cups, use airtight containers. Place the cups in the fridge right after they set. This keeps them fresh and tasty. If you make them ahead of time, cover each cup with plastic wrap or a lid. This helps avoid any weird smells from other foods in the fridge. These cheesecake cups last in the fridge for about 3 to 5 days. After that, the texture may change. You want to enjoy them when they are at their best. Always check for any signs of spoilage before serving. If you see any mold or the smell seems off, it’s best to throw them away. You can freeze these cheesecake cups if you want to save them for later. First, let them chill in the fridge for at least 2 hours. After that, cover each cup tightly with plastic wrap and foil. This extra layer helps prevent freezer burn. You can freeze them for up to 2 months. When you’re ready to enjoy, take them out and let them thaw in the fridge overnight. Remember, the texture may change a bit after thawing. For the full recipe, check back for more details! No-Bake Strawberry Cheesecake Cups last about three days in the fridge. Store them in an airtight container to keep them fresh. You want to enjoy the creamy texture and berry flavor at their best. After three days, the strawberries may lose their crispness and the filling might not be as fresh. Yes, you can use frozen strawberries. Just make sure to thaw and drain them first. This helps avoid extra moisture in your cups. Frozen strawberries can still taste great and add sweetness. However, fresh strawberries give a better texture and brightness to the dish. If you need a substitute for heavy cream, you can use coconut cream or Greek yogurt. Coconut cream adds a rich flavor, while Greek yogurt keeps it light. You may also mix milk with butter for a quick fix. Use a 3:1 ratio of milk to butter for a creamy texture. Just remember, these swaps may change the overall taste slightly. You learned how to make no-bake strawberry cheesecake cups. We covered ingredients, tips, and storage methods. Remember to choose fresh berries for the best taste. Use my tips for a creamy texture and fun flavor twists. Store them right to enjoy later. With these steps, you can craft a delicious treat easily. Embrace your creativity, and have fun making these cheesecake cups!](https://fastmealmate.com/wp-content/uploads/2025/06/462f42fe-2b9d-4e42-aace-05b4fd02c510-768x768.webp)

![- 2 cups all-purpose flour - 1 ½ cups granulated sugar - ½ cup unsalted butter, softened - 1 cup creamy ricotta cheese - 3 large eggs, at room temperature - 1 tsp pure vanilla extract - 1 tsp baking powder - ½ tsp baking soda - ½ tsp salt - 1 tsp ground cinnamon - 1 cup mini chocolate chips - ½ cup crushed pistachios (for topping) - Powdered sugar (for dusting) To create a Cannoli Cake, use fresh ingredients. Fresh items bring out the best taste. Quality ricotta makes the cake creamy and rich. Fresh eggs help the cake rise well. I always suggest using high-quality vanilla extract. It enhances the flavor. You can make some substitutions if needed. For a dairy-free option, try almond or coconut milk yogurt instead of ricotta. You can also use dairy-free butter. These swaps keep the taste close to the original. Another option is to switch out regular flour for gluten-free flour. This helps those with gluten sensitivities enjoy the cake too. Whatever you choose, keep it fresh to ensure the best Cannoli Cake experience. Check the [Full Recipe] for more details. 1. Preheat the Oven: Start by preheating your oven to 350°F (175°C). 2. Prepare Cake Pans: Grease two 9-inch round cake pans with butter. Dust them with flour to help the cakes come out easily. 3. Cream the Butter and Sugar: In a large bowl, mix the softened butter and granulated sugar. Use an electric mixer for about 3-4 minutes until light and fluffy. 4. Incorporate Ricotta: Add the ricotta cheese to this mixture. Blend until it is smooth and free of lumps. 5. Mix in Eggs and Vanilla: Crack three large eggs into the bowl, mixing well after each. Add in the pure vanilla extract and combine. 6. Combine Dry Ingredients: In a separate bowl, whisk together the flour, baking powder, baking soda, salt, and cinnamon. 7. Combine Wet and Dry Mixtures: Gradually add the dry mix to the ricotta mix. Stir gently until just combined. Don’t overmix; some lumps are fine! 8. Fold in Chocolate Chips: With a spatula, fold in mini chocolate chips until they are spread throughout the batter. 9. Divide the Batter: Pour the batter evenly into the prepared pans. Smooth the tops with a spatula. - Baking Time and Temperature: Place the pans in the oven and bake for 25-30 minutes. - Check Doneness: To check if the cakes are done, insert a toothpick in the center. It should come out clean. 1. Cool the Cakes: After baking, take the cakes out and let them cool in the pans for about 10 minutes. Then, invert them onto wire racks to cool completely. 2. Layer the Cakes: Once cool, put one cake layer on a serving plate. Spread a layer of ricotta filling on top. You can mix powdered sugar with ricotta for sweetness. Place the second layer on top. 3. Frost: Use any leftover ricotta filling or whipped cream to frost the top and sides of the cake. 4. Garnish: For a lovely finish, sprinkle crushed pistachios on top. Dust it with powdered sugar before serving. For more details on the ingredients and the full recipe, check the [Full Recipe]. To get the best texture in your Cannoli Cake, avoid overmixing. Mix until the wet and dry ingredients just come together. You want some lumps to keep it light. Using room temperature ingredients is key. It helps everything blend smoothly, which gives the cake a fluffy texture. You can add spices or extracts for a unique twist. Try adding a pinch of nutmeg or almond extract for extra flavor. These small changes can make your cake stand out. For serving, consider pairing it with fresh berries or a scoop of vanilla ice cream. These sides brighten the cake and add freshness. For the full flavor experience, try my Full Recipe for Cannoli Cake. {{image_4}} You can have fun with Cannoli Cake by changing the filling. While the classic ricotta is great, try adding chocolate or fruit. - Chocolate Filling: Mix in cocoa powder or melted chocolate for a rich taste. - Fruit Filling: Use pureed strawberries or raspberries for a fresh twist. You can also switch up the cake flavors. A lemon or almond cake base adds a new layer of taste. Want to mix up the frosting? Use whipped cream, cream cheese, or even a flavored buttercream. If you want a gluten-free version, swap regular flour for almond or coconut flour. You can also find gluten-free cake mixes. For a vegan Cannoli Cake, replace eggs with flax eggs and use vegan butter. Substitute ricotta with cashew cream or a store-bought vegan alternative. If you're cutting back on sugar, reduce the granulated sugar by half. You can also use natural sweeteners like honey or maple syrup. Just keep in mind that these may change the cake's texture. These variations help you enjoy Cannoli Cake while meeting different dietary needs. For the full recipe, check out the Cannoli Cake Delight section. To keep your Cannoli Cake fresh, store it in an airtight container. This will help prevent it from drying out and losing flavor. If you have leftovers, place them in the fridge. It is best to wrap each slice in plastic wrap before putting it in the container. For freezing, slice the cake first. Wrap each slice tightly in plastic wrap, then place them in a freezer-safe bag. This way, you can take out one slice at a time. When you want to enjoy a slice, let it thaw in the fridge overnight. Cannoli Cake can stay fresh in the fridge for about 4 to 5 days. If frozen, it can last up to 3 months. Always look for signs of spoilage. If the cake smells off or has a change in texture, it's best to toss it. Mold is a clear sign that the cake is no longer safe to eat. Enjoy your Cannoli Cake while it's fresh for the best taste! What is Cannoli Cake? Cannoli cake is a delightful dessert inspired by the classic Italian cannoli. It features layers of moist cake filled with a rich ricotta mixture. The cake often includes mini chocolate chips and hints of cinnamon, giving it a sweet and creamy flavor. Can I make Cannoli Cake ahead of time? Yes! You can make cannoli cake a day or two in advance. Just store it in the fridge. Keep it covered to maintain freshness. This also allows the flavors to blend nicely. How long does Cannoli Cake last in the refrigerator? Cannoli cake lasts about 3 to 5 days in the refrigerator. Make sure to cover it well. Check for any signs of spoilage before serving. Can I use other cheeses instead of ricotta? You can use mascarpone cheese if you want a richer taste. Cream cheese is another option for a different flavor. However, ricotta provides the classic cannoli texture you crave. Pairing Cannoli Cake with beverages Cannoli cake pairs well with coffee or espresso. A glass of sweet dessert wine also complements its flavors. For a non-alcoholic option, try a chilled almond milk or vanilla soda. Ideal occasions for serving Cannoli Cake Serve cannoli cake at birthday parties, family gatherings, or holidays. It's perfect for any celebration. You can also enjoy it as a special treat on a cozy night in. Making a Cannoli Cake is fun and rewarding. You learned about fresh ingredients, step-by-step baking, and cooling tips. We explored variations and storage methods, too. Remember, fresh tastes best, and small changes can make a big difference. You can adapt this cake to fit any diet or preference. Now it’s time to gather your ingredients and start baking. Enjoy each bite of your tasty creation! This cake is a treat everyone will love.](https://fastmealmate.com/wp-content/uploads/2025/06/6e5f8d9a-9791-42a1-9598-f56c39528743-768x768.webp)