Grilled Corn Salad Fresh and Flavorful Delight
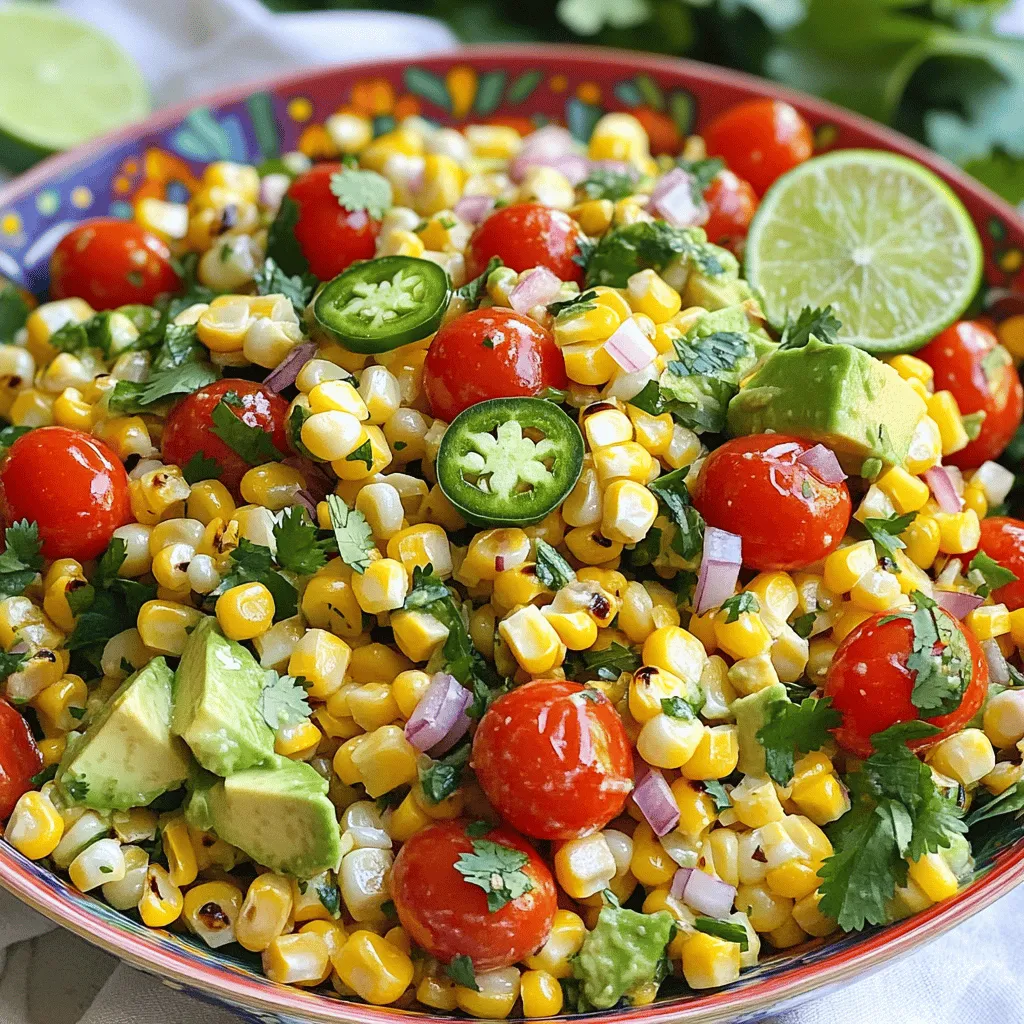
Are you ready to enjoy a vibrant dish that screams summer? Grilled Corn Salad is fresh, flavorful, and easy to make! With sweet corn, juicy tomatoes, and creamy avocado, each bite is pure delight. I’ll guide you through simple steps that will impress your friends and family. Dive in and discover how to create this tasty treat that everyone will love. Let’s get started on your new favorite salad!
Ingredients
To create a vibrant grilled corn salad, gather the following fresh ingredients. Each one adds flavor and texture to the dish.
– Fresh Corn
– Cherry Tomatoes
– Avocado
– Red Onion
– Jalapeño Pepper
– Cilantro
– Lime Juice
– Olive Oil
– Salt and Pepper
– Feta Cheese (optional)
Using fresh corn is key. It brings sweetness and crunch. I love to pick corn in season for the best flavor. Cherry tomatoes add a juicy burst. Choose ripe ones for a colorful display. Avocado lends creaminess, making every bite satisfying.
Red onion adds a sharp bite, while jalapeño gives a hint of heat. Adjust the amount to your spice level. Fresh cilantro brings a bright note, balancing the flavors. Lime juice adds acidity, making the salad pop. Olive oil smooths everything together. Season with salt and pepper to taste.
For an optional twist, crumbled feta cheese enhances the salad’s flavor profile. It adds a nice salty element. This ingredient list sets you up for a fresh and flavorful delight.
Step-by-Step Instructions
Preparation of the Grill
Preheat your grill to medium-high heat. This step ensures even cooking and a nice char on the corn. A hot grill helps lock in moisture and flavor.
Grilling the Corn
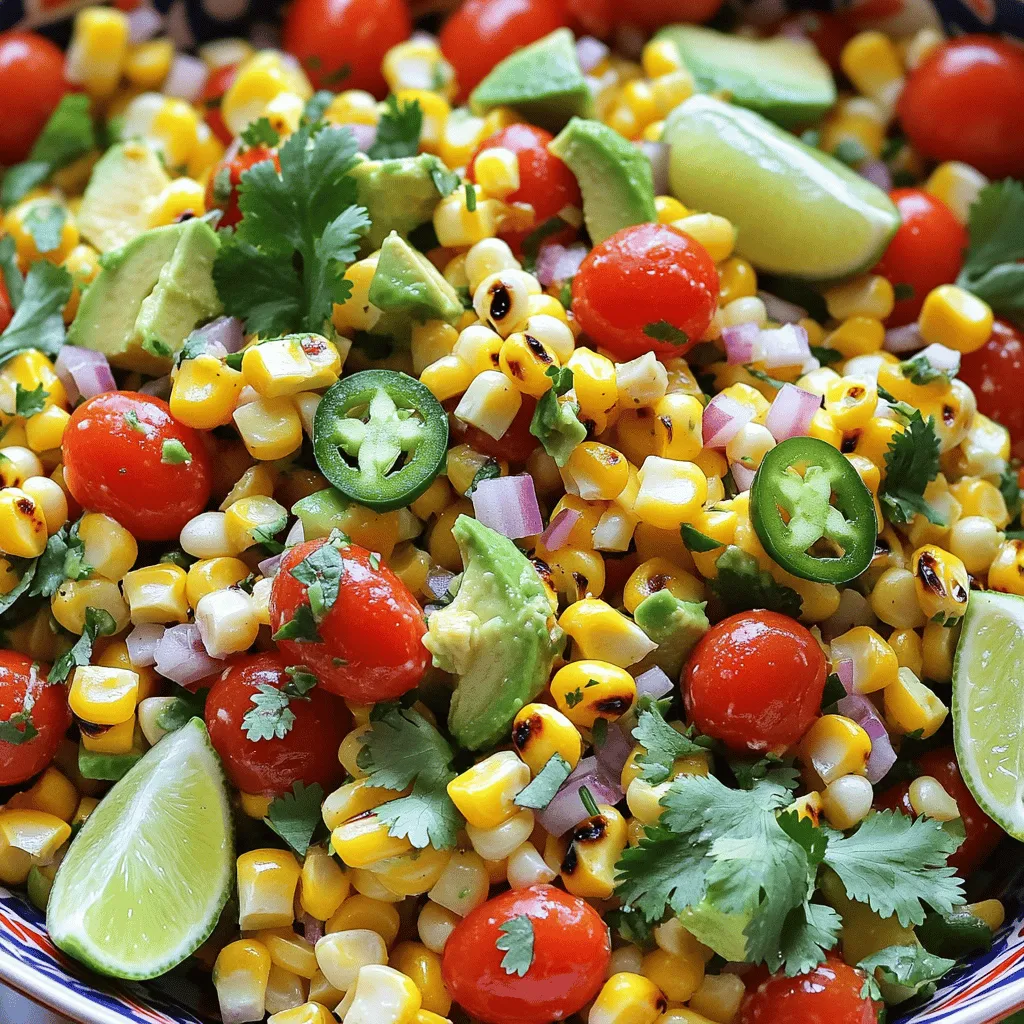
Place the husked corn directly on the grill grates. Grill the corn for about 10-12 minutes. Turn the corn every few minutes to get a good char on all sides. You want the kernels to look golden and feel tender. Once done, carefully remove the corn and let it cool slightly.
Mixing the Ingredients
While the corn cools, grab a large mixing bowl. Add the halved cherry tomatoes, diced avocado, finely chopped red onion, minced jalapeño, and chopped cilantro. Mix these ingredients gently to combine. This colorful mix will add freshness to your salad.
Next, take your cooled corn and cut the kernels off each cob using a sharp knife. Add these fresh corn kernels to your vegetable mixture. The corn will add sweetness and a great crunch.
Making the Dressing
In a small bowl, whisk together the juice of two limes, two tablespoons of olive oil, salt, and pepper. This dressing will bring all the flavors together. Make sure to whisk well until combined.
Tossing the Salad
Drizzle the dressing over your corn and vegetable mix. With clean hands or utensils, toss everything together. Make sure every piece gets coated with that zesty dressing. Taste the salad and adjust the flavors if needed. You can add more lime juice or salt for extra flavor.
This step-by-step guide makes preparing your grilled corn salad easy and fun.
Tips & Tricks
Best Practices for Grilling Corn
To grill corn well, start with fresh ears. Remove the husk completely. Preheat your grill to medium-high heat. This step helps cook the corn evenly. Place the corn directly on the grill grates. Turn the corn every few minutes. Aim for a light char without burning. You want tender kernels that pop with flavor.
Flavor Enhancements
To boost the taste, try adding herbs like basil or parsley. Chopped green onions also add a nice touch. For a spicy kick, consider a pinch of cayenne or smoked paprika. These spices bring extra warmth and depth. A drizzle of balsamic glaze can add sweetness, too. Mix and match to find your favorite flavor combo!
Presentation Tips
For a lovely display, use a big, colorful bowl. Layer the salad for visual appeal. Top it with extra cilantro leaves for a fresh look. Serve lime wedges on the side for extra zest. Guests can squeeze fresh lime over their servings. This adds a burst of flavor and makes it fun!
Variations
Add Your Favorite Proteins
You can make this grilled corn salad even better by adding proteins. Grilled chicken is a great choice. Just slice it thin and mix it in. Shrimp also works well; grill it until pink and toss it in. For a plant-based option, add beans like black beans or chickpeas. They add protein and make the salad hearty.
Alternative Dressings
While the lime dressing is fresh, you can try other dressings too. A creamy ranch dressing adds a cool taste. A balsamic vinaigrette brings a sweet tang. You can also try a zesty cilantro-lime dressing for a twist. Just whisk up your choice and pour it over the salad. Taste it, and adjust if needed.
Seasonal Variations
Make this salad shine with seasonal veggies. In summer, sweet bell peppers add color and crunch. In fall, diced apples give a sweet bite. In winter, roasted butternut squash adds warmth. Each season brings new flavors. Experiment with what you find fresh at the market. You can keep the base, then swap in your favorite seasonal finds.
Storage Info
Proper Storage Methods
To keep your grilled corn salad fresh, store it in an airtight container. Ensure the salad cools to room temperature before sealing it. This way, you avoid steam build-up, which can make it soggy. If possible, separate the dressing from the salad for better texture. This keeps the salad crisp.
Shelf Life
You should eat the leftovers within three days. After that, the flavors and textures can change. If the salad looks or smells off, it’s best to toss it. Always check for signs of spoilage before consuming.
Reheating Suggestions
If you want to refresh the salad, do not microwave it. Instead, let it sit at room temperature for about 15 minutes. This helps bring back some freshness. You can also add a bit more lime juice or olive oil to brighten the flavors.
FAQs
Can I make Grilled Corn Salad ahead of time?
Yes, you can prepare Grilled Corn Salad ahead. Just grill the corn and chop the veggies. Store them separately in the fridge. Mix them right before serving. This keeps the salad fresh and tasty. The flavors will blend well when you let it sit for a bit. But be careful; too long, and the veggies may get soggy.
What can I serve with Grilled Corn Salad?
Grilled Corn Salad pairs well with many dishes. Try serving it with grilled chicken or fish. It works great as a side for burgers or steak too. You can even serve it with tacos for a fun twist. It adds a fresh touch to any meal.
Is Grilled Corn Salad gluten-free?
Yes, Grilled Corn Salad is gluten-free. It contains no wheat or gluten-based ingredients. This makes it a safe choice for those with gluten allergies. Always check your dressings and additional toppings for hidden gluten.
How can I make this salad more filling?
To make Grilled Corn Salad more filling, add protein. Grilled chicken, shrimp, or black beans work well. You could also toss in quinoa for extra texture. Adding these ingredients keeps the flavor and boosts your meal.
What types of corn are best for grilling?
Fresh sweet corn is best for grilling. Look for ears with bright green husks and plump kernels. Silver Queen and Sugar Pop are great choices. You want corn that is sweet and juicy. This makes for a more flavorful salad.
This blog post covers how to make a fresh and tasty grilled corn salad. We talked about the key ingredients and how to prepare and grill the corn. I shared tips for mixing, dressing, and presenting your salad. You can even try different proteins and dressings or use seasonal veggies to switch things up. Remember, proper storage helps keep leftovers fresh. Enjoy making this salad for your next meal or gathering!

![- 1 cup unsalted butter, softened to room temperature - 1/2 cup powdered sugar, plus additional for dusting - 1 teaspoon pure vanilla extract - 1/2 teaspoon almond extract - 2 cups all-purpose flour - 1/2 cup finely chopped almonds - 1/4 teaspoon salt - 1/2 cup raspberry preserves When making Raspberry Almond Snowball Cookies, each ingredient plays a key role. The butter makes the cookies rich and tender. Powdered sugar adds a sweet touch and helps with that snowy look. Vanilla and almond extracts give the cookies a warm, nutty flavor. The flour gives structure to the cookies. Chopped almonds add a nice crunch. Salt balances the sweetness. Finally, raspberry preserves are the surprise inside. They burst with flavor when you take a bite. - For a different sweet taste, try using honey or maple syrup instead of powdered sugar. - If you want a dairy-free option, use vegan butter. It works well in this recipe. - For a gluten-free treat, swap all-purpose flour with almond flour or a gluten-free mix. These substitutions can change the flavor and texture, but they keep the spirit of the cookies alive. Experimenting with these ingredients can lead to fun and tasty variations! For the full recipe, check out the detailed steps to create this delightful treat. First, preheat your oven to 350°F (175°C). This step helps your cookies bake evenly. While the oven heats, line a baking sheet with parchment paper. This keeps the cookies from sticking, making cleanup easy. Next, in a large bowl, mix 1 cup of softened butter with 1/2 cup of powdered sugar. Then, add 1 teaspoon of pure vanilla extract and 1/2 teaspoon of almond extract. Beat this mixture with an electric mixer until light and fluffy. This takes about 2-3 minutes. Now, gradually add 2 cups of all-purpose flour and 1/4 teaspoon of salt to the butter mixture. Mix on low speed until just combined. Be careful not to overmix; we want a nice texture. Gently fold in 1/2 cup of finely chopped almonds. For the fun part, scoop about 1 tablespoon of dough. Flatten it slightly in your hand. Add 1/2 teaspoon of raspberry preserves in the center. Carefully fold the dough edges around the preserves, sealing it tightly into a ball. Place the cookie balls on your prepared baking sheet. Make sure they are about 2 inches apart. This spacing allows them to spread while baking. Bake the cookies for 12-15 minutes. Keep an eye on them; you want the bottoms to turn lightly golden. After baking, let the cookies cool on the baking sheet for about 5 minutes. This helps them firm up a bit. Then, gently transfer them to a wire rack to cool completely. Once cool, take some extra powdered sugar and dust it generously over the cookies. This adds a lovely snowy look. Enjoy these delightful treats with your friends or family! For the full recipe, check out the details provided. To make the best cookies, start with room temperature butter. Soft butter mixes well, creating a light and fluffy dough. Cold butter makes it hard to blend. Another tip is to prevent cookies from spreading too much. Chill your cookie dough for at least 30 minutes before baking. This helps them keep their shape while baking. When you arrange your cookies, think about a nice display. Use a decorative plate to showcase them beautifully. You can also garnish with fresh raspberries or a sprinkle of almond slices. This adds color and makes them look even more inviting. A light-colored dish contrasts nicely with the snowy dusting of sugar. Want to boost the flavor? Try adding a pinch of cinnamon or a dash of lemon zest. This can give your cookies a unique twist. You can also adjust the sweetness by using different types of raspberry preserves. For a tart flavor, opt for low-sugar preserves. For a sweeter taste, choose regular preserves. You can find the full recipe [here]. {{image_4}} You can play with flavors in your Raspberry Almond Snowball Cookies. Try different fruit preserves like strawberry or apricot. Each fruit adds a unique twist. You might also add chocolate chips or cocoa powder. This makes the cookies richer and more indulgent. Mixing in these flavors can make each batch fun and exciting. For those with dietary needs, there are great options. You can make gluten-free cookies by using almond flour or a gluten-free flour blend. These swaps keep the cookies light and tasty. If you want a vegan version, substitute the butter with coconut oil or vegan butter. Use a plant-based milk in place of any dairy. These changes keep the spirit of the cookies while catering to different diets. You can make themed cookies for special occasions. For holidays, add colorful sprinkles or food coloring to the dough. This gives the cookies a festive touch. For parties, consider making mini cookie versions. Smaller cookies are great for sharing and look lovely on a platter. Each theme allows you to share the joy of baking with your loved ones. If you want the full recipe, check out the details above! To keep your Raspberry Almond Snowball Cookies fresh, store them in an airtight container. This helps to lock in moisture and flavor. You can use glass jars or plastic containers with tight lids. Place parchment paper between layers of cookies to prevent sticking. Keep the cookies at room temperature for up to a week. If you want to keep them longer, then freezing is a great option. You can freeze both unbaked and baked cookies. For unbaked cookies, scoop them onto a baking sheet lined with parchment paper. Freeze until solid, then transfer them to a freezer bag. This way, you can bake fresh cookies anytime. For baked cookies, let them cool completely first. Place them in a freezer-safe container or bag, separating layers with parchment paper. When you are ready to enjoy them, thaw baked cookies at room temperature. If you want a warm treat, pop them in the oven at 350°F for a few minutes. Reheating brings back their delightful texture. For unbaked cookies, just bake them straight from the freezer. Add a couple of extra minutes to the bake time to ensure they cook through. How long do Raspberry Almond Snowball Cookies last? These cookies stay fresh for about one week. Store them in an airtight container. If you want them to last longer, you can freeze them. Can I make the dough ahead of time? Yes, you can make the dough and chill it in the fridge. Wrap it tightly in plastic. This way, you can bake them later. What can I do if my cookies turn out too crumbly? If your cookies are too crumbly, you might need more butter. Add a little melted butter to the dough. Mix gently until it holds together. Can I substitute almond extract with something else? Yes, you can use vanilla extract or even a bit of coconut extract. Each will give a different flavor but will still taste great. What is the best way to measure flour for this recipe? Use the spoon and level method. Scoop flour into a measuring cup, then level it off with a knife. Don’t pack it down for the best results. What to serve with these cookies? These cookies pair well with fresh fruit, like raspberries or strawberries. You can also serve them with vanilla ice cream for a tasty treat. Ideal beverages to pair with Raspberry Almond Snowball Cookies Enjoy these cookies with a warm cup of tea or coffee. A glass of milk also complements their sweet and nutty flavor nicely. In this blog post, I covered how to make Raspberry Almond Snowball Cookies. We explored the key ingredients and tips for perfecting texture and flavor. You can use alternatives like vegan butter and gluten-free flour too. I shared storage methods for keeping cookies fresh and ways to freeze them. Try different fruit preserves or chocolate chips for fun variations. Remember, cookies taste best when shared and enjoyed fresh. Give this recipe a try, and I bet you will love it!](https://fastmealmate.com/wp-content/uploads/2025/07/7fd5f108-97a5-4fb0-86b3-b9219b799aa8-768x768.webp)

![When making zucchini brownies, you need simple and quality ingredients. Here’s what you will need: - 1 cup shredded zucchini - 1/2 cup unsweetened applesauce - 1/3 cup pure maple syrup or agave nectar - 1/4 cup vegetable oil or melted coconut oil - 1 teaspoon pure vanilla extract - 1/2 cup all-purpose flour or gluten-free flour - 1/4 cup unsweetened cocoa powder - 1/2 teaspoon baking soda - 1/2 teaspoon baking powder - 1/4 teaspoon fine sea salt - 1/2 cup chocolate chips These ingredients come together to create a rich and moist brownie. The zucchini adds moisture without a strong taste. Applesauce keeps the brownies soft. The maple syrup or agave nectar sweetens them naturally. You can use vegetable oil or coconut oil, depending on your preference. Using high-quality cocoa powder makes a big difference in flavor. The baking soda and baking powder help the brownies rise. Finally, the chocolate chips give a delightful chocolate burst in every bite. For the full recipe, check out the [Full Recipe]. - Set temperature to 350°F (175°C). - Prepare your baking pan by greasing it or lining it with parchment paper. - In a large bowl, combine shredded zucchini, applesauce, maple syrup, oil, and vanilla. - Mix until the mixture is smooth and well blended. - In a separate bowl, whisk together flour, cocoa powder, baking soda, baking powder, and salt until mixed well. - Gradually add the dry ingredients to the wet mixture. - Mix gently to avoid overmixing, which can make the brownies dense. - Fold in the chocolate chips. - Make sure they are evenly spread throughout the batter for a rich flavor. - Pour the batter into the prepared pan. - Bake for 25-30 minutes. - After baking, cool in the pan for at least 15 minutes before cutting. Enjoy the delightfully unexpected zucchini boost hidden in every bite with this full recipe! To make your brownies moist, avoid overmixing the batter. Overmixing adds air, which can make them dry. Mix until just combined for a fudgy treat. Using ripe zucchini is key too. Ripe zucchini has more water, which adds moisture and flavor. Shred the zucchini and squeeze out excess water. This keeps your brownies rich and tasty. You can add nuts or spices to boost flavor. Chopped walnuts or pecans add crunch. A sprinkle of cinnamon or nutmeg makes them warm and cozy. You could also mix in chocolate chunks for extra gooeyness. For toppings, serve with ice cream or whipped cream. A scoop of vanilla ice cream on warm brownies is heavenly! Check your brownies for doneness by inserting a toothpick in the center. It should come out with a few moist crumbs. If you live at a high altitude, bake for less time. High altitude can change how baked goods rise and cook. Start checking at the lower end of baking time, around 25 minutes. Adjust as needed. {{image_4}} You can make these brownies gluten-free. Just swap the all-purpose flour for a gluten-free flour blend. Many blends work well. Look for ones that contain rice flour or almond flour. These blends give the brownies a nice texture. Make sure to check the package for the right measurements. This way, you still get that rich, fudgy taste. For a vegan version, you can replace the eggs. Use a flaxseed or chia seed mixture instead. To make this, mix one tablespoon of ground flaxseed or chia seeds with three tablespoons of water. Let it sit for five minutes until it thickens. This works great in the recipe. Your brownies will still be moist and delicious without eggs. If you want a healthier treat, try different sweeteners. You can use stevia or coconut sugar instead of maple syrup. Both options lower the sugar content. Stevia is quite sweet, so use less. Coconut sugar adds a nice caramel flavor. These substitutes keep your brownies tasty while making them a bit healthier. For the full recipe, check out the main article. To keep your zucchini brownies fresh, use an airtight container. This helps seal in moisture and flavor. You can store them at room temperature for up to two days. If you want to keep them longer, refrigerate them for up to a week. If you want to save some for later, freezing is a great option. First, cut the brownies into squares. Wrap each square in plastic wrap, and then place them in a freezer-safe bag. This way, they won’t stick together. You can freeze them for up to three months. When you’re ready to enjoy, take them out and thaw at room temperature. For the best texture, you can also warm them in the microwave for a few seconds. These tips will help you enjoy your zucchini brownies at their best! For the complete recipe, check out the [Full Recipe]. Yes, you can use yellow squash. The texture will be similar, but the flavor differs. Yellow squash has a slightly sweeter taste. Zucchini tends to have a more neutral flavor. This can change how the brownies taste. If you like sweetness, yellow squash is a great choice. To check if brownies are done, insert a toothpick into the center. If it comes out with a few moist crumbs, they are ready. If it comes out wet with batter, they need more time. Brownies should look set but still soft. These brownies can be made ahead of time. Bake them, let them cool, then store them. Wrap them in plastic wrap or place them in an airtight container. They keep well for about three days at room temperature. You can also refrigerate them for up to a week. If your brownies are dense, try a few tips. First, check your mixing. Overmixing can cause density. Mix until just combined. You can also add a bit more liquid. Adding an extra tablespoon of applesauce can help. Lastly, ensure your baking powder is fresh for proper rise. These zucchini brownies are easy to make and taste great. We covered the ingredients, step-by-step instructions, and tips to boost flavor and texture. You learned how to store them and gave answers to common questions. Experiment with different flours or sweeteners to fit your needs. Enjoy these tasty treats that offer a fun twist on the classic brownie! Happy baking!](https://fastmealmate.com/wp-content/uploads/2025/06/384a547d-f08a-42f3-b5f4-9a38b6c4e0e7-768x768.webp)