
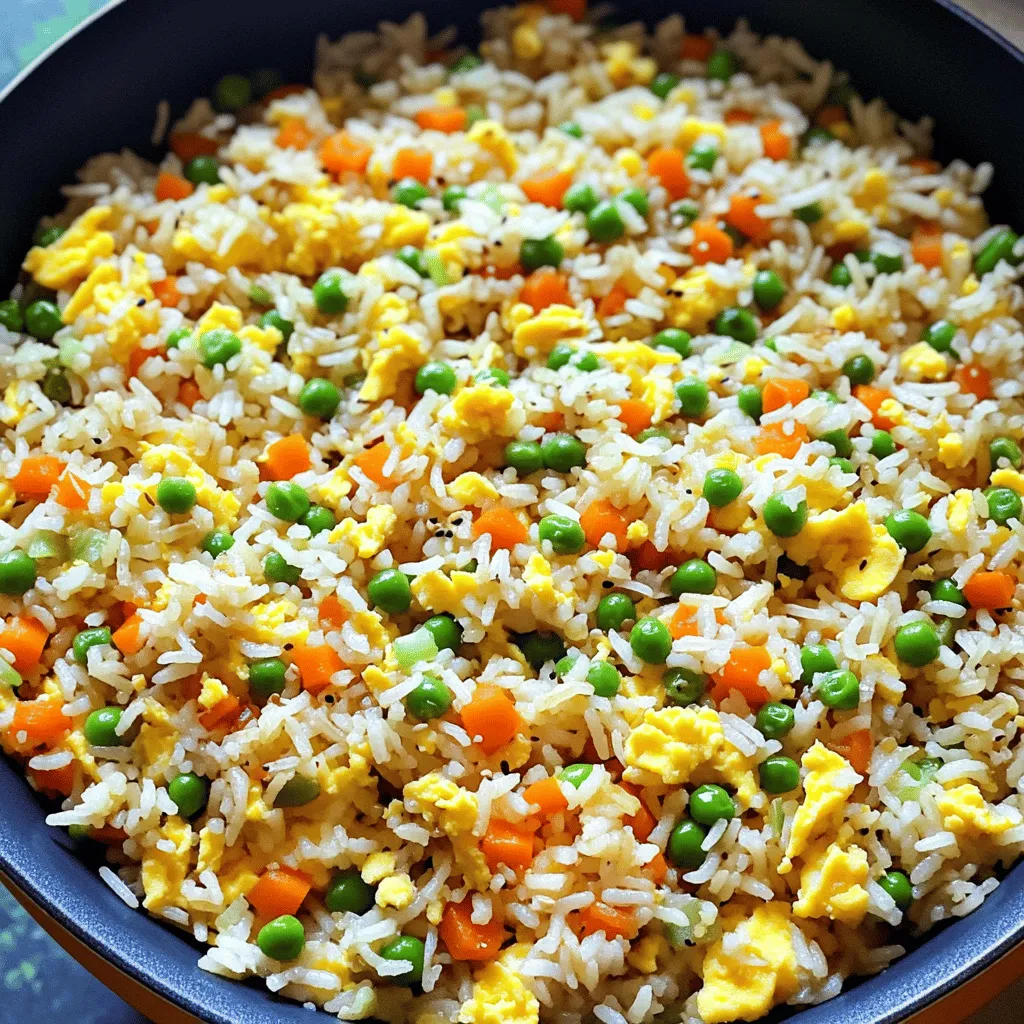
15-Minute Fried Rice Quick and Tasty Weeknight Meal

Looking for a quick and tasty weeknight meal? In just 15 minutes, you can whip up delicious fried rice that will satisfy everyone at the table. This easy recipe is packed with flavor and allows for all kinds of mix-ins, making it perfect for any night. Join me as I share essential tips, step-by-step instructions, and tasty variations to elevate your frying game. Let’s dive in!
Ingredients
Essential Ingredients for 15-Minute Fried Rice
To make a tasty fried rice, gather these key ingredients:
– 2 cups cooked jasmine rice (day-old is best)
– 1 tablespoon vegetable oil
– 2 cloves garlic, finely minced
– 1 small carrot, finely diced
– 1/2 cup frozen peas
– 2 green onions, chopped (white and green parts separated)
– 2 large eggs, lightly beaten
– 3 tablespoons soy sauce (low sodium if preferred)
– 1 tablespoon sesame oil
– Salt and pepper to taste
– Optional: Sriracha sauce for heat
Tips for Choosing Quality Ingredients
Choose fresh and vibrant ingredients for the best flavor. Look for:
– Jasmine rice with a nice aroma.
– Bright orange carrots that feel firm.
– Peas that are bright green and not dried out.
– Eggs that are fresh and from a good source.
– Soy sauce that has a rich, deep color.
Using these tips helps ensure tasty results. Fresh vegetables boost flavor and texture.
Substitutions for Common Allergens
If you need to avoid certain allergens, try these swaps:
– Use coconut aminos instead of soy sauce for a soy-free option.
– Substitute olive oil for vegetable oil if you prefer.
– Use tofu instead of eggs for a vegan option.
– For gluten-free, pick tamari sauce instead of soy sauce.
These substitutions help everyone enjoy this meal without worry. You can still achieve great taste!
Step-by-Step Instructions
Quick Cooking Process Overview
Making fried rice is quick and fun. You can have a tasty meal in just 15 minutes. Follow these steps closely for the best results. Gather your ingredients first for a smooth process.
Detailed Steps to Make Fried Rice in 15 Minutes
1. Heat 1 tablespoon of vegetable oil in a large skillet over medium-high heat.
2. Add 2 cloves of minced garlic and sauté for about 30 seconds. The garlic should smell nice but not brown.
3. Toss in 1 small diced carrot and stir-fry it for 2 minutes. Stir often to help it soften.
4. Add 1/2 cup of frozen peas to the pan and cook for another minute. They should heat up nicely.
5. Push the veggies to one side of the skillet. Pour in 2 beaten eggs. Let them sit for a moment before scrambling. Mix them into the veggies when cooked.
6. Add 2 cups of cooked jasmine rice to the pan. Use a spatula to break up any clumps. Mix it all well.
7. Drizzle 3 tablespoons of soy sauce and 1 tablespoon of sesame oil over the rice. Stir to coat everything. Season with salt and pepper to your liking.
8. Fold in the chopped green onions, using the white parts first. Cook for another minute until everything is hot.
9. If you like it spicy, add some Sriracha sauce just before serving.
Important Cooking Techniques to Ensure Flavor
To get great flavor, it’s key to use day-old rice. Fresh rice can be too sticky. The hot skillet helps to fry the rice quickly, giving it a nice texture. Always keep stirring to mix all the ingredients well. This way, every bite is full of flavor. Remember, don’t overcook the garlic; it can turn bitter. Use a spatula to break up clumps of rice for even cooking. Following these tips will lead to a tasty fried rice that you will love.
Tips & Tricks
Best Practices for Perfect Fried Rice Texture
To get great texture in your fried rice, start with day-old rice. Fresh rice can be too moist, making it sticky. Use a large skillet or wok for even cooking. This gives your rice room to fry instead of steam. When you add the rice, break up clumps with a spatula. This helps each grain get crispy. Stirring frequently ensures all the rice gets that nice, golden color.
Secrets to Enhancing Flavor
To boost flavor, use fresh ingredients. Fresh garlic and green onions make a big difference. Don’t skip the sesame oil; it adds a rich, nutty taste. Soy sauce is key too! Use low-sodium soy sauce to control salt levels. You can also add a splash of rice vinegar for extra zing. For heat, drizzle some Sriracha over the top before serving. It gives your dish a great kick.
Timing and Equipment Recommendations
Timing is important when making fried rice. Pre-cook your rice and keep it in the fridge. Measure out your ingredients before you start. This makes cooking quick and easy. A non-stick skillet or wok is best for even cooking. Keep the heat high for a nice sear. If you have a lid, use it to trap heat when cooking eggs. This helps them cook faster.
Variations
Vegetarian Options for Fried Rice
You can make fried rice vegetarian by skipping the eggs. Use tofu instead. Tofu adds protein and absorbs flavors well. Use firm tofu for the best texture. You can also add vegetables like bell peppers, mushrooms, or broccoli. These add color and nutrition. Try using soy sauce and sesame oil for flavor.
Protein Additions: Chicken, Shrimp, or Tofu
For a protein boost, add chicken or shrimp. Both cook quickly and taste great. Chop the chicken into small pieces. Cook it in the oil before adding veggies. Shrimp can go in after the garlic. Cook until they turn pink. If you prefer tofu, choose firm tofu. Cut it into cubes and sauté until golden. This gives a nice crunch.
Spicy and Flavorful Variations with Add-ins
Want a kick? Add Sriracha or chili paste to your fried rice. Mix it in when you add soy sauce. You can also try adding ginger for a fresh taste. Chopped jalapeños add a spicy twist, too. For a sweet flavor, toss in pineapple chunks. This balances the heat and adds fun. Don’t be afraid to mix and match your favorite flavors!
Storage Info
How to Store Leftover Fried Rice
Leftover fried rice is easy to store. First, let it cool to room temperature. Then, place it in an airtight container. Make sure to seal it well. Store it in the fridge for up to three days. This keeps the rice fresh and tasty.
Reheating Tips for Optimal Texture
When you reheat fried rice, you want it to taste fresh. Use a skillet or a wok for best results. Add a splash of water or oil to prevent sticking. Heat it on medium until warm. Stir often to keep it from burning. This method helps maintain the rice’s texture.
Freezing Fried Rice: Best Practices
Freezing fried rice is a great option for meal prep. First, cool the rice completely. Then, divide it into portions. Use freezer-safe bags or containers. Remove as much air as possible before sealing. It can last up to three months in the freezer. To enjoy, just thaw it overnight in the fridge and reheat.
FAQs
How do I make fried rice with fresh rice?
You can make fried rice with fresh rice, but it takes a few steps. First, cook your rice and let it cool. Spread it on a tray to cool faster. This helps the rice dry out a bit. When it’s cool, you can use it in your fried rice. Fresh rice has more moisture, so it may be a bit sticky.
Can I make this recipe vegan?
Yes, you can make this recipe vegan. Just skip the eggs and use tofu instead. Scramble firm tofu in the skillet like you would eggs. This gives you protein and adds texture. You can also add more veggies to make it hearty and satisfying.
What are the best sauces to use in fried rice?
Soy sauce is the classic choice for fried rice. It adds salty flavor. You can also use oyster sauce or hoisin sauce for a sweeter taste. For spice, add some chili sauce or sriracha. Each sauce gives a different twist to your dish.
How can I make fried rice less sticky?
To reduce stickiness, use day-old rice. It dries out overnight, making it perfect for fried rice. If you must use fresh rice, cool it first. Spread it out on a tray to let steam escape. This helps prevent clumping when cooking.It gives step-by-step instructions along with the ingredients you need.
In this guide, we explored how to make quick fried rice. We covered essential ingredients, cooking steps, and tips for great texture and flavor. You can easily substitute ingredients to fit your needs. Remember, timing and technique matter for perfect results. Enjoy trying different variations and storing leftovers properly. Now, you have everything you need to create your own delicious fried rice in just 15 minutes. Take these skills to your kitchen and impress your family and friends!
![- 2 medium yellow squashes - 1 small onion - 1 cup whole wheat breadcrumbs - 2 large eggs - 1/2 cup freshly grated Parmesan cheese - 1/4 cup fresh parsley - 1 teaspoon garlic powder - 1 teaspoon paprika - Salt and pepper to taste - Cooking spray or olive oil Using fresh ingredients makes a big difference in flavor. The yellow squash adds a nice sweetness. The onion gives it a sharp bite. Whole wheat breadcrumbs help bind the fritters while adding fiber. Eggs are key for holding everything together while baking. Herbs and spices really boost the taste. Fresh parsley adds a pop of color and flavor. Garlic powder gives a nice depth, and paprika adds warmth. Don't forget to season with salt and pepper to make flavors shine. For greasing, using cooking spray or olive oil helps the fritters brown nicely. You want a golden crust that contrasts with the soft inside. For a full recipe, check out the [Full Recipe]. - Preheat the oven to 400°F (200°C). - Prepare and grease the baking sheet. Use cooking spray or a drizzle of olive oil. - Grate the yellow squash. - Chop the onion finely and remove excess moisture. Wrap it in a towel, twist, and squeeze gently. - Mix all the ingredients in a bowl. - Form fritters and place them on the baking sheet. Aim for patties about 2-3 inches wide. - Spray or drizzle the fritters with olive oil. - Bake for 20-25 minutes, flipping halfway. This ensures they cook evenly and get crispy. Follow these steps to make your fritters tasty and enjoyable. You can find the Full Recipe for more details. To get your fritters nice and crispy, start by removing excess moisture from the squash. Moisture makes them soggy. After grating the squash, wrap it in a clean kitchen towel. Twist and squeeze the towel to remove as much liquid as you can. This step is key to crispiness. Next, use cooking spray wisely. Lightly spray the tops of the fritters before baking. This helps them brown evenly and adds a nice crunch. You can also drizzle olive oil for a richer flavor. Garnish your fritters with fresh parsley for a pop of color. It adds a fresh taste that pairs well with the fritters. You can also serve them with dips. Creamy yogurt or tzatziki works great. These dips add another layer of flavor and make your dish more fun. Oven types may vary, so cooking times can change. If you use a convection oven, check your fritters a few minutes early. They may cook faster. For standard ovens, stick to 20-25 minutes. To ensure even baking, flip the fritters halfway through cooking. This helps both sides become golden and crispy. Enjoy your perfectly baked fritters from the [Full Recipe]. {{image_4}} You can change the recipe by using different vegetables. Zucchini works well, too. It has a similar texture and taste. Carrots can add a sweet touch. Sweet potatoes bring a nice flavor and color. For cheese, you can swap the Parmesan for feta or cheddar. Feta gives a tangy twist, while cheddar offers a rich taste. This simple change can make your fritters unique. To boost the flavor, you can add spices. Try cumin for a warm taste. Chili flakes can bring some heat. Just a pinch can change the whole dish. Adding fresh herbs can also enhance the flavor. Basil gives a sweet note, while thyme adds earthiness. Mixing in any of these can make your fritters even better. If you need a gluten-free option, use gluten-free breadcrumbs. These work just as well in the recipe. You can also use ground oats or almond flour. Both are great substitutes. For binding, you can add more eggs or use mashed beans. Beans add protein and help hold the fritters together. These easy swaps keep the dish tasty and friendly for all diets. For the full recipe, check out the main article. To keep your fritters fresh, refrigerate them quickly. Place them in a single layer on a plate. Cover them with plastic wrap or foil. If you have many fritters, stack them with parchment paper in between layers. The best containers for storage are airtight ones. Use glass or plastic containers with tight lids. This helps keep moisture out and preserves flavor. For the best texture, reheat fritters in the oven. Set it to 350°F (175°C). Place fritters on a baking sheet for about 10 minutes. This method keeps them crispy. If you want to freeze fritters, let them cool first. Place them in a single layer on a baking sheet and freeze for about an hour. Once frozen, transfer them to a freezer bag. They can last up to three months in the freezer. Baked fritters last about 3 to 4 days in the fridge. Always check for signs of spoilage. If they smell sour or look slimy, throw them away. Fresh fritters should smell like squash and herbs. Enjoy your delicious oven-baked yellow squash fritters! For the full recipe, check out the section above. Yes, you can prepare these fritters ahead of time. To do this, follow these steps: - Prepare the Mixture: Make the fritter mix as per the Full Recipe. - Storage: Place the mixture in an airtight container. You can keep it in the fridge for up to two days. - Form the Fritters: When ready to cook, form the fritters and bake them. This method saves time on busy days and keeps the flavor fresh. Yes, yellow squash fritters offer great health benefits. Here are some reasons they are good for you: - Low in Calories: Yellow squash is low in calories, making it a great choice for light meals. - High in Fiber: It helps with digestion and keeps you full longer. - Rich in Vitamins: Yellow squash is packed with vitamins A and C, which support your immune system. Incorporating these fritters into your meals can add nutrition without sacrificing taste. If you want a healthier fritter, try these substitutes for breadcrumbs: - Oats: Use ground oats for a gluten-free option. - Chickpea Flour: This adds protein and a nutty flavor. - Crushed Nuts: Almonds or walnuts can give a crunchy texture. These alternatives can change the taste and texture, making your fritters unique. Absolutely! Baking in an air fryer is simple and fast. Here’s how to adjust the recipe: - Temperature: Set your air fryer to 375°F (190°C). - Cooking Time: Cook for about 12-15 minutes, flipping halfway through. Using an air fryer makes the fritters extra crispy while using less oil. Oven-baked yellow squash fritters are easy and fun to make. We covered key ingredients like squash, onion, and Parmesan. You learned how to prep, mix, bake, and even store leftovers. Remember to remove moisture for crispiness and try different spices for added flavor. These fritters are not just tasty; they're a healthy choice too. With simple steps, you can impress anyone. Enjoy experimenting with variations that suit your taste. Now, get cooking and savor your delicious fritters!](https://fastmealmate.com/wp-content/uploads/2025/06/228bb01e-104c-4728-9be6-f22ec78a35c6-768x768.webp)
 to guide you through each step. - Preheat your oven to 375°F (190°C). - Rinse and prepare the quinoa and vegetables. To start, turn on your oven and set it to 375°F (190°C). This step ensures your oven is hot and ready when it’s time to bake. While it heats, take one cup of quinoa and rinse it under cool water. This helps remove any bitterness. Next, chop your zucchinis and bell pepper. Dice the zucchini into small cubes and chop the bell pepper into bite-sized pieces. Don’t forget to finely dice one small onion and mince three cloves of garlic. - Sauté onion and garlic in olive oil until translucent. - Add zucchini and bell pepper, cooking until softened. Next, grab a medium saucepan. Add one tablespoon of olive oil and heat it over medium. Once the oil is warm, toss in your diced onion and minced garlic. Stir them for about 3-4 minutes. You want the onion to turn translucent and smell great. After that, add the diced zucchini and chopped bell pepper. Cook these veggies for around 5 minutes, stirring often. They should soften but still have a little crunch. - Mix in quinoa, cherry tomatoes, broth, and seasonings. - Transfer to a casserole dish and bake for 20-25 minutes. Now comes the fun part! Mix in your rinsed quinoa, one cup of halved cherry tomatoes, and two cups of vegetable broth into the pan. Add one teaspoon of dried oregano, one teaspoon of dried basil, and sprinkle salt and pepper to taste. Stir everything well to combine. Bring this mix to a gentle boil. Once it bubbles, reduce the heat to low, cover the pan, and let it simmer for 15 minutes. This allows the quinoa to absorb the broth. Once done, transfer the mixture into a lightly greased 9x13 inch casserole dish. If you love cheese, sprinkle one cup of shredded mozzarella on top. Place the dish in your preheated oven and bake for 20-25 minutes. You’ll know it’s ready when it bubbles and the cheese is golden brown. To make fluffy quinoa, rinse it well before cooking. This removes the bitter coating called saponin. Use two cups of vegetable broth for one cup of quinoa. Bring it to a boil, then lower the heat and cover. Let it simmer for 15 minutes. After cooking, let it rest for five minutes before fluffing with a fork. This will keep it light and airy. For the vegetables, sauté onion and garlic first in olive oil. Cook them until they are soft and fragrant. Then add zucchini and bell pepper. Stir them for about five minutes until they soften. This builds a great flavor base for your casserole. To elevate the dish, try adding a pinch of red pepper flakes for heat. Fresh herbs like thyme or parsley can add brightness. You can also swap out the dried oregano and basil for fresh herbs. Fresh herbs bring a stronger flavor. If you want to change ingredients, use brown rice instead of quinoa. You can also add cooked beans for a protein boost. For a creamier texture, mix in some ricotta cheese or yogurt before baking. Pair the casserole with a light side salad or some crusty bread. A fresh garden salad with lemon vinaigrette works well. It adds a nice contrast to the warm casserole. For gatherings, serve the casserole directly from the dish. Garnish with fresh basil leaves to make it look inviting. You can also sprinkle some extra cheese on top just before serving for a melty touch. {{image_4}} You can easily change the vegetables in this casserole. Try using bell peppers, spinach, or even eggplant. These swaps keep the dish vibrant and fresh throughout the summer. You can also mix in seasonal veggies like corn or cherry tomatoes for a burst of flavor. If you need a quinoa substitute, consider using brown rice or farro. These grains add a nice texture and flavor. Other options include couscous or even cauliflower rice for a low-carb choice. To make this casserole vegan, simply skip the cheese or use a plant-based cheese. You'll still get a creamy texture from the cooked veggies and broth. For a gluten-free option, use certified gluten-free quinoa. This way, everyone can enjoy the dish. If you're looking to cut calories, reduce the olive oil or skip the cheese. You can also use less quinoa and bulk up with more veggies. This keeps the dish light, tasty, and full of nutrients. Each of these variations allows you to enjoy this Summer Zucchini Quinoa Casserole in your own way. For the full recipe, check out the detailed instructions above. To keep your summer zucchini quinoa casserole fresh, first let it cool. Once cool, store it in an airtight container. You can refrigerate it for up to five days. If you want to save it for later, freeze it. Use a freezer-safe container or heavy-duty freezer bags. This way, it can last for up to three months. Remember to label the container with the date. This helps you track how long it has been stored. When you want to enjoy the casserole again, reheating is easy. For the best texture, use an oven. Preheat the oven to 350°F (175°C). Place the casserole in an oven-safe dish and cover it with foil. Heat for about 20 minutes or until warm. If you're in a hurry, you can use the microwave. Place a single serving in a microwave-safe dish. Heat for 1-2 minutes, checking every 30 seconds. This will keep the flavors and texture intact. Enjoy your delicious meal! Can I prepare the Summer Zucchini Quinoa Casserole in advance? Yes, you can prepare it ahead of time. Make the casserole, then cover and refrigerate it. When you're ready to eat, just bake it straight from the fridge. You may need to add a few more minutes to the cooking time. How to customize the recipe to suit my taste preferences? Feel free to swap out the veggies. For instance, you can use spinach, carrots, or even corn. You can also change the cheese or add some cooked chicken for extra protein. What are the best herbs to use for added flavor? Fresh herbs like basil and thyme work great. You can also try parsley or cilantro. These herbs add a fresh taste and brighten up your dish. Is this recipe suitable for a low-carb diet? This recipe is not low-carb due to the quinoa. Quinoa has more carbs than other grains but is also high in protein. If you want a lower carb option, you can use cauliflower rice instead of quinoa. What are the main nutritional benefits of zucchini and quinoa? Zucchini is low in calories and high in vitamins A and C. It also has a lot of water, which keeps you hydrated. Quinoa is a complete protein, meaning it has all nine essential amino acids. It’s also high in fiber, which is good for digestion. What should I do if my casserole is too watery? If your casserole is watery, try draining some liquid before baking. You can also bake it longer to help it thicken up. How can I prevent the quinoa from sticking together? To prevent sticking, rinse the quinoa well before cooking. This removes excess starch. Also, fluff the quinoa with a fork after it cooks to keep it separate. For the full recipe, check out the details above! You learned how to make a tasty Summer Zucchini Quinoa Casserole. We covered the ingredients, simple steps, and tips for perfect results. You can adjust the recipe to fit your taste and needs. Explore flavor swaps and storage tips to keep it fresh. With this dish, enjoy a healthy meal that is easy to make. I hope you try it and enjoy every bite!](https://fastmealmate.com/wp-content/uploads/2025/07/552d1654-693f-4b1b-8ee9-d91b85ff9950-768x768.webp)