Homemade Baked Apple Fritters Sweet and Simple Treat

If you crave a sweet treat, homemade baked apple fritters are a must-try. These fluffy delights mix fresh apples with a simple batter, making them perfect for any occasion. Forget frying; baking keeps them light and tasty. In this guide, I’ll share my secrets for making the best fritters, including tips on selecting apples and glazing for that perfect finish. Let’s dive in and get baking!
Ingredients
Essential Ingredients for Homemade Baked Apple Fritters
– Apples: I love using Granny Smith or Honeycrisp apples. Granny Smith gives a nice tartness, while Honeycrisp adds sweetness. Both types hold their shape well when baked. Their texture makes every bite a treat. You can also mix them for more taste!
– Key dry ingredients: You need all-purpose flour, granulated sugar, baking powder, ground cinnamon, ground nutmeg, and salt. The flour forms the base, while sugar adds sweetness. Baking powder helps the fritters rise. Cinnamon and nutmeg bring warmth and spice. Salt balances the flavors.
– Wet ingredients: Buttermilk is key in this recipe. It keeps the fritters moist and tender. Melted butter adds richness and flavor. The beaten egg binds everything together. A splash of vanilla extract brings a lovely aroma. Each of these ingredients works together to create a perfect batter.
The combination of these ingredients makes the fritters sweet and simple.
Step-by-Step Instructions
Preparation Steps for Delicious Fritters
1. First, preheat your oven to 375°F (190°C).
2. Next, line a baking sheet with parchment paper. This helps the fritters not stick.
3. In a large bowl, mix the dry ingredients. Combine flour, sugar, baking powder, cinnamon, nutmeg, and salt. Whisk them well until blended.
4. In another bowl, whisk your wet ingredients. Mix buttermilk, melted butter, egg, and vanilla. Ensure the mixture is smooth.
5. Now, slowly pour the wet mix into the dry mix. Stir gently until just combined. Do not overmix, or your fritters may turn out tough.
Adding Apples to the Batter
1. Take your diced apples and fold them into the batter. Use a spatula for this step.
2. Ensure the apples are evenly mixed in. This gives you great flavor in every bite.
Baking Your Fritters
1. Use a spoon or small ice cream scoop to drop batter onto the sheet. Space each fritter about 2 inches apart. This allows room for them to rise.
2. Bake for 15-20 minutes. They are done when golden brown and a toothpick comes out clean.
3. Let the fritters cool for a few minutes on the baking sheet. This helps them set before glazing.
4. While cooling, prepare the glaze. Mix powdered sugar and milk until smooth. Adjust with more milk if needed for a drizzle-able texture.
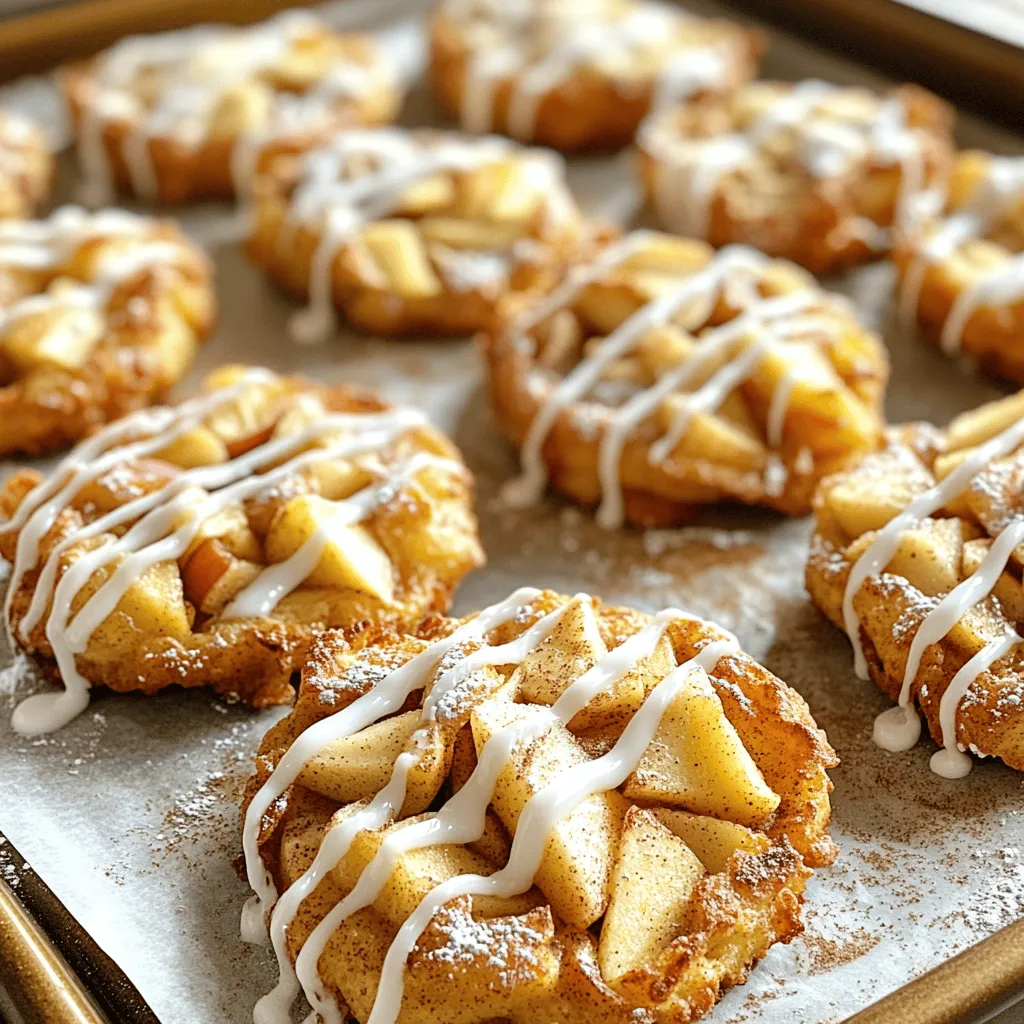
5. Once cooled, drizzle the glaze over your fritters. For a nice touch, dust with more cinnamon.
This process leads you to a delightful treat that is easy to make at home.
Tips & Tricks
Achieving the Perfect Texture
To make light and fluffy fritters, avoid dense fritters by following a few key steps. First, choose the right apples. Granny Smith or Honeycrisp add great flavor without making the fritters too wet. Next, remember to measure your flour correctly. Too much flour can lead to a heavy texture. Use the spoon-and-level method for measuring flour, which gives you accurate results.
Another important tip is to not overmix your batter. Mix the dry and wet ingredients until just combined. If you overmix, the fritters can come out tough. A few lumps are okay! It’s better to have a slightly rough batter than to risk a chewy fritter.
Glazing Techniques
Creating a smooth glaze is simple and rewarding. Start by whisking the powdered sugar and milk together in a bowl. Aim for a thick yet pourable consistency. If the glaze seems too thick, add more milk, one teaspoon at a time. This ensures a nice drizzle over your fritters.
For a fun twist, try adding vanilla or almond extract to the glaze. This will give your fritters an extra layer of flavor. You can also experiment with different types of milk, like almond or oat milk, for a unique taste.
When your fritters have cooled slightly, drizzle the glaze generously over them. For a beautiful finish, sprinkle extra ground cinnamon on top. This not only looks nice but adds a warm flavor that pairs well with the apples.
Variations
Adding Different Flavors
You can make your apple fritters even tastier by adding different flavors. Mixing in nuts, like walnuts or pecans, gives a nice crunch. Both nuts add healthy fats and flavor that pair well with apples. Simply chop them and fold them into the batter before baking.
You can also try adding spices like cardamom or allspice. These spices add warmth and can change the whole taste of your fritters. Just a pinch can make a big difference. Experiment with different spices to find the perfect blend that you enjoy.
Alternative Toppings
While a glaze is a classic choice, you can explore other toppings too. Try a dusting of powdered sugar for a sweet finish. You can also use a simple cinnamon sugar mix. Just combine sugar and cinnamon, then sprinkle it over the warm fritters for extra flavor.
For a healthier option, consider using a cinnamon sugar dusting instead of glaze. This keeps the fritters light yet still packs a sweet punch. You can easily make this by mixing sugar with ground cinnamon in a bowl. Just remember to coat your fritters while they are warm so the sugar sticks well.
Storage Info
Best Practices for Storing Leftover Fritters
To keep your baked apple fritters fresh, store them in the refrigerator. Place the fritters in an airtight container. This keeps them from drying out or absorbing other smells in the fridge. They will stay good for about three days. If you want to save them longer, consider freezing.
For freezing, let the fritters cool completely. Then, wrap each fritter tightly in plastic wrap. Place them in a freezer-safe bag or container to prevent freezer burn. They can last up to three months in the freezer.
Reheating Methods
To reheat the fritters, use the oven for the best texture. Preheat your oven to 350°F (175°C). Place the fritters on a baking sheet. Heat them for about 10 minutes or until warm. This method keeps the outside crispy.
If you’re in a hurry, you can use a microwave. Place a fritter on a microwave-safe plate. Heat for about 15 seconds. Check if it’s warm. Be careful not to overheat, as this can make them soggy. Enjoy your delicious fritters warm and fresh!
FAQs
Common Questions about Homemade Baked Apple Fritters
Can I use other fruits besides apples?
Yes, you can! Pears and peaches work well too. Use fruits that are firm and not too juicy. This keeps the fritters from getting soggy. You can try berries too, but they may change the texture.
How can I make these fritters dairy-free?
To make dairy-free fritters, swap the buttermilk for almond milk or coconut milk. You can use plant-based butter instead of regular butter. Make sure to check if the egg substitute fits your dietary needs.
Can I prepare the batter in advance?
You can prepare the batter a few hours ahead. Keep it covered in the fridge. However, it’s best to bake it fresh for the best texture and flavor. If you store it too long, it may lose its rise.
What is the best way to ensure my fritters rise nicely?
To help your fritters rise, make sure your baking powder is fresh. Mix the wet and dry ingredients just until combined. Overmixing can make them dense.
Troubleshooting Common Issues
What to do if the fritters are too greasy?
If your fritters are too greasy, check the amount of butter you used. Too much butter can lead to greasiness. Also, ensure you bake them at the right temperature. Overcrowding the baking sheet can cause frying instead of baking.
How to fix undercooked fritters?
If you find your fritters are undercooked, return them to the oven immediately. Bake for an additional 5 to 10 minutes. Check for a golden brown color and a clean toothpick. This ensures they are cooked through.
Homemade baked apple fritters are fun and easy to make. We covered key ingredients, step-by-step instructions, tips for texture, and glaze methods. You can personalize your fritters with different flavors and toppings.
Remember to store leftovers properly and use the right reheating methods. Now, you can enjoy tasty fritters that fit your taste. Dive in, experiment, and enjoy the sweet results. Happy baking!

![- Ground beef - Flour tortillas - Cheeses: cheddar and mozzarella - Pickles, ketchup, and mustard The heart of my Cheeseburger Quesadilla Smash Sliders lies in the essential ingredients. I always choose high-quality ground beef for flavor. The flour tortillas serve as the base, holding everything together. I love using both cheddar and mozzarella cheese. They melt perfectly and add a creamy texture. Pickles, ketchup, and mustard bring that classic cheeseburger taste. - Garlic powder - Onion powder - Salt and pepper Seasonings are key to great flavor. I add garlic powder and onion powder to the beef. They enhance the taste without being overpowering. Salt and pepper are a must for balance. Adjust them to your liking for the best results. - Fresh lettuce leaves - Sliced tomatoes and onions For extra crunch and freshness, I recommend optional toppings. Fresh lettuce leaves add a nice texture. Sliced tomatoes and onions give a burst of flavor. Feel free to mix and match these toppings to suit your taste. They make the sliders even better! For the full recipe, check out the [Full Recipe]. - Start by mixing the ground beef with garlic powder, onion powder, salt, and pepper. - Use your hands or a spoon to blend the mixture well. - Divide the mixture into 8 equal parts. Shape each part into small patties. - Preheat a large skillet over medium-high heat. - Place the patties in the skillet, making sure not to crowd them. - Cook each patty for 2-3 minutes. Look for a nice golden brown crust before flipping. - Once cooked through, remove the patties and set them aside on a plate. - Lay one flour tortilla flat in the skillet. - Sprinkle half of the shredded cheddar and mozzarella cheese on the tortilla. - Place 2 cooked beef patties on top of the cheese. - Add chopped pickles and drizzle ketchup and mustard over the patties for extra flavor. - Top with the remaining cheese, then place a second tortilla over it. - Cook for about 2-3 minutes until the bottom is golden brown. Flip it carefully to cook the other side until crispy. - Once cooked, let it rest for a minute on a cutting board. Slice into wedges and enjoy. For the full recipe, check the [Full Recipe]. To ensure even cooking of patties, make them all the same size. I like to shape them about the size of a golf ball. This way, they cook evenly in the skillet. Preheat your skillet well before adding the patties. This helps develop a nice crust. For a crispy quesadilla, use medium-high heat while cooking. This allows the tortillas to become golden and crispy. Flip them carefully to keep the fillings intact. You want that delightful crunch with every bite! Adding spices can make a big difference. Try a pinch of smoked paprika or chili powder for a kick. Fresh herbs, like cilantro or parsley, can brighten the flavors too. These small changes can take your sliders to the next level. When it comes to sauces, think beyond ketchup and mustard. Barbecue sauce or spicy mayo can add a new twist. You can even mix them for extra flavor. Don’t be afraid to experiment! For the best sides, consider crispy fries or a fresh salad. Both pair nicely with these sliders. You can also serve them with a side of salsa for a fun dip! Presentation is key. Try stacking the quesadilla slices in a tower. Add fresh lettuce or tomatoes on the side for color. It makes the dish look great and appetizing. For a fun touch, use small skewers to hold the sliders together! You can find the full recipe for these delicious Cheeseburger Quesadilla Smash Sliders to explore more ways to enjoy this amazing dish! {{image_4}} You can change the protein in these sliders. Instead of ground beef, try ground chicken or turkey. Both offer great taste and a leaner option. If you want a plant-based choice, use vegan ground meat. Vegan cheese options are also available. Brands like Daiya or Violife melt well and taste good. Want some spice? Add jalapeños to your sliders for a kick. You can also mix in spices like cumin or chili powder for extra flavor. For a Southwestern twist, top your quesadilla with avocado or pico de gallo. These toppings add freshness and texture, making every bite exciting. You can cook your sliders in different ways. Grilling gives a smoky flavor. If you prefer stovetop cooking, use a skillet for a crispy finish. An air fryer is perfect for a lighter option. Set it to 375°F and cook for about 8-10 minutes. This method makes your quesadilla super crispy without excess oil. For the complete recipe, check out the Full Recipe. To keep your quesadilla sliders fresh, store them in an airtight container. Place parchment paper between layers to avoid sticking. They can last up to three days in the fridge. Make sure to cool them down before sealing. This helps keep them safe and tasty. When reheating, use a skillet over medium heat. This method warms them evenly and keeps them crispy. Add a drop of oil for extra crispness. Avoid the microwave, as it can make them soggy. Heat each slider for about 3-4 minutes per side. You can freeze either assembled or cooked sliders. Wrap each slider tightly in plastic wrap and then in foil. This helps prevent freezer burn. They can last up to two months in the freezer. To enjoy them, thaw in the fridge overnight. Reheat in the skillet as mentioned above for the best results. For the full recipe, check out the earlier sections. To make these sliders, start by mixing ground beef with garlic powder, onion powder, salt, and pepper. Shape the mix into small patties. Next, cook the patties in a skillet until they are brown. Then, place one tortilla in the skillet, add cheese, cooked patties, pickles, ketchup, and mustard. Top with another tortilla. Cook until both tortillas are crispy and the cheese melts. Cut the quesadilla into wedges, and enjoy! I recommend using a blend of cheddar and mozzarella. Cheddar gives a rich flavor, while mozzarella melts beautifully. You can also try pepper jack for a spicy kick or gouda for a smoky taste. Mixing these cheeses will create a creamy, tasty filling that pulls apart nicely. Yes, you can prepare the beef patties and chop the toppings ahead of time. Store them in the fridge for up to a day. When ready to cook, just assemble the quesadillas and grill them. This will save you time and let you enjoy your meal stress-free. For the full recipe, check out the details above. You learned how to make delicious cheeseburger quesadilla smash sliders. We covered essential ingredients, like ground beef and cheeses, and how to cook them perfectly. I shared key tips for flavor and cooking techniques. You also discovered variations and storage tips for these tasty sliders. By trying these recipes, you can impress your family or friends at your next gathering. Happy cooking!](https://fastmealmate.com/wp-content/uploads/2025/07/75d3e756-492b-48dc-99fb-d4828a25c64e-768x768.webp)