Looking for a bright and zesty side dish? Vinegar slaw is your answer! Packed with fresh veggies like cabbage, carrots, and apples, this crisp salad brings tang and crunch to any meal. I’ll guide you through making the perfect vinegar dressing and give you tips to enhance the flavors. Whether you’re serving it at a picnic or alongside dinner, this simple recipe is a must-try. Let’s dive in!
Ingredients
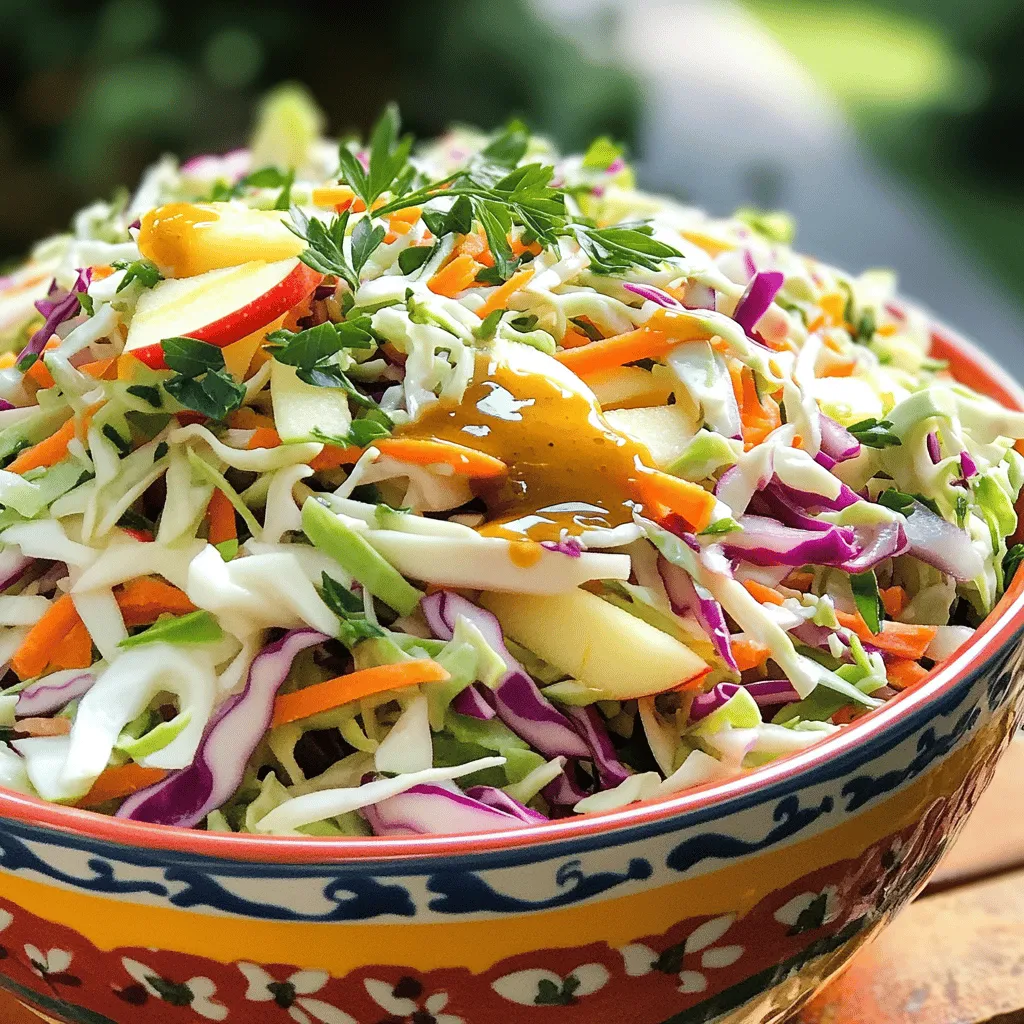
Fresh Vegetables
– 4 cups green cabbage, finely shredded
– 1 cup red cabbage, finely shredded
– 1 cup carrots, julienned or grated
– 1 crisp apple, cored and thinly sliced
– 1/2 red onion, finely sliced
To make the best vinegar slaw, start with fresh vegetables. Green and red cabbage add color and crunch. Carrots give it sweetness. A crisp apple, like Granny Smith, adds tartness. Red onion brings a sharp flavor. Together, these veggies create a bright mix.
Dressing Components
– 1/4 cup apple cider vinegar
– 2 tablespoons honey (or agave syrup)
– 1 tablespoon Dijon mustard
– 1 teaspoon celery seeds
Next, we create a zesty dressing. Apple cider vinegar provides tang. Honey or agave syrup sweetens the mix. Dijon mustard adds a little kick. Celery seeds give a unique taste. This dressing ties everything together and makes the slaw shine.
Seasoning and Garnish
– Salt, to taste
– Pepper, to taste
– Fresh herbs (like parsley or cilantro) for garnish
Finally, season your slaw. Add salt and pepper to enhance the flavors. Fresh herbs add a pop of color and aroma. You can use parsley or cilantro based on your taste. This is where the slaw really comes alive!
Step-by-Step Instructions
Preparation of Vegetables
To make vinegar slaw, first, you need to shred the cabbage. Take your green and red cabbage and slice them thinly. You want pieces that are about the same size. This makes the slaw look nice and helps it mix well. Use a sharp knife or a mandoline for ease.
Next, julienne the carrots. This means cutting them into thin matchstick shapes. If you have a grater, that works too. Just remember to keep the sizes similar to the cabbage for a great bite.
Now, let’s slice the apple and onion. Core the apple and cut it into thin slices. I like using Granny Smith for a tart taste, but any crisp apple works. For the onion, slice it thinly. The red onion adds a nice color and flavor kick to the slaw.
Making the Dressing
In a small bowl, mix the apple cider vinegar, honey, and Dijon mustard. Whisk until smooth. This dressing is what gives your slaw a zesty kick. If you want it sweeter, add more honey. If you prefer it tangier, add a little more vinegar. Taste as you go to find your perfect mix.
Combining Ingredients
Now, it’s time to bring everything together. In a large bowl, combine the shredded cabbage, carrots, apple slices, and onion. Use your hands or salad tongs to toss them gently.
Next, pour the zesty dressing over the veggies. Toss everything together until all pieces are coated. This is key for full flavor in every bite.
Finally, season with salt and pepper to taste. Adjust as needed. Cover the bowl and let it chill in the fridge for at least 30 minutes. This allows the flavors to meld and the cabbage to soften just a bit.
Once you’re ready to serve, give it a final stir. Enjoy your fresh, crisp vinegar slaw with any meal!
Tips & Tricks
Achieving the Right Flavor Balance
To make your vinegar slaw pop, focus on the right balance of flavors. Start with the vinegar. A good choice is apple cider vinegar. It gives a nice tang. If you want it sweeter, add honey. You can adjust both to your taste. If you want more tang, add more vinegar. For sweetness, add a bit more honey. Salt and pepper help too. They enhance the flavor and bring it all together. Taste and tweak as you go. This way, you get a slaw that suits your palate just right.
Texture Tips
Chilling your slaw is very important. When you let it sit in the fridge, the flavors mix. It also softens the cabbage a bit. I recommend chilling for at least 30 minutes. This time allows the cabbage to soak up the dressing. If you skip this step, your slaw may taste flat. The cabbage should be crisp but tender. The right texture makes every bite enjoyable.
Serving Suggestions
Presentation can make your slaw shine. Serve it in a colorful bowl. This draws the eye and makes it look fresh. Add extra apple slices on top for a nice touch. It adds color and shows what’s inside. Don’t forget to garnish with fresh herbs. A sprig of parsley or cilantro adds flair. You can even serve it alongside grilled meats or sandwiches. This slaw can be a bright side dish for your meals.

Variations
Alternative Vinegar Choices
You can switch out apple cider vinegar for other types. Balsamic vinegar gives a sweet twist. Rice vinegar offers a milder flavor, which works well. White wine vinegar adds a nice tang. Each type brings its own character to the slaw.
Adding Extra Ingredients
Feel free to mix in more veggies or fruits. Shredded bell peppers add color and crunch. Thinly sliced radishes bring a peppery bite. You can also add diced pineapple or mango for sweetness. These extras make the slaw more fun and colorful.
Healthier Substitutions
For a vegan option, swap honey with agave syrup. You can use low-sugar dressings if you want fewer calories. Try using a mix of vinegar and mustard without added sugars. This keeps the flavor bright while being a bit healthier.
Storage Info
How to Store Leftovers
To keep your vinegar slaw fresh, store it in the fridge. Use an airtight container. This helps prevent the slaw from wilting. Make sure to press out any air before sealing. If you have a lot of slaw, divide it into smaller containers. This makes it easy to grab portions as needed.
Shelf Life
Your vinegar slaw will stay fresh for about 3 to 5 days in the fridge. The crispness may fade over time, but the flavor will still be great. Always check for any signs of spoilage before eating. If it looks or smells off, it’s best to toss it.
Freezing Considerations
Freezing vinegar slaw is not ideal, but it can be done. If you choose to freeze it, use a freezer-safe container. Leave some space at the top, as the slaw will expand when frozen. Thaw it overnight in the fridge. The texture may change, and the slaw may become softer. This is normal, so use it in cooked dishes or soups for the best results.
FAQs
What is vinegar slaw?
Vinegar slaw is a fresh, tangy salad made mostly of cabbage. It uses vinegar instead of mayo, giving it a crisp texture and bright flavor. The base is usually green cabbage, but you can mix in red cabbage and carrots for color. A zesty dressing of apple cider vinegar, honey, and Dijon mustard brings everything together. This slaw is a great side dish and adds crunch to any meal.
Can I make vinegar slaw in advance?
Yes, you can make vinegar slaw ahead of time. I recommend making it a few hours before you plan to serve it. The flavors improve as the slaw chills in the fridge. Just remember to let it sit for about 30 minutes before serving. This allows the cabbage to soften slightly while keeping its crunch. If you make it too far in advance, the vegetables might get too soft.
What dishes pair well with vinegar slaw?
Vinegar slaw pairs well with many dishes. It’s great with barbecue meats, tacos, or sandwiches. You can serve it alongside grilled chicken or fish for a refreshing contrast. It also works as a topping for burgers or hot dogs. The tangy flavor of the slaw complements rich and savory dishes. For a fun twist, add it to a picnic spread or potluck.
This blog post covered how to make a fresh and tasty vinegar slaw. We discussed the key ingredients, like green cabbage and apple, and how to prepare them. I shared tips on balancing flavors and achieving the right texture. Want to switch it up? Try different vinegars or add extra fruits. Remember, store your leftovers in the fridge for easy access. Enjoy this delicious dish with your favorite meals! It’s simple, healthy, and sure to impress anyone at your table.


