Texas Cowboy Cookies Irresistible Chewy Delight

If you’ve ever craved a cookie that’s both chewy and loaded with flavor, then Texas Cowboy Cookies are your answer. They combine rich chocolate, crunchy nuts, and sweet coconut in every bite. As someone who loves baking, I can tell you these cookies are simple to make, too. Get ready to whip up a batch that will have everyone asking for seconds! Let’s dive into the recipe and tips for this irresistible treat.
Ingredients
Main Ingredients
– 1 cup unsalted butter, softened to room temperature
– 1 cup packed light brown sugar
– 1/2 cup granulated sugar
– 2 large eggs
– 1 teaspoon pure vanilla extract
Dry Ingredients
– 2 cups all-purpose flour
– 1 teaspoon baking soda
– 1/2 teaspoon salt
– 1 1/2 cups quick-cooking oats
Add-ins
– 1 cup semi-sweet chocolate chips
– 1 cup chopped pecans or walnuts
– 1/2 cup sweetened shredded coconut
– 1/2 cup toffee bits (optional)
When I think of Texas Cowboy Cookies, I think of a mix of flavors and textures. These cookies have a soft, chewy center and a crispy outside. You need butter for richness and sugars for sweetness. The eggs bring moisture and help the cookies rise. Vanilla adds a lovely flavor that makes you want more.
For the dry part, flour is key. It gives structure to your cookies. Baking soda helps them puff up a bit. Salt might seem small, but it enhances all the flavors. Oats add a nice chewiness that makes these cookies unique.
Now, let’s talk about the fun part—add-ins! Chocolate chips bring sweetness and melt in your mouth. Nuts add crunch and flavor. Coconut gives a tropical twist, while toffee bits can add a sweet crunch if you want.
Step-by-Step Instructions
Preparing the Dough
– Preheat your oven to 350°F (175°C) and line a baking sheet with parchment paper. This step helps the cookies not stick and makes cleanup easy.
– In a large bowl, cream together 1 cup of softened unsalted butter, 1 cup of packed light brown sugar, and 1/2 cup of granulated sugar. Use a mixer to blend until light and fluffy. This creates a nice airy texture.
– Next, add 2 large eggs, one at a time. Mix well after each egg. Then, stir in 1 teaspoon of pure vanilla extract for flavor.
Mixing Dry Ingredients
– In another bowl, combine 2 cups of all-purpose flour, 1 teaspoon of baking soda, and 1/2 teaspoon of salt. Whisk until well mixed.
– Gradually add this dry mixture to the wet ingredients. Mix on low speed until just combined. Be careful not to overmix.
Finalizing the Cookie Dough
– Now, it’s time to fold in the fun stuff! Add 1 1/2 cups of quick-cooking oats, 1 cup of semi-sweet chocolate chips, 1 cup of chopped pecans or walnuts, and 1/2 cup of sweetened shredded coconut. If you like, add 1/2 cup of toffee bits. Use a spatula to mix until everything is evenly distributed.
– Using a large tablespoon or cookie scoop, drop heaping tablespoons of cookie dough onto the prepared baking sheet. Make sure to space them about 2 inches apart so they have room to spread.
Baking the Cookies
– Bake the cookies in the preheated oven for 10 to 12 minutes. Keep an eye on them! Look for golden brown edges and soft centers.
– After baking, let the cookies cool on the baking sheet for about 5 minutes. This helps them set. Then transfer them to a wire rack to cool completely. This ensures a nice chewy texture.Enjoy making these Texas Cowboy Cookies, and share them with friends!
Tips & Tricks
Perfecting Your Cookies
To make Texas Cowboy Cookies shine, start with room temperature ingredients. This helps them mix better. Softened butter blends well with sugar, creating a fluffy texture.
Avoid overmixing the dough. Gently combine your ingredients until just mixed. This keeps your cookies chewy and tender.
Baking Tips
Every oven behaves differently. You may need to adjust the baking time. Keep a close eye on your cookies as they bake.
Use proper spacing on the baking sheet. Place cookies about 2 inches apart. This prevents them from merging into one big cookie.
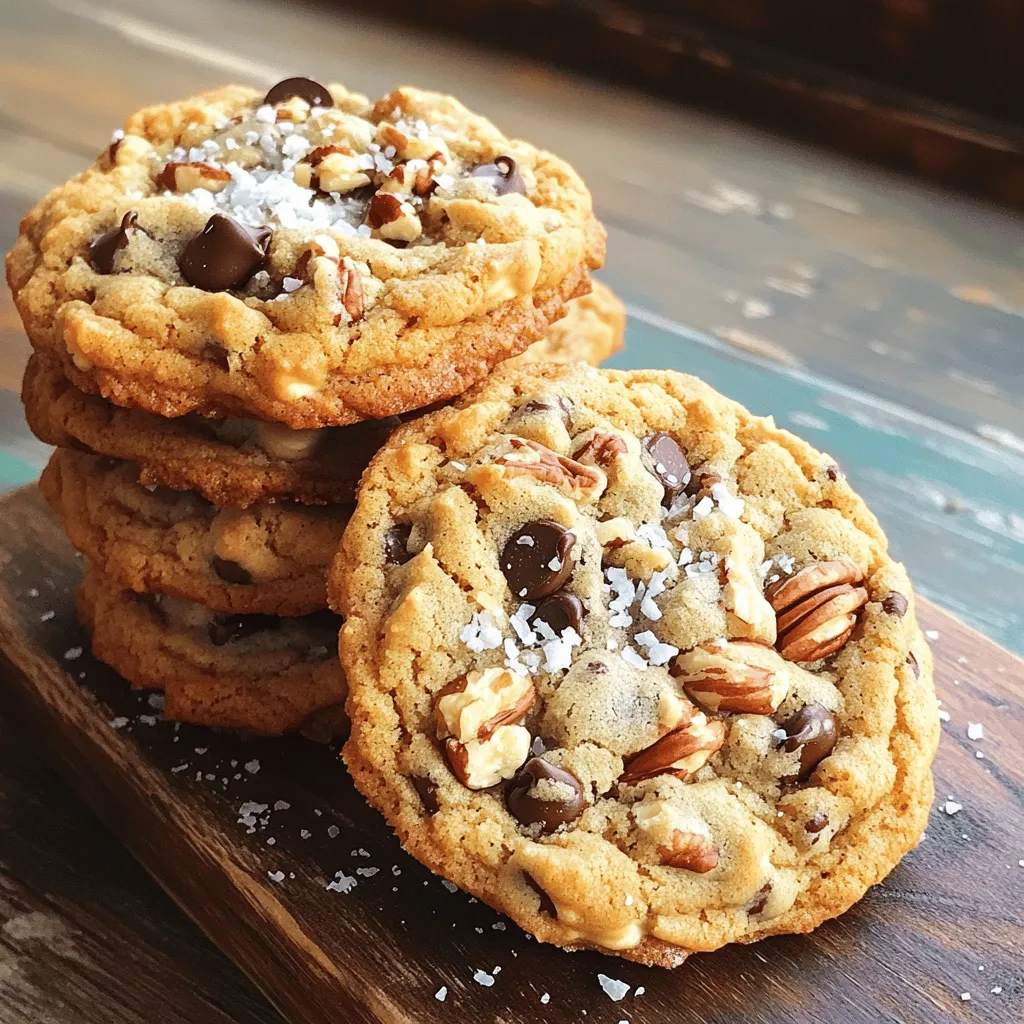
Presentation Tips
Make your cookies look great when serving. Stack them on a rustic wooden board. A sprinkle of sea salt on top adds a nice touch.
If you want to give them as gifts, wrap them in clear cellophane. Tie with twine for a charming presentation.

Variations
Ingredient Substitutions
You can swap nuts if allergies are a concern. Try using sunflower seeds or pumpkin seeds instead of pecans or walnuts. They add crunch and flavor without risk.
You can also change the type of chocolate you use. Dark chocolate chips give a deep taste, while white chocolate chips add sweetness. You can even mix them for a fun twist.
Flavor Enhancements
To make your cookies stand out, add spices like cinnamon or nutmeg. Just a pinch can boost the flavor. It gives a warm touch that makes each bite special.
Dried fruits can also enhance the cookie’s taste. Try adding cranberries or raisins. They bring a tangy sweetness that pairs well with chocolate.
Alternative Sweeteners
If you want a healthier option, consider using coconut sugar or honey. These sweeteners add flavor and can be better for your health.
You can adjust the sugar levels to fit your taste. If you like it less sweet, cut back on the sugars. You can still enjoy the chewy delight of Texas Cowboy Cookies.
Storage Info
Storing Baked Cookies
To keep your Texas Cowboy Cookies fresh, you should store them properly. The best method is to use an airtight container. This keeps cookies soft and chewy. Plastic bags can also work, but they may not keep cookies as fresh. If you choose bags, push out as much air as you can before sealing. Place a piece of bread in the container to help keep cookies moist.
Freezing Instructions
You can freeze cookie dough for a later treat. Simply scoop the dough onto a baking sheet. Freeze the dough balls for a few hours until hard. Then, place them in a freezer bag. When you want cookies, take out the dough and let it thaw in the fridge.
Shelf Life
At room temperature, your cookies will stay fresh for about a week. If you store them in an airtight container, they will last longer. Look for signs of spoilage, like a dry or hard texture. If cookies smell off or show mold, they should be thrown away. Always check before enjoying your delightful treat!
FAQs
What are Texas Cowboy Cookies?
Texas Cowboy Cookies are big, chewy treats filled with flavor. They mix oats, chocolate, nuts, and sometimes coconut. These cookies reflect cowboy culture, made to be hearty and satisfying. The origins come from Texas, where cowboys needed energy for long days. You can taste their spirit in every bite!
Can I make these cookies gluten-free?
Yes, you can make Texas Cowboy Cookies gluten-free. Use gluten-free all-purpose flour instead of regular flour. You can also check if your oats are certified gluten-free. This way, you can enjoy the same great taste without the gluten.
How do I know when the cookies are done?
Look for golden edges on your cookies. The centers should be set but soft. This usually takes about 10 to 12 minutes in the oven at 350°F. Keep an eye on them to avoid overbaking. Remember, they will firm up a bit as they cool.
Can I use different mix-ins for the cookies?
Absolutely! Texas Cowboy Cookies are versatile. You can swap chocolate chips for butterscotch or peanut butter chips. Dried fruits, like cranberries, add a nice twist. Experiment with your favorite mix-ins for fun, new flavors.
How should I store leftover cookies?
To keep your cookies fresh, store them in an airtight container. This helps retain their chewiness. You can also layer parchment paper between cookies to avoid sticking. If you want to keep them longer, freeze them. Just thaw before enjoying!
This blog covered how to make delicious Texas Cowboy Cookies. We outlined the key ingredients, step-by-step instructions, and tips for perfect baking. We also discussed flavor variations and storage methods to keep your cookies fresh. Remember to enjoy the process and have fun with different add-ins. Customize these cookies for any occasion and watch them delight everyone. With practice, you can master these treats and share them with friends. Happy baking!


![Here is everything you need for this tasty dish: - 8 oz spaghetti or fettuccine pasta - 1 lb fresh scallops, cleaned and patted dry - 1 lb shrimp, peeled and deveined - 6 tablespoons unsalted butter - 4 cloves garlic, finely minced - 1 teaspoon red pepper flakes (optional for heat) - 1 cup cherry tomatoes, halved - 1 medium lemon, zested and juiced - 1/4 cup fresh parsley, chopped - Salt and freshly ground black pepper to taste - Grated Parmesan cheese, for serving Fresh, quality ingredients make a big difference. The pasta forms the base and gives the dish its heart. Scallops and shrimp add a rich flavor that makes each bite special. Garlic brings out the best in seafood, while the lemon brightens everything. Don't forget the fresh parsley for a pop of color and taste. For those who like a little kick, red pepper flakes can be a nice touch. Using these ingredients, you can create a beautiful meal that impresses friends and family. Check the [Full Recipe] for detailed steps to follow. Enjoy cooking! To make perfect pasta, start with a big pot of salted water. Bring it to a rolling boil. Add 8 oz of spaghetti or fettuccine and cook it until al dente. This usually means cooking it for about 1-2 minutes less than the package says. Before you drain the pasta, save 1 cup of the starchy pasta water. This water helps the sauce stick later. After reserving the water, drain the pasta and set it aside. For great seared scallops, use a hot skillet. Melt 3 tablespoons of unsalted butter over medium-high heat. Season 1 lb of cleaned scallops with salt and pepper. When the butter is sizzling, gently add the scallops. Sear them for 2-3 minutes on each side. They should be golden brown and opaque. Once done, take them out and place them on a plate. In the same skillet, lower the heat to medium and add the rest of the butter. Wait until it melts, then add 4 cloves of finely minced garlic and 1 teaspoon of red pepper flakes if you like heat. Sauté for about 30 seconds until the garlic smells great. Now, toss in 1 lb of peeled and deveined shrimp. Cook for 2-3 minutes, stirring often, until the shrimp turn pink. Next, add 1 cup of halved cherry tomatoes to the skillet. Cook for another minute until the tomatoes soften. Return the seared scallops to the pan. Squeeze the juice from 1 medium lemon over everything, and add the lemon zest. Stir gently to mix the flavors well. Now for the fun part! Add the cooked pasta to the skillet. Toss everything together so the pasta gets coated in the garlic butter sauce. If the sauce feels too thick, add some of the reserved pasta water slowly until you like the consistency. Make sure the pasta is evenly coated. Fold in 1/4 cup of chopped fresh parsley. Taste your dish and adjust the salt and pepper if needed. Serve the pasta hot. For an elegant touch, sprinkle grated Parmesan cheese on top. You can also add a sprig of parsley and a lemon wedge for a nice look. Enjoy this meal that combines so many amazing flavors! Check out the Full Recipe for detailed steps. - Recommended cooking times: For scallops, cook 2-3 minutes per side. Shrimp need about 2-3 minutes until pink. Pasta should be al dente, usually around 8-10 minutes. - Adjusting spice levels: If you like heat, add more red pepper flakes. For milder flavor, leave them out or reduce the amount. - Best pans for searing: Use a large skillet with a heavy bottom or cast iron. These help get a good sear on scallops and shrimp. - Essential tools for pasta preparation: A large pot for boiling pasta and a colander for draining are key. Tongs work great for tossing pasta with sauce. - Suggested wines to pair: A crisp white wine, like Sauvignon Blanc, complements the seafood well. You can also try a light Pinot Grigio. - Additional herbs and spices to try: Fresh basil or thyme can add a nice twist. A touch of smoked paprika gives a unique flavor boost. For the full recipe, check out the details above. {{image_4}} You can easily swap the seafood in this dish. Try using fish like cod or halibut. These options give a nice, flaky texture. You can also use lobster or crab for a more luxurious feel. If you prefer a lighter dish, switch to shrimp and scallops only. For a vegan or vegetarian twist, use mushrooms instead of seafood. Portobello or oyster mushrooms can add a meaty texture. You can also use firm tofu. This change keeps the dish flavorful while being plant-based. Cheese can change the flavor of this pasta. Adding feta cheese gives a tangy taste. Creamy goat cheese adds richness, while a sharp blue cheese brings boldness. Each cheese will create a unique twist. Incorporating seasonal vegetables can also enhance the dish. Fresh asparagus or zucchini adds crunch and color. You can toss in spinach or arugula for a touch of green. These veggies make the pasta healthier and more vibrant. If gluten is a concern, try gluten-free pasta. Options like brown rice or quinoa pasta work well. They will absorb the garlic butter sauce nicely without losing flavor. You can also switch up the noodles. Instead of spaghetti or fettuccine, use penne or linguine. Each type of noodle will give a different eating experience. Just make sure to adjust cooking times as needed. For the full recipe, check the section above! To keep your garlic butter scallop and shrimp pasta fresh, follow these steps: - Refrigeration: Place leftovers in an airtight container. Store them in the fridge for up to 3 days. This keeps the flavors intact and prevents spoilage. - Freezing: If you want to freeze, use a freezer-safe container. This dish can stay frozen for up to 2 months. However, scallops and shrimp may lose some texture when thawed. To enjoy your pasta again, use these reheating methods: - Best Method: Heat the pasta in a skillet over low heat. Add a splash of water or broth to prevent sticking. Stir gently until warmed through. - Refreshing Flavors: To boost the taste, add a little fresh garlic or a squeeze of lemon juice while reheating. This brings back the vibrant flavors of the dish. For the full recipe and more cooking tips, refer to the Full Recipe provided above. Garlic butter scallop and shrimp pasta can last up to three days in the fridge. Store it in an airtight container to keep it fresh. Always check for any off smells or changes in texture before eating. Yes, you can make garlic butter scallop and shrimp pasta ahead of time. Cook the pasta and seafood, then store them separately. Mix them together right before serving for the best taste and texture. You can serve garlic butter scallop and shrimp pasta with: - A simple green salad - Garlic bread - Roasted vegetables - A light white wine, like Sauvignon Blanc These sides balance the rich flavors of the pasta. To reheat the pasta, use a skillet over low heat. Add a splash of water or broth to keep it moist. Stir gently until heated through. This method helps maintain the dish's creamy texture. You can enhance garlic butter scallop and shrimp pasta with these spices: - Fresh basil for a sweet touch - Thyme for earthiness - Oregano for a hint of warmth - Black pepper for a little kick - A pinch of paprika for color and depth These spices can boost flavor and create a unique twist. For the full recipe, check the section above. This dish of garlic butter scallop and shrimp pasta combines fresh seafood with rich flavors. We covered the key ingredients, tips for cooking pasta, and how to perfect your dish. Remember to adjust spice levels to suit your taste. You can try different seafood or pasta types for fun twists. This recipe is easy to follow and great for impressing guests. Enjoy every bite and share it with family and friends for a delightful meal experience. Happy cooking!](https://fastmealmate.com/wp-content/uploads/2025/06/494cb207-4638-4860-b24c-000c711884e6-768x768.webp)

![- 3 medium-sized beets, thoroughly scrubbed to remove dirt - 4 cups of mixed salad greens (a blend of arugula, spinach, and romaine for texture) - 1/2 cup goat cheese, crumbled into small pieces - 1/4 cup walnuts, toasted and roughly chopped for a crunchy contrast - 1/4 cup dried cranberries for a sweet burst of flavor - 2 tablespoons extra virgin olive oil - 1 tablespoon aged balsamic vinegar for depth - 1 teaspoon Dijon mustard to add tang - Salt and freshly ground black pepper to taste - Fresh herbs for garnish (such as chopped parsley or finely sliced chives) When measuring, use a dry measuring cup for solid ingredients like walnuts and cranberries. For liquids, a liquid measuring cup works best. Make sure to level off dry ingredients for accuracy. This helps you get the right taste and texture. Choose fresh, firm beets. Look for greens that are vibrant and crisp. For goat cheese, select a soft, creamy variety. Fresh herbs should be fragrant and bright. High-quality olive oil and balsamic vinegar make a big difference in flavor. This salad shines when you use the best ingredients. For the full recipe, check out the details above. To start, preheat your oven to 400°F (200°C). This heat helps the beets cook well. Take 3 medium-sized beets and scrub them clean to remove dirt. Wrap each beet in aluminum foil. This keeps them moist while roasting. Place the wrapped beets on a baking sheet. Roast them for 45 to 60 minutes. They are done when a fork can pierce them easily. After roasting, let them cool for a few minutes. Unwrap, peel off the skin, and cut them into wedges. In a large bowl, mix the roasted beet wedges with 4 cups of mixed salad greens. I love using arugula, spinach, and romaine for varied texture. Next, add 1/2 cup of crumbled goat cheese for creaminess. For crunch, toss in 1/4 cup of toasted walnuts. Finally, sprinkle in 1/4 cup of dried cranberries for a sweet touch. This mixture looks colorful and inviting. In a small bowl, whisk together 2 tablespoons of extra virgin olive oil and 1 tablespoon of aged balsamic vinegar. Add 1 teaspoon of Dijon mustard to give it a nice tang. Season it with salt and freshly ground black pepper to taste. Mix until all ingredients blend well. Drizzle the dressing over the salad. Toss gently so that the beets and cheese stay intact. Taste and adjust the seasoning if needed. Serve on a platter or individual plates, and garnish with fresh herbs for a beautiful finish. Enjoy this delicious and healthy dish! For the complete recipe, refer to the Full Recipe. Roasting beets is easy. Start by preheating your oven to 400°F. Wrap each beet in foil. This helps them cook evenly. Roast for 45 to 60 minutes until they’re soft. A fork should slide in with ease. Let them cool before peeling. The skin comes off easily when they are warm. This salad is great as a meal or a side. Serve it with grilled chicken or fish for protein. You can even add chickpeas for a plant-based option. Pair it with crusty bread for a complete meal. This dish shines at dinner parties or casual lunches. Presentation matters in cooking. Use a shallow bowl or a large platter for a stunning look. Start with greens, then add beet wedges. Sprinkle goat cheese and walnuts on top. Add a few dried cranberries for color. Finish with fresh herbs, like parsley or chives. This creates a bright and inviting dish that everyone will love. Check out the Full Recipe for more details on making this delightful salad! {{image_4}} To make your roasted beet goat cheese salad even more filling, you can add protein. Grilled chicken is an easy choice. It adds flavor and heartiness. You can also use chickpeas for a plant-based option. They add great texture and nutrition. If you like seafood, try adding shrimp or smoked salmon. Each protein brings a new twist to your dish. While the balsamic dressing is delicious, you can mix things up. A honey mustard dressing pairs well with the sweet beets. For a creamier option, try a yogurt-based dressing. You could even use a simple lemon vinaigrette for a fresh taste. Each dressing will change the flavor profile and keep things exciting. This salad is versatile! In spring, you might add fresh peas or asparagus. In summer, ripe tomatoes or cucumbers can brighten the dish. Fall brings apples or pears, adding sweetness and crunch. In winter, consider using roasted squash or pomegranate seeds for color and flavor. These swaps keep your salad fresh and aligned with the season. To keep your roasted beet goat cheese salad fresh, store it in an airtight container. Make sure to separate the dressing from the salad to prevent sogginess. You can keep the salad in the fridge for up to three days. If you want to enjoy it later, store the leftovers without the dressing. This way, the flavors stay bright and fresh. Understanding how long your ingredients last can help prevent waste. Here’s a quick guide: - Roasted Beets: Last about 5 days in the fridge when stored properly. - Mixed Greens: Usually stay fresh for 3 to 5 days if kept cool and dry. - Goat Cheese: Can last up to a week after opening, but check for any signs of spoilage. - Walnuts: Store in an airtight container. They stay fresh for about 1 month. - Dried Cranberries: These can last up to a year if kept in a cool, dry place. Typically, you won’t need to reheat this salad. It tastes best cold. If you do want to warm it slightly, use a microwave. Heat on low for about 10-15 seconds. Be careful not to overdo it, as it may change the texture and flavor. Enjoy your salad fresh for the best experience! For the full recipe, check out the section above. Yes, you can use canned beets. They save time and are easy to find. However, fresh roasted beets give a better taste and texture. Canned beets may be softer and less vibrant. If you choose canned beets, rinse them under cold water to remove excess brine. Slice them into wedges and add them directly to your salad. If you need a substitute for goat cheese, try feta or ricotta cheese. Feta has a similar tangy flavor. Ricotta is creamier and milder. You can also use dairy-free cheese for a different taste. Cream cheese can work too, but it is denser. Choose based on your flavor preference and dietary needs. To make this salad vegan, skip the goat cheese. Replace it with vegan cheese or avocado for creaminess. Use maple syrup or agave in the dressing instead of honey. Check that your balsamic vinegar is vegan, as some brands may add honey. This way, you keep all the flavors while making it plant-based. You can find the full recipe here: [Full Recipe]. In this post, I covered how to create a delicious beet salad. We explored the best ingredients, measuring tips, and quality recommendations. You learned step-by-step instructions for prepping beets, assembling the salad, and making the dressing. I shared tips for perfect roasting, serving, and presentation. We also discussed variations like protein options and seasonal swaps. Lastly, I provided storage info and answered common questions. Enjoy crafting your own unique beet salad, and let your creativity shine!](https://fastmealmate.com/wp-content/uploads/2025/06/466f3db8-9be5-4235-af51-29d034f8c92e-768x768.webp)

