Skip to content
About
Contact
Cookie Policy
Copyright Policy
Disclaimer
Search
Home
Dinner
Appetizer
Desserts
Drinks
About
Contact
Privacy Policy
Toggle Menu
Home
/
NO-ING-IMG
- Page 54
NO-ING-IMG
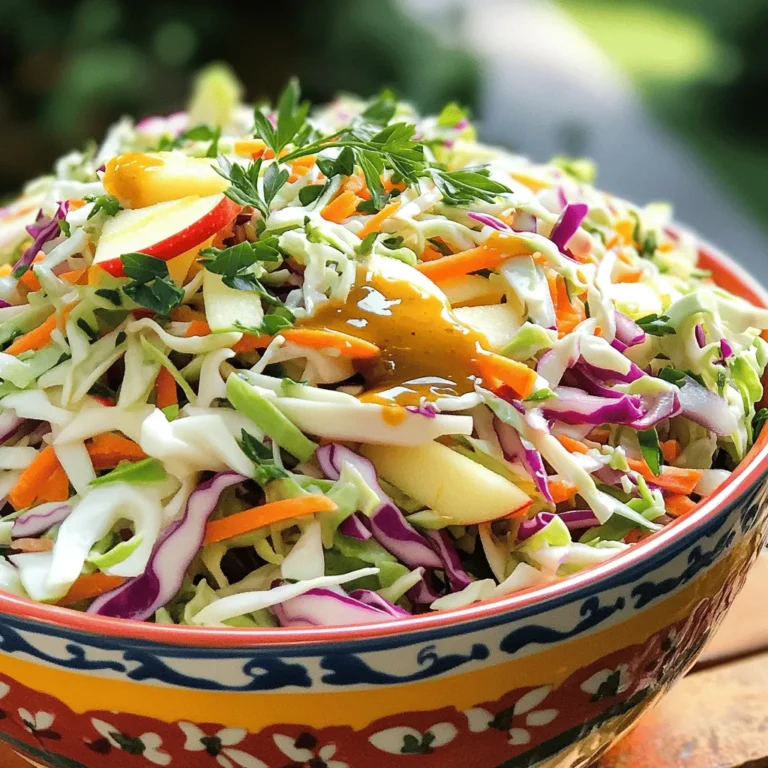
Vinegar Slaw Crisp and Tangy Cabbage Delight
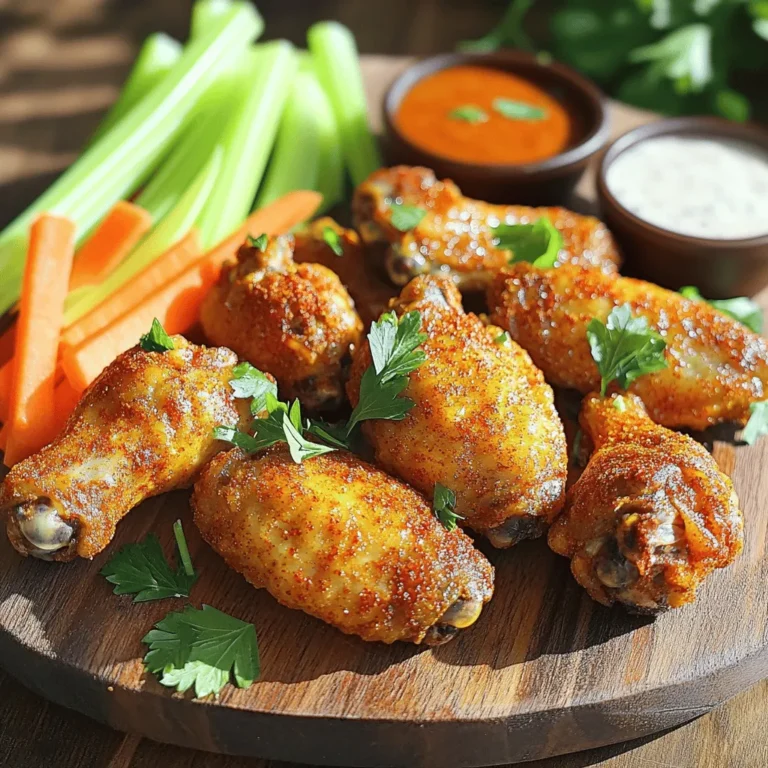
Crispy Air Fryer Chicken Wings Easy and Flavorful Recipe
Sausage French Toast Roll-Ups Easy and Fun Recipe
Irresistible King’s Hawaiian Cheesecake Danish Recipe
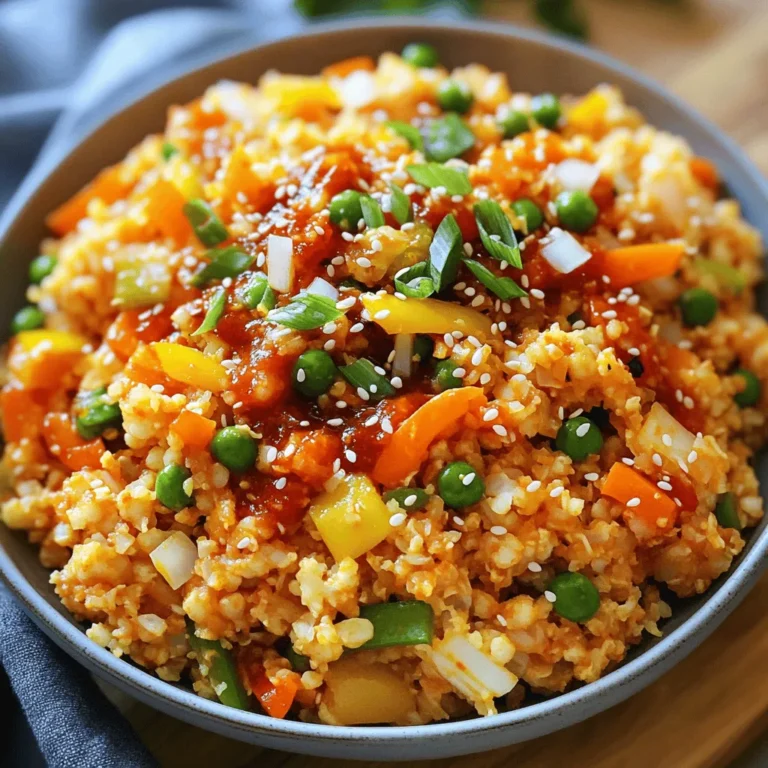
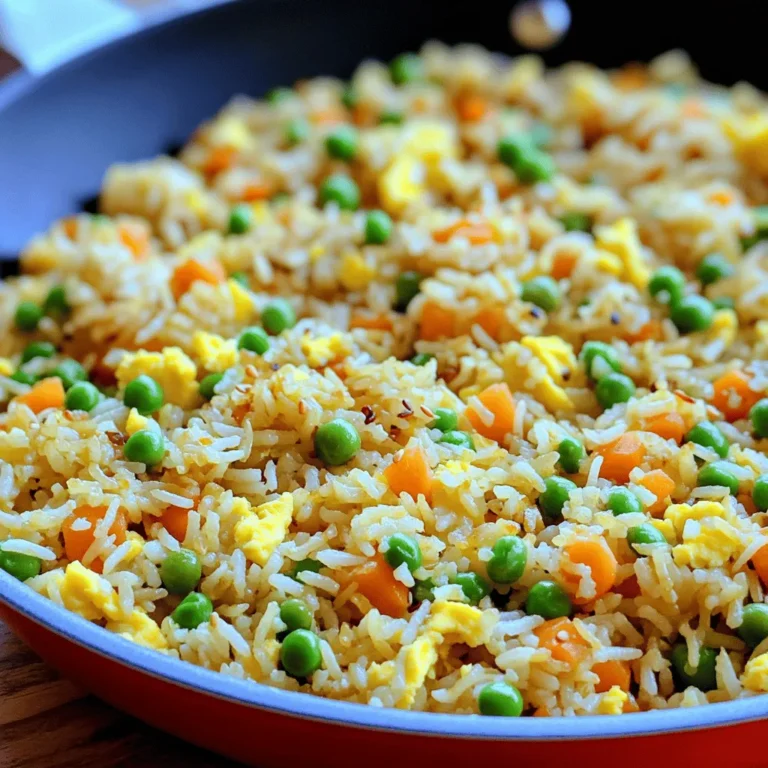
15-Minute Fried Rice Quick and Tasty Weeknight Meal
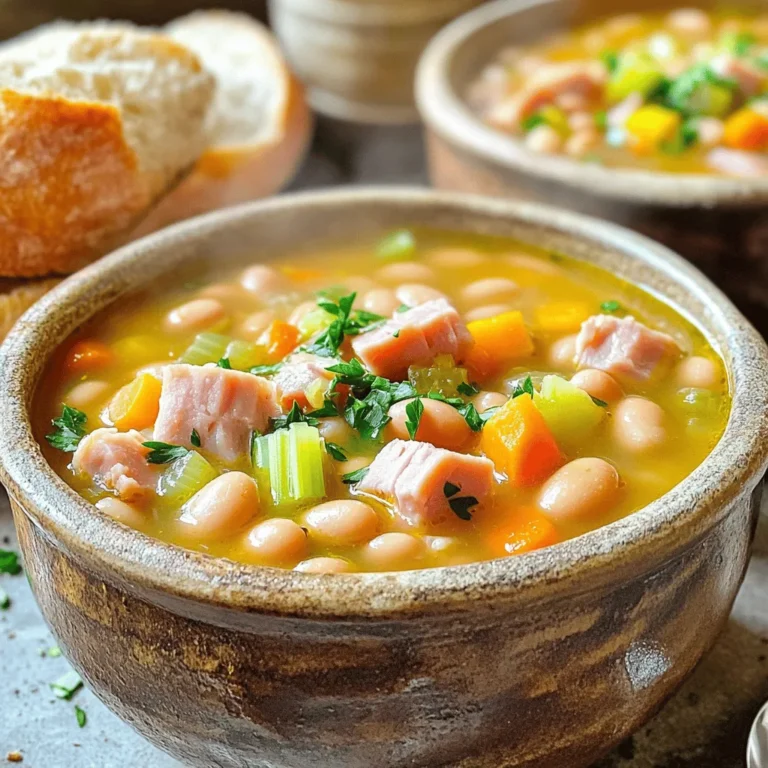
Slow Cooker Ham and Beans Simple Comfort Dish
Honey Garlic Chicken Breasts Flavorful Dinner Delight
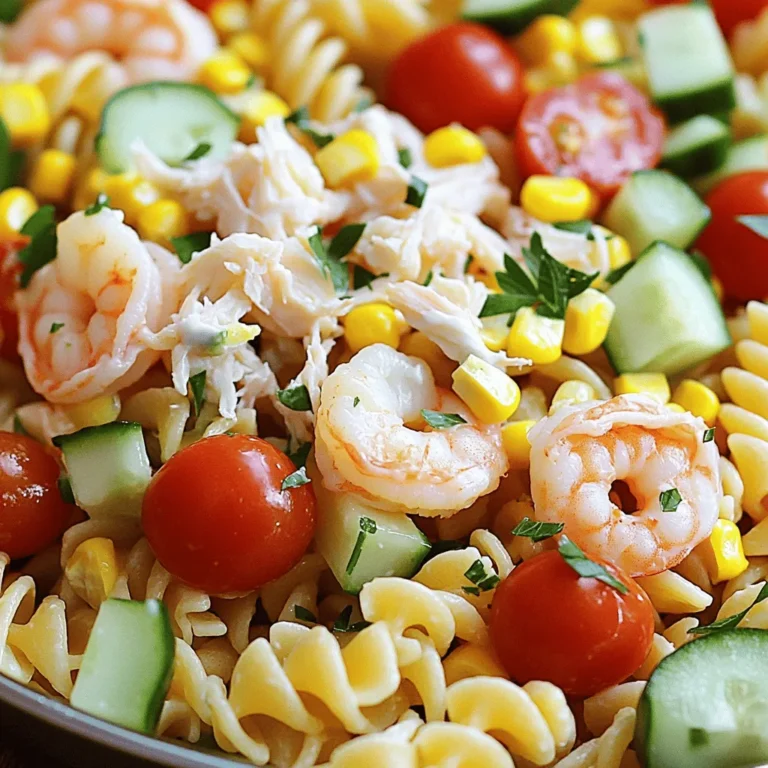
Ocean’s Delight Seafood Pasta Salad Refreshing Treat
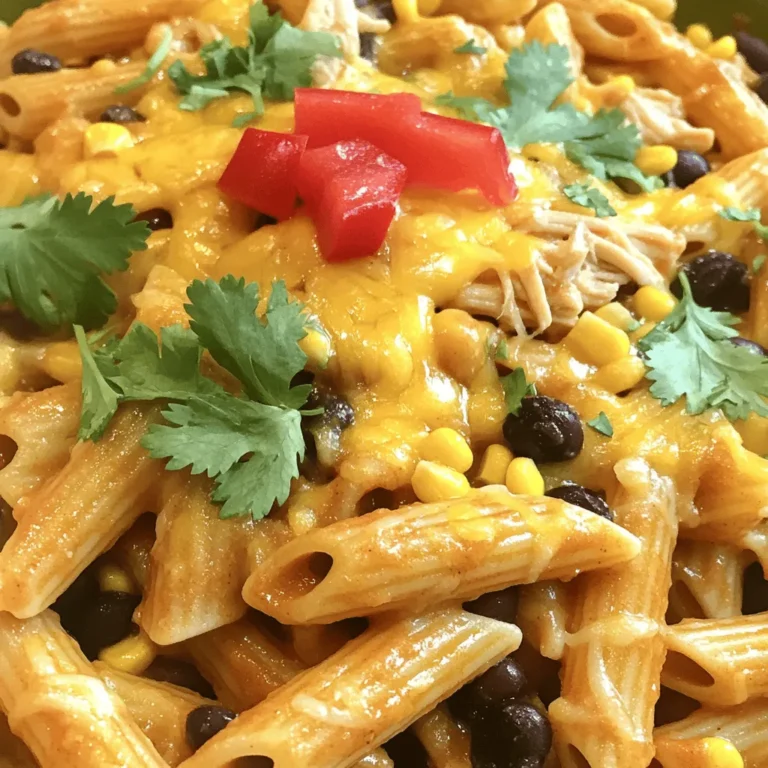
Enchilada Pasta Flavorful Dish Everyone Will Love
Schezwan Cauliflower Fried Rice Easy and Tasty Recipe
Page navigation
Previous Page
Previous
1
…
52
53
54
55
56
…
62
Next Page
Next
Home
Dinner
Appetizer
Desserts
Drinks
About
Contact
Privacy Policy
Toggle Menu Close
Search for:
Search


![To make honey garlic chicken breasts, gather these items: - 4 boneless, skinless chicken breasts - 1/3 cup honey - 1/4 cup low-sodium soy sauce - 4 cloves garlic, finely minced - 1 tablespoon fresh ginger, grated - 1 tablespoon olive oil (for cooking) - 1 teaspoon sesame oil - 1 teaspoon apple cider vinegar - Salt and freshly cracked black pepper, to taste - Chopped green onions (for garnish) - Sesame seeds (for garnish) If you want to switch things up, you can make some simple changes: - Use chicken thighs instead of breasts for more flavor and tenderness. - Swap honey for maple syrup for a different sweet taste. - Choose coconut aminos instead of soy sauce for a gluten-free option. - Replace fresh ginger with powdered ginger in a pinch. - Use canola oil instead of olive oil for frying. Measuring helps your dish taste just right. Here are some tips: - Use a liquid measuring cup for honey and soy sauce. Pour slowly for accuracy. - Use a dry measuring cup for solid ingredients like ginger and garlic. - Level off dry ingredients with a straight edge for a perfect measure. - For sticky ingredients like honey, spray the measuring cup with cooking oil first. This makes it easier to pour out. Get ready for a flavorful dinner delight with these simple ingredients! For the full recipe, check the details above. To start, gather all your ingredients. You need four boneless, skinless chicken breasts, honey, soy sauce, garlic, ginger, olive oil, sesame oil, apple cider vinegar, salt, and pepper. Chop the garlic and grate the ginger. In a medium bowl, mix the honey, soy sauce, garlic, ginger, olive oil, sesame oil, and apple cider vinegar. Whisk the mixture until it is smooth and well combined. Pat the chicken dry with paper towels. Season both sides with salt and freshly cracked black pepper. This step adds flavor to the chicken. Heat a drizzle of olive oil in a large skillet over medium-high heat. Once the oil is hot and shimmering, place the seasoned chicken breasts in the skillet. Cook each side for about 5-7 minutes. You want a rich, golden-brown crust. Use a meat thermometer to check if the chicken has reached 165°F (75°C). When the chicken is golden, pour the honey garlic sauce over the top. Reduce the heat to medium-low and cover the skillet. Let it simmer for 10-15 minutes. This allows the sauce to thicken and flavor the chicken. To check if your chicken is done, use a meat thermometer. Insert it into the thickest part of the chicken. It should read 165°F (75°C). If you don’t have a thermometer, you can cut into the chicken. The juices should run clear, not pink. Make sure to check all pieces, as they can cook unevenly. After cooking, let the chicken rest for a few minutes before serving. This helps keep it juicy. For a great presentation, drizzle extra sauce on top and garnish with green onions and sesame seeds. Enjoy this flavorful dinner delight from the Full Recipe! To make your honey garlic chicken truly shine, use fresh ingredients. Fresh garlic and ginger pack a punch and enhance the dish's flavor. If you want more depth, let the chicken marinate. A 30-minute soak in the sauce will increase flavor. You can also add a splash of lime juice to brighten the taste. Remember, balance is key! Use salt to enhance sweetness and acidity to cut through richness. Cooking chicken breasts can be tricky. To keep them juicy, avoid overcooking. Use a meat thermometer to check for an internal temperature of 165°F (75°C). Start on high heat to get a nice crust, then lower the heat. This helps the inside cook without drying out. Covering the skillet while simmering allows the chicken to absorb sauce flavors. Here are some tools that can help you cook like a pro: - Large skillet - Meat thermometer - Whisk for mixing - Cutting board - Sharp knife for slicing These tools make cooking smoother and more enjoyable. Having the right equipment allows you to focus on creating a delicious meal. For the full recipe, check out the details above! {{image_4}} You can add more colors and flavors to your honey garlic chicken. Try mixing in vegetables like bell peppers, broccoli, or snap peas. Cut them into bite-sized pieces. Add them to the skillet after the chicken has cooked for about 5 minutes. This way, the veggies soak up the sauce and stay crisp. It makes the dish healthy and fun. If you like heat, spice up your honey garlic chicken. Add red pepper flakes or chili paste to the sauce. Start with half a teaspoon and adjust to your taste. This spicy kick pairs well with the sweetness of honey. It gives you a nice balance of flavors. You can also use sriracha for a different heat profile. You don’t have to cook the chicken on the stove. Grilling gives it a smoky flavor. Marinate the chicken in the honey garlic sauce for at least one hour. Then, grill it on medium heat for about 6-8 minutes per side. If you prefer baking, preheat your oven to 400°F (200°C). Place the chicken in a baking dish, pour the sauce over it, and bake for 20-25 minutes. This keeps the chicken juicy and full of flavor. For the full recipe, check the [Full Recipe]. After your meal, let the chicken cool down. Place leftovers in an airtight container. This keeps them fresh and tasty. Store the container in the fridge. Honey garlic chicken can last for up to four days. If you plan to eat it later, consider freezing it. To reheat, you have a few options. The best way is to use the oven. Preheat it to 350°F (175°C). Place the chicken in a baking dish and cover it. Heat for about 15-20 minutes. Check that the chicken is hot all the way through. You can also use a microwave. Heat in short bursts, checking often. This keeps the chicken juicy. If you want to freeze the chicken, it’s simple. Wrap each piece tightly in plastic wrap. Then, place them in a freezer bag. Squeeze out as much air as possible. This helps prevent freezer burn. You can freeze the chicken for up to three months. When you’re ready to eat, thaw it overnight in the fridge. Then, reheat using the oven or microwave. This way, you enjoy a delicious meal later. You can serve many sides with honey garlic chicken breasts. Here are some great options: - Steamed rice: This absorbs the sauce well and adds a nice balance. - Sautéed vegetables: Try broccoli, bell peppers, or carrots for color and crunch. - Mashed potatoes: Creamy potatoes enhance the meal and add comfort. - Quinoa: A healthy grain that pairs perfectly with the sauce. - Salad: A fresh green salad can lighten up the meal. These sides complement the flavors of the chicken and make a complete meal. Yes! You can prepare honey garlic chicken breasts ahead of time. Here’s how: - Marinate: You can marinate the chicken in the sauce for up to 24 hours. This adds flavor and tenderizes the meat. - Cook and store: After cooking, let the chicken cool. Store it in an airtight container in the fridge for up to 3 days. - Reheat: When you’re ready to eat, simply reheat in a skillet or microwave. Add a splash of water if the sauce thickens too much. This method saves time and keeps dinner stress-free. You can easily change the sweetness of the honey garlic sauce. Here are some tips: - Add more honey: For a sweeter sauce, increase the honey a bit. - Use less honey: If you prefer less sweetness, reduce the honey. - Try other sweeteners: Maple syrup or agave can be good substitutes. They offer a different flavor while keeping it sweet. - Balance with acid: If it gets too sweet, add a splash of apple cider vinegar for a tangy touch. Adjusting the sweetness helps you tailor the dish to your taste. You learned about the ingredients, steps, and tips for cooking honey garlic chicken. We covered ingredient substitutions, measuring tips, and how to check doneness. I shared best practices for enhancing flavor and cooking juicy chicken. You also saw variations and how to store leftovers properly. Cooking can be simple and fun. Use these tips to make your meals taste great. Enjoy your cooking experience!](https://fastmealmate.com/wp-content/uploads/2025/06/7fed451b-ca95-459f-be21-3e50f3436304-768x768.webp)