Skip to content
About
Contact
Cookie Policy
Copyright Policy
Disclaimer
Search
Home
Dinner
Appetizer
Desserts
Drinks
About
Contact
Privacy Policy
Toggle Menu
Home
/
NO-ING-IMG
- Page 50
NO-ING-IMG
Cheesy Taco Pasta Simple and Satisfying Recipe
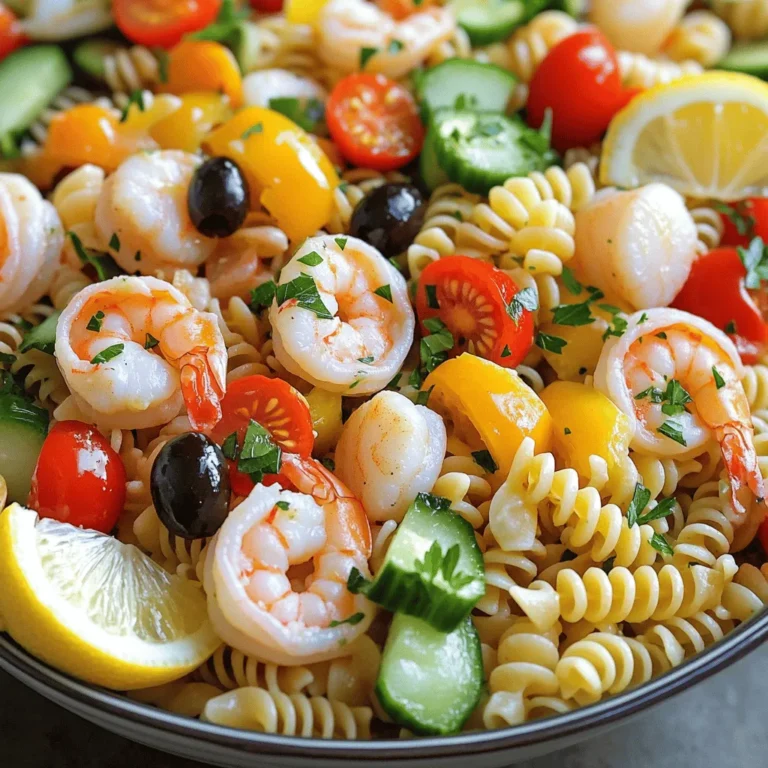
Savory Seafood Pasta Salad Fresh and Flavorful Dish
Classic Strawberry Shortcake Delightful and Simple Recipe
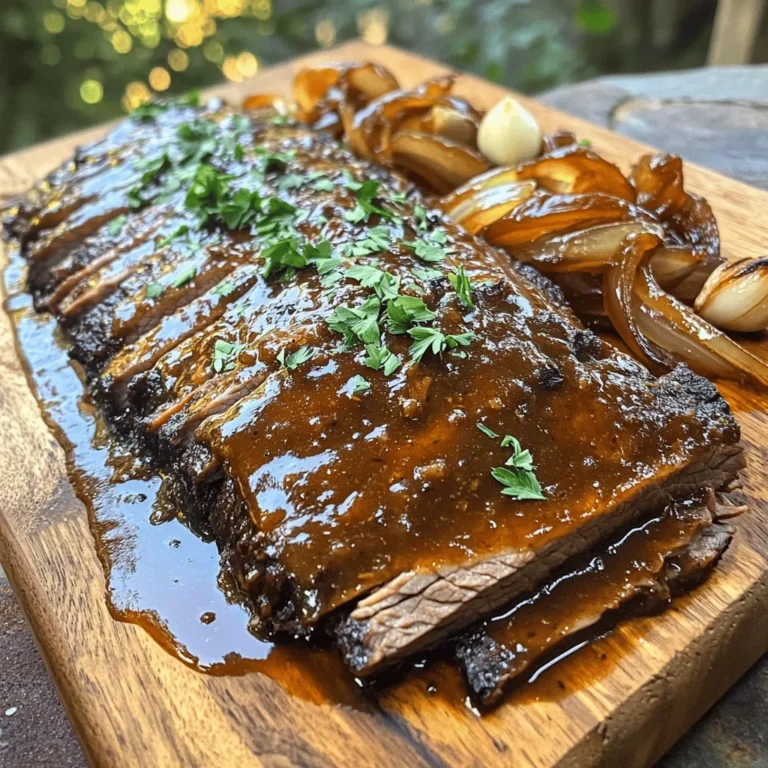
Slow Cooker Beef Brisket Tender and Tasty Delight
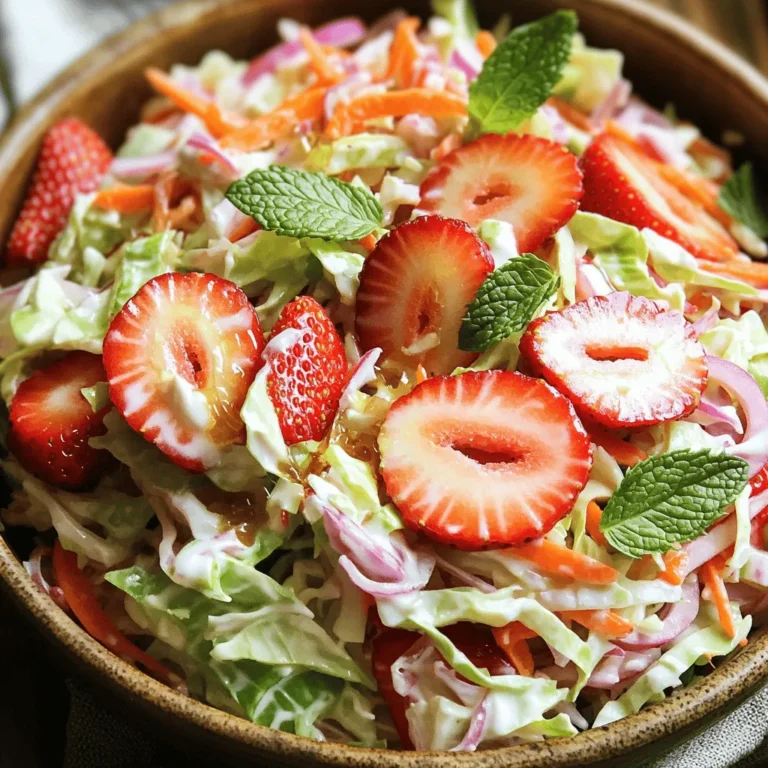
Strawberry Coleslaw Fresh and Flavorful Delight
No-Bake Strawberry Cheesecake Cups Simple and Tasty
Caramel Banana Pecan Cake Deliciously Simple Recipe
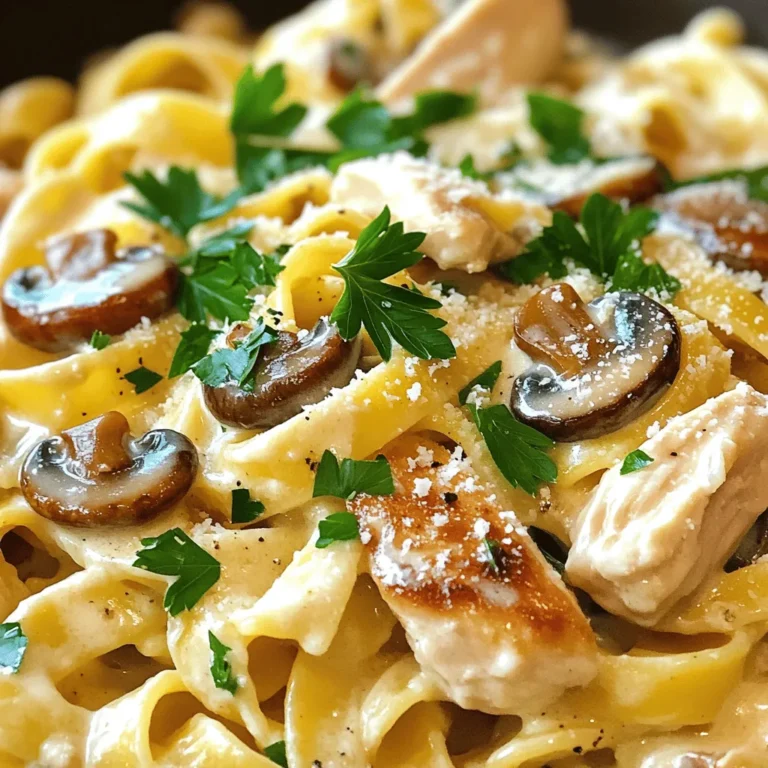
Creamy Chicken Mushroom Pasta Delicious Dinner Delight
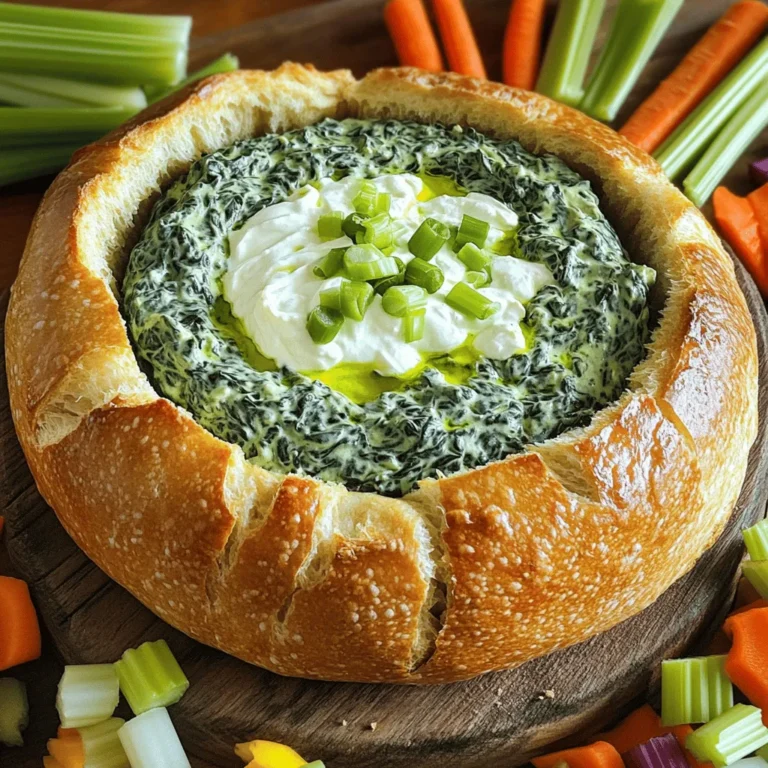
Spinach Dip Bread Bowl Irresistible Appetizer Delight
Double Chocolate Peppermint Cookies Festive Treat
Page navigation
Previous Page
Previous
1
…
48
49
50
51
52
…
62
Next Page
Next
Home
Dinner
Appetizer
Desserts
Drinks
About
Contact
Privacy Policy
Toggle Menu Close
Search for:
Search


. To make your shortcake soft and fluffy, avoid overmixing the dough. Overmixing can lead to tough shortcakes. Mix just until the dough comes together. This keeps your shortcakes light. The temperature of your ingredients matters. Use cold butter and chilled cream. Cold butter creates steam when baked. This steam helps the shortcakes rise. Chilled cream keeps the dough from getting warm. Use a good pastry cutter or your hands to mix the butter. A sturdy mixing bowl helps, too. For cutting, a round biscuit cutter works best. It gives neat edges for your shortcakes. For baking, use a parchment-lined baking sheet. This prevents sticking and makes cleanup easier. A wire rack helps cool the shortcakes evenly after baking. Whipped cream is a classic topping for your shortcake. It adds creaminess and balances the sweetness of the strawberries. You can also use ice cream for a richer dessert. For a beautiful presentation, garnish with fresh strawberries on top. A sprinkle of mint leaves adds color and freshness. Serve your shortcake with a dollop of whipped cream on the side for extra delight. For the full recipe, check the Classic Strawberry Shortcake Delight. {{image_4}} You can swap strawberries for other fruits. Berries, peaches, and rhubarb work great. For berries, use blueberries, raspberries, or blackberries. Just follow the same steps for macerating. With peaches, slice them thin and sprinkle with sugar. Let them sit for about 20 minutes to get juicy. Rhubarb needs a little cooking. Chop it and simmer with sugar until tender. Then use it just like strawberries. Whipped cream can be fun! Try adding different flavors to it. Mix in vanilla, almond, or even a bit of lemon zest. You can create a unique taste. For a twist, drizzle chocolate or caramel over the top. Melt chocolate chips for a rich sauce, or warm up caramel. Both add a nice touch to your dessert. Want a vegan version? Swap dairy for plant-based options. Use coconut cream instead of heavy cream. For the shortcake, replace butter with coconut oil. You can choose almond milk or soy milk for the liquid. If you're looking for sugar-free options, use a sugar substitute. Stevia or monk fruit can work well. Just adjust the amount to your taste. Feeling adventurous? Check the Full Recipe to see all the details! To keep your baked shortcakes fresh, store them in an airtight container. Place parchment paper between layers to avoid sticking. Store at room temperature for up to two days. If you need to keep them longer, refrigerate for up to a week. However, cold can change the texture. For best taste, eat them fresh. After macerating your strawberries, cover them tightly with plastic wrap. This keeps them juicy and tasty. Store them in the fridge for up to three days. Avoid washing them until just before use. Moisture can cause strawberries to spoil quickly. If you have leftover shortcakes, you can warm them up. Preheat your oven to 350°F (175°C). Wrap each shortcake in foil to keep them soft. Heat for about 10 minutes. You can also microwave them for about 15-20 seconds. Just be careful not to overheat. Enjoy the warmth and flavor! Strawberry shortcake has roots in England. The dessert started as a simple biscuit, served with cream and fruit. In the 19th century, it made its way to America. Here, chefs added sweetened strawberries and whipped cream. This combination made it a summer favorite. Today, it remains a beloved treat, especially during strawberry season. Yes, you can prepare some parts ahead. Make the shortcakes and store them in an airtight container. You can also prepare the strawberries and chilling cream earlier. Just keep the strawberries in the fridge. When you're ready to serve, assemble the shortcake. This way, you keep the shortcakes fresh and fluffy. Look for a golden-brown color on top. The edges should feel firm, and the center should spring back when touched. You can also insert a toothpick into the center. If it comes out clean, your shortcakes are done. Be careful not to overbake, as this can dry them out. Yes, you can freeze leftover shortcake. Wrap each piece tightly in plastic wrap, then place them in a freezer bag. They can last up to three months in the freezer. When you want to enjoy them, thaw them in the fridge overnight. Reheat in the oven for a few minutes to restore warmth and texture. In this blog post, we explored how to make great strawberry shortcake. We covered fresh ingredients, the right techniques, and tips for perfect results. Remember, the quality of your ingredients matters most. You can swap in different fruits and toppings for variety. Storing and reheating your shortcake can keep it fresh. I hope these steps inspire you to whip up this classic dessert. Enjoy the sweet rewards of your hard work!](https://fastmealmate.com/wp-content/uploads/2025/06/e92a88f0-b46a-45f1-a24e-50dd1609a02e-768x768.webp)
![For this no-bake strawberry cheesecake cups, you will need: - 1 cup graham cracker crumbs - 2 tablespoons granulated sugar - 1/2 cup unsalted butter, melted - 1 cup cream cheese, softened - 1/2 cup powdered sugar - 1 teaspoon pure vanilla extract - 1 cup heavy whipping cream - 1 cup fresh strawberries, diced - Additional fresh strawberries, sliced for topping You can swap some ingredients if needed: - Use chocolate cookies instead of graham crackers for a twist. - Swap granulated sugar with brown sugar for a deeper flavor. - Low-fat cream cheese works well if you're watching calories. - Coconut cream can replace heavy cream for a dairy-free option. - If fresh strawberries are not available, try using raspberries or blueberries. When using fresh strawberries, choose ripe ones for the best taste. Look for bright red berries without any green spots. Wash them gently and pat them dry before dicing. If you want to enhance their flavor, sprinkle a little sugar on the diced strawberries and let them sit for about 10 minutes. This draws out the juices and creates a sweet syrup, making your cheesecake cups even more delicious. For the full recipe and step-by-step instructions, check out the [Full Recipe]. To make the crust, start with a mixing bowl. Add 1 cup of graham cracker crumbs and 2 tablespoons of granulated sugar. Pour in 1/2 cup of melted unsalted butter. Mix it well until the crumbs look like wet sand. This will give your crust a great flavor and texture. Next, take about two tablespoons of this crumb mixture and spoon it into each cup. Use your fingers or the back of a spoon to press it down gently. This step helps form a solid base for your cheesecake. For the cream cheese filling, grab another bowl. Beat 1 cup of softened cream cheese with an electric mixer. Keep mixing until it is smooth and creamy. Once it looks good, add 1/2 cup of powdered sugar and 1 teaspoon of pure vanilla extract. Mix until everything is silky and combined. In a separate bowl, whip 1 cup of heavy cream. Use the mixer until stiff peaks form. Be careful not to over-whip it. You want the cream to be light and fluffy. Now, gently fold the whipped cream into the cream cheese mixture. Use a spatula and mix until just combined. This folding keeps the mixture airy. Spoon the cream cheese filling over the crust in each cup. Fill them about three-quarters full. Use the spatula to smooth the tops. Next, top each cup with diced strawberries. Press them gently into the cream cheese layer. This step spreads their flavor throughout the dessert. For the final touch, add a dollop of remaining cream cheese mixture on top. Garnish each cup with a fresh strawberry slice. Now, place the cups in the refrigerator. Chill them for at least 2 hours. This step lets the layers set and enhances the flavors. Enjoy your no-bake strawberry cheesecake cups! For the full recipe, refer to the section above. To get a smooth and creamy filling, make sure your cream cheese is at room temperature. If it’s too cold, it will clump. Use an electric mixer to beat the cream cheese until it is silky. Slowly add in the powdered sugar and vanilla while mixing. This step helps blend everything perfectly. When whipping the heavy cream, stop when you see stiff peaks. Over-whipping makes it grainy. Finally, gently fold the whipped cream into the cream cheese mixture. This keeps it light and fluffy. Serve these cheesecake cups in clear glass dishes. This way, everyone can see the beautiful layers. For a fun twist, try adding a layer of chocolate sauce or a fruit puree. You can also sprinkle crushed graham crackers on top for added crunch. If you want to impress your guests, use fresh mint leaves as a garnish. It adds a nice pop of color and flavor. You’ll need a few basic tools. A mixing bowl is key for combining ingredients. An electric mixer is best for whipping the cream and mixing the filling. Use a spatula to gently fold mixtures together. For serving, small glass cups or jars work wonderfully. They show off the layers and make for a pretty presentation. Lastly, have a measuring cup and spoons on hand for accuracy. Don't forget to check out the Full Recipe to perfect your technique! {{image_4}} You can switch up the flavor of your no-bake cheesecake cups. Try chocolate by adding cocoa powder to the cream cheese mix. For mango, blend fresh mango into the cream cheese before mixing. You can even use lemon zest for a bright, citrusy kick. These simple changes keep your dessert fun and fresh. Want a lighter cheesecake? Use low-fat cream cheese instead of regular cream cheese. You can also swap out heavy cream for Greek yogurt. This keeps the taste rich but lowers the fat. Using honey or agave syrup instead of sugar can add sweetness without the extra calories. Layering is key to a stunning dessert. Start with a crust layer, then add your creamy filling. You can add a layer of fruit between the cream cheese and whipped cream. This adds texture and flavor. For a fun twist, try layering different fillings. You could alternate between plain and flavored mixes. This creates a beautiful, colorful effect in your cups. For the full recipe, check out the [Full Recipe]. To store your no-bake strawberry cheesecake cups, use airtight containers. Place the cups in the fridge right after they set. This keeps them fresh and tasty. If you make them ahead of time, cover each cup with plastic wrap or a lid. This helps avoid any weird smells from other foods in the fridge. These cheesecake cups last in the fridge for about 3 to 5 days. After that, the texture may change. You want to enjoy them when they are at their best. Always check for any signs of spoilage before serving. If you see any mold or the smell seems off, it’s best to throw them away. You can freeze these cheesecake cups if you want to save them for later. First, let them chill in the fridge for at least 2 hours. After that, cover each cup tightly with plastic wrap and foil. This extra layer helps prevent freezer burn. You can freeze them for up to 2 months. When you’re ready to enjoy, take them out and let them thaw in the fridge overnight. Remember, the texture may change a bit after thawing. For the full recipe, check back for more details! No-Bake Strawberry Cheesecake Cups last about three days in the fridge. Store them in an airtight container to keep them fresh. You want to enjoy the creamy texture and berry flavor at their best. After three days, the strawberries may lose their crispness and the filling might not be as fresh. Yes, you can use frozen strawberries. Just make sure to thaw and drain them first. This helps avoid extra moisture in your cups. Frozen strawberries can still taste great and add sweetness. However, fresh strawberries give a better texture and brightness to the dish. If you need a substitute for heavy cream, you can use coconut cream or Greek yogurt. Coconut cream adds a rich flavor, while Greek yogurt keeps it light. You may also mix milk with butter for a quick fix. Use a 3:1 ratio of milk to butter for a creamy texture. Just remember, these swaps may change the overall taste slightly. You learned how to make no-bake strawberry cheesecake cups. We covered ingredients, tips, and storage methods. Remember to choose fresh berries for the best taste. Use my tips for a creamy texture and fun flavor twists. Store them right to enjoy later. With these steps, you can craft a delicious treat easily. Embrace your creativity, and have fun making these cheesecake cups!](https://fastmealmate.com/wp-content/uploads/2025/06/462f42fe-2b9d-4e42-aace-05b4fd02c510-768x768.webp)

![Gathering the right ingredients is key to making delicious Double Chocolate Peppermint Cookies. Below is a list of what you need: - 1 cup all-purpose flour - 1/2 cup unsweetened cocoa powder - 1/2 teaspoon baking soda - 1/4 teaspoon salt - 1/2 cup unsalted butter, softened to room temperature - 1 cup granulated sugar - 1/2 cup packed brown sugar - 1 large egg - 1 teaspoon pure vanilla extract - 1/2 teaspoon peppermint extract - 1 cup semi-sweet chocolate chips - 1/2 cup crushed peppermint candies (reserve some for topping) These ingredients come together to create a rich, chocolatey cookie with a refreshing mint twist. The all-purpose flour and cocoa powder form the base. The butter adds a creamy texture, while the sugars bring sweetness. The egg binds everything, and the extracts infuse that festive flavor. Chocolate chips add extra richness, and crushed peppermint brings a delightful crunch. For the full recipe, check out the details on how to combine and bake these ingredients into a festive treat! - Preheat the oven and prepare baking sheets: Start by preheating your oven to 350°F (175°C). Line your baking sheets with parchment paper to keep the cookies from sticking. - Mix the dry ingredients: In a medium bowl, whisk together 1 cup of all-purpose flour, 1/2 cup of unsweetened cocoa powder, 1/2 teaspoon of baking soda, and 1/4 teaspoon of salt. Set this dry mix aside for now. - Cream the butter and sugars: In a large bowl, take 1/2 cup of softened butter, 1 cup of granulated sugar, and 1/2 cup of brown sugar. Use an electric mixer to beat these ingredients until they turn light and fluffy, about 2-3 minutes. - Incorporate egg and extracts: Add 1 large egg, 1 teaspoon of vanilla extract, and 1/2 teaspoon of peppermint extract to the butter-sugar blend. Mix until everything is smooth and well combined. - Combine wet and dry mixtures: Gradually add the dry ingredients to the wet mix. Stir on low speed until just combined. Don’t worry if a few flour streaks are left; it’s okay! - Add chocolate and peppermint: Gently fold in 1 cup of semi-sweet chocolate chips and 1/2 cup of crushed peppermint candies. Make sure they’re evenly mixed into the dough. - Form cookie dough balls: With a tablespoon or cookie scoop, drop balls of dough onto the lined baking sheets. Space them about 2 inches apart to allow room for spreading. - Top with candies: Before you bake, sprinkle a few extra crushed peppermint candies on top of each cookie. This adds a fun, festive touch. - Bake the cookies: Place your baking sheets in the preheated oven. Bake for 10-12 minutes. The edges should be set, and the centers should feel soft for a chewy bite. - Cool the cookies: After baking, take the cookies out of the oven. Let them cool on the baking sheet for about 5 minutes. Then, move them to a wire rack to cool completely. You can find the Full Recipe for all the details! - How to achieve the best texture For soft and chewy cookies, measure your flour correctly. Use a spoon to scoop flour into your measuring cup. Then level it off with a knife. This prevents too much flour, which can make cookies dry. - Preventing cookies from spreading Chill your dough for about 30 minutes before baking. This helps keep the cookies from spreading too much. Also, use parchment paper on your baking sheets. It keeps cookies from sticking and helps them hold shape. - Ensuring cookies are soft in the center Bake your cookies until the edges are set, but the centers look slightly underbaked. They will continue to cook as they cool. Aim for a baking time of 10-12 minutes for the best results. - Festive presentation suggestions To make your cookies look extra special, serve them on a bright platter. Surround them with whole peppermint sticks. Dust with powdered sugar for a snowy effect. This adds a fun touch to your holiday table. - Using different toppings Try adding different toppings for variety. Use white chocolate chips or crushed nuts. You can also drizzle melted chocolate on top for a beautiful look. This will impress your guests and make your cookies unique. For the full recipe, check out the [Full Recipe]. {{image_4}} When making Double Chocolate Peppermint Cookies, it’s great to know your options. Here are some easy swaps: - Gluten-free alternatives: Use a gluten-free flour blend. Look for one that has xanthan gum for better texture. - Vegan options: Replace the butter with a plant-based butter. Use a flax egg for the egg. Mix 1 tablespoon of flaxseed meal with 2.5 tablespoons of water, then let it sit for 5 minutes. - Adjusting sweetness levels: If you want less sugar, cut the granulated sugar by 1/4 cup. You can also use coconut sugar for a different flavor. To deepen the flavor of your cookies, consider these tips: - Using dark chocolate instead of semi-sweet: Dark chocolate gives a richer taste. You can use 70% cocoa chocolate for a more intense flavor. - Adding spices for more depth: Try adding a pinch of cinnamon or a dash of espresso powder. These spices can bring out the chocolate flavor even more. Experimenting with these variations can help you create a cookie that fits your taste. Check the Full Recipe for the base you can build upon! To keep your Double Chocolate Peppermint Cookies fresh, follow these tips: - Cool completely: Let the cookies cool on a wire rack. - Use airtight containers: Store them in a container with a tight seal. - Layer with parchment: If stacking, place parchment paper between layers to avoid sticking. For the best taste, eat them within a week. If you need them to last longer, freezing is a great option. To freeze your cookies properly, do this: - Cool first: Ensure the cookies are cool before freezing. - Flash freeze: Place them on a baking sheet in a single layer. Freeze for about two hours. - Transfer to bags: Once frozen, move cookies to a freezer-safe bag. Remove as much air as possible. When you want to enjoy them: - Thaw at room temp: Leave them out for about 30 minutes. - Warm them up: For a fresh-from-the-oven taste, heat them in the oven for a few minutes at 350°F. These steps keep your cookies delicious and ready for any occasion. Try out the [Full Recipe] for the perfect baking experience! To make Double Chocolate Peppermint Cookies from scratch, start with simple ingredients. You will need flour, cocoa powder, baking soda, salt, butter, sugar, an egg, vanilla extract, peppermint extract, chocolate chips, and crushed peppermint candies. Mix your dry ingredients first, then cream the butter and sugars. Add the egg and extracts, then combine everything. Finally, fold in the chocolate chips and peppermint candies. Drop spoonfuls of dough onto a baking sheet and bake at 350°F for about 10-12 minutes. You can find the Full Recipe above. Yes, you can make these cookies ahead of time. You can prepare the dough and chill it in the fridge for up to 24 hours. This helps the flavors blend and improves the texture. You can also bake the cookies and store them in an airtight container for up to a week. If you don't have peppermint extract, you can use vanilla extract for a different flavor. For a minty twist, try using fresh mint leaves. Crush them and add to the dough. Just remember, fresh mint will give a lighter mint flavor than extract. Double Chocolate Peppermint Cookies last about a week when stored properly. Keep them in an airtight container at room temperature. If you want them to last longer, you can freeze them for up to three months. Just make sure they are well-wrapped. Yes, you can use mint chocolate chips instead of semi-sweet chocolate chips. This change will add extra mint flavor and make the cookies even more festive. Just keep in mind that mint chocolate chips are usually sweeter, so you may want to reduce the added sugar slightly. In this blog post, we explored how to create delicious Double Chocolate Peppermint Cookies. We covered the ingredients needed, from flour to crushed peppermint candies. I shared step-by-step instructions for the perfect bake and tips for great texture. You can also find variations, storage methods, and answers to common questions. With these easy steps, you can impress anyone with your baking. Enjoy your tasty treats!](https://fastmealmate.com/wp-content/uploads/2025/06/fd57d0d4-4c0f-42d7-b1ba-84fe10f3d73b-768x768.webp)