Skip to content
About
Contact
Cookie Policy
Copyright Policy
Disclaimer
Search
Home
Dinner
Appetizer
Desserts
Drinks
About
Contact
Privacy Policy
Toggle Menu
Home
/
NO-ING-IMG
- Page 12
NO-ING-IMG
Savory Summer Shrimp Tostadas with Guacamole Salsa
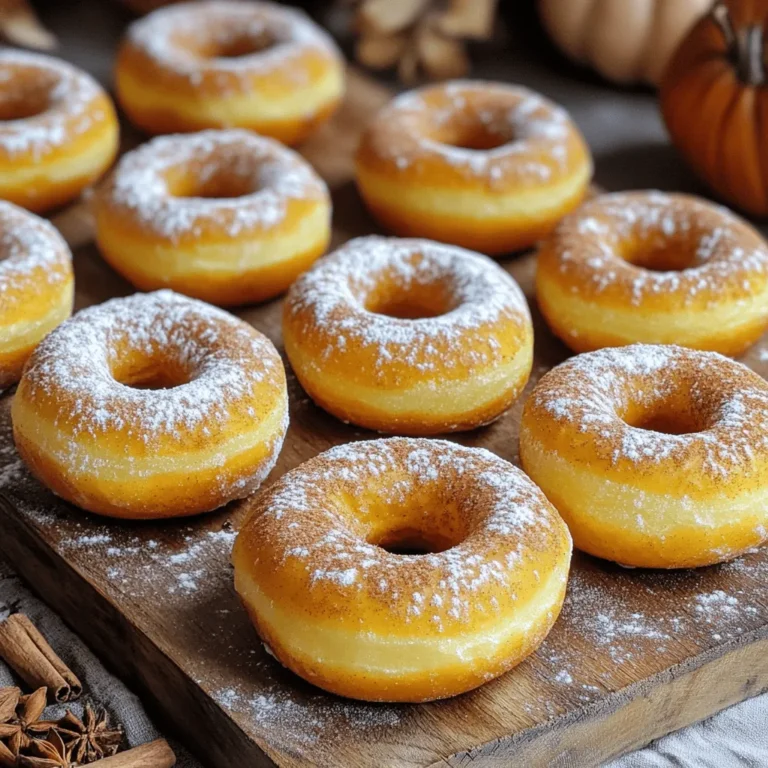
Pumpkin Spice Baked Donuts Tasty Fall Treats
Summer Shrimp Tostadas with Guacamole Salsa Recipe
Pumpkin Spice Baked Donuts Delightful Fall Treat
Cheesy Parmesan Chicken Bombs Irresistible Flavor Hit
Delicious Apple Crumb Muffins Easy and Flavorful Treat
Creamy Vegetable Soup Healthy and Flavorful Recipe
Caramel Apple Cookies Delightful Fall Treat Recipe
Mini Apple Hand Pies Flavorful Homemade Delight
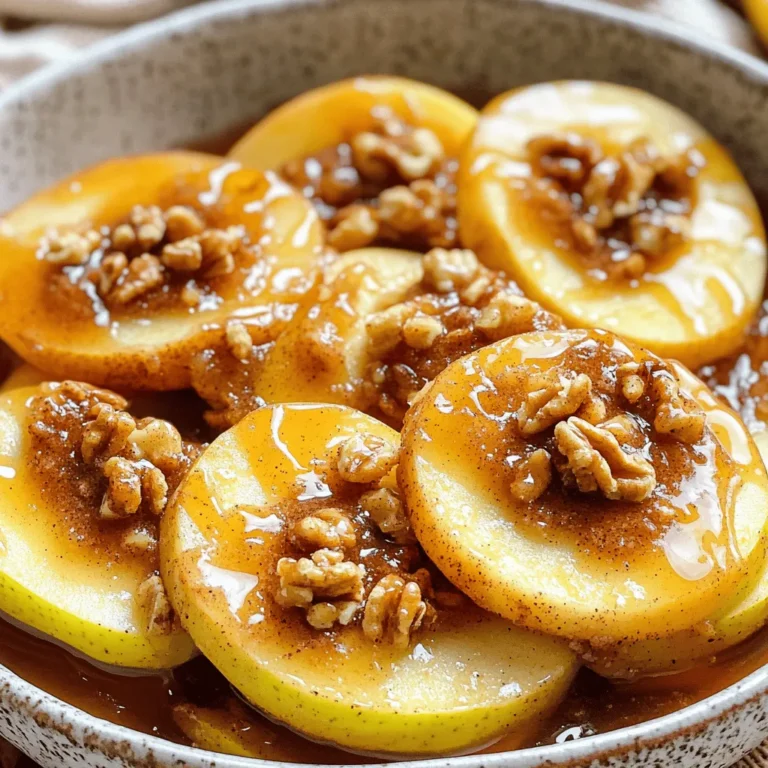
Air Fryer Cinnamon Apples Tasty and Simple Recipe
Page navigation
Previous Page
Previous
1
…
10
11
12
13
14
…
62
Next Page
Next
Home
Dinner
Appetizer
Desserts
Drinks
About
Contact
Privacy Policy
Toggle Menu Close
Search for:
Search


![- 2 cups all-purpose flour - 1 teaspoon baking powder - 1/2 teaspoon baking soda - 1/2 teaspoon salt - 1 teaspoon ground cinnamon - 3/4 cup granulated sugar - 1/2 cup packed brown sugar - 1/2 cup unsalted butter, melted - 2 large eggs, at room temperature - 1 teaspoon pure vanilla extract - 1 cup plain yogurt (or sour cream) - 2 cups apples, peeled and diced (approximately 2 medium apples) - 1/2 cup old-fashioned rolled oats When you measure your ingredients, use proper tools. For dry ingredients, a dry measuring cup is best. Press flour down slightly to avoid gaps. For liquids, use a liquid measuring cup and check at eye level. This ensures you get the right amounts for recipes. Accurate measurements lead to better results. You can switch some ingredients if needed. Use whole wheat flour for a healthier option. If you want a dairy-free muffin, try almond or coconut yogurt instead. Apples are key, but you can use pears or peaches too. For a nutty touch, add chopped walnuts or pecans. Always feel free to adjust! Make sure to check the [Full Recipe] for detailed instructions and baking times! Preheating the Oven Start by preheating your oven to 350°F (175°C). This step is key for even baking. Preparing the Muffin Tin Line a standard muffin tin with paper liners. You can also spray each cup with non-stick cooking spray. This helps the muffins release easily after baking. Dry Mixture Preparation In a large bowl, whisk together 2 cups of all-purpose flour, 1 teaspoon of baking powder, 1/2 teaspoon of baking soda, 1/2 teaspoon of salt, and 1 teaspoon of ground cinnamon. Mix well and set it aside. Sugar and Butter Mixture In another bowl, combine 3/4 cup of granulated sugar, 1/2 cup of packed brown sugar, and 1/2 cup of melted butter. Stir until this mixture is smooth and creamy. Wet and Dry Ingredient Integration Gently pour the sugar-butter mixture into the bowl with the dry ingredients. Use a spatula to mix just until combined. Be careful not to overmix, as this keeps the muffins light and fluffy. Folding in Apples Next, fold in 2 cups of peeled and diced apples. Use a spatula to distribute them evenly without overmixing the batter. Preparing the Crumb Topping In a small bowl, mix 1/2 cup of old-fashioned rolled oats with 1/4 cup of flour, 1/4 cup of brown sugar, and 1/4 cup of melted butter. Blend until it becomes crumbly. This topping adds a nice crunch. Filling Muffin Liners Spoon the muffin batter into the lined muffin cups. Fill each about two-thirds full. This allows room for the muffins to rise while baking. Baking Instructions Place the muffin tin in your preheated oven. Bake for 20 to 25 minutes. To check if they are done, insert a toothpick into the center of a muffin. It should come out clean. These steps will guide you to make delicious apple crumb muffins. For more details, check the Full Recipe. Preventing Overmixing To keep your muffins light, mix gently. After adding the wet ingredients to the dry, stir just until combined. If you see some flour lumps, that’s okay. Overmixing can make your muffins dense, not fluffy. Ensuring Proper Baking Time Baking time is key. Set your timer for 20 minutes. Check doneness by inserting a toothpick in the center. If it comes out clean, they’re ready. If not, check every minute. Be careful not to open the oven too often, as it can affect the rise. Adding a pinch of nutmeg can boost flavor. You might also try mixing in some chopped walnuts or pecans. They add a nice crunch and depth. If you love spice, a dash of ginger pairs well with apple too. Presentation makes your muffins shine. Arrange them on a rustic wooden platter. A light dusting of powdered sugar adds charm. For an extra touch, place slices of fresh apples around the muffins. This creates a warm and inviting look. {{image_4}} Choosing the right apple makes a big difference. Sweet apples like Fuji or Honeycrisp work well. They add a nice balance of flavor. Tart apples like Granny Smith give a refreshing zing. You can mix different apples for a unique taste. This adds layers of flavor to your muffins. Adding nuts or dried fruits can enhance your muffins. Chopped walnuts or pecans add a nice crunch. Dried cranberries or raisins bring a burst of sweetness. Just fold them in with the apples to keep it simple. Consider adding spices for extra flavor. A pinch of nutmeg gives warmth. You can also try cardamom for a unique twist. Just remember to balance the spices so they don’t overpower the apples. You can make these muffins gluten-free. Substitute all-purpose flour with a gluten-free blend. This works well and keeps the texture light. Just ensure your baking powder is gluten-free too. If you want to cut back on sugar, try using applesauce. It keeps the muffins moist and sweet. You can also use less butter or switch to a lighter oil. This way, you enjoy a tasty treat without the guilt. For the complete recipe, check out the Full Recipe section. Store your leftover muffins in an airtight container. This keeps them fresh for up to four days. If you want to keep them longer, consider freezing them. To freeze muffins, let them cool completely. Wrap each muffin in plastic wrap and place them in a freezer bag. They can last up to three months in the freezer. When you're ready to enjoy, just take them out and let them thaw at room temperature. Reheat muffins in the oven for the best taste. Preheat your oven to 350°F (175°C). Place the muffins on a baking sheet and warm them for about 10 minutes. You can also use the microwave. Heat each muffin for about 20-30 seconds. Enjoy them warm for the best flavor! For more details on making these muffins, check out the Full Recipe. You can use sour cream instead of yogurt. It gives a similar texture and flavor. Another option is to use buttermilk, which makes the muffins moist. Yes, you can make mini muffins. Just adjust the baking time to 12-15 minutes. Keep an eye on them, so they don’t overbake. Check for doneness by inserting a toothpick into the center of a muffin. If it comes out clean, they are ready. You can also lightly press the top; it should spring back. These muffins stay fresh for about 3 days at room temperature. Store them in an airtight container to keep them soft. Yes, you can prepare the batter the night before. Cover it and store it in the fridge. When you're ready, bake them fresh in the morning. For the full recipe, check the earlier section. You’ll find all the steps and ingredients needed to make these tasty Apple Crumb Muffins. You now have all the key steps to make delicious Apple Crumb Muffins. We covered ingredients, preparation, and baking instructions to ensure your muffins turn out great. Remember to follow the tips for flavor and presentation. With these easy instructions, you can enjoy warm muffins at home. Whether you share them or keep them all, they are sure to impress. Happy baking!](https://fastmealmate.com/wp-content/uploads/2025/07/c8d25f82-9d23-458d-8a15-e1a22d6eabb0-768x768.webp)
![- 1 tablespoon olive oil - 1 medium onion, finely diced - 2 cloves garlic, minced - 2 medium carrots, peeled and diced - 1 medium zucchini, diced - 1 cup green peas (fresh or frozen) - 1 cup cauliflower florets, chopped - 4 cups vegetable broth - 1 cup coconut milk To make a creamy vegetable soup, start with olive oil, onion, and garlic. The olive oil adds a nice richness. The onion gives a sweet base flavor. Garlic brings a warm, aromatic touch. Next, choose fresh vegetables like carrots, zucchini, and cauliflower. Carrots add sweetness and color. Zucchini brings a mild flavor and a tender texture. Cauliflower gives the soup a creamy feel when blended. For the broth and creaminess, use vegetable broth and coconut milk. Vegetable broth adds depth. Coconut milk makes the soup rich and smooth. Together, these ingredients create a lovely balance of flavors. - 1 teaspoon dried thyme - ½ teaspoon smoked paprika - Salt and freshly ground black pepper to taste - Fresh parsley, chopped (for garnish) Now, season your soup with dried thyme and smoked paprika. Thyme adds a warm herbal note. Smoked paprika gives a hint of smokiness. Use salt and pepper to taste, adjusting as you go. Finally, top your soup with fresh parsley. It adds a pop of color and a fresh taste. This simple garnish makes the soup look inviting and bright. For the complete recipe, check the [Full Recipe]. Start by heating 1 tablespoon of olive oil in a large pot over medium heat. Once the oil is hot, add 1 medium onion, finely diced, and 2 cloves of minced garlic. Sauté these for about 3-4 minutes. Keep stirring until the onion is soft and clear. This step builds a strong flavor base for your soup. Next, add 2 medium carrots, peeled and diced, along with 1 medium zucchini, diced, and 1 cup of chopped cauliflower florets. Cook these vegetables for an additional 5 minutes. Stir often until they begin to soften. This mix of veggies adds color and nutrition to your dish. Now, pour in 4 cups of vegetable broth. This broth acts as the heart of the soup. Add 1 cup of green peas, 1 teaspoon of dried thyme, and ½ teaspoon of smoked paprika. Bring this mixture to a boil. After it boils, lower the heat and let it simmer uncovered for about 15 minutes. The goal is to cook until all the vegetables are tender and full of flavor. Once the soup has simmered, remove it from the heat. Use an immersion blender to carefully purée the soup until it is smooth and creamy. If you prefer, you can also transfer the soup in batches to a countertop blender. Blend until the mixture is silky. This step is key for achieving that creamy texture we all love. Return the pot to low heat. Now, stir in 1 cup of coconut milk. This ingredient adds a rich creaminess and a hint of sweetness. Season the soup with salt and freshly ground black pepper to taste. Gently warm the soup for about 5 minutes. This will make sure everything is hot without boiling. Serve the soup hot in bowls. Garnish with fresh chopped parsley for a pop of color. Enjoy your creamy vegetable soup, made with love and fresh ingredients! For the complete recipe, check out the Full Recipe section. Choosing the right vegetables is key to great flavor. I love using fresh carrots, zucchini, and cauliflower. Each adds a unique taste. You can also add sweet potatoes or bell peppers for a twist. Always pick vegetables that are in season. They taste better and have more nutrients. Adjusting the creaminess level is easy. For a lighter soup, use less coconut milk. If you like it rich, add more. You can also blend in some white beans for extra creaminess without extra calories. Garnishing the soup makes it look stunning. I like to sprinkle fresh parsley on top. It adds a pop of color and fresh taste. You can also drizzle a bit of coconut milk for a fancy touch. Serving suggestions are just as important. A slice of crusty bread pairs well with the soup. You can also serve it with a side salad. This makes for a filling meal. For the full recipe, check out the complete guide! {{image_4}} You can change your creamy vegetable soup by using different veggies. Try seasonal vegetables for fresh flavors. For spring, add asparagus or green beans. In summer, use ripe tomatoes and corn. In fall, butternut squash and sweet potatoes shine. You can also experiment with bases. Instead of coconut milk, try almond milk for a nutty twist. This gives the soup a different taste and texture. Each change brings a new layer of flavor to your soup. Adding protein can make your soup heartier. Beans and lentils are great options. They add fiber and keep you full. For example, black beans or chickpeas blend well with the soup. You can add them when you simmer the broth. Another option is chicken or sausage. Cooked chicken pieces are tasty and satisfying. If you like sausage, slice it and sauté it with the onions. This adds a savory kick to the soup. Enjoy making it your own! Check out the Full Recipe for more ideas. To keep your creamy vegetable soup fresh, allow it to cool before storing. Place it in airtight containers to avoid air exposure. This helps maintain its flavor and texture. Store the soup in the fridge for up to three days. If you want to keep it longer, freezing is a great option. For freezing, use freezer-safe containers or bags. Make sure to leave some space for expansion. The soup can last up to three months in the freezer. When reheating the soup, you want to keep it creamy. The best method is to use the stove over low heat. Stir it gently to avoid burning. If you want to use the microwave, do so in short bursts. Stir the soup in between each burst to ensure even heating. To prevent separation, add a splash of water or vegetable broth if it thickens too much. This keeps the texture smooth and enjoyable. Can I make creamy vegetable soup vegan? Yes, you can easily make this soup vegan. Just use vegetable broth and coconut milk. Skip any dairy products. How do I make the soup spicier? To add heat, sprinkle in red pepper flakes or cayenne pepper. You can also add fresh jalapeños for a kick. What are the best side dishes to serve with the soup? Serve the soup with crusty bread, a fresh salad, or grilled cheese. These pair well and add more flavor. What to do if the soup is too thick? If your soup is too thick, add more vegetable broth. Stir well to combine and adjust until you reach your desired texture. How can I add more flavor? For extra flavor, try adding herbs like basil or dill. A splash of lemon juice can also brighten the taste. If you want, use the Full Recipe to explore more options. This blog post covered how to make a creamy vegetable soup from scratch. We explored essential ingredients like olive oil, fresh veggies, and broth. You learned step-by-step instructions, from sautéing to blending the soup. Tips for perfecting flavor and presentation will enhance your dish. Remember, you can change the recipe to suit your taste and store leftovers for later. With this knowledge, you can create a warm, comforting dish that you and others will enjoy. Happy cooking!](https://fastmealmate.com/wp-content/uploads/2025/07/74153262-6d82-4db7-a8c8-a4016c29ccdc-768x768.webp)
![Caramel apple cookies blend sweet apples and rich caramel in a soft cookie. This recipe makes about 24 cookies. You will love the warm flavors of fall in every bite. - 1 cup unsalted butter, softened to room temperature - 1 cup packed brown sugar - 1/2 cup granulated sugar - 2 large eggs - 1 teaspoon pure vanilla extract - 2 1/4 cups all-purpose flour - 1 teaspoon baking soda - 1/2 teaspoon fine sea salt - 1 teaspoon ground cinnamon - 1 cup fresh apples, diced (peeled and cored) - 1/2 cup caramel sauce (plus extra for drizzling) - 1/2 cup chopped walnuts or pecans (optional) - A pinch of sea salt for garnish You can customize your cookies! Try adding chocolate chips for extra sweetness. Use almond flour for a gluten-free option. If you want a nut-free treat, skip the walnuts or pecans. You can even swap the apples for pears for a unique twist. Enjoy experimenting! Start by preheating your oven to 350°F (175°C). This helps the cookies bake evenly. Next, line a baking sheet with parchment paper. This step prevents the cookies from sticking. In a large bowl, cream together one cup of softened butter, one cup of packed brown sugar, and half a cup of granulated sugar. Use an electric mixer on medium speed until the mix is light and fluffy. Next, add two large eggs. Beat them in one at a time. After that, stir in one teaspoon of pure vanilla extract until it blends in well. In another bowl, whisk together two and a quarter cups of all-purpose flour, one teaspoon of baking soda, half a teaspoon of fine sea salt, and one teaspoon of ground cinnamon. Gradually sift the dry mix into the wet mix. Stir gently until just combined. Be careful not to overmix; this keeps the cookies soft. Now, fold in one cup of diced apples and half a cup of caramel sauce. If you like, add half a cup of chopped walnuts or pecans too. Using a tablespoon or a cookie scoop, drop rounded portions of dough onto the prepared baking sheet. Leave about two inches between each cookie to allow for spreading. Place the baking sheet in the preheated oven. Bake the cookies for 10 to 12 minutes. Keep an eye on them. The edges should turn lightly golden, while the centers may look slightly underbaked. They will set as they cool. Once baked, remove the cookies from the oven. Let them cool on the baking sheet for about five minutes. After that, transfer the cookies to a wire rack to cool completely. For a delightful finish, drizzle extra caramel sauce over the cookies. Sprinkle a tiny pinch of sea salt on top of each one to enhance the flavor. This recipe makes about 24 cookies. Enjoy every bite of your caramel apple cookies! For a full recipe, check out the [Full Recipe]. To get the best texture in your caramel apple cookies, use softened butter. This helps create a nice, soft dough. Mix well but don’t overdo it. Overmixing can lead to tough cookies. When you add the apples, make sure they are diced small, so they blend into the dough. Avoid adding too much caramel sauce; it can make the dough too wet. For making these cookies, you need a few simple tools: - Mixing bowls - Electric mixer - Baking sheets - Parchment paper - Cookie scoop or tablespoon - Wire rack for cooling Using the right tools will make the process easier and more fun. One common mistake is not measuring ingredients correctly. Use proper measuring cups and spoons. Another mistake is baking cookies at the wrong temperature. Always preheat your oven before baking. Watch the cookies closely in the oven. If you take them out too soon, they may fall apart. If you leave them too long, they can get hard. Follow the Full Recipe carefully for the best results. {{image_4}} You can switch up the flavors in your caramel apple cookies. Try adding: - 1/2 cup of chocolate chips for a sweet touch. - 1 teaspoon of nutmeg for a warm spice flavor. - A splash of maple syrup for a unique twist. Experimenting helps you discover new favorites! Want to make these cookies fit your needs? Here are simple swaps: - For gluten-free cookies, use a 1:1 gluten-free flour blend. - To make them vegan, replace the butter with coconut oil and the eggs with flax eggs. - Substitute the caramel sauce with homemade date caramel for a healthy option. These swaps keep the taste delicious while catering to different diets. Make your cookies shine each fall! Add these seasonal spices: - A teaspoon of pumpkin spice for a cozy flavor. - A hint of ginger for a warm, zesty kick. - Chopped pecans or walnuts for a crunch that complements the apples. These twists make your caramel apple cookies perfect for any autumn gathering. For the full recipe, check out the earlier section! To keep your caramel apple cookies fresh, store them properly. Use an airtight container to keep out air and moisture. Place parchment paper between layers to prevent sticking. Store them at room temperature for up to one week. If you want to enjoy them longer, consider freezing them. Freezing your cookies is simple. Wait until they cool completely. Then, wrap them tightly in plastic wrap or foil. Place them in a freezer-safe bag. You can freeze them for up to three months. When you're ready to eat, just thaw them at room temperature. To regain that fresh-baked taste, reheat your cookies. Preheat your oven to 350°F (175°C). Place the cookies on a baking sheet. Heat for about 5 to 7 minutes. Check to avoid overbaking. The cookies should feel warm and soft again. Enjoy them warm with a drizzle of caramel sauce for a delightful touch! To make your caramel apple cookies chewy, focus on a few key steps. First, use brown sugar in your dough. Brown sugar has molasses, which adds moisture. Second, do not overmix the dough. Overmixing can make cookies tough. Third, underbake them slightly. When you take them out, they should look set but soft in the middle. They will continue to cook as they cool. This will give you that perfect chewy texture that you crave. Yes, you can make the dough ahead of time! Just prepare the dough as you normally would. After mixing, cover it tightly with plastic wrap or place it in an airtight container. You can store it in the fridge for up to 2 days. When ready to bake, let it sit at room temperature for about 10-15 minutes before scooping and baking. This makes it easy to enjoy fresh cookies whenever you want. Caramel apple cookies pair well with several treats. A scoop of vanilla ice cream adds creaminess and balances the sweet flavors. You can also serve them with warm caramel sauce for dipping. For a cozy touch, try them with a cup of hot apple cider. This drink brings out the fall flavors and makes for a delightful combination. You can get the full recipe for these tasty cookies to impress your friends and family. This post covered how to make delicious caramel apple cookies. We went through essential ingredients, preparation, and baking. I shared tips to avoid common mistakes and variations for your tastes. You learned how to store and reheat these cookies for the best flavor. With simple steps, you can bake a treat that impresses everyone. Enjoy experimenting with different flavors and adjustments. Happy baking!](https://fastmealmate.com/wp-content/uploads/2025/07/9c1a808e-f093-4e89-97b6-472e42d8d3a6-768x768.webp)