Taco Dip with Ground Beef Delicious and Easy Recipe

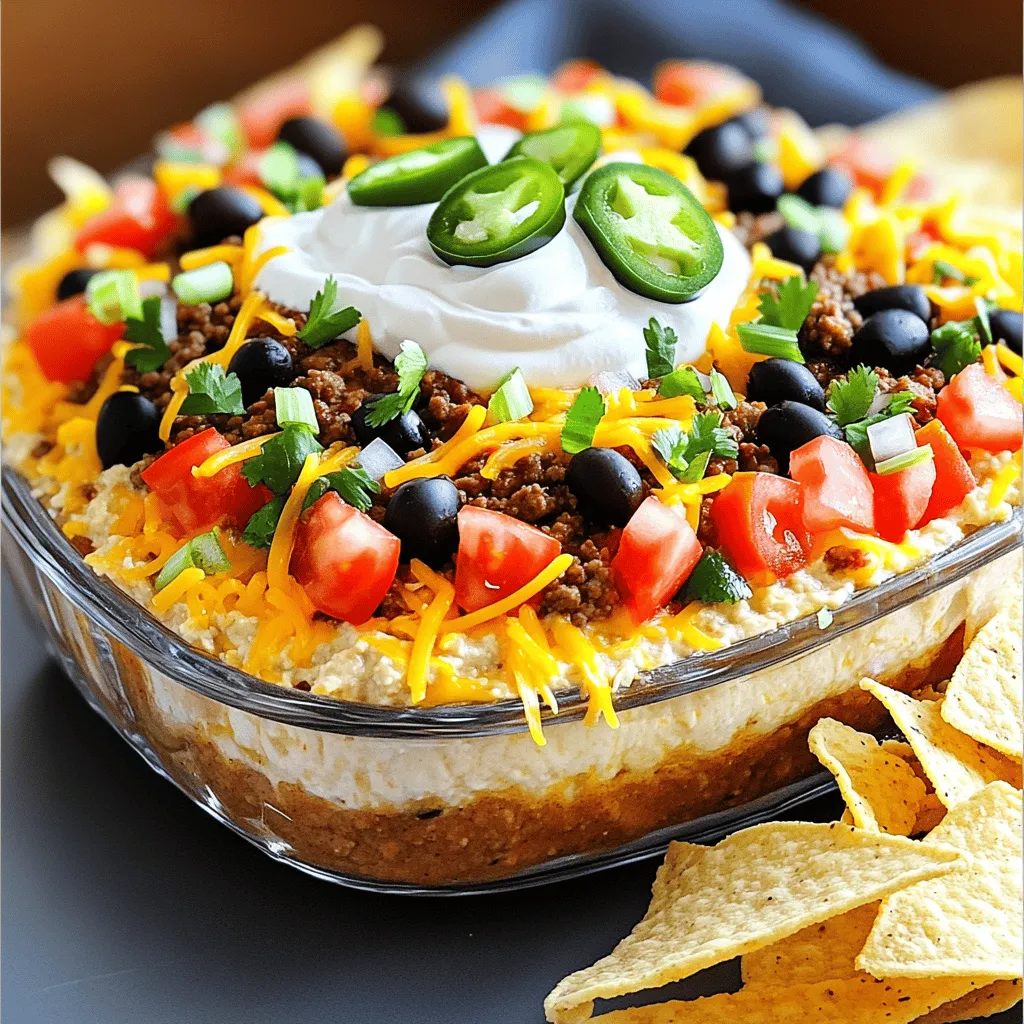
Looking for a tasty and easy snack for your next gathering? This Taco Dip with Ground Beef recipe is sure to impress! It combines flavorful ground beef, creamy layers of beans and cheese, and fresh toppings for a delicious appetizer. With just a few simple steps, you can whip up a crowd-pleaser in no time. Let’s dive into this recipe that’s perfect for game nights or casual get-togethers!
Ingredients
Main Ingredients
– 1 pound ground beef
– 1 packet taco seasoning
– 1 can (15 oz) refried beans
– 1 cup sour cream
– 1 cup shredded cheddar cheese
Topping Ingredients
– 1 cup diced tomatoes (fresh or canned)
– 1/2 cup black olives, sliced
– 1/2 cup green onions, finely chopped
– 1 jalapeño, sliced (optional)
For Serving
– Tortilla chips for serving
When deciding on the ingredients for my taco dip, I always start with ground beef. It gives a rich flavor. I like to use a good taco seasoning packet to keep things easy. Refried beans add a smooth base and pack in more taste. Sour cream is a must for that creamy layer. I love to sprinkle shredded cheddar cheese on top for a warm, melty finish.
For the toppings, I enjoy fresh diced tomatoes to add color and freshness. Black olives give a salty crunch, while green onions add a nice bite. If you like heat, add sliced jalapeños for a spicy kick.
Finally, don’t forget the tortilla chips! They are key for dipping and enjoying every layer of this dip.
Step-by-Step Instructions
Cooking the Ground Beef
– Heat a large skillet over medium heat.
– Brown the ground beef for 7-10 minutes.
Start by taking a large skillet. Set it on medium heat. Once hot, add the ground beef. Use a wooden spoon to break it apart as it cooks. You want it to turn brown and lose its pink color. This takes about 7 to 10 minutes. If you see a lot of grease, drain it off. This keeps the dip from being greasy.
Once the beef is browned, sprinkle the taco seasoning on top. Add the water the packet says to use, usually about 1/2 cup. Stir it well and let it simmer for a few minutes. This thickens the mix and brings out the great taco flavor. Remove it from heat and let it cool a bit.
Layering the Dip
– Spread refried beans on the bottom layer.
– Add the ground beef mixture on top.
Grab a 9×13 inch baking dish. Take the refried beans and spread them evenly on the bottom. Use a spatula to smooth them out. This forms a nice base for the dip.
Next, take the ground beef mixture and carefully layer it over the beans. Make sure to cover the beans entirely. This keeps the flavors together and makes every bite tasty.
Adding Toppings
– Spoon sour cream and sprinkle cheese.
– Layer diced tomatoes, olives, and green onions.
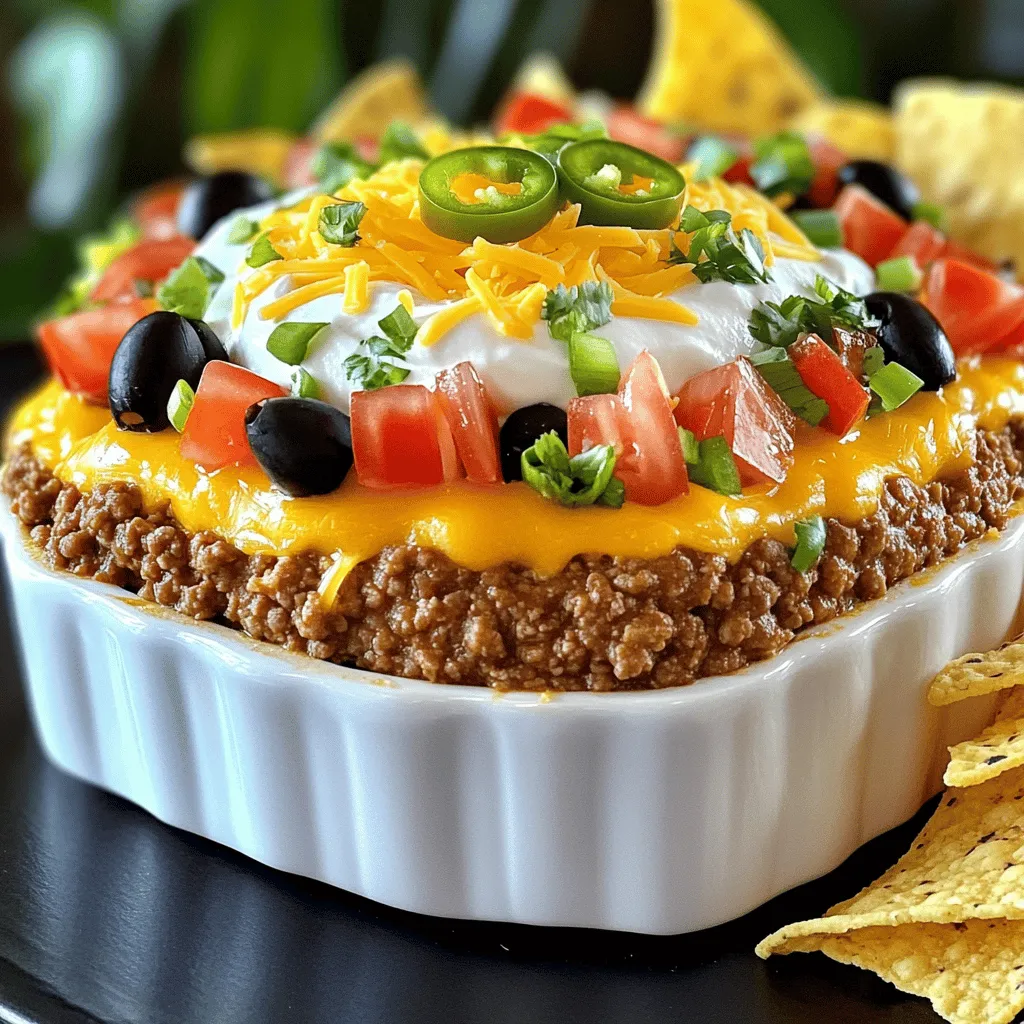
Now it’s time for the fun part! Spoon the sour cream over the beef layer. Spread it out evenly with your spatula. This adds a creamy texture that everyone loves.
Next, sprinkle a generous amount of shredded cheddar cheese on top. This cheese will melt slightly and add a rich flavor.
After the cheese, it’s time to add the fresh diced tomatoes. Layer them evenly across the top. Then, add the sliced black olives and finely chopped green onions. These give your dip extra color and a bit of crunch.
If you like some heat, add sliced jalapeños on top. They give a zesty finish.
To make it even better, cover the dip with plastic wrap. Chill it in the fridge for at least 30 minutes. This step lets all the flavors mix and taste even better. When you serve it, pair the dip with crispy tortilla chips for a perfect snack.
Tips & Tricks
Perfecting Flavor
Chill your dip for 30 minutes before serving. This step helps the flavors mix. Consider adding fresh herbs like cilantro or parsley on top. They add a pop of color and flavor.
Equipment Recommendations
Use a 9×13 inch baking dish for even layering. This size allows you to spread each layer nicely. A spatula is very helpful for spreading ingredients. It ensures the dip looks great.
Serving Suggestions
Pair your taco dip with different tortilla chips or fresh veggies. Crunchy chips add texture, while veggies bring freshness. For extra flair, garnish with sliced jalapeños or fresh cilantro. They brighten up the dish and add flavor.

Variations
Dietary Substitutions
You can make simple swaps to fit your needs. For a lighter option, use ground turkey or chicken instead of beef. This change keeps the flavor but cuts calories. Another great swap is to replace sour cream with Greek yogurt. It adds protein and tang without extra fat.
Spice Level Adjustments
Want more heat? Add more jalapeños or a dash of hot sauce. These small changes can really kick up the flavor. You can also include a layer of spicy cheese for extra kick. Pepper jack cheese works great here and melts beautifully.
Theme Variations
Feel like mixing it up? Create a Tex-Mex version by adding avocado and corn. The creamy avocado and sweet corn balance the spice nicely. For a vegetarian option, use black beans instead of beef. This keeps it hearty while being meat-free.
Storage Info
Proper Storage Techniques
To keep your taco dip fresh, store leftovers in an airtight container. This helps prevent it from drying out. You can keep it in the fridge for up to three days. If you notice any separation or change in texture, give it a good stir before serving.
Freezing Instructions
You can freeze taco dip both before and after layering. If you freeze it before layering, make sure to wrap it well. If it’s already layered, cover it tightly with plastic wrap. To use, thaw it overnight in the refrigerator before serving. This keeps the flavors bright and delicious.
Reheating Guidelines
To reheat the taco dip, use the microwave or oven. Heat until it’s warm throughout, but avoid overheating. Overheating can change the dip’s texture and make it less enjoyable. Stir it gently while reheating to ensure even warmth. Enjoy your tasty taco dip!
FAQs
Can I make Taco Dip in advance?
Yes, preparing it a day ahead enhances the flavor. The longer it sits, the more the tastes blend. Just cover it well and chill in the fridge.
What can I substitute for ground beef?
Ground turkey, chicken, or plant-based alternatives work well. These options provide the same texture and flavor. You can choose what fits your diet best.
Is Taco Dip gluten-free?
It can be gluten-free if you use certified gluten-free seasoning and chips. Always check the labels to ensure no hidden gluten. This makes it safe for those with gluten sensitivities.
How long does Taco Dip last in the fridge?
It lasts about 3 days when stored properly in an airtight container. Make sure to seal it tightly to keep it fresh. If it smells off or looks strange, it’s best to toss it.
This taco dip recipe combines simple ingredients and easy steps to create a tasty dish. You can mix ground beef, refried beans, cheese, and fresh toppings for great flavors. Use my tips to adjust spice levels or make healthier swaps.
By following my storage advice, your leftovers will stay fresh longer. Enjoy serving this dip at your next gathering, or savor it as a tasty snack at home. Dive in and make your version today!


![To make a classic Italian zucchini pasta casserole, you will need the following ingredients: - 3 medium zucchinis, sliced into thin, even rounds - 2 cups cooked pasta (choose your favorite like penne or fusilli) - 1 cup marinara sauce (preferably homemade or high-quality store-bought) - 1 cup creamy ricotta cheese - 1 cup shredded mozzarella cheese, plus extra for topping - 1/2 cup grated Parmesan cheese - 1 large egg, lightly beaten - 2 cloves garlic, minced - 1 teaspoon dried oregano - 1 teaspoon dried basil - Sea salt and freshly cracked black pepper, to taste - Olive oil, for drizzling and greasing - Fresh basil leaves, for garnish Each ingredient plays a key role in building flavor and texture. The zucchini adds a fresh crunch, while the pasta provides a hearty base. The cheeses bring creaminess and richness. Marinara sauce ties everything together with its robust flavor. When I make this dish, I focus on using fresh ingredients. It makes a big difference. Quality marinara or homemade sauce enhances the taste. I also love to mix different cheeses for added depth. You can switch up the cheeses based on your preference. Using good olive oil is essential for greasing the dish and drizzling on top. It adds a lovely finish. As for herbs, oregano and basil deliver classic Italian flavor. Feel free to personalize this recipe. Adjust the seasonings to suit your taste. This dish is forgiving, making it easy to put your spin on it. For the full recipe, check out the complete instructions. 1. Preheating the Oven and Sautéing Zucchini - First, set your oven to 375°F (190°C). This temperature works well for baking. - Next, grab a skillet and drizzle some olive oil into it. Heat it over medium heat. - Add the sliced zucchinis and minced garlic to the skillet. Sauté them for about 5-7 minutes. - Keep stirring until the zucchinis become soft and slightly golden. - Season with sea salt, black pepper, oregano, and basil. This adds a punch of flavor. - Once done, remove the skillet from the heat and let it cool for a few moments. 2. Mixing Ingredients for the Casserole - While the zucchini cools, take a large mixing bowl and combine the cooked pasta, marinara sauce, ricotta cheese, and the lightly beaten egg. - Add half of the mozzarella and half of the Parmesan cheese to the bowl. - Stir everything together until well mixed. This will create a creamy base. - Now, gently fold the sautéed zucchini into the pasta mixture. Make sure it blends without mashing the veggies. 1. Assembling the Casserole - Grease a 9x13 inch baking dish with olive oil. This keeps the casserole from sticking. - Pour the pasta and zucchini mixture into the greased dish. Spread it out evenly with a spatula. - To finish, sprinkle the remaining mozzarella and Parmesan on top. This creates a cheesy crust. 2. Baking and Best Practices - Cover the dish tightly with aluminum foil and place it in the preheated oven. - Bake for 20 minutes. This helps all the flavors mix well. - After 20 minutes, carefully take off the foil. Bake for another 10-15 minutes. Watch for the cheese to melt and turn golden brown. - Once it’s done, remove the casserole from the oven. Let it cool for a few minutes before serving. - For a lovely touch, garnish with fresh basil leaves. This adds color and flavor to your dish. For the complete recipe, refer to [Full Recipe]. - Seasoning Suggestions: I love using fresh herbs. Basil and oregano add a lovely taste. Don’t forget to season with sea salt and black pepper. These simple touches make a big difference. Consider adding a pinch of red pepper flakes for a bit of heat. - Achieving the Perfect Cheese Crust: To get that golden crust, use a mix of mozzarella and Parmesan on top. When you bake the casserole, keep it covered for the first part of cooking. This helps the cheese melt nicely. Uncover it towards the end to allow browning. - Sautéing Tips: When sautéing zucchini, cut it into thin, even rounds. This ensures even cooking. Don’t overcrowd the pan; this can lead to steaming instead of browning. Give them enough space to caramelize. - Alternative Pasta Cooking Methods: You can use different pasta shapes, like penne or fusilli. You don’t need to cook it all the way. Make it al dente, as it will cook more in the oven. This keeps the pasta from getting mushy in the casserole. Make sure to check out the Full Recipe for all the steps and details! {{image_4}} Different Cheese Options Cheese makes this dish rich and creamy. You can swap ricotta for cottage cheese if you like. For a sharper taste, use aged provolone or gouda. If you want a bit of tang, try feta cheese. Each cheese brings its unique flavor to the casserole. Meat Additions and Alternatives For meat lovers, ground beef or turkey can add protein. Cook the meat first and mix it with the pasta. If you prefer a lighter option, add cooked chicken or sausage. You can also use plant-based meats for a tasty, hearty dish. Gluten-Free Options To make this casserole gluten-free, choose gluten-free pasta. Many brands offer great options that hold up well in baking. Just check the package for cooking times to ensure perfect texture. Vegan Adaptations For a vegan version, swap all cheeses for cashew cream or tofu ricotta. You can also use a flax egg instead of the beaten egg for binding. Use your favorite marinara sauce that is dairy-free, and you’ll have a delicious vegan casserole. Experimenting with these swaps and modifications can make the Classic Italian Zucchini Pasta Casserole fit any diet or taste. For the full recipe, check out the details above. After enjoying your Classic Italian Zucchini Pasta Casserole, let’s talk storage. First, cool the casserole completely. This helps prevent condensation, which can make it soggy. Once cool, place leftovers in an airtight container. Store them in the fridge for up to three days. If you want to save it for longer, freezing works too. Cut the casserole into portions. Wrap each slice tightly in plastic wrap, then place them in a freezer-safe bag. This way, you can enjoy it for up to three months. When ready to enjoy your casserole again, reheating is key. The best method is using an oven. Preheat it to 350°F (175°C). Place the casserole in a baking dish and cover it with foil. Heat for 20-25 minutes. This helps keep the texture nice and creamy. If you’re in a hurry, a microwave works too. Use a microwave-safe plate and cover it with a damp paper towel. Heat in short bursts, stirring in between, until hot. This method may not keep the texture as good as the oven. For the best flavor and texture, always let it cool slightly before serving. Enjoy! Can I use other vegetables? Yes, you can use other veggies. Try bell peppers, spinach, or mushrooms. Just chop them small so they cook well. Mixing different vegetables adds flavor and color to your dish. How to make it ahead of time? You can make this casserole a day ahead. Just prepare it like normal, but do not bake it. Cover it and store it in the fridge. When ready, bake it as instructed, adding a few extra minutes if needed. What types of pasta work best? I love using penne or fusilli for this dish. Both types hold sauce well and stay firm while baking. You can also use gluten-free pasta if you prefer. How long can it be stored in the fridge? You can keep leftovers in the fridge for about three days. Make sure to cover it well. To reheat, just warm it in the oven or microwave until hot. Recommended Side Dishes Serve this casserole with a fresh salad or garlic bread. A simple mixed greens salad adds a crisp touch. Garlic bread brings a nice crunch and flavor. Pairing Wine with Casserole A light red wine like Chianti pairs well with this dish. It balances the flavors of the zucchini and cheese. If you prefer white, try a crisp Pinot Grigio. How to Garnish and Serve Garnish with fresh basil leaves for a pop of color. You can also sprinkle extra Parmesan on top before serving. This adds flavor and looks great on the table. For the full recipe, check the details above. Enjoy your cooking! In this blog post, we explored a delicious zucchini pasta casserole. We covered ingredients like zucchini, pasta, marinara, and various cheeses. You learned step-by-step instructions for preparation and baking. We included helpful tips for flavor and texture enhancement. You also discovered variations to suit different diets and preferences. In closing, this casserole is versatile and easy to make. Enjoy the cooking process and share it with loved ones.](https://fastmealmate.com/wp-content/uploads/2025/07/1e9eddde-dee0-4a9c-92bd-9b0350c13af8-768x768.webp)