Summer Zucchini Quinoa Casserole Flavorful and Fresh
 to guide you through each step. - Preheat your oven to 375°F (190°C). - Rinse and prepare the quinoa and vegetables. To start, turn on your oven and set it to 375°F (190°C). This step ensures your oven is hot and ready when it’s time to bake. While it heats, take one cup of quinoa and rinse it under cool water. This helps remove any bitterness. Next, chop your zucchinis and bell pepper. Dice the zucchini into small cubes and chop the bell pepper into bite-sized pieces. Don’t forget to finely dice one small onion and mince three cloves of garlic. - Sauté onion and garlic in olive oil until translucent. - Add zucchini and bell pepper, cooking until softened. Next, grab a medium saucepan. Add one tablespoon of olive oil and heat it over medium. Once the oil is warm, toss in your diced onion and minced garlic. Stir them for about 3-4 minutes. You want the onion to turn translucent and smell great. After that, add the diced zucchini and chopped bell pepper. Cook these veggies for around 5 minutes, stirring often. They should soften but still have a little crunch. - Mix in quinoa, cherry tomatoes, broth, and seasonings. - Transfer to a casserole dish and bake for 20-25 minutes. Now comes the fun part! Mix in your rinsed quinoa, one cup of halved cherry tomatoes, and two cups of vegetable broth into the pan. Add one teaspoon of dried oregano, one teaspoon of dried basil, and sprinkle salt and pepper to taste. Stir everything well to combine. Bring this mix to a gentle boil. Once it bubbles, reduce the heat to low, cover the pan, and let it simmer for 15 minutes. This allows the quinoa to absorb the broth. Once done, transfer the mixture into a lightly greased 9x13 inch casserole dish. If you love cheese, sprinkle one cup of shredded mozzarella on top. Place the dish in your preheated oven and bake for 20-25 minutes. You’ll know it’s ready when it bubbles and the cheese is golden brown. To make fluffy quinoa, rinse it well before cooking. This removes the bitter coating called saponin. Use two cups of vegetable broth for one cup of quinoa. Bring it to a boil, then lower the heat and cover. Let it simmer for 15 minutes. After cooking, let it rest for five minutes before fluffing with a fork. This will keep it light and airy. For the vegetables, sauté onion and garlic first in olive oil. Cook them until they are soft and fragrant. Then add zucchini and bell pepper. Stir them for about five minutes until they soften. This builds a great flavor base for your casserole. To elevate the dish, try adding a pinch of red pepper flakes for heat. Fresh herbs like thyme or parsley can add brightness. You can also swap out the dried oregano and basil for fresh herbs. Fresh herbs bring a stronger flavor. If you want to change ingredients, use brown rice instead of quinoa. You can also add cooked beans for a protein boost. For a creamier texture, mix in some ricotta cheese or yogurt before baking. Pair the casserole with a light side salad or some crusty bread. A fresh garden salad with lemon vinaigrette works well. It adds a nice contrast to the warm casserole. For gatherings, serve the casserole directly from the dish. Garnish with fresh basil leaves to make it look inviting. You can also sprinkle some extra cheese on top just before serving for a melty touch. {{image_4}} You can easily change the vegetables in this casserole. Try using bell peppers, spinach, or even eggplant. These swaps keep the dish vibrant and fresh throughout the summer. You can also mix in seasonal veggies like corn or cherry tomatoes for a burst of flavor. If you need a quinoa substitute, consider using brown rice or farro. These grains add a nice texture and flavor. Other options include couscous or even cauliflower rice for a low-carb choice. To make this casserole vegan, simply skip the cheese or use a plant-based cheese. You'll still get a creamy texture from the cooked veggies and broth. For a gluten-free option, use certified gluten-free quinoa. This way, everyone can enjoy the dish. If you're looking to cut calories, reduce the olive oil or skip the cheese. You can also use less quinoa and bulk up with more veggies. This keeps the dish light, tasty, and full of nutrients. Each of these variations allows you to enjoy this Summer Zucchini Quinoa Casserole in your own way. For the full recipe, check out the detailed instructions above. To keep your summer zucchini quinoa casserole fresh, first let it cool. Once cool, store it in an airtight container. You can refrigerate it for up to five days. If you want to save it for later, freeze it. Use a freezer-safe container or heavy-duty freezer bags. This way, it can last for up to three months. Remember to label the container with the date. This helps you track how long it has been stored. When you want to enjoy the casserole again, reheating is easy. For the best texture, use an oven. Preheat the oven to 350°F (175°C). Place the casserole in an oven-safe dish and cover it with foil. Heat for about 20 minutes or until warm. If you're in a hurry, you can use the microwave. Place a single serving in a microwave-safe dish. Heat for 1-2 minutes, checking every 30 seconds. This will keep the flavors and texture intact. Enjoy your delicious meal! Can I prepare the Summer Zucchini Quinoa Casserole in advance? Yes, you can prepare it ahead of time. Make the casserole, then cover and refrigerate it. When you're ready to eat, just bake it straight from the fridge. You may need to add a few more minutes to the cooking time. How to customize the recipe to suit my taste preferences? Feel free to swap out the veggies. For instance, you can use spinach, carrots, or even corn. You can also change the cheese or add some cooked chicken for extra protein. What are the best herbs to use for added flavor? Fresh herbs like basil and thyme work great. You can also try parsley or cilantro. These herbs add a fresh taste and brighten up your dish. Is this recipe suitable for a low-carb diet? This recipe is not low-carb due to the quinoa. Quinoa has more carbs than other grains but is also high in protein. If you want a lower carb option, you can use cauliflower rice instead of quinoa. What are the main nutritional benefits of zucchini and quinoa? Zucchini is low in calories and high in vitamins A and C. It also has a lot of water, which keeps you hydrated. Quinoa is a complete protein, meaning it has all nine essential amino acids. It’s also high in fiber, which is good for digestion. What should I do if my casserole is too watery? If your casserole is watery, try draining some liquid before baking. You can also bake it longer to help it thicken up. How can I prevent the quinoa from sticking together? To prevent sticking, rinse the quinoa well before cooking. This removes excess starch. Also, fluff the quinoa with a fork after it cooks to keep it separate. For the full recipe, check out the details above! You learned how to make a tasty Summer Zucchini Quinoa Casserole. We covered the ingredients, simple steps, and tips for perfect results. You can adjust the recipe to fit your taste and needs. Explore flavor swaps and storage tips to keep it fresh. With this dish, enjoy a healthy meal that is easy to make. I hope you try it and enjoy every bite!](https://fastmealmate.com/wp-content/uploads/2025/07/552d1654-693f-4b1b-8ee9-d91b85ff9950.webp)
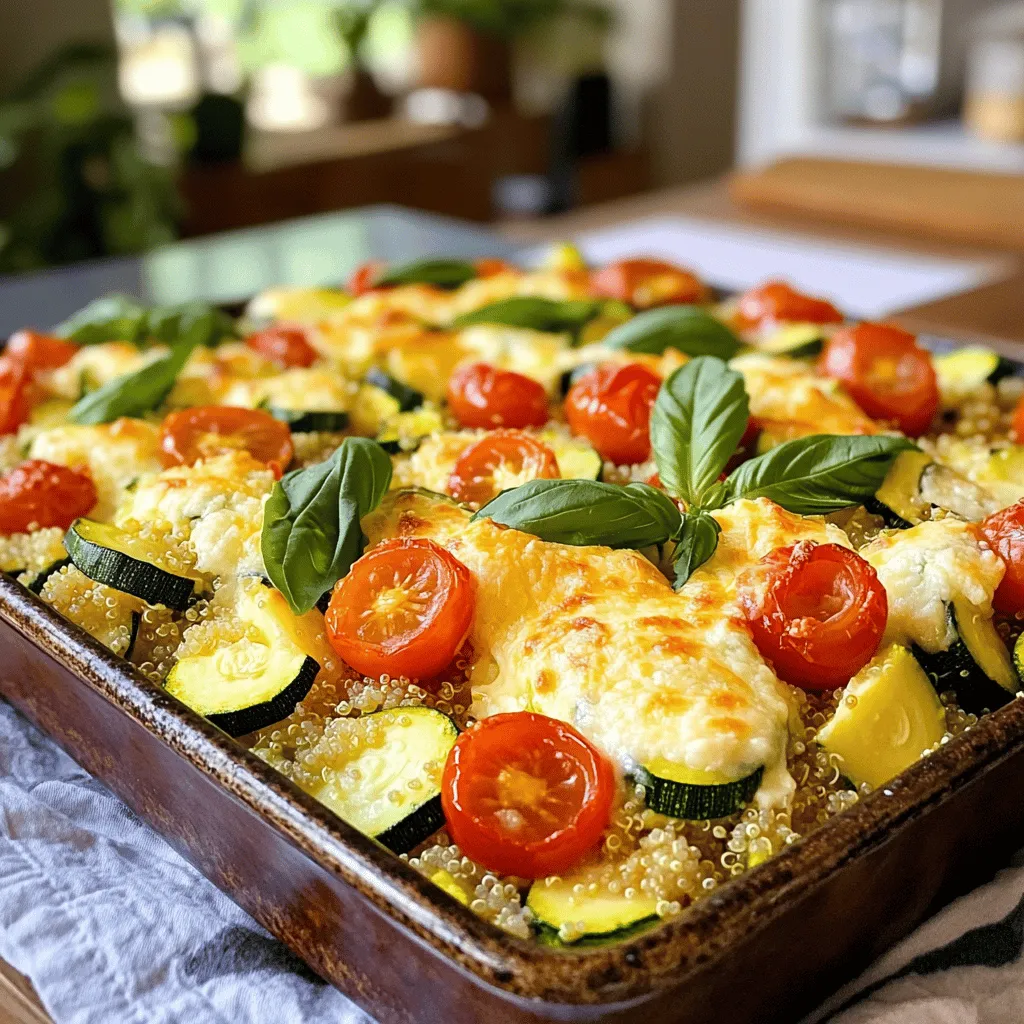
Get ready to enjoy summer’s bounty in a tasty way with my Summer Zucchini Quinoa Casserole. This dish blends fresh zucchinis, vibrant tomatoes, and savory spices with fluffy quinoa, making it a perfect healthy meal. Whether you’re serving a crowd or meal-prepping for the week, you’ll find this recipe easy to follow. Let’s dive into making a colorful and satisfying meal that’s full of flavor and nutrition!
Ingredients
Here are the fresh ingredients you’ll need for a bright and tasty Summer Zucchini Quinoa Casserole:
– 1 cup quinoa, thoroughly rinsed and drained
– 2 medium zucchinis, diced into small cubes
– 1 cup cherry tomatoes, halved
– 1 red or yellow bell pepper, chopped into bite-sized pieces
– 1 small onion, finely diced
– 3 cloves of garlic, minced
– 2 cups vegetable broth
– 1 teaspoon dried oregano
– 1 teaspoon dried basil
– Salt and freshly ground black pepper to taste
– 1 cup shredded mozzarella cheese (optional for a cheesy topping)
– 1 tablespoon olive oil
– Fresh basil leaves for garnish
Each ingredient plays a role in making this dish flavorful. The quinoa serves as a hearty base. Zucchini adds a nice texture and a hint of sweetness. Cherry tomatoes and bell peppers bring bright flavors and color. Onion and garlic add depth, while herbs like oregano and basil elevate the overall taste.
This Summer Zucchini Quinoa Casserole is not just about taste. It is also about health. Quinoa is a great source of protein. Zucchini is low in calories but rich in vitamins. Together, they make a satisfying meal that feels good to eat.
Step-by-Step Instructions
Preparing Your Oven and Ingredients
– Preheat your oven to 375°F (190°C).
– Rinse and prepare the quinoa and vegetables.
To start, turn on your oven and set it to 375°F (190°C). This step ensures your oven is hot and ready when it’s time to bake. While it heats, take one cup of quinoa and rinse it under cool water. This helps remove any bitterness. Next, chop your zucchinis and bell pepper. Dice the zucchini into small cubes and chop the bell pepper into bite-sized pieces. Don’t forget to finely dice one small onion and mince three cloves of garlic.
Cooking the Vegetables
– Sauté onion and garlic in olive oil until translucent.
– Add zucchini and bell pepper, cooking until softened.
Next, grab a medium saucepan. Add one tablespoon of olive oil and heat it over medium. Once the oil is warm, toss in your diced onion and minced garlic. Stir them for about 3-4 minutes. You want the onion to turn translucent and smell great. After that, add the diced zucchini and chopped bell pepper. Cook these veggies for around 5 minutes, stirring often. They should soften but still have a little crunch.
Combining and Baking
– Mix in quinoa, cherry tomatoes, broth, and seasonings.
– Transfer to a casserole dish and bake for 20-25 minutes.
Now comes the fun part! Mix in your rinsed quinoa, one cup of halved cherry tomatoes, and two cups of vegetable broth into the pan. Add one teaspoon of dried oregano, one teaspoon of dried basil, and sprinkle salt and pepper to taste. Stir everything well to combine. Bring this mix to a gentle boil. Once it bubbles, reduce the heat to low, cover the pan, and let it simmer for 15 minutes. This allows the quinoa to absorb the broth. Once done, transfer the mixture into a lightly greased 9×13 inch casserole dish. If you love cheese, sprinkle one cup of shredded mozzarella on top. Place the dish in your preheated oven and bake for 20-25 minutes. You’ll know it’s ready when it bubbles and the cheese is golden brown.
Tips & Tricks
Achieving Perfect Texture
To make fluffy quinoa, rinse it well before cooking. This removes the bitter coating called saponin. Use two cups of vegetable broth for one cup of quinoa. Bring it to a boil, then lower the heat and cover. Let it simmer for 15 minutes. After cooking, let it rest for five minutes before fluffing with a fork. This will keep it light and airy.
For the vegetables, sauté onion and garlic first in olive oil. Cook them until they are soft and fragrant. Then add zucchini and bell pepper. Stir them for about five minutes until they soften. This builds a great flavor base for your casserole.
Flavor Enhancements
To elevate the dish, try adding a pinch of red pepper flakes for heat. Fresh herbs like thyme or parsley can add brightness. You can also swap out the dried oregano and basil for fresh herbs. Fresh herbs bring a stronger flavor.
If you want to change ingredients, use brown rice instead of quinoa. You can also add cooked beans for a protein boost. For a creamier texture, mix in some ricotta cheese or yogurt before baking.
Serving Suggestions
Pair the casserole with a light side salad or some crusty bread. A fresh garden salad with lemon vinaigrette works well. It adds a nice contrast to the warm casserole.
For gatherings, serve the casserole directly from the dish. Garnish with fresh basil leaves to make it look inviting. You can also sprinkle some extra cheese on top just before serving for a melty touch.

Variations
Ingredient Swaps
You can easily change the vegetables in this casserole. Try using bell peppers, spinach, or even eggplant. These swaps keep the dish vibrant and fresh throughout the summer. You can also mix in seasonal veggies like corn or cherry tomatoes for a burst of flavor.
If you need a quinoa substitute, consider using brown rice or farro. These grains add a nice texture and flavor. Other options include couscous or even cauliflower rice for a low-carb choice.
Dietary Considerations
To make this casserole vegan, simply skip the cheese or use a plant-based cheese. You’ll still get a creamy texture from the cooked veggies and broth. For a gluten-free option, use certified gluten-free quinoa. This way, everyone can enjoy the dish.
If you’re looking to cut calories, reduce the olive oil or skip the cheese. You can also use less quinoa and bulk up with more veggies. This keeps the dish light, tasty, and full of nutrients. Each of these variations allows you to enjoy this Summer Zucchini Quinoa Casserole in your own way.
Storage Info
How to Store Leftovers
To keep your summer zucchini quinoa casserole fresh, first let it cool. Once cool, store it in an airtight container. You can refrigerate it for up to five days. If you want to save it for later, freeze it. Use a freezer-safe container or heavy-duty freezer bags. This way, it can last for up to three months. Remember to label the container with the date. This helps you track how long it has been stored.
Reheating Instructions
When you want to enjoy the casserole again, reheating is easy. For the best texture, use an oven. Preheat the oven to 350°F (175°C). Place the casserole in an oven-safe dish and cover it with foil. Heat for about 20 minutes or until warm. If you’re in a hurry, you can use the microwave. Place a single serving in a microwave-safe dish. Heat for 1-2 minutes, checking every 30 seconds. This will keep the flavors and texture intact. Enjoy your delicious meal!
FAQs
Common Questions
Can I prepare the Summer Zucchini Quinoa Casserole in advance?
Yes, you can prepare it ahead of time. Make the casserole, then cover and refrigerate it. When you’re ready to eat, just bake it straight from the fridge. You may need to add a few more minutes to the cooking time.
How to customize the recipe to suit my taste preferences?
Feel free to swap out the veggies. For instance, you can use spinach, carrots, or even corn. You can also change the cheese or add some cooked chicken for extra protein.
What are the best herbs to use for added flavor?
Fresh herbs like basil and thyme work great. You can also try parsley or cilantro. These herbs add a fresh taste and brighten up your dish.
Nutritional Information
Is this recipe suitable for a low-carb diet?
This recipe is not low-carb due to the quinoa. Quinoa has more carbs than other grains but is also high in protein. If you want a lower carb option, you can use cauliflower rice instead of quinoa.
What are the main nutritional benefits of zucchini and quinoa?
Zucchini is low in calories and high in vitamins A and C. It also has a lot of water, which keeps you hydrated. Quinoa is a complete protein, meaning it has all nine essential amino acids. It’s also high in fiber, which is good for digestion.
Troubleshooting
What should I do if my casserole is too watery?
If your casserole is watery, try draining some liquid before baking. You can also bake it longer to help it thicken up.
How can I prevent the quinoa from sticking together?
To prevent sticking, rinse the quinoa well before cooking. This removes excess starch. Also, fluff the quinoa with a fork after it cooks to keep it separate.
You learned how to make a tasty Summer Zucchini Quinoa Casserole. We covered the ingredients, simple steps, and tips for perfect results. You can adjust the recipe to fit your taste and needs. Explore flavor swaps and storage tips to keep it fresh. With this dish, enjoy a healthy meal that is easy to make. I hope you try it and enjoy every bite!
 to guide you through each step. - Preheat your oven to 375°F (190°C). - Rinse and prepare the quinoa and vegetables. To start, turn on your oven and set it to 375°F (190°C). This step ensures your oven is hot and ready when it’s time to bake. While it heats, take one cup of quinoa and rinse it under cool water. This helps remove any bitterness. Next, chop your zucchinis and bell pepper. Dice the zucchini into small cubes and chop the bell pepper into bite-sized pieces. Don’t forget to finely dice one small onion and mince three cloves of garlic. - Sauté onion and garlic in olive oil until translucent. - Add zucchini and bell pepper, cooking until softened. Next, grab a medium saucepan. Add one tablespoon of olive oil and heat it over medium. Once the oil is warm, toss in your diced onion and minced garlic. Stir them for about 3-4 minutes. You want the onion to turn translucent and smell great. After that, add the diced zucchini and chopped bell pepper. Cook these veggies for around 5 minutes, stirring often. They should soften but still have a little crunch. - Mix in quinoa, cherry tomatoes, broth, and seasonings. - Transfer to a casserole dish and bake for 20-25 minutes. Now comes the fun part! Mix in your rinsed quinoa, one cup of halved cherry tomatoes, and two cups of vegetable broth into the pan. Add one teaspoon of dried oregano, one teaspoon of dried basil, and sprinkle salt and pepper to taste. Stir everything well to combine. Bring this mix to a gentle boil. Once it bubbles, reduce the heat to low, cover the pan, and let it simmer for 15 minutes. This allows the quinoa to absorb the broth. Once done, transfer the mixture into a lightly greased 9x13 inch casserole dish. If you love cheese, sprinkle one cup of shredded mozzarella on top. Place the dish in your preheated oven and bake for 20-25 minutes. You’ll know it’s ready when it bubbles and the cheese is golden brown. To make fluffy quinoa, rinse it well before cooking. This removes the bitter coating called saponin. Use two cups of vegetable broth for one cup of quinoa. Bring it to a boil, then lower the heat and cover. Let it simmer for 15 minutes. After cooking, let it rest for five minutes before fluffing with a fork. This will keep it light and airy. For the vegetables, sauté onion and garlic first in olive oil. Cook them until they are soft and fragrant. Then add zucchini and bell pepper. Stir them for about five minutes until they soften. This builds a great flavor base for your casserole. To elevate the dish, try adding a pinch of red pepper flakes for heat. Fresh herbs like thyme or parsley can add brightness. You can also swap out the dried oregano and basil for fresh herbs. Fresh herbs bring a stronger flavor. If you want to change ingredients, use brown rice instead of quinoa. You can also add cooked beans for a protein boost. For a creamier texture, mix in some ricotta cheese or yogurt before baking. Pair the casserole with a light side salad or some crusty bread. A fresh garden salad with lemon vinaigrette works well. It adds a nice contrast to the warm casserole. For gatherings, serve the casserole directly from the dish. Garnish with fresh basil leaves to make it look inviting. You can also sprinkle some extra cheese on top just before serving for a melty touch. {{image_4}} You can easily change the vegetables in this casserole. Try using bell peppers, spinach, or even eggplant. These swaps keep the dish vibrant and fresh throughout the summer. You can also mix in seasonal veggies like corn or cherry tomatoes for a burst of flavor. If you need a quinoa substitute, consider using brown rice or farro. These grains add a nice texture and flavor. Other options include couscous or even cauliflower rice for a low-carb choice. To make this casserole vegan, simply skip the cheese or use a plant-based cheese. You'll still get a creamy texture from the cooked veggies and broth. For a gluten-free option, use certified gluten-free quinoa. This way, everyone can enjoy the dish. If you're looking to cut calories, reduce the olive oil or skip the cheese. You can also use less quinoa and bulk up with more veggies. This keeps the dish light, tasty, and full of nutrients. Each of these variations allows you to enjoy this Summer Zucchini Quinoa Casserole in your own way. For the full recipe, check out the detailed instructions above. To keep your summer zucchini quinoa casserole fresh, first let it cool. Once cool, store it in an airtight container. You can refrigerate it for up to five days. If you want to save it for later, freeze it. Use a freezer-safe container or heavy-duty freezer bags. This way, it can last for up to three months. Remember to label the container with the date. This helps you track how long it has been stored. When you want to enjoy the casserole again, reheating is easy. For the best texture, use an oven. Preheat the oven to 350°F (175°C). Place the casserole in an oven-safe dish and cover it with foil. Heat for about 20 minutes or until warm. If you're in a hurry, you can use the microwave. Place a single serving in a microwave-safe dish. Heat for 1-2 minutes, checking every 30 seconds. This will keep the flavors and texture intact. Enjoy your delicious meal! Can I prepare the Summer Zucchini Quinoa Casserole in advance? Yes, you can prepare it ahead of time. Make the casserole, then cover and refrigerate it. When you're ready to eat, just bake it straight from the fridge. You may need to add a few more minutes to the cooking time. How to customize the recipe to suit my taste preferences? Feel free to swap out the veggies. For instance, you can use spinach, carrots, or even corn. You can also change the cheese or add some cooked chicken for extra protein. What are the best herbs to use for added flavor? Fresh herbs like basil and thyme work great. You can also try parsley or cilantro. These herbs add a fresh taste and brighten up your dish. Is this recipe suitable for a low-carb diet? This recipe is not low-carb due to the quinoa. Quinoa has more carbs than other grains but is also high in protein. If you want a lower carb option, you can use cauliflower rice instead of quinoa. What are the main nutritional benefits of zucchini and quinoa? Zucchini is low in calories and high in vitamins A and C. It also has a lot of water, which keeps you hydrated. Quinoa is a complete protein, meaning it has all nine essential amino acids. It’s also high in fiber, which is good for digestion. What should I do if my casserole is too watery? If your casserole is watery, try draining some liquid before baking. You can also bake it longer to help it thicken up. How can I prevent the quinoa from sticking together? To prevent sticking, rinse the quinoa well before cooking. This removes excess starch. Also, fluff the quinoa with a fork after it cooks to keep it separate. For the full recipe, check out the details above! You learned how to make a tasty Summer Zucchini Quinoa Casserole. We covered the ingredients, simple steps, and tips for perfect results. You can adjust the recipe to fit your taste and needs. Explore flavor swaps and storage tips to keep it fresh. With this dish, enjoy a healthy meal that is easy to make. I hope you try it and enjoy every bite!](https://fastmealmate.com/wp-content/uploads/2025/07/552d1654-693f-4b1b-8ee9-d91b85ff9950-300x300.webp)


![To make these tasty strawberry cream cheese rolls, gather these simple ingredients: - 1 cup fresh strawberries, diced - 1 tablespoon granulated sugar (optional; for sweetness) - 8 oz cream cheese, softened to room temperature - 1/4 cup powdered sugar - 1 teaspoon pure vanilla extract - 1 package (about 8 oz) crescent roll dough - 1 egg, beaten (for egg wash) - 1 tablespoon sesame seeds (for topping, optional) You can change some ingredients if needed. Here are some easy swaps: - Strawberries: Use any berry like blueberries or raspberries. - Cream Cheese: Neufchâtel cheese is a great lower-fat choice. - Sugar: Try honey or maple syrup for a natural sweetener. - Crescent Roll Dough: Use puff pastry if you want a flakier roll. - Egg Wash: Brush with milk or a non-dairy milk for a vegan option. Having the right tools makes the process easier. Here’s what you need: - Baking sheet - Parchment paper - Mixing bowls - Electric mixer or whisk - Rolling pin (optional) - Knife for cutting strawberries - Measuring cups and spoons Gathering these items will help you whip up these rolls with ease. Enjoy the process! First, we need to get the oven ready. Set your oven to 375°F (190°C). This step is key. Preheating helps the rolls bake evenly. While the oven heats, you can prep the other ingredients. Next, let’s work on the strawberries. Dice 1 cup of fresh strawberries. Place them in a bowl. If you want extra sweetness, add 1 tablespoon of granulated sugar. Gently stir them together. Let the strawberries sit for about 10 minutes. This process, called macerating, helps them soften and release their juices. Now, it’s time to make the filling. In a separate bowl, take 8 oz of softened cream cheese. Add 1/4 cup of powdered sugar and 1 teaspoon of pure vanilla extract. Beat these together until the mixture is smooth and creamy. Make sure there are no lumps. This filling is rich and tasty, perfect for our rolls. Let’s assemble our rolls. Unroll 1 package of crescent roll dough on a clean surface. Separate the dough into individual triangles. For each triangle, spread a generous spoonful of the cream cheese mixture on the wide end. Add a few pieces of the macerated strawberries on top. Roll the dough from the wider side to the tip, tucking in the filling as you go. Press the tip down gently to seal the roll. Now, we prepare for baking. Place the rolls on a parchment-lined baking sheet. To make them shiny and golden, brush the tops with a beaten egg. If you like, sprinkle sesame seeds on top for extra crunch. Now, put the baking sheet in your preheated oven. Bake the rolls for about 12-15 minutes. Look for a golden brown color. Once baked, take the rolls out of the oven. Let them cool for a few minutes on the baking sheet. The filling will be hot, so be careful! For a lovely presentation, serve the rolls on a nice platter. You can dust them with powdered sugar and add whole strawberries on the side for a fresh touch. Enjoy your sweet treat! For the full recipe, check out the details above. To make the best strawberry cream cheese rolls, focus on the texture. Always use softened cream cheese. This helps it blend well with the sugar and vanilla. If your cream cheese is too cold, it will be lumpy. For the strawberries, let them sit with sugar for about 10 minutes. This softens them and brings out their natural juice. When rolling the dough, avoid over-stretching. This keeps the rolls fluffy and light. Watch out for a few common mistakes. First, don’t skip the egg wash. This gives the rolls a lovely golden color. Second, be careful not to overfill. Too much filling can cause the rolls to burst open while baking. Lastly, always preheat your oven. This step is crucial for even baking. If you skip it, the rolls may not rise properly. Presentation matters, especially with these rolls. Serve them on a nice platter, dusted with powdered sugar. This makes them look extra special. You can also add whole strawberries around the rolls. This adds color and freshness to your dish. For a finishing touch, consider drizzling a little melted chocolate on top. These simple steps make your rolls shine on any table. For the complete recipe, check the Full Recipe section. Enjoy making your own delicious strawberry cream cheese rolls! {{image_4}} You can switch up the fruit in these rolls. Instead of strawberries, use raspberries, blueberries, or peaches. Each fruit brings a unique taste. Raspberries add a tart flavor, while blueberries offer a sweet touch. To use other fruits, chop them into small pieces. Mix them with sugar, just like you did with the strawberries. Let them sit to release their juices. This step helps enhance the flavor. If you're gluten-free, don't worry! You can still enjoy these rolls. Look for gluten-free crescent roll dough in stores. Many brands make tasty options. Just follow the same steps as the regular recipe. The end result will still be fluffy and delicious. Always check the ingredients to ensure they meet your needs. Feel free to add more flavors to the cream cheese filling. You can mix in lemon zest for a fresh twist. Alternatively, consider adding a dash of cinnamon for warmth. For a chocolatey treat, fold in some mini chocolate chips. These add-ins will create a fun twist on the classic rolls. You can also use flavored cream cheese, like strawberry or vanilla. This can save time while adding even more flavor. Check out the Full Recipe for these ideas and details! Store leftover strawberry cream cheese rolls in an airtight container. Keep them in the fridge for up to three days. If you want to keep them fresh for longer, consider wrapping each roll in plastic wrap before placing them in the container. This helps maintain their moisture and flavor. To reheat the rolls, preheat your oven to 350°F (175°C). Place the rolls on a baking sheet and cover them with foil. Heat for about 10-15 minutes, or until warm throughout. You can also use a microwave. Heat each roll for 15-20 seconds until warm. Just be careful not to overheat them, as this can make them tough. You can freeze these rolls for later enjoyment. Allow them to cool completely after baking. Then, wrap each roll tightly in plastic wrap, followed by aluminum foil. This helps prevent freezer burn. Store them in the freezer for up to two months. When you are ready to enjoy them, thaw them in the fridge overnight and reheat as described above. For the full recipe, check out the complete instructions above! You can prepare the rolls a day before. Follow the steps until the baking part. Once you assemble them, cover the rolls tightly with plastic wrap. Store them in the fridge overnight. When you're ready to bake, take them out and let them sit for about 20 minutes. Then, brush with egg wash and bake as usual. Yes, you can use frozen strawberries. Thaw them first and drain any excess juice. Dicing them will help them mix well with the cream cheese. The taste will still be great, but fresh strawberries do add a nice touch. These rolls pair well with a few items. Consider serving them with whipped cream or a scoop of vanilla ice cream. A light drizzle of chocolate sauce can elevate the flavor. Fresh mint leaves also add a nice touch and color. Check the color and texture of the rolls. They should be golden brown and puffed up. You can gently tap the top; it should sound hollow. If you're unsure, an instant-read thermometer can help. The internal temperature should reach 190°F (88°C) for a perfect bake. For the full recipe, refer to the [Full Recipe]. This blog post covered everything you need to make Strawberry Cream Cheese Rolls. We explored the ingredients, gave useful substitutions, and listed the best tools. Then, I provided simple steps for prepping, baking, and serving. I shared tips for great texture and ways to avoid common mistakes. In conclusion, enjoy these tasty rolls with your favorite flavors. They are fun to make and eat! Keep experimenting with variations and storage tips to make the most of your delicious treats. Happy baking!](https://fastmealmate.com/wp-content/uploads/2025/06/0240e1a4-5971-472f-af7e-a45e0386d654-768x768.webp)

. To keep your loaded baked potato salad fresh, store it in an airtight container. Make sure to cover the salad tightly to prevent air from entering. This keeps the flavors intact and stops the salad from drying out. In the refrigerator, your salad stays fresh for up to three days. After three days, the taste and texture start to decline. Reheating loaded baked potato salad can be tricky. The best way to do it is slowly. You can warm it in the microwave on low power. Stir it gently to help the heat spread evenly. Avoid using high heat, as it can make the potatoes mushy. You can also serve it cold for a refreshing twist. Can it be frozen? Yes, but it may change the texture. If you freeze it, store it in a freezer-safe container. When you thaw it, the salad might be a bit watery. To fix this, just stir it well and add a bit of sour cream or mayonnaise to bring back creaminess. Enjoy your loaded baked potato salad, no matter how you choose to serve it! You can prepare this salad up to a day in advance. Just follow all the steps and chill it in the fridge. This makes it perfect for parties or picnics. The flavors will mix together nicely, making it taste even better. Absolutely! You can use any cheese you like. Try mozzarella for a milder taste or pepper jack for some spice. Just make sure your cheese melts well if you bake the potatoes. If you want to cut calories, try Greek yogurt or a mix of sour cream and yogurt. Both options keep the creamy texture but add extra protein. They also help the salad taste fresh and zesty. This potato salad will stay fresh for about 3 to 5 days in the fridge. Just make sure to store it in an airtight container. Check for any changes in smell or texture before serving. Yes! This salad is very flexible. You can add diced tomatoes, jalapeños, or olives. Try mixing in some corn or bell peppers for extra crunch. Get creative and add whatever you enjoy! You can find the full recipe for Loaded Baked Potato Salad in this article. It has all the details you need to create this delicious dish at home. In this blog post, we explored how to make a creamy Loaded Baked Potato Salad. We covered important ingredients, step-by-step prep, and helpful tips. Remember, choosing the right potatoes and mixing well makes a big difference. Feel free to customize with your favorite toppings and seasonings. This dish works great for gatherings or as a side for grilled meats. With these guidelines, you can serve a delicious and satisfying salad any time. Trust me, it’s worth the effort! Enjoy your cooking adventure!](https://fastmealmate.com/wp-content/uploads/2025/06/841684b0-3d76-4995-bccc-748e700eeb02-768x768.webp)
