
Are you ready to elevate your dinner game? Stuffed yellow squash is not only flavorful but also packed with nutrients. This dish is an easy way to impress family and friends. In just a few simple steps, you can create a delicious meal that caters to various diets. Whether you want to add meat or keep it vegan, I have tips and tricks for you. Let’s dive in and make stuffed yellow squash a staple in your kitchen!
Ingredients
Main Ingredients for Stuffed Yellow Squash
For a tasty stuffed yellow squash, gather these key ingredients:
– 4 medium yellow squash
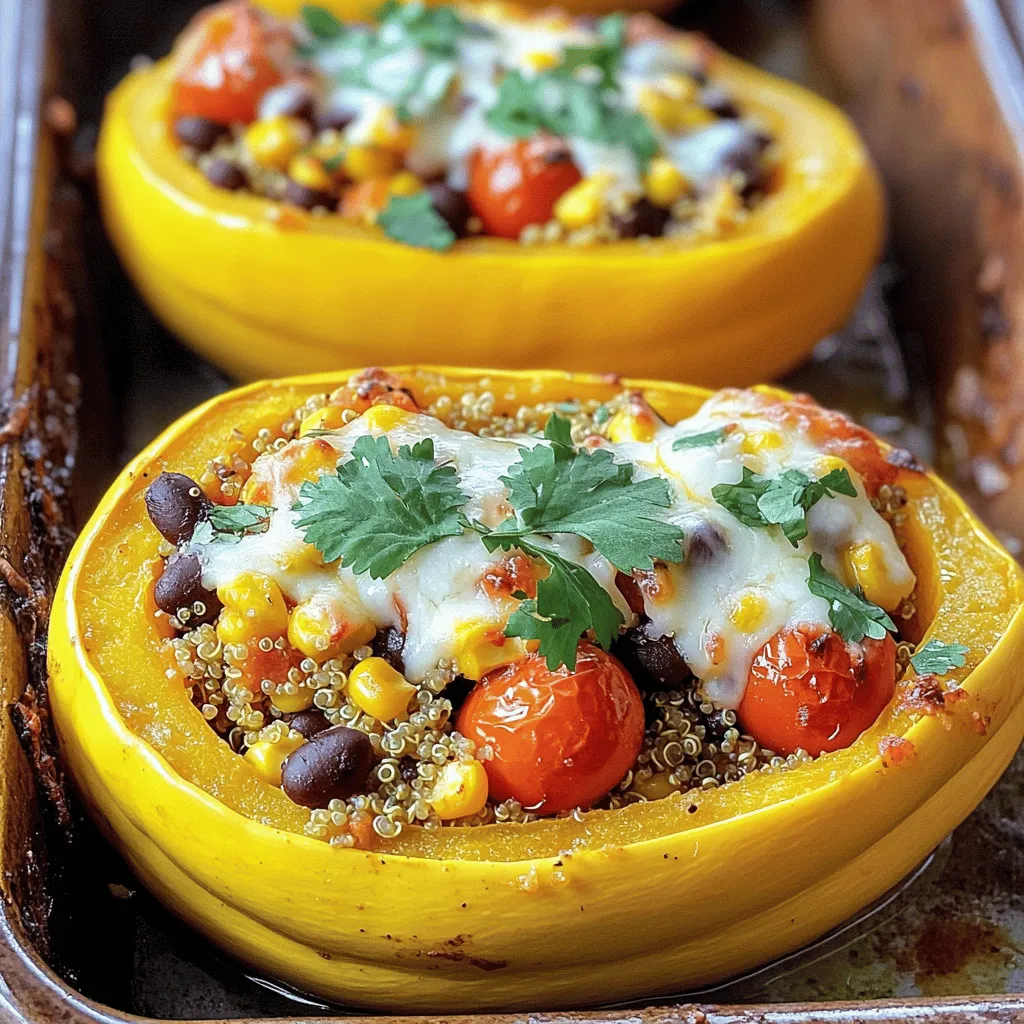
– 1 cup quinoa, rinsed
– 2 cups vegetable broth
– 1 cup cherry tomatoes, halved
– 1 cup black beans, rinsed and drained
– 1 cup corn kernels (fresh or frozen)
– 1 teaspoon cumin
– 1 teaspoon smoked paprika
– ½ teaspoon garlic powder
– ½ teaspoon onion powder
– ½ cup shredded cheese (cheddar or Monterey Jack)
– 2 tablespoons olive oil
– Salt and pepper to taste
– Fresh cilantro, chopped, for garnish
Optional Ingredients for Added Flavor
You can enhance the dish by adding:
– Diced bell peppers for crunch
– Chopped onions for sweetness
– Fresh herbs like basil or parsley
– A squeeze of lime juice for brightness
Tools and Equipment Needed
Make sure you have these tools ready:
– A sharp knife for slicing the squash
– A spoon for scooping out the seeds
– A baking dish to hold the squash halves
– A medium saucepan for cooking quinoa
– A mixing bowl for combining the filling
– Aluminum foil for covering the dish while baking
Having all these ingredients and tools will make your cooking process smooth and enjoyable. The stuffed yellow squash is a great way to explore new flavors and impress your family and friends.
Step-by-Step Instructions
Prepping the Squash
Start by preheating your oven to 375°F (190°C). This step is key for perfect cooking. Next, take your medium yellow squash and slice them in half lengthwise. Use a spoon to scoop out the seeds. This creates hollow boats for your filling. Place the squash halves cut side up in a baking dish. Make sure they sit nicely without tipping over.
Cooking the Quinoa Filling
In a medium saucepan, combine 1 cup of rinsed quinoa and 2 cups of vegetable broth. Bring this mixture to a rolling boil. Then, reduce the heat to low. Cover the saucepan and let it simmer for about 15 minutes. You want the quinoa to be fluffy and the liquid fully absorbed. Once done, transfer the cooked quinoa to a mixing bowl. Add 1 cup of halved cherry tomatoes, 1 cup of black beans, and 1 cup of corn kernels. Sprinkle in 1 teaspoon of cumin, 1 teaspoon of smoked paprika, ½ teaspoon of garlic powder, and ½ teaspoon of onion powder. Mix well and season with salt and pepper to taste. Don’t forget to add half of the shredded cheese!
Assembling and Baking the Stuffed Squash
Now, it’s time to fill the squash. Use a spoon to carefully pack the quinoa mixture into each squash half. Let the filling mound slightly above the edges. Drizzle 2 tablespoons of olive oil over the stuffed squash to keep them moist. Cover your baking dish tightly with aluminum foil. Bake in the preheated oven for 25 minutes. After that, remove the foil and sprinkle the remaining shredded cheese on top. Return the dish to the oven and bake uncovered for another 10 minutes. You want the cheese to be melted and bubbling. Check that the squash is tender. Once baked, let the stuffed squash cool slightly. Garnish with fresh cilantro before serving.
Tips & Tricks
How to Best Cut and Hollow the Squash
Start by washing the yellow squash. Use a sharp knife to slice each squash in half lengthwise. Hold the squash steady on a cutting board. Cut carefully to avoid injury. Once halved, use a spoon to scoop out the seeds. Aim for a depth of about half an inch. This gives you enough space for the filling.
Enhancing Flavor with Spices and Seasonings
To boost the taste of your stuffed squash, use spices. I recommend cumin, smoked paprika, garlic powder, and onion powder. Each adds a unique flavor profile. You can also try fresh herbs like basil or oregano for a fresh touch. Don’t forget salt and pepper. These basics elevate the overall taste of your dish.
Perfect Cooking Times for Tender Squash
Cooking times are key for tender squash. Start baking the squash covered for 25 minutes at 375°F (190°C). This helps the squash cook evenly. After that, remove the foil and add cheese. Bake uncovered for an additional 10 minutes. This step will melt the cheese and finish cooking the squash. Check with a fork to see if it’s tender. Enjoy your delicious stuffed yellow squash!
Variations
Vegetarian and Vegan Options
You can easily make stuffed yellow squash vegetarian or vegan. For a vegetarian twist, use cheese made from dairy. If you want it vegan, swap the cheese for a dairy-free version. Nutritional yeast can give a cheesy flavor without dairy. You can also add more veggies like spinach or bell peppers. These choices keep the dish fresh and healthy.
Protein Alternatives
For protein, consider using ground turkey or tofu. Ground turkey adds a savory taste. Just brown it in a pan before mixing it with the other filling ingredients. If you prefer tofu, use firm tofu for a nice texture. Crumble it into the mixture after pressing out excess water. Both options make your meal hearty and satisfying.
Gluten-Free Adjustments
To keep this dish gluten-free, check your seasonings. Most spices are gluten-free, but always verify the labels. If you want to add breadcrumbs, use gluten-free options instead. Quinoa is already gluten-free and makes a great base. These simple swaps ensure everyone can enjoy this tasty meal.
Storage Info
How to Store Leftover Stuffed Squash
Store leftover stuffed squash in an airtight container. Make sure it cools down first. Keep it in the fridge for up to three days. This helps maintain the flavor and texture. You can also wrap them tightly in plastic wrap if you prefer.
Reheating Instructions
To reheat, place the stuffed squash in the oven. Set it to 350°F (175°C). Heat for about 15-20 minutes. You can also use the microwave. Just heat on medium for 2-3 minutes. Cover it with a damp paper towel to keep it moist.
Freezing Tips for Longer Shelf Life
If you want to save stuffed squash for later, freezing is a great option. First, let the squash cool completely. Wrap each piece in plastic wrap tightly. Then, place the wrapped squash in a freezer bag. This keeps out air and prevents freezer burn. You can freeze it for up to three months. When you are ready to eat, thaw it in the fridge overnight before reheating.
FAQs
How can I make Stuffed Yellow Squash ahead of time?
You can prepare Stuffed Yellow Squash in advance. First, follow the recipe to the point of filling the squash. Then, cover the dish with foil and refrigerate it. This keeps the flavors fresh. When you are ready to eat, just bake it. You may need to add a few extra minutes to the cooking time.
Can I use different vegetables in the stuffing?
Absolutely! You can mix and match vegetables in the stuffing. Some great options are bell peppers, zucchini, or mushrooms. Just make sure to chop them finely. This way, they cook evenly. You can also add spinach or kale for more nutrition. Feel free to be creative!
What are the best side dishes to serve with stuffed squash?
Stuffed squash pairs well with many sides. A fresh garden salad adds crunch and color. You can also serve it with a side of rice or quinoa. For a heartier meal, try garlic bread or roasted vegetables. These sides complement the flavors of the stuffed squash nicely.
How do I know when the squash is fully cooked?
You can check the squash by poking it with a fork. If it goes in easily, the squash is done. The cheese on top should be golden and bubbly. The squash should feel tender but not mushy. If it’s still firm, give it a few extra minutes in the oven.
Ingredients
Main Ingredients for Stuffed Yellow Squash
– 4 medium yellow squash
– 1 cup quinoa, rinsed
– 2 cups vegetable broth
– 1 cup cherry tomatoes, halved
– 1 cup black beans, rinsed and drained
– 1 cup corn kernels (fresh or frozen)
– 1 teaspoon cumin
– 1 teaspoon smoked paprika
– ½ teaspoon garlic powder
– ½ teaspoon onion powder
– ½ cup shredded cheese (cheddar or Monterey Jack)
– 2 tablespoons olive oil
– Salt and pepper to taste
– Fresh cilantro, chopped, for garnish
Optional Ingredients for Added Flavor
You can add a splash of lime juice for zest. Chopped bell peppers or jalapeños can boost the heat. For a kick, include a pinch of cayenne pepper. Don’t forget to use fresh herbs like parsley or basil for a fresh taste.
Tools and Equipment Needed
You will need:
– A sharp knife for cutting
– A spoon for scooping out seeds
– A medium saucepan for cooking quinoa
– A mixing bowl for combining the filling
– A baking dish for cooking the stuffed squash
– Aluminum foil to cover the dish during baking
Stuffed yellow squash is a tasty dish that anyone can love. We covered the main and optional ingredients, tools you’ll need, and step-by-step instructions to make them. We also shared tips to enhance flavor and variations to suit different diets. Finally, we discussed how to store leftovers and answered common questions. With this guide, you can enjoy cooking stuffed squash with ease. Get ready to create a delicious meal that fits your taste!


