Strawberry Coleslaw Fresh and Flavorful Delight

Craving something fresh and different? Strawberry coleslaw is a tasty twist on a classic favorite! This vibrant dish combines tangy strawberries with crisp veggies for a delightful crunch. In this post, I’ll show you how to gather your ingredients, craft the perfect dressing, and even customize your coleslaw. Whether for a picnic or weeknight dinner, you’ll love this refreshing side. Let’s dive in and create your new go-to recipe!
Ingredients
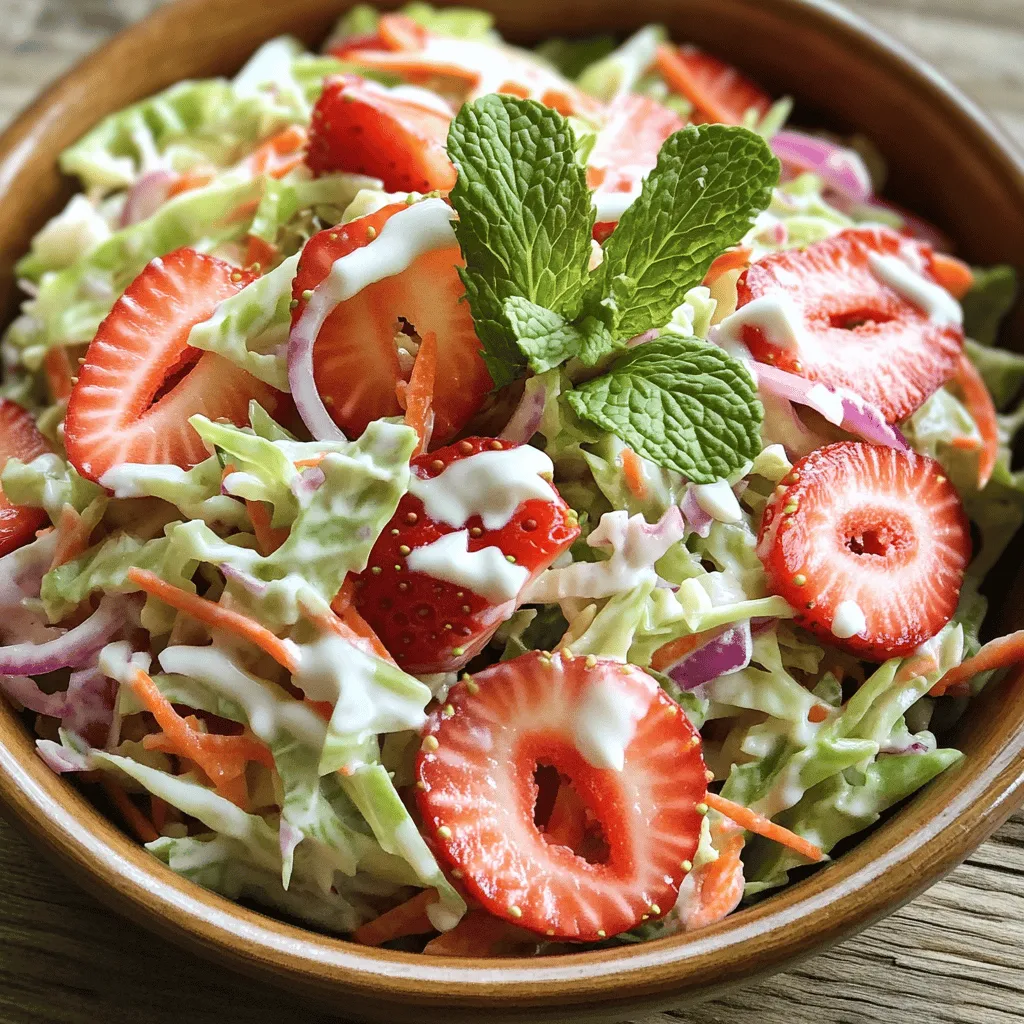
Fresh Produce Needed
For a fresh and vibrant strawberry coleslaw, start with these key ingredients:
– 4 cups green cabbage, finely shredded
– 1 cup carrots, grated
– 1 cup ripe strawberries, hulled and thinly sliced
– 1/4 cup red onion, finely sliced
These fresh veggies create a colorful base. The cabbage adds crunch, while the carrots bring sweetness. Strawberries offer a juicy burst, and red onion gives a hint of sharpness.
Dressing Ingredients
Next, let’s make the dressing. Gather these simple items:
– 1/2 cup creamy Greek yogurt
– 2 tablespoons pure honey
– 1 tablespoon apple cider vinegar
– Salt and pepper to taste
This creamy dressing balances the flavors. Greek yogurt gives a rich base, and honey adds a touch of sweetness. Apple cider vinegar brightens it all up.
Optional Add-ins
For a twist, consider these optional add-ins:
– 1/4 cup fresh mint leaves, chopped
Mint adds a refreshing flavor. This herb pairs well with strawberries and makes your coleslaw stand out. You can also try nuts or seeds for extra crunch.
Ready to make this delicious strawberry coleslaw?
Step-by-Step Instructions
Preparing the Vegetables
First, gather all your fresh veggies. You need 4 cups of green cabbage, 1 cup of grated carrots, 1 cup of sliced strawberries, and 1/4 cup of red onion. Take a large bowl and add the cabbage. Then, add the carrots, strawberries, and onion. Mix them gently. This helps combine the colors and flavors.
Making the Dressing
In a smaller bowl, combine the creamy Greek yogurt, pure honey, and apple cider vinegar. Use a whisk to blend these ingredients well. Add a pinch of salt and black pepper for taste. Make sure the dressing is smooth and creamy. This will give your coleslaw a rich flavor.
Combining and Chilling the Mixture
Now, drizzle the dressing over the veggies in the large bowl. Use salad tongs or a large spoon to toss everything together. Make sure all the ingredients are coated in the dressing. Taste it! Adjust the salt and pepper if needed. Cover the bowl with plastic wrap or a lid. Place it in the fridge for at least 30 minutes. This waiting time lets the flavors mix and makes the veggies crunchier. When you are ready to serve, stir it again. You can add chopped mint leaves for extra flavor and color.
Tips & Tricks
Enhancing Flavor Profiles
To make your strawberry coleslaw sing, focus on balance. The sweetness of strawberries needs a bit of acidity. Use apple cider vinegar, as it adds a nice tang. You can also try adding a splash of lemon juice for brightness. If you want more depth, consider mixing in some finely chopped jalapeño. This adds a gentle kick that contrasts well with the sweet strawberries.
Ideal Serving Suggestions
Strawberry coleslaw shines in many settings. Serve it alongside grilled chicken or pork for a fresh crunch. It also works well as a topping on tacos or sandwiches. For a fun twist, serve it in a taco shell. This makes a great finger food for gatherings. Don’t forget to pair it with a light, fruity drink to complement the dish.
Making Ahead for Gatherings
Preparing your coleslaw ahead of time is smart. It saves you stress on the day of your event. You can make the coleslaw up to a day in advance. Just store it in the fridge to keep it fresh. The flavors will deepen as it chills. Just remember to give it a good stir before serving. This ensures everything is mixed evenly again. For a special touch, add fresh mint leaves right before serving to keep them vibrant.

Variations
Substituting Ingredients
You can swap ingredients in strawberry coleslaw to suit your taste. Instead of green cabbage, try purple cabbage for a vibrant look. You can also use kale for a more earthy flavor and extra nutrients. If you don’t have Greek yogurt, sour cream works well, too. For a sweeter touch, replace honey with maple syrup. Just remember that these changes can alter the taste slightly.
Adding Complementary Flavors
Adding flavors can make your coleslaw pop. Try mixing in some diced apples or pears for a crunchy bite. Chopped nuts, like walnuts or pecans, add a nice crunch and healthy fats. If you like heat, add a pinch of cayenne pepper or diced jalapeños. Fresh herbs, like cilantro or basil, can also brighten the dish. Each of these additions can elevate your strawberry coleslaw and create new taste experiences.
Healthier Alternatives
If you want a lighter version, reduce the yogurt and replace it with low-fat yogurt. You can also use a sugar substitute for the honey. Adding more veggies, like bell peppers or cucumbers, boosts fiber without many calories. To make it vegan, use a plant-based yogurt and skip the honey. These changes keep the dish tasty while making it healthier.
Storage Info
Best Practices for Storing Leftovers
To keep your strawberry coleslaw fresh, store it in an airtight container. This helps prevent moisture loss and keeps flavors intact. Place it in the fridge right after serving. Avoid leaving it out for too long. The crunchiness of the cabbage and carrots will stay nice if stored properly.
Freezing Options
Freezing coleslaw is not ideal due to the texture changes. The cabbage and carrots may become soggy once thawed. If you want to freeze it, consider storing the dressing separately. You can freeze the veggies without dressing for up to two months. When ready to use, thaw the veggies and mix with fresh dressing.
Shelf Life Considerations
Strawberry coleslaw lasts about three to five days in the fridge. Keep an eye on it for any signs of spoilage, like an off smell or discoloration. If you notice any, it’s best to throw it away. Always trust your senses when it comes to food safety. Enjoy your coleslaw fresh for the best taste!
FAQs
Can I use different fruits in my coleslaw?
Yes, you can use other fruits in your coleslaw. Apples, pineapple, or blueberries work well. These fruits add sweetness and a nice crunch. Mix them with the cabbage and carrots for a colorful dish. Experimenting with fruits keeps your coleslaw fresh and exciting. You can also try dried fruits like raisins for a chewy texture.
How can I make this recipe vegan?
To make this recipe vegan, swap the Greek yogurt for a plant-based yogurt. Use maple syrup instead of honey for sweetness. Both changes keep the creaminess and flavor intact. Make sure the yogurt you choose is thick and creamy. This way, you still enjoy a delicious coleslaw without any animal products.
What are the nutritional benefits of this recipe?
This coleslaw is packed with nutrients. Cabbage is a great source of vitamins K and C. Carrots provide a good dose of beta-carotene. Strawberries add antioxidants and fiber, which support digestion. The yogurt offers protein and probiotics for gut health. Overall, this coleslaw is a tasty way to enjoy healthy ingredients.
This blog covered the key ingredients and steps for making coleslaw. We explored how to prepare fresh produce, create a tasty dressing, and combine everything. You learned tips for boosting flavor and serving ideas, plus how to store leftovers. Variations let you swap ingredients and try healthier options. Remember, you can customize recipes to suit your taste. Enjoy making coleslaw your way, and share your results with friends. Try these tips to make your dish stand out. Happy cooking!


![For a perfect classic patty melt, you will need: - 1 lb ground beef - 1 medium onion, thinly sliced - 4 slices of Swiss cheese - 4 slices of hearty rye bread These ingredients bring together the rich flavors that make this dish so special. The ground beef forms the juicy patty, while the onion adds a sweet touch. Swiss cheese melts beautifully, making every bite creamy. Rye bread gives it a unique flavor and crunch. To take your patty melt to the next level, consider adding: - 1 tablespoon Worcestershire sauce - 1 teaspoon garlic powder - 1 tablespoon mayonnaise (for spreading) Worcestershire sauce adds a deep umami flavor. Garlic powder brings a hint of warmth without being overpowering. Mayonnaise can add a nice creamy texture if you choose to spread it on the bread. Don’t forget these key seasonings: - Salt and black pepper to taste - 2 tablespoons unsalted butter, divided Seasoning your beef with salt and pepper ensures that it tastes great. Butter is essential for grilling the bread to a golden crisp. It enhances the flavor and makes the outside crunchy, while the inside stays soft. For the full recipe, check out the details above! To start, I melt 1 tablespoon of butter in a skillet over medium heat. I add thinly sliced onions and a pinch of salt. Stir the onions often. This helps them caramelize nicely. The cooking time is about 15 to 20 minutes. Keep an eye on the heat. You want them golden brown and sweet. Once done, take them off the heat and set them aside. In a mixing bowl, I combine 1 pound of ground beef with Worcestershire sauce and garlic powder. I add salt and pepper for taste. Mix gently to keep the beef tender. Next, I divide the mixture into two equal parts. Shape each part into a patty, about ¾ inch thick. Now, it’s time to cook the patties. I return the skillet to the stove, adding the remaining butter. I turn the heat to medium-high. I cook the patties for about 4 to 5 minutes per side. You can adjust the time based on how you like your meat cooked. During the last minute, I add a slice of Swiss cheese on top of each patty. This makes it melt beautifully. If you like, spread mayonnaise on one side of each slice of rye bread. I take two slices and place a cheesy patty on the unbuttered side of each. Then, I add a generous helping of the caramelized onions. Finally, I close the sandwiches with the other slices of bread, making sure the buttered side is facing up. Next, I wipe the skillet to remove any bits left behind. I heat the skillet over medium-low heat. I grill the assembled sandwiches for about 3 to 4 minutes per side. I want them to be golden brown and crispy. Using a spatula, I press down gently on the sandwiches. This helps everything cook evenly and stay melty inside. For the full recipe, check the main article. - Best cooking temperatures: Start with medium-high heat. This helps to brown the outside and keep the inside juicy. - Checking for doneness: Use a meat thermometer. Aim for 160°F for ground beef. A quick poke with your finger can also help; if it feels firm, it’s likely done. - Choosing the right type of rye bread: Look for hearty rye bread with good texture. The flavor of the rye pairs well with the meat and cheese. - Alternative bread options: If rye isn't your favorite, try sourdough or whole wheat. Both provide a nice crunch and flavor. - Best side dishes to pair with patty melts: Crispy fries or sweet potato fries are classic choices. A fresh side salad adds a nice crunch. - Ideal garnish ideas for presentation: A sprinkle of fresh parsley or dill can brighten up your plate. You can also add pickles on the side for extra tang. For the complete recipe, check the Full Recipe section. {{image_4}} You can switch up the meat in your patty melt. Try ground turkey or even a veggie patty for a healthier twist. Both options keep the sandwich tasty. For cheese, Swiss is classic, but you can use cheddar or pepper jack for a kick. These swaps change the flavor, keeping it fresh and exciting. The patty melt has many faces. In classic forms, it stays true to its roots. But gourmet versions take it to new heights. Chefs add toppings like sautéed mushrooms or spicy sauces. You can find global inspirations too. Some cultures use different breads or spices. Each region puts its own spin on this beloved dish, making it unique. If you need a gluten-free option, choose gluten-free bread. Many brands make great choices that hold up well. For a vegan patty melt, use a plant-based patty and vegan cheese. These swaps keep the spirit of a patty melt while fitting dietary needs. Experiment with these variations to make your patty melt your own. Check out the Full Recipe for more ideas! To keep your leftover patty melts fresh, use proper refrigeration techniques. First, let the patty melts cool down to room temperature. This step helps avoid condensation, which can make your sandwiches soggy. Next, wrap each patty melt tightly in plastic wrap or aluminum foil. You can also place them in an airtight container. The best container types are glass or BPA-free plastic. These containers keep out moisture and protect from odors in the fridge. When you’re ready to enjoy leftovers, reheating correctly is key. You can use a skillet, oven, or microwave. The skillet method brings back the original texture and flavor. Heat the skillet over medium heat. Place the patty melt in the pan and cover it with a lid. This step helps the cheese melt without drying out the bread. Heat for about 3-4 minutes on each side. If you prefer the oven, preheat it to 350°F (175°C). Wrap the patty melt in foil to keep it from drying out. Heat for about 10-15 minutes. This keeps the bread crisp while warming the filling. Avoid the microwave if you want to keep your patty melt from getting soggy. Microwaving can make the bread soft and chewy. If you must use it, heat for only 30 seconds and check if it’s warm enough. Enjoy your delicious patty melts again! For the full recipe, refer back to the classic patty melt section. A burger is usually served on a bun. A patty melt uses bread like rye. In a burger, you find toppings like lettuce and tomato. In a patty melt, you get melted cheese and onions. The cooking method differs too. A burger is grilled, while a patty melt is cooked in a skillet. Yes, you can prepare the meat and onions in advance. Cook the patties and caramelize the onions. Store them in the fridge. When you're ready to eat, just assemble and grill the sandwich. This saves time on busy days. Some great sides include: - Crispy fries - Sweet potato fries - Coleslaw - Salad - Pickles These sides balance the rich flavors of the patty melt. You can use lean ground beef for fewer calories. Try whole grain rye bread instead of regular. Add fresh veggies like spinach or tomato. You can also skip the mayonnaise or use a light version. These changes make your meal tasty and healthier. The patty melt has roots in the United States. It gained popularity in diners during the 1940s. Many believe it started in California. The mix of flavors and textures made it a favorite comfort food. Absolutely! While Swiss is classic, you can try: - Cheddar - Pepper jack - American - Gouda Each cheese adds a unique taste to your patty melt. Experiment to find your favorite! For the complete recipe, check out the [Full Recipe]. A classic patty melt combines simple, tasty ingredients for a satisfying meal. We covered essential items like ground beef, Swiss cheese, and rye bread. You learned steps to prepare, assemble, and grill your sandwich for that perfect finish. Tips on customization and storage enhance your experience. Remember that variations let you make it your own. Enjoy your cooking and the delicious patty melts you create!](https://fastmealmate.com/wp-content/uploads/2025/06/2e833bb9-ccca-4b03-bda9-565aa6b9e8a1-768x768.webp)
![To make Greek chicken bowls, gather these key items: - 2 large chicken breasts - 2 tablespoons extra virgin olive oil - 1 teaspoon dried oregano - 1 teaspoon garlic powder - 1 teaspoon smoked paprika - Salt and freshly ground black pepper to taste - 1 cup quinoa, rinsed under cold water - 2 cups vegetable broth (or water) - 1 cup cherry tomatoes, halved - 1 cucumber, diced into bite-sized pieces - ½ red onion, thinly sliced - 1 cup kalamata olives, pitted and halved - ½ cup crumbled feta cheese - ½ cup tzatziki sauce - Fresh parsley, finely chopped for garnish Feel free to add more flavor and texture with these extras: - Avocado slices - Roasted red peppers - Spinach or mixed greens - Artichoke hearts For the best results, consider these brands: - Olive Oil: Colavita or Pompeian - Quinoa: TruRoots or Ancient Harvest - Feta Cheese: Athenos or Dodoni - Tzatziki Sauce: Oikos or Fage These ingredients come together to create a healthy, delicious meal. You can find the full recipe for a complete guide on how to prepare these tasty bowls. First, let's marinate the chicken. In a medium bowl, mix together the olive oil, oregano, garlic powder, smoked paprika, salt, and black pepper. Use a whisk to blend them well. Add the chicken breasts and coat them completely with this marinade. Cover the bowl and place it in the fridge. Let the chicken sit for at least 30 minutes or up to 2 hours. This step adds great flavor. While the chicken marinates, it's time to cook the quinoa. In a medium saucepan, combine the rinsed quinoa and vegetable broth. Bring the mixture to a rolling boil. Then, reduce the heat to low and cover the pot. Let it simmer for about 15 minutes. The quinoa should absorb all the liquid and become fluffy. Once done, remove it from heat and let it sit for 5 more minutes while covered. Now, we grill the chicken. Preheat your grill or skillet over medium-high heat. Place the marinated chicken on the grill or skillet. Cook each side for about 6-7 minutes. You want the chicken to reach an internal temperature of 165°F (75°C). Once it’s done, move the chicken to a cutting board. Let it rest for a few minutes before slicing it thin. While the chicken cooks, prepare the veggies. Start by halving the cherry tomatoes. Next, dice the cucumber into bite-sized pieces. Then, thinly slice the red onion. Once done, set the veggies aside. This step adds freshness and crunch to your bowls. Grab four serving bowls to assemble your meal. Begin by spooning a generous scoop of fluffy quinoa into each bowl. Next, layer on the sliced chicken. Follow this with the halved cherry tomatoes, diced cucumber, red onion, and halved kalamata olives. Finally, sprinkle crumbled feta cheese on top for a creamy touch. To finish your bowls, drizzle a good amount of tzatziki sauce over each one. This sauce adds a cool and refreshing flavor. For the final touch, sprinkle finely chopped parsley on top. This adds color and freshness. Now you have a delightful Greek chicken bowl! For the full recipe, check [Full Recipe]. To make Greek chicken bowls shine, focus on marinating the chicken well. A good marinade adds flavor, so let it sit for at least 30 minutes. You can use a grill or skillet for cooking. Both methods yield juicy chicken. For grilling, preheat the grill to medium-high heat. Cook the chicken for about 6-7 minutes on each side. If using a skillet, add a splash of olive oil to keep the chicken moist. You can enhance flavors easily. Try adding lemon zest to the marinade for a fresh twist. Fresh herbs like dill or mint can boost your vegetables. For a spicy kick, sprinkle some red pepper flakes on the chicken. If you love garlic, use fresh minced garlic instead of powder. This small change adds depth to the dish. Presentation matters! Use colorful bowls to make your meal pop. Layer the ingredients nicely. Start with a base of fluffy quinoa. Arrange the sliced chicken and veggies in a circular pattern on top. Add crumbled feta and a drizzle of tzatziki sauce for a beautiful finish. Don’t forget to add a lemon wedge on the side. It makes the dish look fresh and inviting. For more detail, check the Full Recipe. {{image_4}} You can easily swap chicken for other proteins. Try grilled shrimp for a seafood twist. It cooks quickly and adds a nice flavor. Lamb is another great choice for those who want something richer. If you enjoy beef, use thinly sliced steak. Each protein brings its unique taste and texture. If you prefer a plant-based meal, consider chickpeas or lentils. Both are high in protein and very filling. You can roast chickpeas with spices for extra crunch. Another option is marinated tofu. It soaks up flavors well and works perfectly in bowls. While tzatziki is classic, you can mix things up with other sauces. A tahini dressing adds a nutty flavor that complements the veggies. Or, try a lemon herb vinaigrette for bright freshness. You could even drizzle some spicy harissa for a kick. Each option changes the flavor profile and keeps your meals exciting. For a complete recipe, check out the Full Recipe for Mediterranean Bliss Greek Chicken Bowls. To store leftovers, place your Greek chicken bowls in airtight containers. Make sure to separate the chicken, quinoa, and veggies if you can. This keeps everything fresh and tasty. You can store them in the fridge for up to three days. When you’re ready to eat, reheat your bowl in the microwave. Just cover the bowl with a microwave-safe lid or wrap. Heat it in short bursts, about one minute at a time. Stir in between to ensure even warming. You can also reheat everything in a skillet over low heat. If you want to freeze your Greek chicken bowls, do so before adding tzatziki or feta cheese. Freeze the chicken, quinoa, and veggies in airtight bags. They can last for up to three months in the freezer. When ready to eat, thaw overnight in the fridge. Then, reheat and add fresh toppings. This way, you keep the flavors bright! To make Greek chicken bowls, start by marinating the chicken. Mix olive oil, oregano, garlic powder, smoked paprika, salt, and pepper. Coat the chicken breasts and let them sit for at least 30 minutes. Next, cook the quinoa in vegetable broth until fluffy. While it cooks, grill or pan-cook the chicken until it reaches 165°F. Prepare your veggies by chopping cherry tomatoes, cucumber, and red onion. Assemble the bowls with quinoa, chicken, veggies, olives, feta cheese, and tzatziki sauce. For the full recipe, check out the detailed steps above. Yes, using store-bought tzatziki sauce is a great time saver. It can add a nice flavor without extra work. Just make sure to choose a brand you like. Look for fresh options in the refrigerated section for the best taste. If you want to change it up, try brown rice or farro as substitutes for quinoa. Both have great textures and flavors. You can also use couscous or bulgur wheat for a different twist. Just adjust the cooking times based on what you choose. Greek chicken bowls will stay fresh in the fridge for up to four days. Store them in airtight containers to keep them tasty. Always check for any signs of spoilage before eating leftovers. Absolutely! You can marinate the chicken and cook the quinoa a day ahead. Chop your veggies in advance and store them in the fridge. This way, you can assemble and enjoy bowls quickly when you're ready to eat. Greek chicken bowls are simple to make and tasty. We covered ingredients, cooking steps, and clever tips. You can try different proteins or sauces to mix things up. Keep leftovers fresh and reheat them easily. In closing, making these bowls is fun and healthy. You can enjoy cooking while creating delicious meals. Follow these steps, and you’ll impress anyone who eats your food!](https://fastmealmate.com/wp-content/uploads/2025/06/353123fa-fb97-4087-931a-2db7911ed322-768x768.webp)


