
Are you ready to spice up your snacks? This Spicy Dill Pickled Okra is a flavorful and tangy delight that will elevate any meal. In just a few simple steps, you can turn fresh okra into a zesty treat. I’ll show you how to make the perfect brine and pack those jars with mouthwatering goodness. Let’s dive into the world of pickling and create a bite of joy together!
Ingredients
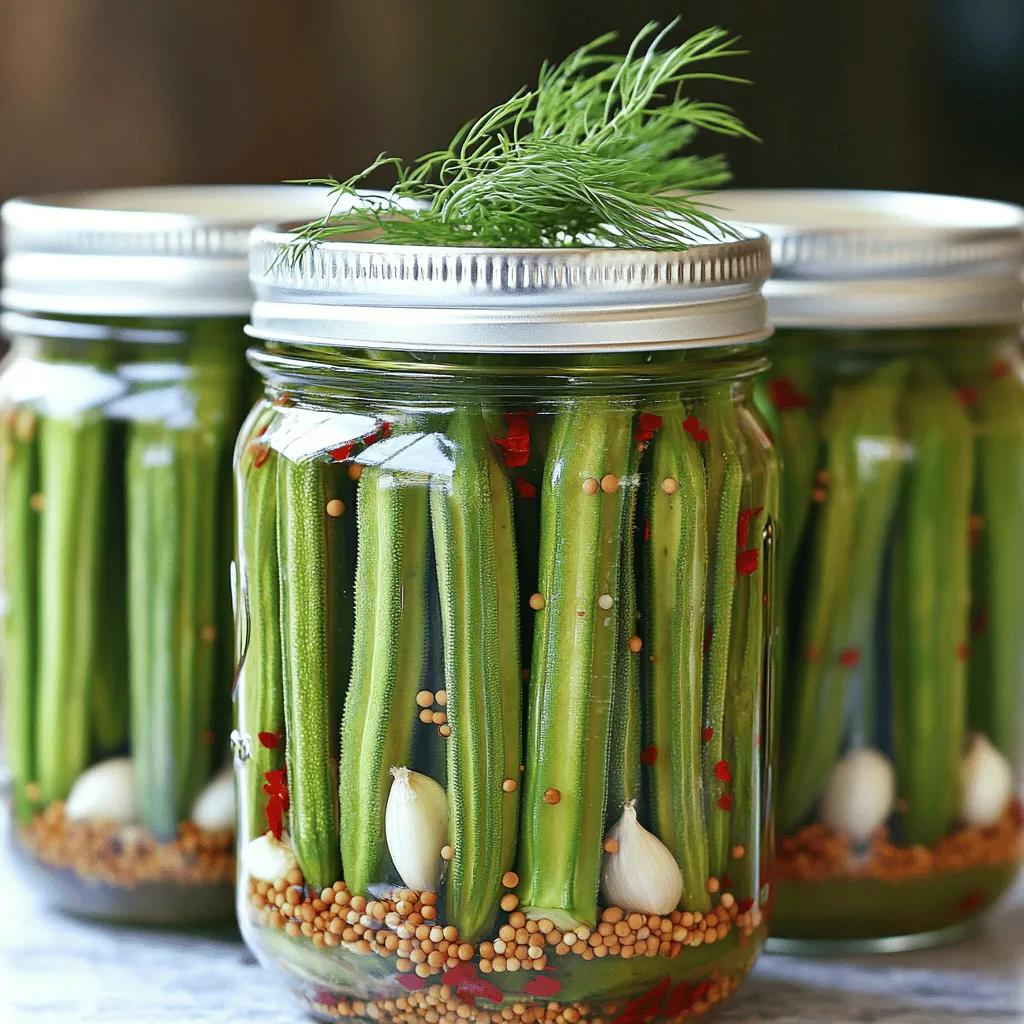
Fresh Produce and Spices
– 1 pound fresh okra, trimmed
– 4 cloves garlic, peeled
– Fresh dill sprigs (for garnish)
Brine Components
– 4 cups water
– 1 cup apple cider vinegar
– 2 tablespoons sea salt
– 2 tablespoons granulated sugar
Seasonings for Heat and Flavor
– 2 teaspoons mustard seeds
– 1 teaspoon red pepper flakes
– 1 teaspoon dill seeds
– 1 teaspoon black peppercorns
Gathering fresh ingredients is key to making spicy dill pickled okra. Start with one pound of okra. Make sure the okra is firm and bright green. Trim the ends carefully. You will also need four cloves of garlic. Peel them and set them aside. Fresh dill sprigs add a nice touch when you serve.
Next, let’s talk about the brine. You will need four cups of water and one cup of apple cider vinegar. This mix gives a great tangy flavor. Add two tablespoons of sea salt and two tablespoons of granulated sugar to balance the taste.
Now, for the heat! You will need two teaspoons of mustard seeds. They add a crunchy pop. One teaspoon of red pepper flakes brings the spice. Use one teaspoon of dill seeds for extra flavor. Lastly, add one teaspoon of black peppercorns for a little warmth.
Using the right ingredients makes all the difference. Each element works together to create a flavorful and tangy delight.
Step-by-Step Instructions
Preparing the Jars
To start, you need to sterilize mason jars and lids. Use four pint-sized jars for this recipe. Place them in a pot of boiling water for 10 minutes. This step ensures your jars are clean and safe for the pickling process. After sterilizing, carefully remove the jars and lids. Let them air-dry upside down on a clean cloth. This prevents any germs from getting inside.
Making the Brine
Next, make the brine for your okra. In a large pot, combine 4 cups of water, 1 cup of apple cider vinegar, 2 tablespoons of sea salt, and 2 tablespoons of granulated sugar. Heat the mixture over medium heat. Stir until the salt and sugar dissolve completely. Once everything is mixed, bring it to a rolling boil. After this, remove the pot from the heat.
Packing the Okra
Now it’s time to pack the okra. Take your sterilized jars and fill each with fresh okra. Evenly distribute the okra among the jars. Add 1 peeled garlic clove to each jar. Then, sprinkle in 1/2 teaspoon of mustard seeds, 1/4 teaspoon of red pepper flakes, 1/4 teaspoon of dill seeds, and a few black peppercorns.
Sealing and Processing
After packing the okra, carefully pour the hot brine over it. Make sure the okra is fully submerged in the brine. Leave about 1/2 inch of headspace at the top of each jar. Wipe the rims of the jars with a clean cloth to remove any residue. Place the sterilized lids on top and screw on the metal bands. Do this securely but don’t over-tighten. Now, lower the jars into a boiling water bath. Process them for 10-15 minutes to seal properly.
Cooling and Storing
Once the processing time ends, remove the jars from the water bath. Place them on a clean towel or cooling rack. Allow them to cool completely. You will hear a popping sound from the lids, which means they sealed correctly. Store the sealed jars in a cool, dark place. Let them sit for at least 1 week for the flavors to develop.
Tips & Tricks
Ensuring Proper Sealing
To check if the jars sealed correctly, listen for a popping sound. This sound means the lid has sealed tight. You can also press the center of the lid. If it pops back, the jar did not seal. Store any jars that did not seal in the fridge and use them within a week. Proper sealing keeps your spicy dill pickled okra fresh longer.
Adjusting Spice Level
You can customize the heat and flavor intensity of your pickled okra. If you like it spicier, add more red pepper flakes. For a milder taste, reduce the flakes. You can also try using fresh jalapeños or even other peppers. This way, you can make the dish perfect for your taste buds.
Using Fresh Ingredients
Using fresh okra and herbs is key to great flavor. Fresh okra has a crisp texture and bright taste, making your pickles more enjoyable. Look for firm, bright green pods without blemishes. Fresh dill adds a wonderful aromatic quality. When you choose fresh ingredients, you elevate the entire dish, making it more vibrant and tasty.
Variations
Flavor Combinations
You can make spicy dill pickled okra even more exciting! Try adding cumin or coriander. These spices add warmth and depth. Cumin lends a nutty taste, while coriander offers a citrus note. Mix and match spices to find your favorite blend. Don’t be afraid to experiment! Each addition can change the flavor profile.
Vinegar Alternatives
If you want a twist, consider vinegar choices. White vinegar works well and is sharp. Rice vinegar adds a sweet touch, making it milder. Flavored vinegars, like balsamic or red wine, can also enhance your pickles. Each vinegar brings a unique taste, making your okra special. You can have fun discovering new flavors.
Sweet and Spicy Versions
For a sweet and spicy kick, add fruits! Peaches and mango work great. Their sweetness balances the heat from the spices. Simply chop the fruit and add it to the jars. This twist can create a delightful contrast. You’ll enjoy the surprise of flavors in every bite. Each jar can hold a new adventure!
Storage Info
Best Storage Practices
To keep your spicy dill pickled okra fresh, store it in a cool, dark place. A pantry or cupboard works well. Make sure the jars are sealed tightly to keep air out. This helps keep the flavors strong and the okra crunchy.
Shelf Life
Sealed jars can last up to one year in the pantry. Once you open a jar, store it in the fridge. Enjoy the opened okra within two to three weeks for the best taste. Always check the date you made them to keep track.
Signs of Spoilage
Watch for changes in color and smell. If the okra looks cloudy or the brine is cloudy, it might be spoiled. Also, if you see any bubbles or foam, it’s best to throw it away. Always trust your senses; if it smells off, don’t eat it. Enjoy your okra safely!
FAQs
How long does it take to pickle okra?
It takes about 2 weeks for okra to pickle fully. The flavors need time to blend. During this time, the okra absorbs the brine and spices. For best taste, let it sit for at least a week.
Can I use frozen okra for pickling?
I do not recommend frozen okra for pickling. Frozen okra loses its crispness and texture. Fresh okra gives a better crunch and flavor. If you can, always choose fresh okra for this recipe.
Where to buy spicy dill pickled okra?
You can find spicy dill pickled okra at many grocery stores. Look in the pickle aisle or specialty food sections. Local farmers’ markets may also have homemade options. Online shops often sell jars as well.
What can I serve with pickled okra?
Pickled okra is great with sandwiches and burgers. It also adds zing to salads and charcuterie boards. Serve it as a snack on its own or with dips. The tangy flavor pairs well with meats too.
Pickling okra is a fun and easy way to enjoy fresh flavors. We covered key ingredients, step-by-step instructions, helpful tips, and creative variations to enhance your pickling experience. Remember to use fresh produce for the best taste. With proper storage, your pickled okra can last long and stay tasty. Enjoy experimenting with spices and flavors. You’ll find that homemade pickled okra adds a delicious touch to any meal. Get started today and savor the rewards of your hard work!


