Savory Seafood Pasta Salad Fresh and Flavorful Dish

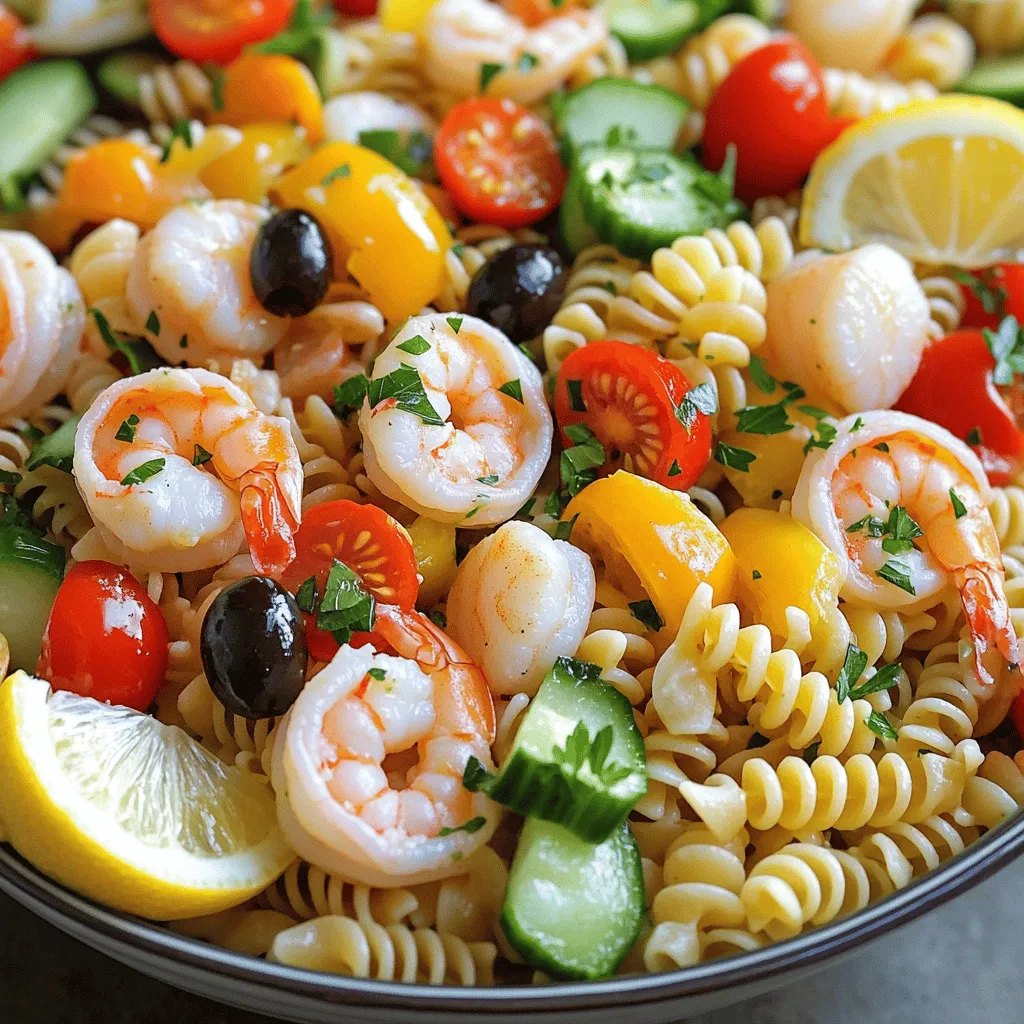
Looking to impress your guests with a dish that’s as fresh as the ocean? This Savory Seafood Pasta Salad combines tender shrimp, sweet scallops, and crisp veggies, all tossed in a zesty dressing. With easy steps and tips for perfecting your salad, you’ll serve a colorful meal that bursts with flavor. Dive into this recipe with me, and let’s create a dish that celebrates seafood in every bite!
Ingredients
Main Ingredients for Seafood Pasta Salad
– 8 oz. rotini pasta
– 1 cup cooked shrimp, peeled and deveined
– 1 cup cooked scallops
– 1/2 cup cherry tomatoes, halved
– 1/4 cup black olives, sliced
Additional Ingredients
– 1/4 cup red bell pepper, diced
– 1/4 cup red onion, finely chopped
– 1/2 cup cucumber, diced
– 1/4 cup fresh parsley, chopped
Dressing Ingredients
– 1/3 cup extra virgin olive oil
– 2 tablespoons fresh lemon juice
– 1 teaspoon Dijon mustard
– Sea salt and freshly cracked black pepper, to taste
When I make seafood pasta salad, I focus on fresh and tasty ingredients. The rotini pasta gives a nice twist and holds the dressing well. I love using shrimp and scallops for their sweet and savory taste. The halved cherry tomatoes add a burst of color and flavor. Black olives give a nice briny touch that balances the salad.
For extra crunch and freshness, I add diced red bell pepper, red onion, and cucumber. Each brings a different texture and flavor. Fresh parsley brightens up the salad and adds a pop of green.
The dressing is simple but full of flavor. I mix olive oil, lemon juice, and Dijon mustard. A good pinch of sea salt and cracked black pepper makes it perfect. This dressing ties all the ingredients together beautifully.
Step-by-Step Instructions
Cooking the Pasta
First, cook your rotini pasta. Follow the package instructions closely. This usually takes about 8-10 minutes. You want the pasta to be al dente, meaning it should still have a slight bite. Once cooked, drain the pasta in a colander. To cool it down, rinse it under cold water for a few seconds. This step helps to stop the cooking process and keep the pasta from sticking together. After rinsing, let it drain well and transfer it to a large bowl.
Making the Dressing
Now, let’s make the dressing. In a small bowl, whisk together the extra virgin olive oil and fresh lemon juice. Add in the Dijon mustard, sea salt, and freshly cracked black pepper. Whisk until you see a smooth blend. This dressing will bring all the flavors together and add a nice tang to the salad.
Combining Ingredients
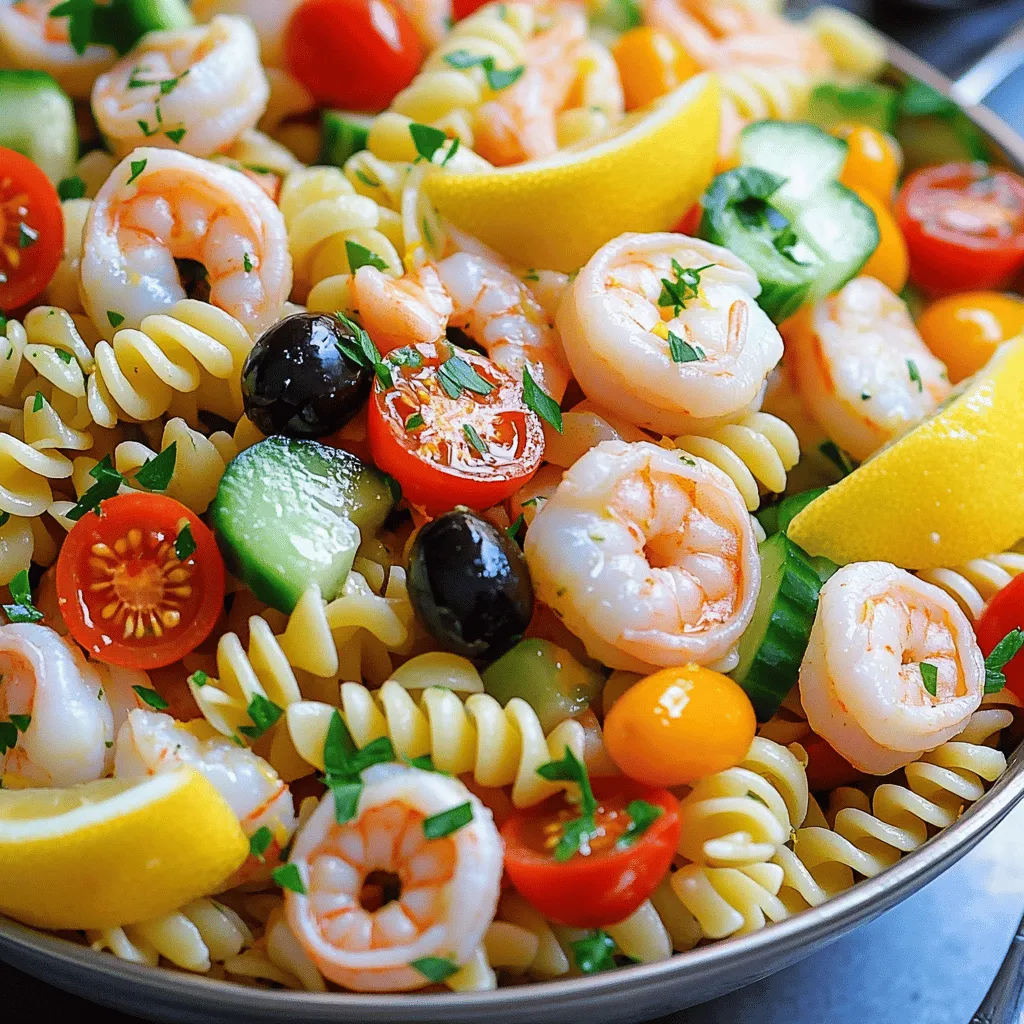
Next, it’s time to combine everything! Gently add the cooled pasta to your large mixing bowl. Then, add the cooked shrimp, scallops, halved cherry tomatoes, sliced black olives, diced red bell pepper, finely chopped red onion, diced cucumber, and chopped fresh parsley. Pour your dressing over this mix. Using a large spoon, toss everything together gently. Make sure all ingredients are coated well with the dressing, but be careful not to break the seafood. Cover the bowl and place it in the refrigerator for at least 30 minutes. This resting time allows the flavors to meld beautifully.
Tips & Tricks
Tips for Perfecting Your Seafood Pasta Salad
– Always cook shrimp and scallops until they are firm and opaque.
– Use fresh ingredients like ripe tomatoes and crisp cucumbers for the best flavor.
Dressing Adjustments
– For a tangy taste, add more lemon juice to the dressing.
– Try using a yogurt-based dressing for a creamy twist.
Presentation Tips
– Serve the salad in a large, colorful bowl for a fun look.
– Garnish with lemon slices and fresh parsley for a pop of color.
With these tips, your seafood pasta salad will shine at any gathering.

Variations
Seafood Alternatives
You can swap shrimp and scallops for other seafood options. Try using crab meat or canned tuna. Both add great flavor and texture. For a fun twist, use smoked salmon. If you prefer something different, consider a mix of clams or mussels. They bring a unique taste to your salad.
If you’re looking for vegetarian alternatives, try roasted chickpeas or marinated artichokes. These options add a hearty element to your dish. You can also use tofu for added protein. It absorbs dressings well and adds a nice texture.
Pasta Variations
Different pasta shapes can make your salad more interesting. Rotini is great, but you could try bowtie or penne pasta. These shapes hold the dressing well and are fun to eat. For a light option, use whole wheat pasta. It offers more fiber and nutrients.
If you need gluten-free options, look for rice or quinoa pasta. These alternatives work well and keep the dish light. They cook similarly to regular pasta, so no need to worry about texture.
Flavor Enhancements
Adding different herbs and spices can elevate your seafood pasta salad. Fresh basil or dill can add a nice twist. You can also sprinkle in some red pepper flakes for a bit of heat. Just a pinch can make a big difference.
Incorporating additional vegetables or ingredients can enhance the flavors even more. Try adding avocado for creaminess or arugula for peppery notes. You can also mix in some capers for a briny flavor. Each option brings new layers to your meal.
Storage Info
Storing Leftovers
To keep your seafood pasta salad fresh, place it in an airtight container. This helps maintain its taste and texture. Make sure to refrigerate the salad within two hours of serving. Seafood pasta salad lasts about three days in the fridge. Always check for signs of spoilage before eating leftovers. If it smells off or looks strange, it’s best to toss it.
Freezing Instructions
You can freeze seafood pasta salad, but it may change in texture. The seafood might become rubbery when thawed. To freeze, place it in a freezer-safe container. Make sure to leave some space for expansion. When ready to eat, thaw it in the fridge overnight. After thawing, give it a good stir to mix the ingredients. If the salad seems dry, add a little olive oil or lemon juice to freshen it up.
FAQs
Common Questions About Seafood Pasta Salad
How long does seafood pasta salad take to prepare?
This salad takes about 15 minutes to prep and 30 minutes to chill. So, plan for around 45 minutes total. You can enjoy this fresh dish in no time.
Can I use frozen seafood for this recipe?
Yes, frozen seafood works well! Just thaw it first and pat it dry. This helps keep the salad from becoming watery.
What sides pair well with seafood pasta salad?
Great sides include crusty bread, green salad, or grilled veggies. They complement the flavors nicely without overwhelming the dish.
Recipe Specific Inquiries
Is this recipe gluten-free?
No, this recipe is not gluten-free because of the rotini pasta. However, you can use gluten-free pasta to make this dish suitable for gluten-free diets.
Can I make this salad a day in advance?
Yes, you can! Making it a day ahead lets the flavors blend better. Just keep it covered in the fridge until you serve it.
Dietary Adjustments
Tips for making it dairy-free or low-carb
To make it dairy-free, simply skip any cheese. For a low-carb version, use spiralized zucchini or cauliflower rice instead of pasta.
Suggestions for allergen-friendly versions
If you have shellfish allergies, try using chicken or tofu. You can also skip the seafood altogether and add more veggies for a fresh twist.
In summary, we explored the key ingredients and preparation steps for a delicious seafood pasta salad. I shared tips for perfecting the dish and ways to customize it. You can make it your own with different seafood or pasta shapes. This salad is not just tasty but also easy to store. With proper care, your leftovers will last. Enjoy making this dish, whether for a gathering or a simple meal at home. It’s versatile, fresh, and sure to please everyone at your table.


![- ripe tomatoes - onion - garlic - extra virgin olive oil - salt and pepper - vegetable broth - granulated sugar - fresh basil leaves - balsamic vinegar - heavy cream (optional) When I make roasted tomato basil soup, I gather the freshest ingredients. Ripe tomatoes are the star. They give the soup its rich flavor. I love using juicy, in-season tomatoes for the best taste. Next, I chop a large onion. It adds sweetness and depth. I also use garlic, which gives the soup a warm, inviting aroma. Extra virgin olive oil is a must. It helps to roast the veggies and adds healthy fats. Salt and pepper season the soup perfectly. I then choose low-sodium vegetable broth. It keeps the soup light but flavorful. A teaspoon of granulated sugar balances the acidity of the tomatoes. Fresh basil leaves add a fragrant touch. I use them generously for that classic flavor. A splash of balsamic vinegar brightens the taste. Finally, I consider adding heavy cream. It makes the soup creamy and rich, but it's optional. This combination of ingredients creates a delightful soup that warms the soul. For the complete recipe, check out the [Full Recipe]. Tomatoes are full of vitamins. They have vitamin C, potassium, and antioxidants. Eating tomatoes can support heart health and skin. Basil is more than just a herb. It has anti-inflammatory properties and is rich in vitamins A and K. It can help boost your immune system too. Olive oil is known for its health benefits. It contains healthy fats that can lower bad cholesterol. It also has antioxidants that help fight disease. These ingredients not only taste great but are good for you too! First, preheat your oven to 425°F (220°C). This helps the tomatoes roast perfectly. While the oven heats, prepare your fresh ingredients. Take 2 pounds of ripe tomatoes and cut them into quarters. Next, chop 1 large onion into bite-sized pieces. Finally, peel 4 cloves of garlic and leave them whole. Now, it's time to roast. On a large baking sheet, arrange the quartered tomatoes, chopped onion, and whole garlic cloves. Drizzle ¼ cup of extra virgin olive oil over the veggies. Season with salt and freshly ground black pepper to taste. Toss everything together to coat evenly. Roast the vegetables in the oven for about 25-30 minutes. You're looking for caramelized edges and soft onions. The aroma should be sweet and inviting. Once roasted, take the baking sheet out and let the veggies cool for a few minutes. In a large pot, combine the roasted vegetables with 2 cups of vegetable broth. Add 1 teaspoon of granulated sugar and 1 cup of fresh basil leaves. Heat the mixture over medium until it simmers. This helps all the flavors blend nicely. Next, you’ll blend the soup. Use an immersion blender for a smooth consistency. If you don’t have one, carefully pour the soup into a blender in batches. Return the blended soup to the pot. Add 1 teaspoon of balsamic vinegar for a hint of tang. For a creamy texture, stir in ½ cup of heavy cream if you like. Taste your soup and adjust the seasoning with salt and pepper as needed. Serve hot in bowls, garnishing with fresh basil leaves or a swirl of olive oil for a nice touch. For the full recipe, check out the detailed instructions. Seasoning is key to great soup. Use salt and pepper to enhance the taste. Adding a sprinkle of sugar balances the acidity of tomatoes. Always taste as you go. This lets you adjust flavors to your liking. Roasting is also vital. Roast your veggies for 25 to 30 minutes. This helps develop a deep, sweet flavor. The edges should caramelize nicely. You want that lovely aroma wafting from your oven. To make a rich soup, you can add heavy cream. This gives a smooth, creamy texture. If you want a lighter option, use blended beans or pureed potatoes. Both will add body without extra fat. When blending, make sure to mix well. This helps create a uniform texture. If you prefer a chunkier soup, blend only half. This way, you get a mix of smooth and textured soup. A beautiful presentation makes your dish shine. Garnish with fresh basil leaves for color. A swirl of olive oil adds a nice touch, too. Serve your soup in deep bowls. Pair it with crusty artisan bread or grilled cheese. This gives a nice crunch and complements the soup. You can also add some croutons on top for extra texture. Enjoying the soup is about the experience, so make it look good! {{image_4}} You can change this soup by adding more vegetables. Carrots add sweetness. Bell peppers bring a nice crunch. Chopping them into small pieces helps them cook well. You might also try adding zucchini for a fresh twist. Using fresh herbs like thyme or oregano can boost the flavor. These herbs add a new layer of taste to your dish. If you want a vegan soup, you can skip the heavy cream. Use coconut milk instead for a creamy texture. Almond milk is another good choice. For broth, make sure to use vegetable broth. This keeps the soup vegan. Adjust the seasoning to fit your taste. You can change the soup's taste with spices. Adding cumin or smoked paprika gives a warm depth. A pinch of chili flakes can add heat. You can also explore cultural variations. For example, Italian versions may include a dash of pesto. Some Mexican versions use lime juice and cilantro. These spices and ingredients make your soup unique and exciting. For the full recipe, check out the [Full Recipe]. After you enjoy your roasted tomato basil soup, you may have some left. Here’s how to keep it fresh: - Refrigeration tips: Store the soup in an airtight container. It lasts for about 4 to 5 days in the fridge. Let it cool before sealing to prevent moisture buildup. - Freezing the soup: If you want to save it longer, freezing works well. Use freezer-safe bags or containers. Leave some space at the top as the soup expands when frozen. It can last up to 3 months in the freezer. When you're ready to enjoy your soup again, here’s how to reheat it without losing flavor: - Methods to reheat without losing flavor: The best way is to use the stovetop. Pour the soup into a pot and heat it over medium heat. Stir often until it's warm. You can also use a microwave. Heat in short bursts, about 1 to 2 minutes, stirring in between. - Tips for maintaining texture: If the soup seems too thick, add a splash of broth or water. This helps restore its creamy texture. Always taste before serving to adjust the seasoning if needed. Roasted Tomato Basil Soup lasts about 5 days in the fridge. Store it in an airtight container. Make sure it cools down before sealing. If you see any mold, toss it right away. For best taste, heat and enjoy it within those days. Yes, you can use canned tomatoes. They are convenient and often more consistent in flavor. Canned tomatoes save time, but fresh tomatoes add a brighter taste. When using canned, choose whole or crushed tomatoes without added sugars. Drain excess liquid to avoid a watery soup. You can pair the soup with a variety of dishes. Some great options include: - Grilled cheese sandwiches - Crusty artisan bread - Fresh basil pesto pasta - A simple mixed green salad These dishes complement the soup's rich flavors and add texture to your meal. For a complete experience, consider adding a dollop of sour cream or a sprinkle of Parmesan cheese on top. Want to explore more? Check the Full Recipe for more serving ideas! This article explored how to make a tasty Roasted Tomato Basil Soup. We covered the ingredients you need, their benefits, and the steps to create this dish. You learned about helpful tips and how to customize the recipe to suit your taste. Storing and reheating the soup was also discussed for your convenience. Now, you have all the tools to make this simple and delicious soup. Enjoy cooking and sharing it with friends and family. Your kitchen can be a place of joy and flavor!](https://fastmealmate.com/wp-content/uploads/2025/07/2e40192c-dd82-4486-9582-e1e9c28fcf57-768x768.webp)

![To create a delightful 20-minute couscous, you need a few simple ingredients. Here’s what you will need: - 1 cup couscous - 1 ¼ cups vegetable broth (or water) - 1 cup cherry tomatoes, halved - 1 small cucumber, diced into small cubes - ½ red onion, finely chopped - ½ cup Kalamata olives, pitted and sliced into rings - 1 cup fresh spinach, roughly chopped - ¼ cup feta cheese, crumbled - 2 tablespoons extra virgin olive oil - 1 tablespoon fresh lemon juice - 1 teaspoon dried oregano - Salt and freshly ground black pepper to taste These ingredients bring a burst of flavor and color to your meal. Couscous cooks fast and absorbs the broth well, making it fluffy. The cherry tomatoes and cucumber add crunch, while olives give a salty kick. Fresh spinach provides nutrients, and feta cheese adds creaminess. Use good olive oil and fresh lemon juice for a bright taste. This mix of flavors makes your dish fresh and inviting. For the detailed recipe, check out the Full Recipe section. To start, bring 1 ¼ cups of vegetable broth or water to a rolling boil in a saucepan. This step is crucial for cooking the couscous properly. Once the liquid bubbles up, remove the pan from the heat. Stir in 1 cup of couscous and cover the pan with a lid. Let it sit for 5 minutes. This allows the couscous to absorb all the liquid, making it fluffy and light. While the couscous cooks, grab a large mixing bowl. Combine 1 cup of halved cherry tomatoes, 1 small diced cucumber, ½ finely chopped red onion, and ½ cup of sliced Kalamata olives. Toss in 1 cup of roughly chopped fresh spinach. Mixing these colorful veggies adds crunch and freshness to your meal. In a small bowl, whisk together 2 tablespoons of extra virgin olive oil, 1 tablespoon of fresh lemon juice, and 1 teaspoon of dried oregano. Add a pinch of salt and pepper to taste. This dressing brings all the flavors together and enhances the dish's brightness. Pour the dressing over the vegetable mix and toss gently. This helps each piece get coated well. Next, fluff the couscous with a fork, breaking apart any clumps. Add the fluffed couscous to the veggie mixture and stir until everything is mixed evenly. To finish, sprinkle ¼ cup of crumbled feta cheese on top. This adds a nice salty bite and creamy texture to the dish. Check the [Full Recipe] for all details. To make your couscous extra tasty, add fresh herbs like parsley or cilantro. You can also try spices like cumin or paprika for more depth. Feel free to swap feta cheese with goat cheese or even mozzarella if you prefer. Each cheese brings its own flavor and texture to the dish. For the best fluff, always use a fork to fluff your couscous. This helps break up any clumps. When cutting vegetables, try to make them uniform in size. This way, they cook evenly and look nice in your dish. Serve your couscous in colorful bowls to make it pop. You can also spread it on a large platter for a family-style meal. For a finishing touch, sprinkle extra crumbled feta and fresh herbs on top. This adds color and makes the dish more inviting. {{image_4}} You can change up the recipe in many ways. Use seasonal vegetables for a fresh twist. Think about adding bell peppers, zucchini, or even asparagus. These veggies add color and flavor to your dish. Protein is another way to mix things up. Chickpeas are great for a plant-based option. They add a nice texture and protein boost. Grilled chicken is another good choice if you want meat. It pairs well with the other flavors in couscous. The flavor can shift based on your ingredients. A Mediterranean style is bright and fresh. Use herbs like basil, parsley, or mint for a burst of taste. On the other hand, a Middle Eastern twist adds warmth. Spices like cumin or coriander can really change the game. Dressings also play a big role. You can use a tangy vinaigrette or a creamy yogurt dressing. Each option gives the dish a new taste profile. Experiment with what you like best. If you're looking for gluten-free options, consider quinoa or rice. Both work well in place of couscous. They provide a similar texture and are easy to cook. For vegan meals, swap out the cheese and broth. Use a plant-based broth and nuts or seeds instead of cheese. Nutritional yeast can give a cheesy flavor without dairy. These changes keep the dish tasty and suitable for all diets. To keep your leftover couscous fresh, use airtight containers. Glass containers work great, as they do not absorb smells. Plastic containers are also fine if they are good quality. Make sure to cool the couscous completely before sealing the container. This reduces moisture inside and keeps it from getting soggy. When refrigerating, store couscous within two hours of cooking. This helps prevent bacteria growth. Place it in the fridge right away. If you plan to eat it later, consider separating it from any dressing or veggies. This keeps the couscous from becoming mushy. Reheating couscous is easy. The best method is to use the microwave. Start by placing your couscous in a microwave-safe bowl. Add a few drops of water to keep it moist. Cover it with a damp paper towel and heat for 1-2 minutes. Stir halfway through for even heat. You can also reheat couscous on the stove. Add a splash of water to a pan over low heat. Stir often until warm. This method helps keep the couscous fluffy. Avoid high heat, as it may dry out the grains. When stored properly, couscous lasts about 3 to 5 days in the fridge. Check for any signs of spoilage before eating. If you see mold or a sour smell, it's best to throw it away. Fresh couscous should have a light, fluffy texture. If it feels hard or clumpy, it may have gone bad. Always trust your senses when deciding whether to eat leftovers. You can tell when couscous is done by its texture. Perfectly cooked couscous is light and fluffy. It should not be sticky or mushy. After letting it sit, fluff it with a fork. This helps break up clumps and adds air. Yes, you can meal prep couscous. Cook it in advance and store it in the fridge. It keeps well for three to five days. Just make sure to let it cool before storing. You can add your veggies and dressing just before eating. This keeps the flavors fresh. Couscous pairs well with many dishes. You can serve it with grilled chicken or fish. A fresh salad is a great side too. Roasted vegetables add nice flavor. You can also enjoy it with hummus or tzatziki for a dip. Check out the " Speedy Mediterranean Couscous Delight" for the detailed recipe and enjoy this quick meal! This blog post guides you to make a tasty Mediterranean couscous dish. We covered the key ingredients, step-by-step cooking instructions, and helpful tips to enhance flavor. Remember, you can mix in different veggies or proteins to make it your own. Storing and reheating couscous is easy, too, so enjoy your leftovers! This simple recipe is perfect for meal prep or a quick dinner. You’re now set to impress your family and friends with this delightful dish. Dive in, create, and enjoy every bite!](https://fastmealmate.com/wp-content/uploads/2025/06/3a323c96-3f14-4a25-b011-50d8f6184ffe-768x768.webp)
