Rainbow Orzo Salad Fresh and Flavorful Dish

Are you ready to brighten up your meal plans? This Rainbow Orzo Salad is packed with vibrant colors and fresh flavors that will make your taste buds dance. With simple ingredients and easy steps, you can create a dish that’s not only healthy but also delightful. Perfect for lunch, dinner, or a potluck, this salad is your ticket to a cheerful and delicious meal experience. Let’s dive in and see how you can make it!
Ingredients
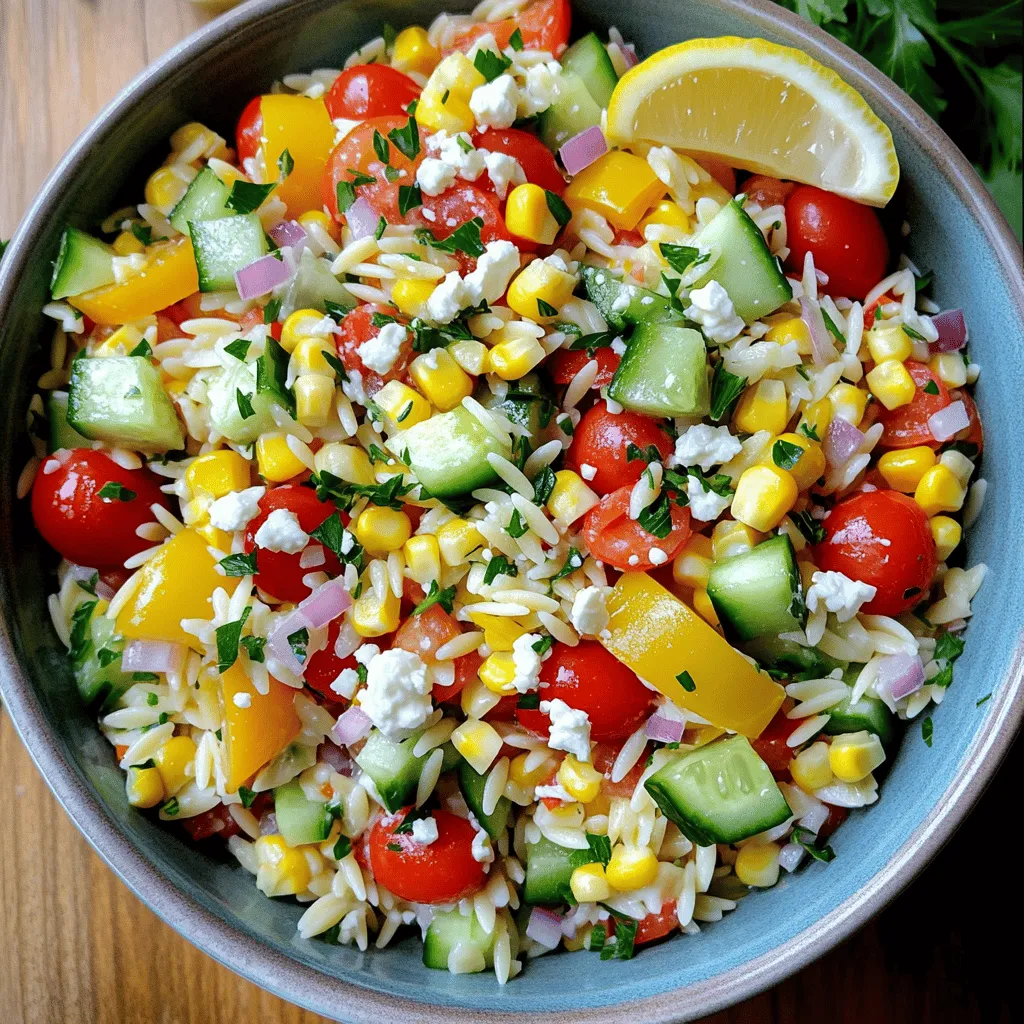
Complete List of Ingredients for Rainbow Orzo Salad
To make a vibrant Rainbow Orzo Salad, gather these fresh ingredients:
– 1 cup orzo pasta
– 1 cup cherry tomatoes, halved
– 1 yellow bell pepper, diced
– 1 cucumber, diced
– 1 cup corn kernels (choose between fresh, frozen, or canned)
– 1/2 red onion, finely chopped
– 1/2 cup feta cheese, crumbled
– 1/4 cup fresh parsley, finely chopped
– 1/4 cup extra virgin olive oil
– 3 tablespoons freshly squeezed lemon juice
– Salt and pepper to taste
– Optional: 1/4 teaspoon red chili flakes for a spicy kick
Optional Ingredients for Customization
Feel free to add your twist! You can try:
– Black olives for a briny touch
– Avocado for creaminess
– Grilled chicken for extra protein
– Spinach or kale for a green boost
– Nuts or seeds for crunch
Dietary Considerations
This salad is easy to adapt to various diets. For gluten-free, swap orzo for rice or quinoa. To make it vegan, replace feta with a plant-based cheese or omit it entirely. Check your ingredients for gluten or dairy, and you can enjoy this salad with ease!
Step-by-Step Instructions
Cooking the Orzo Pasta
To start, bring a pot of salted water to a boil. Add 1 cup of orzo pasta. Cook it according to the package directions until it is al dente. This usually takes about 8 to 10 minutes. Once cooked, drain the orzo in a colander. Rinse it under cold running water to stop the cooking. This step keeps the orzo from getting mushy. Set it aside to cool completely.
Preparing the Vegetables
Next, grab a large mixing bowl. Add 1 cup of halved cherry tomatoes, 1 diced yellow bell pepper, and 1 diced cucumber. Also, include 1 cup of corn kernels. You can use fresh, frozen, or canned corn. Finally, add 1/2 finely chopped red onion. Stir well to mix all these colorful veggies. Each adds a nice crunch and flavor to the salad.
Combining Ingredients and Dressing the Salad
Now, gently add the cooled orzo pasta to the bowl of veggies. This creates a bright mix of colors. Drizzle 1/4 cup of extra virgin olive oil and 3 tablespoons of lemon juice over the combined mix. Use a large spoon or spatula to stir everything together. Make sure all the ingredients get coated with the dressing.
Chilling the Salad for Optimal Flavor
For the best taste, cover the bowl with plastic wrap or a lid. Chill the salad in the fridge for at least 30 minutes. This resting time helps all the flavors blend well. When you are ready to serve, you will notice how fresh and vibrant the salad tastes. Enjoy this delightful dish with family or friends!
Tips & Tricks
Best Practices for Cooking Orzo
Cooking orzo is simple but requires attention. First, always use a pot of salted water. This adds flavor to the pasta. Cook the orzo until it’s al dente, usually about 8-10 minutes. Drain it well, then rinse under cold water. This stops the cooking and keeps it firm. This step helps maintain the perfect texture in your Rainbow Orzo Salad.
How to Enhance the Flavor of Your Salad
To make your salad pop, use fresh ingredients. Fresh herbs like parsley add brightness. A squeeze of lemon juice brings a zesty kick. I love adding a pinch of red chili flakes for heat. It balances the creaminess of feta cheese. Mixing in a variety of colors makes the salad inviting. Don’t forget to taste and adjust the seasoning as you go!
Serving Suggestions for Rainbow Orzo Salad
Serve your Rainbow Orzo Salad in a large, bright bowl. This makes the colors stand out. You can also use mason jars for a fun, portable option. I like to add extra parsley and a lemon wedge on top for garnish. This not only looks great but also adds freshness. Enjoy your salad as a side dish or a light meal. It’s perfect for picnics or potlucks.

Variations
Additional Vegetables to Include
You can customize Rainbow Orzo Salad with other veggies. Consider adding:
– Spinach or arugula for extra greens.
– Shredded carrots for a sweet crunch.
– Broccoli florets for a hearty touch.
– Radishes for a peppery bite.
These additions boost color and nutrition. You can mix and match based on what you enjoy.
Protein Additions
You can make your salad more filling by adding protein. Here are some tasty options:
– Chickpeas for a hearty, plant-based boost.
– Grilled chicken for a lean protein source.
– Shrimp for a seafood twist.
– Tofu for a great vegetarian choice.
Adding protein turns this salad into a full meal.
Different Dressings to Try
While the olive oil and lemon dressing is great, you can try other flavors. Here are some ideas:
– Balsamic vinaigrette for a tangy kick.
– Greek yogurt dressing for a creamy texture.
– Honey mustard dressing for a sweet touch.
Experimenting with dressings can change the salad’s taste. You might discover a new favorite!
Storage Info
How to Properly Store Leftover Salad
To store leftover Rainbow Orzo Salad, place it in a clean, airtight container. Ensure the lid seals tightly to keep air out. This helps maintain freshness and flavor. You can refrigerate the salad for later use. Avoid letting it sit out for more than two hours to keep it safe to eat.
Shelf Life of Rainbow Orzo Salad
When stored correctly, this salad can last up to three days in the fridge. After that, the flavors may fade, and the texture could change. If you notice any off-smells or unusual textures, it’s best to toss it. Always trust your senses when it comes to food safety.
Tips for Refreshing Leftovers
To refresh your Rainbow Orzo Salad, start by adding a splash of fresh lemon juice. This brightens the flavors and brings back some zest. You can also mix in extra herbs or a drizzle of olive oil. If the salad seems dry, adding a little more dressing can help restore its original taste and texture. Enjoy your colorful meal again!
FAQs
How can I make Rainbow Orzo Salad ahead of time?
You can make Rainbow Orzo Salad a day in advance. Just prepare the salad as usual. Store it in the fridge in a sealed container. This allows the flavors to blend well. When you’re ready to serve, give it a quick stir. You might want to add a bit more dressing to freshen it up.
Can I use a different type of pasta?
Yes, you can use any pasta you like. Small shapes like bow tie or penne work great too. Just keep in mind that cooking times may differ. Follow the package directions for the new pasta. This way, you ensure it cooks just right.
Is Rainbow Orzo Salad suitable for meal prep?
Absolutely! This salad is perfect for meal prep. It lasts well in the fridge for up to three days. Portion it into individual containers for easy grab-and-go lunches. The colors and flavors remain bright and tasty, making it a fun meal option.
What can I serve with Rainbow Orzo Salad?
Rainbow Orzo Salad pairs well with many dishes. Consider serving it with grilled chicken or fish for extra protein. It also goes well with crusty bread or a simple green salad. This versatility makes it a great side dish for any meal.
Rainbow Orzo Salad is a fun and tasty dish. We explored all its ingredients, steps, and tips. You can customize it with extra veggies or proteins too. Remember to chill your salad for the best taste. Store leftovers properly to enjoy later. This salad is perfect for any meal or event. Embrace the vibrant flavors and make it your own. Enjoy creating your own Rainbow Orzo Salad masterpiece!


![- 1 pound boneless, skinless chicken thighs, cut into 1-inch cubes - 1/4 cup soy sauce - 1/4 cup honey - 2 tablespoons rice vinegar - 1 tablespoon sesame oil - 2 cloves garlic, finely minced - 1 teaspoon fresh ginger, grated - 1 red bell pepper, cut into 1-inch squares - 1 yellow bell pepper, cut into 1-inch squares - 1 zucchini, sliced into thick rounds The main ingredients are key to a great teriyaki dish. Chicken thighs are juicy and flavorful. The soy sauce and honey create a sweet and salty marinade. Rice vinegar adds a slight tang. Garlic and ginger bring warmth and depth to the flavor. The colorful veggies add crunch and a fresh touch. - 1 teaspoon cornstarch mixed with 1 tablespoon cold water (optional, for thickening the sauce) - Sesame seeds, for garnish - Fresh cilantro, for garnish Cornstarch helps thicken the teriyaki sauce. This makes it stick better to the chicken. Sesame seeds and cilantro are perfect for garnishing. They add a nice look and extra flavor. - Bamboo skewers (soaked in water for at least 30 minutes) - Grill or grill pan You need skewers to hold the chicken and veggies. Soaking them in water prevents burning. A grill or grill pan cooks the skewers evenly. It gives the chicken those beautiful grill marks. For the full recipe and more tips, check out the Full Recipe section. To start, we need to mix the marinade. In a medium bowl, combine the soy sauce, honey, rice vinegar, sesame oil, minced garlic, and grated ginger. Whisk these ingredients together until they blend well. This mixture is key to our teriyaki chicken skewers. Marinating is very important. It lets the chicken soak up all the nice flavors. Aim for at least 30 minutes. For the best taste, try to marinate for 1 to 2 hours. This makes a big difference in flavor. Now, it’s time to thread the chicken and veggies onto the skewers. First, take your soaked bamboo skewers and start with a piece of chicken. Then, add a square of red bell pepper, followed by a piece of yellow pepper. Next, add a thick slice of zucchini. Repeat this pattern. This colorful arrangement is not just tasty; it looks great too! Make sure the pieces fit snugly but not so tightly that they can't cook well. A nice visual appeal will impress everyone at the table. When it’s time to cook, we can grill the skewers. Preheat your grill or grill pan to medium-high heat. Place the skewers on the grill and cook them for about 10 to 12 minutes. Turn them occasionally for even cooking. If you prefer, you can also bake or broil the skewers. Just adjust the cooking time. Cook until the chicken is fully done and has lovely grill marks. For added flavor, brush the skewers with the thickened teriyaki sauce while they cook. Check the Full Recipe for more details on each step! To make a great teriyaki marinade, you need balance. Start with soy sauce for saltiness. Add honey for sweetness. Rice vinegar brings in acidity, which brightens the flavors. Garlic and ginger give depth. Ensure you mix these well. A good marinade coats the chicken evenly. For extra flavor, let the chicken sit in the marinade for longer. Aim for 1 to 2 hours for the best taste. If you want more richness, try adding a splash of orange juice. This will enhance the flavor profile. Grilling your skewers right is key. First, preheat your grill to medium-high heat. This helps get those beautiful grill marks. Place the skewers on the grill and leave them alone for a few minutes. Avoid moving them too much; let them sear. Flip them only once or twice. If you brush them with the thickened sauce, it adds a nice glaze. Keep an eye on the time; cook them for about 10-12 minutes. Common mistakes include overcrowding the grill. Give each skewer space so they cook evenly. Also, don’t skip the resting time after grilling; it helps the juices redistribute. When serving, presentation matters. Lay the skewers on a big platter. Drizzle with any leftover teriyaki sauce for extra flavor. Sprinkle sesame seeds and chopped cilantro on top. It adds color and looks inviting. For side dishes, think simple. Steamed rice or a fresh salad pairs well. You could also serve grilled veggies for a complete meal. These combinations elevate your dish and make for a delicious feast. Remember, the Full Recipe will guide you through the process! {{image_4}} You can swap chicken for other proteins like beef or tofu. Beef gives a rich, hearty taste. Tofu offers a plant-based option that absorbs flavors well. Adjust cooking times depending on what you use. Beef may need longer than chicken, while tofu cooks quicker. Always check for doneness to keep your meal safe. Feel free to include seasonal vegetables. Bell peppers, zucchini, and onions add color and crunch. Try mushrooms or cherry tomatoes for even more variety. These colorful additions not only taste great but also make your dish visually appealing. Mixing different veggies can create a vibrant plate that excites the eyes. You can use store-bought teriyaki sauce for speed. Homemade sauce allows you to control flavors better. If you want a kick, try adding chili flakes for spice. For a sweeter twist, mix in some pineapple juice. These variations help you customize the sauce to fit your taste. Check the [Full Recipe] for details on how to make your own sauce! After enjoying your teriyaki chicken skewers, you may have some leftovers. It’s best to store them right away. Place the skewers in an airtight container. This keeps them fresh and prevents odors. You can refrigerate them for up to four days. For longer storage, wrap them tightly in plastic wrap and place them in a freezer bag. You can freeze them for up to three months. Just remember to label the bag with the date. When it’s time to enjoy leftovers, reheating correctly matters. You want to keep the chicken moist. The oven works best for this. Preheat it to 350°F (175°C). Place the skewers on a baking sheet and cover them with foil. Heat for about 10-15 minutes until warm. The microwave is quicker but can dry out the chicken. If you use it, heat in short bursts of 30 seconds. Check often to avoid overcooking. Leftover teriyaki chicken skewers can last up to four days in the fridge. If frozen, they remain safe for three months. Always check for signs of spoilage before eating. If the chicken smells bad or looks off, don’t eat it. Look for a change in color or texture too. When in doubt, throw it out. Enjoying your teriyaki chicken skewers fresh is the best way to experience their flavor. For the full recipe, refer to the earlier sections. The best chicken for skewers is thighs. They stay juicy and tender when cooked. Breasts can dry out quickly. They have less fat, which makes them less forgiving. Thighs are more flavorful and can handle marinating well. Yes, you can make teriyaki chicken skewers in advance. Marinate the chicken for at least 30 minutes. For the best taste, marinate for 1 to 2 hours. You can even marinate them overnight. Cook them right before serving for the best results. You can serve teriyaki chicken skewers with many tasty sides. Rice, like jasmine or brown rice, pairs well. You can also offer stir-fried veggies for crunch. A fresh salad with sesame dressing adds a nice touch. Consider serving with grilled pineapple for a sweet twist. Explore these options to find what you love! This article covered making delicious teriyaki chicken skewers. We explored key ingredients like chicken, marinade, and vegetables. You learned how to prepare the marinade, assemble skewers, and cook on the grill. We also shared tips for flavor, grilling techniques, and serving ideas. You can mix in different proteins or vegetables and make it your own. Remember to store any leftovers properly to enjoy later. Now, get ready to impress with your new skewering skills!](https://fastmealmate.com/wp-content/uploads/2025/06/9b1dc869-68dc-4727-be9c-b0e6615ca1ac-768x768.webp)
![- Smooth natural peanut butter - Pure maple syrup or honey - Coconut oil (melted) - Rolled oats - Dark or semi-sweet chocolate chips - Unsweetened cocoa powder - Pure vanilla extract - Fine sea salt To make delicious chocolate peanut butter bars, you need these key ingredients. First, smooth natural peanut butter gives a creamy base. I love using peanut butter that has no added sugar or oils. It keeps the bars rich and healthy. Next, pure maple syrup or honey sweetens the bars. Both options work well, but maple syrup has a unique flavor. Coconut oil adds a silky texture. Make sure it’s melted for easy mixing. Rolled oats provide fiber and a chewy texture. They help hold everything together. Choose certified gluten-free oats if needed. Dark or semi-sweet chocolate chips add a sweet touch. They melt beautifully into the mixture. Unsweetened cocoa powder brings a rich chocolate flavor. I recommend high-quality cocoa for the best taste. Pure vanilla extract enhances the overall flavor, while fine sea salt balances the sweetness. When making these bars, accurate measurements are key. If you measure wrong, the texture may change. I suggest using a kitchen scale for best results. A scale gives exact amounts, which is very helpful. Use measuring cups for dry ingredients and liquid measuring cups for liquids. Make sure to level off dry ingredients for accuracy. This helps achieve the perfect consistency in your bars. You can customize these bars easily. For sweeteners, try agave syrup or brown rice syrup. Both options work well if you want to change things up. If you prefer a different nut butter, almond or cashew butter are great choices. Just remember that these may alter the taste a bit. For gluten-free options, use certified gluten-free oats. This way, everyone can enjoy these tasty treats without worry. You can find many useful substitutions to fit your needs. Check out the Full Recipe for detailed steps to create your own chocolate peanut butter bars! Start by lining an 8x8 inch baking dish with parchment paper. This helps with easy removal later. Leave some paper overhang on two sides. It makes lifting the bars out simple. Next, grab a large mixing bowl. Combine 1 cup of smooth peanut butter, 1/2 cup of pure maple syrup, and 1/4 cup of melted coconut oil. Use a whisk or spatula to mix until you see a smooth blend. Now it's time to add the dry ingredients. Toss in 1 cup of rolled oats, 1/2 cup of unsweetened cocoa powder, 1 teaspoon of pure vanilla extract, and 1/4 teaspoon of fine sea salt. Mix everything well until you get a thick batter. Now, gently fold in 1/2 cup of dark or semi-sweet chocolate chips. Make sure they spread evenly through the mix. Transfer this mixture into your lined baking dish. Use a spatula or your hands to press it down firmly. You want a compact, even layer. Once done, place the dish in the fridge. Chill it for at least 1 to 2 hours until the mixture feels firm. For the complete recipe, check the Full Recipe section. To make the best chocolate peanut butter bars, focus on texture. You want a smooth, firm bar that holds together well. Use natural peanut butter for creaminess. If your bars turn out dry or crumbly, it often means too many dry ingredients. Stick to the recipe and measure carefully. Mixing well helps combine all the ingredients and avoids clumps. You can boost flavor with simple add-ins. A splash of pure vanilla extract adds depth. A sprinkle of fine sea salt can enhance sweetness too. Consider adding a bit of cinnamon for warmth or even a few tablespoons of crushed nuts for crunch. Each small change can make your bars even better. Presentation matters when serving these bars. Cut them into neat squares or rectangles. Arrange them on a colorful plate for a pop. Drizzling melted chocolate over the top makes them look fancy. You can also sprinkle some crushed peanuts or a pinch of sea salt on top for a rustic touch. These small efforts make your treat feel special. For the full recipe, check out the [Full Recipe]. {{image_4}} If you want to make these bars healthier, you have options. You can use less sweetener. Try using only 1/4 cup of pure maple syrup. You can also replace coconut oil with unsweetened applesauce. This swap cuts calories and adds moisture. Another great idea is to use a sugar substitute. Look for options like stevia or monk fruit. These can help you cut sugar without losing sweetness. Want to switch up the flavor? Add fruits like mashed bananas or shredded coconut. Bananas give a creamy texture, while coconut adds a tropical twist. You can even mix in some almond extract for a nutty flavor boost. Experiment with different nut butters too! Almond butter or cashew butter can change the taste. Each nut butter brings a unique flavor. It’s fun to find your favorite blend. Toppings can make your bars even better. Try sprinkling crushed nuts on top. Walnuts or pecans add a nice crunch. You can also use coconut flakes for a chewy texture. For a sweet finish, drizzle melted chocolate over the top. You can use dark, milk, or even white chocolate. This extra layer makes the bars look fancy and taste amazing. For the full recipe, check out the detailed instructions above. To keep your chocolate peanut butter bars fresh, use an airtight container. This helps prevent moisture and keeps them from drying out. You can store them in the refrigerator or freezer, depending on how long you want to keep them. If you plan to eat them within a week, the fridge is perfect. For longer storage, the freezer is your best option. In the fridge, these bars can last about one week. If you notice any changes in color or smell, it's best to throw them away. Signs of spoilage include a dry texture or a strange odor. Always inspect your bars before enjoying them. You can freeze the bars either one by one or as a whole batch. If you freeze them individually, wrap each bar in plastic wrap or foil. This way, you can grab one whenever you want a treat. If you prefer to freeze the whole batch, just place the container in the freezer. When you're ready to eat, let them thaw in the fridge for a few hours. For the full recipe, check the earlier section. Yes, you can use crunchy peanut butter! It adds a fun texture. The bars will have a nice bite from the peanut pieces. Keep in mind, the flavor may be more intense with crunchy peanut butter. If you enjoy that nutty crunch, go for it! To check if the bars are set, gently press the top with your finger. If it feels firm and springs back, they are ready. You can also look for a slight sheen on the surface. If it’s still soft, give it more time in the fridge. Patience makes perfect bars! For clean cuts, use a sharp knife. Run the knife under hot water, then dry it off. This helps the knife glide through the bars easily. Cut them into squares or rectangles, depending on your preference. If they crumble, try chilling them longer before cutting. Absolutely! To make these bars vegan, use maple syrup instead of honey. Ensure your chocolate chips are dairy-free. Check that your peanut butter has no added ingredients. With these swaps, you can enjoy a tasty vegan treat! In summary, this guide covered how to make delicious no-bake bars. You learned about the key ingredients, measurement tips, and how to mix everything smoothly. We shared storage techniques to keep your bars fresh and variations to suit your taste. Remember, small changes can lead to big flavor. Experiment with different add-ins and toppings to make these bars your own. By following these tips, you’ll enjoy tasty treats that fit your needs. Enjoy making your no-bake bars!](https://fastmealmate.com/wp-content/uploads/2025/06/11f9b23d-ca49-49dd-b442-fa08a6216cde-768x768.webp)