Pumpkin Zucchini Bread Flavorful and Easy Recipe

Are you ready to fill your kitchen with the warm, delicious scents of fall? This Pumpkin Zucchini Bread recipe is not only tasty but also super easy to make! With fresh zucchini and creamy pumpkin, you’ll enjoy a moist, flavorful loaf. Whether you’re a baking pro or just starting, my step-by-step guide will help you whip up this delightful treat in no time. Let’s dive into the details!
Ingredients
To make pumpkin zucchini bread, gather the following ingredients:
– 1 cup freshly grated zucchini
– 1 cup canned pumpkin puree
– 1/2 cup vegetable oil
– 1 cup brown sugar, tightly packed
– 1/2 cup granulated sugar
– 3 large eggs, at room temperature
– 2 cups all-purpose flour, sifted
– 1 teaspoon baking powder
– 1 teaspoon baking soda
– 1 teaspoon ground cinnamon
– 1/2 teaspoon ground nutmeg
– 1/2 teaspoon ground ginger
– 1/2 teaspoon salt
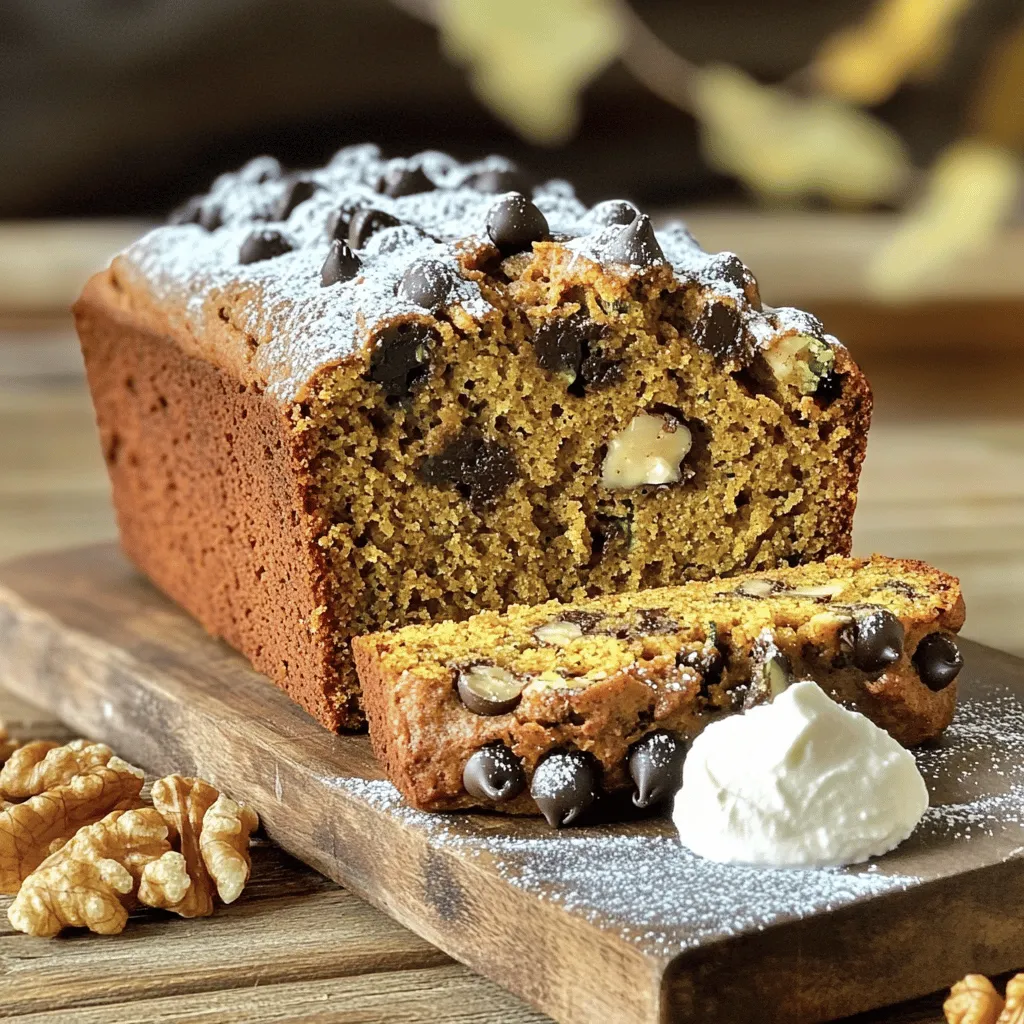
– 1 cup chopped walnuts or pecans (optional)
– 1/2 cup semi-sweet chocolate chips (optional)
Using fresh zucchini adds moisture and texture to the bread. Canned pumpkin puree brings a warm flavor and color. Vegetable oil keeps the bread tender. The combination of brown and granulated sugar offers depth in sweetness.
Eggs act as a binder, holding everything together. All-purpose flour provides structure. Baking powder and baking soda help the bread rise. Ground spices like cinnamon, nutmeg, and ginger enhance the flavor profile. Salt balances the sweetness.
Optional mix-ins like nuts and chocolate chips add crunch and sweetness. Feel free to adjust these to your taste.
Step-by-Step Instructions
Preparing the Oven and Pan
– Preheat oven to 350°F (175°C).
– Prepare a 9×5 inch loaf pan by greasing it or lining it with parchment paper.
Mixing Wet Ingredients
– In a large bowl, combine grated zucchini, pumpkin puree, and sugars.
– Add vegetable oil and eggs. Mix until everything is smooth and well combined.
Combining Dry Ingredients
– In another bowl, sift together flour, baking powder, baking soda, and spices.
– Add salt to this dry mix, making sure to mix well.
Folding Ingredients Together
– Gently fold the dry mix into the wet mixture. Stir until just combined.
– If you want some crunch, gently fold in walnuts or pecans and chocolate chips.
Baking the Bread
– Pour the batter into the prepared loaf pan.
– Bake for 55-65 minutes. Check with a toothpick; it should come out clean.
Tips & Tricks
Ensuring Moisture and Texture
To keep your pumpkin zucchini bread moist, do not overmix the batter. When you combine the wet and dry ingredients, mix just until they blend. A few lumps are fine. This helps the bread stay soft and tender.
Proper egg incorporation is also key. Add each egg one at a time and mix well before adding the next. This step ensures even mixing and a smooth texture throughout the bread.
Checking for Doneness
To check if your bread is done, use a toothpick. Insert it in the center; if it comes out clean, your bread is ready. If it has batter on it, bake a bit longer.
Sometimes the top may brown too quickly. If this happens, cover it loosely with aluminum foil. This will help prevent burning while the inside finishes baking.
Presentation Recommendations
For serving, slice the bread and serve it warm or at room temp. You can lightly dust it with powdered sugar for a nice look.
To enhance flavor, offer cream cheese spread or cinnamon butter on the side. Arrange the slices on a decorative platter for a beautiful display at your next gathering.

Variations
Flavor Swaps
You can change up the spices for great flavor. Instead of cinnamon, try allspice. You can also use cardamom for a unique twist. For a warm kick, add a pinch of cayenne pepper. Mix-ins can also change the taste. Try dried cranberries or raisins for a fruity burst. Seeds like sunflower or pumpkin seeds can add crunch and nutrition.
Dietary Substitutes
If you need a gluten-free option, use almond flour or a gluten-free blend. Both options work well in this recipe. For a low-sugar version, substitute the brown sugar with a sugar alternative like monk fruit sweetener. You can also use unsweetened applesauce to cut down on sugar while keeping moisture.
Creative Serving Ideas
Transform your bread into French toast! Slice the bread, dip it in a mix of eggs and milk, and cook until golden. Top with maple syrup for a delicious breakfast. You can also make Pumpkin Zucchini Bread muffins. Just pour the batter into a muffin tin and bake for about 20-25 minutes. This gives you a portable snack that’s perfect for busy mornings.
Storage Info
Storing Leftovers
To keep your pumpkin zucchini bread fresh, follow these tips. First, let the bread cool completely. This step prevents moisture buildup. Wrap the bread tightly in plastic wrap or aluminum foil. You can also place it in an airtight container. This keeps the bread moist and flavorful.
For best results, store your bread at room temperature. It should last about 3 to 5 days. If you want to keep it longer, freezing is a great option.
Freezing Instructions
Freezing pumpkin zucchini bread is simple and effective. Start by slicing the bread. This way, you can take out only what you need later. Wrap each slice in plastic wrap. Then, place the wrapped slices in a freezer-safe bag. Remove as much air as you can to prevent freezer burn.
For best quality, freeze the bread for up to three months. When you’re ready to eat it, take the slices out and let them thaw at room temperature. You can also warm them in the oven at 350°F for about 10 minutes. This restores the bread’s fresh-baked taste.
FAQs
How long does pumpkin zucchini bread last?
Pumpkin zucchini bread can last about 5 days at room temperature. Store it in an airtight container to keep it fresh. You can also refrigerate it, which extends its life to about 10 days. However, make sure to wrap it well to avoid drying out.
Can I use fresh pumpkin instead of canned?
Yes, you can use fresh pumpkin! To do this, choose a sugar pumpkin. Bake it at 350°F (175°C) until soft. Once cool, scoop out the flesh and mash it until smooth. Fresh pumpkin adds a nice flavor, but it may be a bit more watery. You might need to adjust the flour to balance it out.
What can I substitute for eggs in this recipe?
If you want a vegan version, you have options! You can use:
– 1/4 cup unsweetened applesauce for each egg
– 1/4 cup mashed banana
– 1 tablespoon ground flaxseed mixed with 2.5 tablespoons water (let it sit for a few minutes)
These substitutes keep the bread moist and tasty.
Is it okay to skip the nuts and chocolate chips?
Yes, you can skip the nuts and chocolate chips. The bread will still taste great! However, without these add-ins, the texture will be smoother. Nuts add crunch, and chocolate chips add sweetness. You can also try adding other mix-ins like dried fruit for more flavor.
You learned how to make delicious pumpkin zucchini bread. We covered ingredients, steps, and tips to ensure great texture. From mixing wet and dry to baking, each step matters. We also discussed variations, storage, and answered common questions.
Now, you have all the info to bake this tasty treat. Enjoy experimenting with flavors and sharing it with friends and family!


![- 1 lb (450g) boneless, skinless chicken thighs, cut into bite-sized pieces - 4 tablespoons unsalted butter, divided - 4 cloves garlic, minced finely - 1 large lemon, zested and juiced - 1 teaspoon dried thyme - 1 teaspoon paprika - Salt and freshly ground black pepper to taste - Fresh parsley, chopped (for garnish) These ingredients make the dish shine. The chicken thighs give a tender bite. Garlic adds a strong aroma. Lemon brings brightness and tang. Butter makes everything rich and smooth. Thyme and paprika add depth and warmth. - Red pepper flakes for heat - Fresh herbs like basil or cilantro - A splash of white wine for extra richness - Honey for a touch of sweetness Adding some of these can make your dish unique. Red pepper flakes can spice things up. Fresh herbs can add a pop of freshness. A splash of wine creates a deeper flavor. Honey can balance the tartness of lemon. - Large skillet for cooking - Cutting board for prepping the chicken - Sharp knife for cutting the chicken - Measuring spoons for accuracy - Tongs for turning the chicken These tools will help you cook efficiently. A large skillet allows even cooking. A cutting board keeps the workspace tidy. A sharp knife ensures safe and quick cutting. Measuring spoons keep your flavors balanced. Tongs help with easy flipping and serving. For the detailed cooking steps and more, check the Full Recipe. Start by gathering your ingredients. You will need: - 1 lb boneless, skinless chicken thighs, cut into bite-sized pieces - 4 tablespoons unsalted butter, divided - 4 cloves garlic, minced finely - 1 large lemon, zested and juiced - 1 teaspoon dried thyme - 1 teaspoon paprika - Salt and freshly ground black pepper to taste - Fresh parsley, chopped (for garnish) Next, melt 2 tablespoons of butter in a skillet over medium heat. As it melts, season the chicken thighs with paprika, salt, and pepper. This step adds great flavor. Once the butter is bubbling, add the chicken pieces to the skillet. Spread them out evenly for the best sear. Sear the chicken for 5-7 minutes. Turn the chicken occasionally until it turns golden brown on all sides. This browning adds depth to the dish. When done, remove the chicken and set it aside on a plate. In the same skillet, melt the remaining 2 tablespoons of butter. Add the minced garlic and sauté it for about 30 seconds. Stir constantly to prevent burning. Once fragrant, stir in the lemon juice and zest, along with the dried thyme. Let this simmer for 1-2 minutes. This step melds all the flavors together. Now, return the cooked chicken to the skillet. Toss it in the lemon garlic butter sauce until well coated. Cook everything together for another 2 minutes. This helps the chicken absorb the sauce and heat through completely. Once finished, remove the skillet from the heat. Sprinkle fresh parsley over the chicken bites for a vibrant look. Serve the chicken bites in a large dish or individual bowls. Drizzle any remaining garlic butter sauce over the top. Add lemon wedges and extra parsley for an inviting presentation. For the full recipe, check the earlier section. To get juicy chicken, use boneless, skinless thighs. They cook faster and stay moist. Cut the chicken into even pieces for uniform cooking. Sear the chicken in a hot skillet. This gives a nice brown crust. Cook it for 5-7 minutes, flipping halfway through. Always check for doneness; the chicken should reach 165°F (75°C) inside. For a richer sauce, use high-quality butter. Add fresh herbs like rosemary or basil. If you like heat, toss in red pepper flakes. A splash of white wine adds depth, too. For extra zing, use fresh lemon juice instead of bottled. Don’t forget to taste and adjust seasoning. Every bite should burst with flavor. Prep your ingredients before you start cooking. Chop garlic and zest the lemon ahead of time. Use a sharp knife for quick cutting. Consider using a pre-made garlic butter if you’re short on time. You can also marinate the chicken a few hours before cooking. This step adds flavor and cuts down on cooking time. Feel free to explore the [Full Recipe] for complete instructions! {{image_4}} You can swap chicken thighs for other proteins. Try shrimp for a quick cook. Just sauté until they turn pink. You can use pork tenderloin, cut into small pieces. It cooks fast and absorbs flavor well. Even beef cubes work if you like a heartier bite. Adjust cooking time to match the protein you choose. For a vegetarian version, use mushrooms or tofu. Both soak up flavors like a sponge. Sauté mushrooms until golden brown. For tofu, press to remove water, then cut into cubes. Cook until crispy on all sides. Toss these in the lemon garlic butter sauce just like the chicken. If you have allergies, there are easy swaps. Use olive oil instead of butter for a dairy-free option. You can replace garlic with garlic powder if you're sensitive to fresh garlic. For a low-sodium version, use less salt and a salt substitute. Adjust the recipe to fit your taste and needs. Check out the Full Recipe for more ideas and details! To keep your leftover chicken bites fresh, place them in an airtight container. Make sure to let them cool to room temperature first. Store the container in the refrigerator. They will stay good for up to three days. Label the container with the date for easy tracking. Reheating is simple! You can use a skillet or microwave. For the skillet, heat a little butter over medium heat. Add the chicken bites and stir until warmed through. This keeps the flavors intact. If using a microwave, place the chicken in a microwave-safe dish. Cover it with a damp paper towel and heat in 30-second intervals until hot. If you want to freeze the chicken bites, make sure they are cool first. Place them in a freezer-safe bag or container. Remove as much air as possible to avoid freezer burn. They can last for up to three months in the freezer. When ready to eat, thaw them in the fridge overnight. Then reheat them as mentioned above. Enjoy your Lemon Garlic Butter Chicken Bites again! For the full recipe, check out the earlier section. Yes, you can use chicken breast instead of thighs. Chicken breast is leaner and will cook faster. Just make sure to cut it into similar bite-sized pieces. You may need to adjust the cooking time to keep it juicy. Lemon Garlic Butter Chicken Bites pair well with many sides. Here are a few ideas: - Steamed rice - Pasta with olive oil - Roasted vegetables - A fresh green salad - Garlic bread These options balance the rich flavors of the chicken and add variety to your meal. This recipe is not spicy. It focuses on lemon, garlic, and herbs for flavor. If you want some heat, you can add red pepper flakes. Start with a small amount and taste as you go. To keep the chicken juicy, follow these tips: - Do not overcook the chicken. Use a meat thermometer to check for doneness. - Let the chicken rest for a few minutes after cooking. This helps keep the juices inside. - Use the butter and garlic sauce generously. It adds moisture and flavor. Following these steps will help you achieve tender and juicy chicken bites. For the complete recipe, check out the [Full Recipe]. This blog covered how to make Lemon Garlic Butter Chicken Bites. We looked at key and optional ingredients, as well as the tools you need. I provided step-by-step cooking instructions and tips for perfect chicken. We explored variations, storage methods, and answered common questions. Now, you have all the tools to whip up this dish with ease. Enjoy cooking and share your tasty results!](https://fastmealmate.com/wp-content/uploads/2025/05/97cbb791-292c-4238-a79b-781f43956dc5-768x768.webp)


![- 2 cups all-purpose flour - 1 teaspoon baking powder - 1/2 teaspoon baking soda - 1/2 teaspoon salt - 1 teaspoon ground cinnamon - 3/4 cup granulated sugar - 1/2 cup packed brown sugar - 1/2 cup unsalted butter, melted - 2 large eggs, at room temperature - 1 teaspoon pure vanilla extract - 1 cup plain yogurt (or sour cream) - 2 cups apples, peeled and diced (approximately 2 medium apples) - 1/2 cup old-fashioned rolled oats When you measure your ingredients, use proper tools. For dry ingredients, a dry measuring cup is best. Press flour down slightly to avoid gaps. For liquids, use a liquid measuring cup and check at eye level. This ensures you get the right amounts for recipes. Accurate measurements lead to better results. You can switch some ingredients if needed. Use whole wheat flour for a healthier option. If you want a dairy-free muffin, try almond or coconut yogurt instead. Apples are key, but you can use pears or peaches too. For a nutty touch, add chopped walnuts or pecans. Always feel free to adjust! Make sure to check the [Full Recipe] for detailed instructions and baking times! Preheating the Oven Start by preheating your oven to 350°F (175°C). This step is key for even baking. Preparing the Muffin Tin Line a standard muffin tin with paper liners. You can also spray each cup with non-stick cooking spray. This helps the muffins release easily after baking. Dry Mixture Preparation In a large bowl, whisk together 2 cups of all-purpose flour, 1 teaspoon of baking powder, 1/2 teaspoon of baking soda, 1/2 teaspoon of salt, and 1 teaspoon of ground cinnamon. Mix well and set it aside. Sugar and Butter Mixture In another bowl, combine 3/4 cup of granulated sugar, 1/2 cup of packed brown sugar, and 1/2 cup of melted butter. Stir until this mixture is smooth and creamy. Wet and Dry Ingredient Integration Gently pour the sugar-butter mixture into the bowl with the dry ingredients. Use a spatula to mix just until combined. Be careful not to overmix, as this keeps the muffins light and fluffy. Folding in Apples Next, fold in 2 cups of peeled and diced apples. Use a spatula to distribute them evenly without overmixing the batter. Preparing the Crumb Topping In a small bowl, mix 1/2 cup of old-fashioned rolled oats with 1/4 cup of flour, 1/4 cup of brown sugar, and 1/4 cup of melted butter. Blend until it becomes crumbly. This topping adds a nice crunch. Filling Muffin Liners Spoon the muffin batter into the lined muffin cups. Fill each about two-thirds full. This allows room for the muffins to rise while baking. Baking Instructions Place the muffin tin in your preheated oven. Bake for 20 to 25 minutes. To check if they are done, insert a toothpick into the center of a muffin. It should come out clean. These steps will guide you to make delicious apple crumb muffins. For more details, check the Full Recipe. Preventing Overmixing To keep your muffins light, mix gently. After adding the wet ingredients to the dry, stir just until combined. If you see some flour lumps, that’s okay. Overmixing can make your muffins dense, not fluffy. Ensuring Proper Baking Time Baking time is key. Set your timer for 20 minutes. Check doneness by inserting a toothpick in the center. If it comes out clean, they’re ready. If not, check every minute. Be careful not to open the oven too often, as it can affect the rise. Adding a pinch of nutmeg can boost flavor. You might also try mixing in some chopped walnuts or pecans. They add a nice crunch and depth. If you love spice, a dash of ginger pairs well with apple too. Presentation makes your muffins shine. Arrange them on a rustic wooden platter. A light dusting of powdered sugar adds charm. For an extra touch, place slices of fresh apples around the muffins. This creates a warm and inviting look. {{image_4}} Choosing the right apple makes a big difference. Sweet apples like Fuji or Honeycrisp work well. They add a nice balance of flavor. Tart apples like Granny Smith give a refreshing zing. You can mix different apples for a unique taste. This adds layers of flavor to your muffins. Adding nuts or dried fruits can enhance your muffins. Chopped walnuts or pecans add a nice crunch. Dried cranberries or raisins bring a burst of sweetness. Just fold them in with the apples to keep it simple. Consider adding spices for extra flavor. A pinch of nutmeg gives warmth. You can also try cardamom for a unique twist. Just remember to balance the spices so they don’t overpower the apples. You can make these muffins gluten-free. Substitute all-purpose flour with a gluten-free blend. This works well and keeps the texture light. Just ensure your baking powder is gluten-free too. If you want to cut back on sugar, try using applesauce. It keeps the muffins moist and sweet. You can also use less butter or switch to a lighter oil. This way, you enjoy a tasty treat without the guilt. For the complete recipe, check out the Full Recipe section. Store your leftover muffins in an airtight container. This keeps them fresh for up to four days. If you want to keep them longer, consider freezing them. To freeze muffins, let them cool completely. Wrap each muffin in plastic wrap and place them in a freezer bag. They can last up to three months in the freezer. When you're ready to enjoy, just take them out and let them thaw at room temperature. Reheat muffins in the oven for the best taste. Preheat your oven to 350°F (175°C). Place the muffins on a baking sheet and warm them for about 10 minutes. You can also use the microwave. Heat each muffin for about 20-30 seconds. Enjoy them warm for the best flavor! For more details on making these muffins, check out the Full Recipe. You can use sour cream instead of yogurt. It gives a similar texture and flavor. Another option is to use buttermilk, which makes the muffins moist. Yes, you can make mini muffins. Just adjust the baking time to 12-15 minutes. Keep an eye on them, so they don’t overbake. Check for doneness by inserting a toothpick into the center of a muffin. If it comes out clean, they are ready. You can also lightly press the top; it should spring back. These muffins stay fresh for about 3 days at room temperature. Store them in an airtight container to keep them soft. Yes, you can prepare the batter the night before. Cover it and store it in the fridge. When you're ready, bake them fresh in the morning. For the full recipe, check the earlier section. You’ll find all the steps and ingredients needed to make these tasty Apple Crumb Muffins. You now have all the key steps to make delicious Apple Crumb Muffins. We covered ingredients, preparation, and baking instructions to ensure your muffins turn out great. Remember to follow the tips for flavor and presentation. With these easy instructions, you can enjoy warm muffins at home. Whether you share them or keep them all, they are sure to impress. Happy baking!](https://fastmealmate.com/wp-content/uploads/2025/07/c8d25f82-9d23-458d-8a15-e1a22d6eabb0-768x768.webp)