One Pan Summer Corn Zucchini Orzo Flavorful Dish
. Enjoy your cooking! To boost flavor, use fresh herbs. Fresh basil adds a bright note. You can also try parsley or thyme. Adding lemon zest brings a nice zing. For a kick, sprinkle in some red pepper flakes. If you want more depth, use vegetable broth instead of water. You can even roast the zucchini and corn first to enhance their sweetness. One common mistake is overcooking the orzo. Keep a close eye on it as it simmers. If you let it cook too long, it can become mushy. Another mistake is not seasoning enough. Taste and adjust with salt and pepper during cooking. Lastly, don’t skip the resting time after cooking. This helps the flavors blend better. To serve, use a large bowl for a family-style look. Spoon the orzo into the center, leaving some space around it. Top with fresh basil leaves for color. You can also add a sprinkle of cheese for richness. Serve with a lemon wedge on the side. This adds a pop of color and lets guests brighten their dish as they like. For the full recipe, be sure to check out the detailed cooking steps. {{image_4}} This dish shines as a vegetarian option. It uses fresh veggies and orzo, making it filling. To make it vegan, simply ensure your vegetable broth is plant-based. You can also add more protein by including chickpeas or tofu. These additions will keep the dish hearty and satisfying. If you need a gluten-free version, swap the orzo for gluten-free pasta. There are many types available, like rice or quinoa pasta. Just check the cooking time, as it may vary from regular orzo. This way, you can enjoy the flavors without worrying about gluten. Feel free to get creative with seasonal veggies! Try adding diced tomatoes, spinach, or bell peppers. You could also include peas or carrots for extra color and nutrition. Just remember to adjust the cooking time, so everything remains tender and vibrant. These changes can make the dish fun and new each time you prepare it. For the complete recipe, check the Full Recipe section. To keep your One Pan Summer Corn Zucchini Orzo fresh, let it cool first. Transfer the dish into an airtight container. Store it in the fridge for up to three days. This helps maintain its flavors and textures. When you are ready to enjoy leftovers, you can reheat them easily. Place the orzo in a skillet over low heat. Add a splash of vegetable broth or water to prevent sticking. Stir occasionally until it is heated through. This should take about 5 to 7 minutes. You can also use a microwave. Heat for one minute, then stir and check if it's warm. Repeat until heated. If you want to save your dish for later, freezing is a great option. Allow the orzo to cool completely. Portion it into freezer-safe bags or containers. Make sure to remove as much air as possible. Label the bags with the date. You can freeze it for up to three months. For best results, thaw it overnight in the fridge before reheating. For the full recipe, check out the detailed instructions above. To cook orzo perfectly, start with plenty of water. Use a ratio of 1 cup of orzo to 2 cups of water or broth. Bring the liquid to a boil, then add the orzo. Stir it gently to prevent sticking. Cook for about 8 to 10 minutes. Taste it a minute or two before the time is up. You want it al dente, firm but not hard. If there’s excess liquid, drain it off. This method keeps your orzo from getting mushy. Yes, you can use frozen vegetables in this dish. They save time and are often just as healthy. For the One Pan Summer Corn Zucchini Orzo, frozen corn works great. Just add it directly to the skillet. You may need to cook it a bit longer. Frozen zucchini can also work, but fresh zucchini gives a nicer texture. If using frozen, make sure to thaw it first if you want even cooking. Many sides go well with this dish. Here are some ideas: - Grilled Chicken: Adds protein and a nice char. - Garlic Bread: Perfect for soaking up extra broth. - Simple Salad: A light salad with lemon dressing complements the dish. - Roasted Vegetables: A mix of seasonal veggies enhances the meal. These sides make your meal more complete and satisfying. For the full recipe, check out the details above! You learned about the key ingredients and how to cook them. I covered steps, tips, and tricks for a great dish. You also found ways to adapt the recipe for special diets. Storing and reheating leftovers will help cut waste. Always aim for flavor and avoid common mistakes. With these insights, you'll create a tasty one-pan summer corn zucchini orzo. Enjoy your cooking journey and impress your guests!](https://fastmealmate.com/wp-content/uploads/2025/07/e3382d29-f029-483c-a1d1-82293022c013.webp)
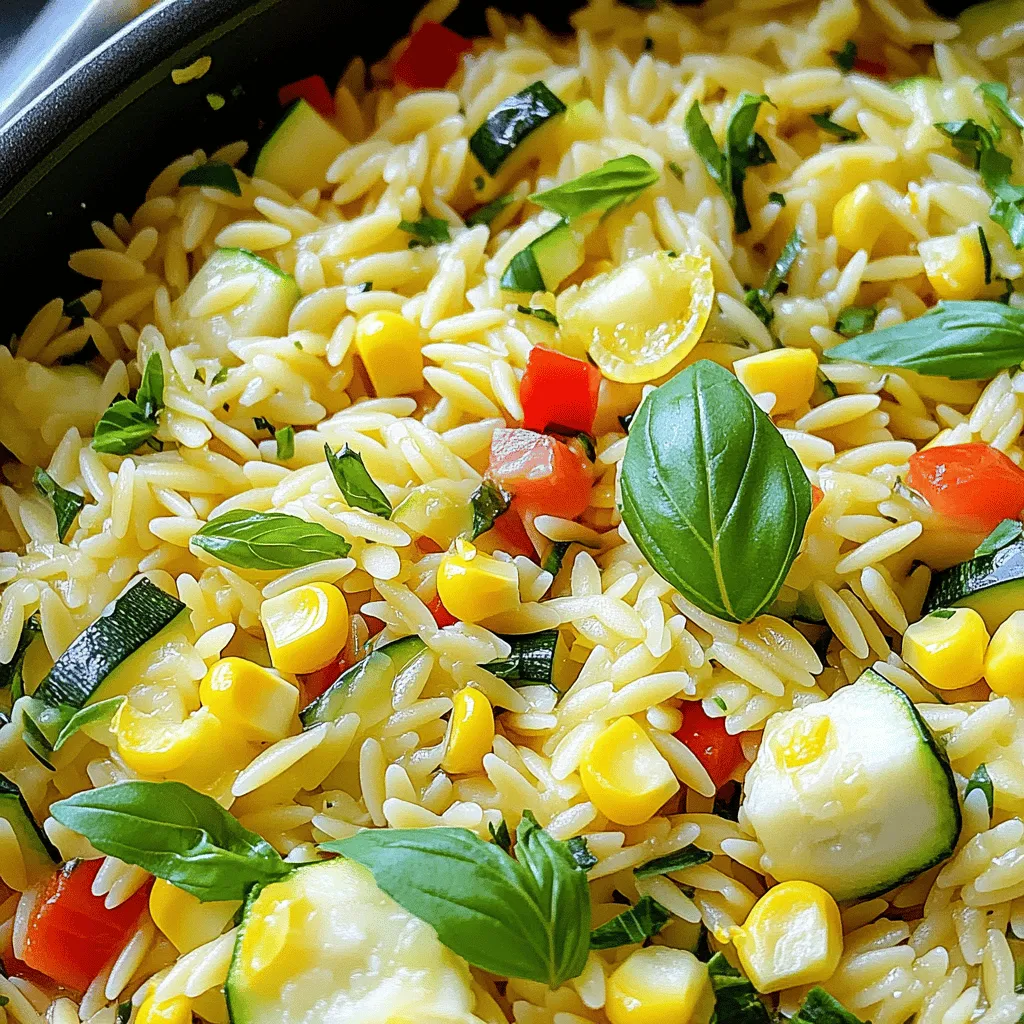
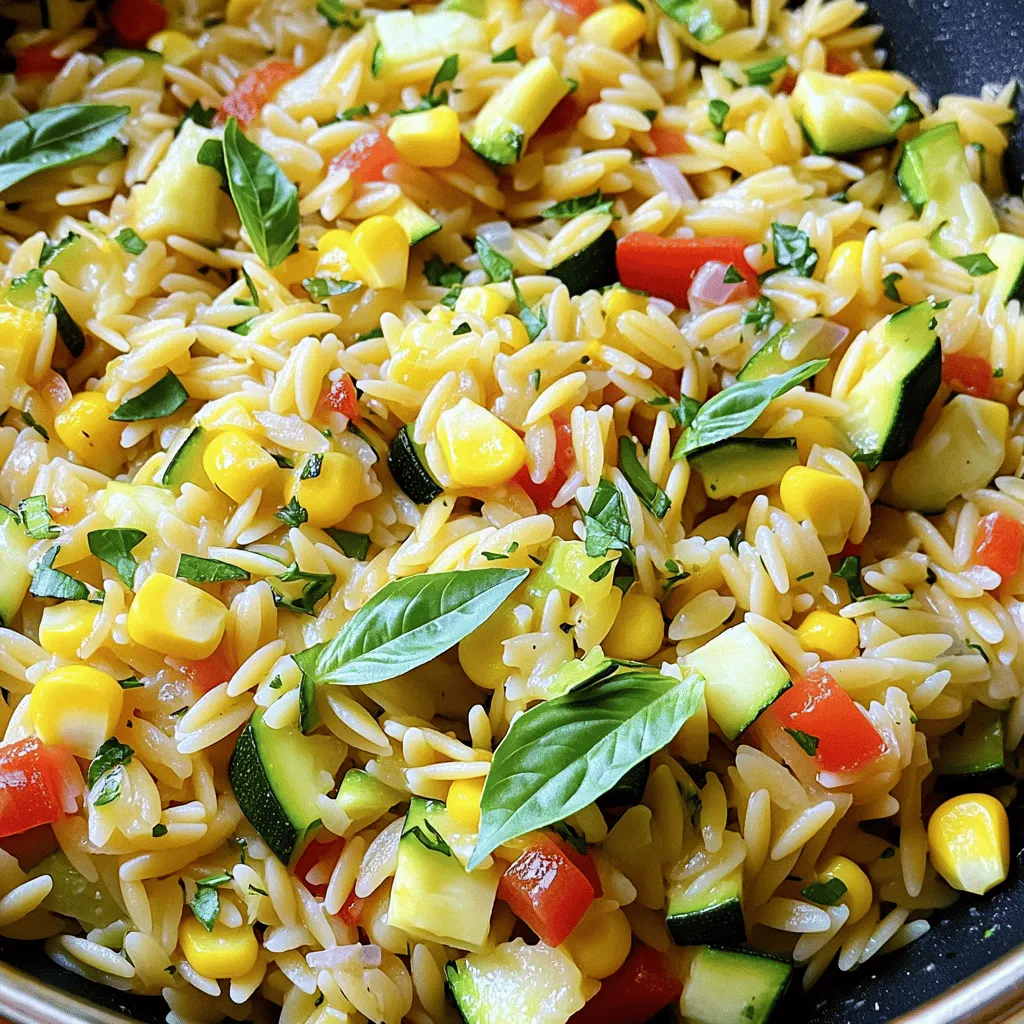
Get ready to spice up your summer meals with this One Pan Summer Corn Zucchini Orzo! I’ll show you how to create a bright and tasty dish packed with fresh flavors and seasonal veggies. This easy recipe requires just one pan, making cleanup a breeze. Whether you’re cooking for family or friends, you’ll impress them with this delightful meal. Let’s dive into the ingredients and get started!It combines sweet corn, tender zucchini, and orzo pasta in one skillet. You get a great mix of flavors in every bite. This recipe is perfect for summer meals and easy to make.
Required Ingredients List
To make this dish, gather these simple ingredients:
– 1 cup orzo pasta
– 2 cups vegetable broth
– 1 medium zucchini, diced
– 1 cup fresh corn kernels (or substitute with frozen corn)
– 1 red bell pepper, diced
– 1 small onion, diced
– 2 cloves garlic, minced
– 1 tablespoon olive oil
– 1 teaspoon dried oregano
– Salt and black pepper, to taste
– Fresh basil leaves, for garnish
– Zest of 1 lemon
Recommended Ingredient Substitutions
If you need some swaps, here are a few ideas:
– Use quinoa instead of orzo for a gluten-free option.
– Swap zucchini with yellow squash for a different flavor.
– Frozen corn works well if fresh corn is not available.
– You can use vegetable stock instead of broth for more flavor.
– Try fresh herbs like parsley or thyme in place of basil.
These swaps keep the dish tasty and fun!
Step-by-Step Instructions
Detailed Cooking Directions
1. Heat the Oil: Start with a large skillet. Warm the olive oil over medium heat. Wait until it shimmers but is not smoking.
2. Sauté Aromatics: Add the diced onion and minced garlic to the skillet. Sauté for 3 to 4 minutes. Stir occasionally until the onion turns soft and fragrant.
3. Add Vegetables: Toss in the diced red bell pepper and zucchini. Cook for 3 to 5 minutes. Stir frequently until the veggies soften and their colors pop.
4. Mix in Corn and Oregano: Add the fresh corn kernels and dried oregano. Stir well to mix the corn and herbs evenly with the vegetables.
5. Pour in Broth: Carefully pour the vegetable broth into the skillet. Bring it to a gentle boil. This helps all those great flavors to come together.
6. Cook the Orzo: Stir in the orzo pasta. Reduce the heat to low. Let the orzo simmer uncovered for 10 to 12 minutes. Stir often to stop the orzo from sticking.
7. Season and Brighten: When the orzo is cooked, season with salt, black pepper, and lemon zest. Stir well to blend the flavors.
8. Rest and Serve: Remove the skillet from heat. Let the orzo rest for a couple of minutes. This helps improve the texture.
9. Garnish: Serve warm, topped with fresh basil leaves. This adds a nice touch and fresh flavor.
Tips for Each Cooking Step
– Heating Oil: Make sure the skillet is hot enough. This helps to cook the ingredients well without burning.
– Sautéing Aromatics: Stir often to prevent any burning. It helps to keep the flavors bright.
– Adding Vegetables: Cut all veggies to a similar size. This ensures they cook evenly.
– Mixing Corn and Oregano: Use fresh corn for the best taste. Frozen corn works too, but fresh is sweeter.
– Pouring Broth: Pour slowly to avoid splashing. This keeps your workspace clean.
– Cooking Orzo: Keep stirring occasionally. This helps the orzo cook evenly and prevents sticking.
– Seasoning and Brightening: Taste as you go. Adjust the salt and pepper to your liking.
– Resting and Serving: Resting lets the flavors settle. It makes a big difference in taste.
Cooking Timing and Techniques
– Prep Time: About 10 minutes for chopping and measuring ingredients.
– Total Cook Time: Roughly 15 minutes for cooking.
– Servings: This recipe makes enough for 4 servings.
Using a single pan simplifies cleanup and keeps all the flavors mingling.Enjoy your cooking!
Tips & Tricks
How to Make the Dish More Flavorful
To boost flavor, use fresh herbs. Fresh basil adds a bright note. You can also try parsley or thyme. Adding lemon zest brings a nice zing. For a kick, sprinkle in some red pepper flakes. If you want more depth, use vegetable broth instead of water. You can even roast the zucchini and corn first to enhance their sweetness.
Common Mistakes to Avoid
One common mistake is overcooking the orzo. Keep a close eye on it as it simmers. If you let it cook too long, it can become mushy. Another mistake is not seasoning enough. Taste and adjust with salt and pepper during cooking. Lastly, don’t skip the resting time after cooking. This helps the flavors blend better.
Serving Suggestions for Best Presentation
To serve, use a large bowl for a family-style look. Spoon the orzo into the center, leaving some space around it. Top with fresh basil leaves for color. You can also add a sprinkle of cheese for richness. Serve with a lemon wedge on the side. This adds a pop of color and lets guests brighten their dish as they like.

Variations
Vegetarian and Vegan Options
This dish shines as a vegetarian option. It uses fresh veggies and orzo, making it filling. To make it vegan, simply ensure your vegetable broth is plant-based. You can also add more protein by including chickpeas or tofu. These additions will keep the dish hearty and satisfying.
Gluten-Free Adaptations
If you need a gluten-free version, swap the orzo for gluten-free pasta. There are many types available, like rice or quinoa pasta. Just check the cooking time, as it may vary from regular orzo. This way, you can enjoy the flavors without worrying about gluten.
Other Seasonal Vegetable Add-ins
Feel free to get creative with seasonal veggies! Try adding diced tomatoes, spinach, or bell peppers. You could also include peas or carrots for extra color and nutrition. Just remember to adjust the cooking time, so everything remains tender and vibrant. These changes can make the dish fun and new each time you prepare it.
Storage Info
Best Practices for Storing Leftovers
To keep your One Pan Summer Corn Zucchini Orzo fresh, let it cool first. Transfer the dish into an airtight container. Store it in the fridge for up to three days. This helps maintain its flavors and textures.
Reheating Instructions
When you are ready to enjoy leftovers, you can reheat them easily. Place the orzo in a skillet over low heat. Add a splash of vegetable broth or water to prevent sticking. Stir occasionally until it is heated through. This should take about 5 to 7 minutes. You can also use a microwave. Heat for one minute, then stir and check if it’s warm. Repeat until heated.
Freezing Guidelines
If you want to save your dish for later, freezing is a great option. Allow the orzo to cool completely. Portion it into freezer-safe bags or containers. Make sure to remove as much air as possible. Label the bags with the date. You can freeze it for up to three months. For best results, thaw it overnight in the fridge before reheating.
FAQs
How to Get Perfectly Cooked Orzo?
To cook orzo perfectly, start with plenty of water. Use a ratio of 1 cup of orzo to 2 cups of water or broth. Bring the liquid to a boil, then add the orzo. Stir it gently to prevent sticking. Cook for about 8 to 10 minutes. Taste it a minute or two before the time is up. You want it al dente, firm but not hard. If there’s excess liquid, drain it off. This method keeps your orzo from getting mushy.
Can I Use Frozen Vegetables?
Yes, you can use frozen vegetables in this dish. They save time and are often just as healthy. For the One Pan Summer Corn Zucchini Orzo, frozen corn works great. Just add it directly to the skillet. You may need to cook it a bit longer. Frozen zucchini can also work, but fresh zucchini gives a nicer texture. If using frozen, make sure to thaw it first if you want even cooking.
What Sides Pair Well with One Pan Summer Corn Zucchini Orzo?
Many sides go well with this dish. Here are some ideas:
– Grilled Chicken: Adds protein and a nice char.
– Garlic Bread: Perfect for soaking up extra broth.
– Simple Salad: A light salad with lemon dressing complements the dish.
– Roasted Vegetables: A mix of seasonal veggies enhances the meal.
These sides make your meal more complete and satisfying.
You learned about the key ingredients and how to cook them. I covered steps, tips, and tricks for a great dish. You also found ways to adapt the recipe for special diets. Storing and reheating leftovers will help cut waste. Always aim for flavor and avoid common mistakes. With these insights, you’ll create a tasty one-pan summer corn zucchini orzo. Enjoy your cooking journey and impress your guests!
. Enjoy your cooking! To boost flavor, use fresh herbs. Fresh basil adds a bright note. You can also try parsley or thyme. Adding lemon zest brings a nice zing. For a kick, sprinkle in some red pepper flakes. If you want more depth, use vegetable broth instead of water. You can even roast the zucchini and corn first to enhance their sweetness. One common mistake is overcooking the orzo. Keep a close eye on it as it simmers. If you let it cook too long, it can become mushy. Another mistake is not seasoning enough. Taste and adjust with salt and pepper during cooking. Lastly, don’t skip the resting time after cooking. This helps the flavors blend better. To serve, use a large bowl for a family-style look. Spoon the orzo into the center, leaving some space around it. Top with fresh basil leaves for color. You can also add a sprinkle of cheese for richness. Serve with a lemon wedge on the side. This adds a pop of color and lets guests brighten their dish as they like. For the full recipe, be sure to check out the detailed cooking steps. {{image_4}} This dish shines as a vegetarian option. It uses fresh veggies and orzo, making it filling. To make it vegan, simply ensure your vegetable broth is plant-based. You can also add more protein by including chickpeas or tofu. These additions will keep the dish hearty and satisfying. If you need a gluten-free version, swap the orzo for gluten-free pasta. There are many types available, like rice or quinoa pasta. Just check the cooking time, as it may vary from regular orzo. This way, you can enjoy the flavors without worrying about gluten. Feel free to get creative with seasonal veggies! Try adding diced tomatoes, spinach, or bell peppers. You could also include peas or carrots for extra color and nutrition. Just remember to adjust the cooking time, so everything remains tender and vibrant. These changes can make the dish fun and new each time you prepare it. For the complete recipe, check the Full Recipe section. To keep your One Pan Summer Corn Zucchini Orzo fresh, let it cool first. Transfer the dish into an airtight container. Store it in the fridge for up to three days. This helps maintain its flavors and textures. When you are ready to enjoy leftovers, you can reheat them easily. Place the orzo in a skillet over low heat. Add a splash of vegetable broth or water to prevent sticking. Stir occasionally until it is heated through. This should take about 5 to 7 minutes. You can also use a microwave. Heat for one minute, then stir and check if it's warm. Repeat until heated. If you want to save your dish for later, freezing is a great option. Allow the orzo to cool completely. Portion it into freezer-safe bags or containers. Make sure to remove as much air as possible. Label the bags with the date. You can freeze it for up to three months. For best results, thaw it overnight in the fridge before reheating. For the full recipe, check out the detailed instructions above. To cook orzo perfectly, start with plenty of water. Use a ratio of 1 cup of orzo to 2 cups of water or broth. Bring the liquid to a boil, then add the orzo. Stir it gently to prevent sticking. Cook for about 8 to 10 minutes. Taste it a minute or two before the time is up. You want it al dente, firm but not hard. If there’s excess liquid, drain it off. This method keeps your orzo from getting mushy. Yes, you can use frozen vegetables in this dish. They save time and are often just as healthy. For the One Pan Summer Corn Zucchini Orzo, frozen corn works great. Just add it directly to the skillet. You may need to cook it a bit longer. Frozen zucchini can also work, but fresh zucchini gives a nicer texture. If using frozen, make sure to thaw it first if you want even cooking. Many sides go well with this dish. Here are some ideas: - Grilled Chicken: Adds protein and a nice char. - Garlic Bread: Perfect for soaking up extra broth. - Simple Salad: A light salad with lemon dressing complements the dish. - Roasted Vegetables: A mix of seasonal veggies enhances the meal. These sides make your meal more complete and satisfying. For the full recipe, check out the details above! You learned about the key ingredients and how to cook them. I covered steps, tips, and tricks for a great dish. You also found ways to adapt the recipe for special diets. Storing and reheating leftovers will help cut waste. Always aim for flavor and avoid common mistakes. With these insights, you'll create a tasty one-pan summer corn zucchini orzo. Enjoy your cooking journey and impress your guests!](https://fastmealmate.com/wp-content/uploads/2025/07/e3382d29-f029-483c-a1d1-82293022c013-300x300.webp)


![- 1 lb lobster tails, halved lengthwise - 1 lb fresh sea scallops - 4 tablespoons unsalted butter, divided - 4 cloves garlic, finely minced - 1 lemon, juiced (about 2 tablespoons) - 2 tablespoons fresh parsley, finely chopped - Salt and freshly ground black pepper, to taste - Lemon wedges, for serving When I prepare Easy Garlic Butter Lobster Scallops, I love how fresh ingredients shine. The lobster tails and scallops are the stars of this dish. Using fresh seafood makes all the difference. Each bite bursts with flavor. Butter brings richness to the dish. I use unsalted butter to control the saltiness. Garlic adds a lovely aroma and taste. It’s important to finely mince the garlic. This helps to spread its flavor evenly. I always squeeze fresh lemon juice for brightness. The juice balances the rich butter. Chopped parsley adds a nice touch. It gives the dish a pop of color and freshness. Don’t forget about seasoning! Salt and black pepper enhance the seafood’s natural flavor. I like to season both the lobster and scallops well before cooking. Lastly, lemon wedges are a must. They add a fresh hit of citrus when served. I find that a squeeze of lemon elevates the whole meal. For the full recipe, check out the details above. Enjoy creating this flavorful delight! First, take the lobster tails and scallops out of the package. Gently pat them dry with a paper towel. This step is key for a nice sear later. Next, season them with salt and black pepper. Make sure to cover all sides for even flavor. Now, let’s get cooking! In a large skillet, melt 2 tablespoons of unsalted butter over medium heat. Once the butter is melted and bubbly, add the minced garlic. Sauté the garlic for about one minute until it is fragrant. Be careful not to let it burn. Next, add the lobster tails to the skillet. Place them cut-side down first. Sear the tails for about 3-4 minutes until they turn golden brown. Then, carefully flip them over and cook for another 2-3 minutes. They should look opaque and fully cooked. Remove them and set aside. Now, it’s time for the scallops. Add them to the same skillet, making sure not to overcrowd them. Sear each side for about 2-3 minutes until they get a beautiful golden crust. Once done, remove the scallops and place them with the lobster. Return the cooked lobster to the skillet. Squeeze in the fresh lemon juice and sprinkle the chopped parsley over everything. Gently toss the lobster and scallops in the garlic butter sauce. This will help all the flavors blend nicely. Finally, serve the lobster and scallops on a large platter. Drizzle any remaining garlic butter sauce over the seafood. Garnish with more parsley and add lemon wedges on the side. For the full recipe, check the detailed instructions above. Enjoy your tasty dish! To make your lobster and scallops shine, start with good searing. Searing gives seafood a nice crust. Heat your skillet until it's hot. Add butter and let it melt before placing the seafood in. This helps lock in flavors and moisture. Drying your seafood before cooking is very important. Use paper towels to pat the lobster tails and scallops dry. Removing excess moisture helps achieve that perfect golden sear. Wet seafood will steam instead of sear. Adding herbs and spices can elevate your dish. Fresh thyme or basil can add great flavor. A pinch of red pepper flakes can give it a nice kick. Don't be afraid to experiment with flavors you love. For sauces, consider making a light citrus sauce. A mix of lemon juice and olive oil works well. You can also add a splash of white wine for depth. These additions can enhance the overall taste of your seafood. Presentation matters when serving seafood. Arrange the lobster tails and scallops on a large platter. Place them in a way that looks inviting. You can stack the scallops for a layered look. Garnishing makes your dish pop. Use chopped parsley for a fresh touch. Lemon wedges add color and a burst of flavor. A well-presented dish makes a great impression, so take your time with this step. Want to try this delicious dish? Check out the [Full Recipe]. {{image_4}} If you cannot find lobster or scallops, you have options. You can use shrimp instead of lobster. Shrimp cooks fast and adds great flavor. For scallops, try using firm fish like cod or halibut. Both will work well in this dish. For dairy-free butter, consider using olive oil or coconut oil. Both options will give a nice taste. You can also find plant-based butter in stores. Just make sure it melts well for your sauce. You can cook your seafood in different ways. Grilling is a fun option. It gives a smoky flavor that pairs well with garlic. Just brush the lobster and scallops with butter before grilling. Sautéing is great for a quick meal. It lets the garlic and butter shine through. Broiling is another method to try. It cooks the seafood from above. This method creates a crispy top while keeping the inside juicy. You will get a different flavor profile that is equally delicious. For side dishes, consider a fresh salad or garlic bread. A light pasta with lemon pairs well, too. These sides will balance the rich flavors of the seafood. As for drinks, a crisp white wine like Sauvignon Blanc is perfect. It cuts through the richness of the butter. If you prefer non-alcoholic drinks, try sparkling water with lemon. It refreshes the palate nicely. For the full recipe, check the Easy Garlic Butter Lobster Scallops 🦞🧄 section. To keep your Easy Garlic Butter Lobster Scallops fresh, place them in an airtight container. This helps avoid any unwanted smells in your fridge. Make sure to refrigerate them within two hours of cooking. They can last up to three days in the fridge. If you notice any off smell or discoloration, it's best to toss them out. When you want to enjoy your leftovers, the best way to reheat is on the stove. Use low heat to warm them gently. This keeps the seafood tender. You can also use the microwave, but do it in short bursts to avoid overcooking. Cover the dish with a damp paper towel to keep moisture in. Remember, seafood can dry out quickly. Yes, you can freeze lobster scallops! However, freezing may change their texture. To freeze, place them in a freezer-safe bag or container. Remove as much air as possible before sealing. They can stay frozen for up to three months. When you're ready to use them, thaw in the fridge overnight. Avoid thawing at room temperature to keep them safe. If you're looking for the full recipe, check out the Easy Garlic Butter Lobster Scallops recipe above! You can tell when scallops are done by their color and texture. They should be opaque and firm. A golden crust on the outside shows they are well-seared. Avoid cooking them too long. Overcooked scallops become rubbery and tough. Common mistakes include overcrowding the pan and not drying them well. Always dry scallops with paper towels. This helps them sear nicely and not steam. Yes, you can use frozen lobster tails and scallops. Just make sure to choose high-quality seafood. Look for ones that are flash-frozen for best taste. To thaw, place them in the fridge overnight. If you're in a hurry, seal them in a bag and submerge in cold water for about 30 minutes. Cook them right after thawing for the best flavor. Pair your dish with light sides. A fresh salad with lemon vinaigrette works well. Roasted asparagus or green beans add great color and flavor. For a complete meal, serve with garlic bread and a glass of white wine. This combination enhances the rich flavors of the lobster and scallops. You can find the full recipe for Easy Garlic Butter Lobster Scallops and create a delightful feast! This blog post highlighted key ingredients for an easy garlic butter lobster and scallops dish. I walked you through preparation, cooking, tips for perfect seafood, and variations to keep meals exciting. You now have practical storage info and answers to common questions. No matter how you serve this dish, it promises flavor. Enjoy crafting a meal that impresses everyone at your table. Happy cooking!](https://fastmealmate.com/wp-content/uploads/2025/06/dfec37c8-f7d2-4a99-9114-2c33cea5f0b3-768x768.webp)
