
Looking for a quick and easy treat? These No-Bake Peanut Butter Bars are perfect for any snack craving. With just a handful of simple ingredients like creamy peanut butter, oats, and a touch of honey, you can whip these up in no time. Plus, there’s no oven needed! Join me as I share my simple recipe and tips for making the best bars. Let’s dive in!
Ingredients
Complete List of Ingredients
– 1 cup creamy peanut butter
– 1 cup rolled oats
– 1/2 cup honey or maple syrup
– 1/2 cup graham cracker crumbs
– 1/4 cup chocolate chips (dark or milk chocolate)
– 1/4 teaspoon vanilla extract
– Pinch of salt
To make no-bake peanut butter bars, you need a few key ingredients. Each one plays an important role in the texture and flavor. The creamy peanut butter gives a rich taste. Rolled oats add a chewy texture. Honey adds sweetness and binds everything together. Graham cracker crumbs give a nice crunch. Chocolate chips add that sweet touch, making the bars even more enjoyable. The vanilla and salt balance the flavors.
Ingredient Substitutions
If you don’t have honey, you can use agave or brown sugar. They work great as sweeteners, too. For a different flavor, swap creamy peanut butter for almond or cashew butter. This change can add a fun twist! If you need gluten-free options, look for gluten-free graham crackers. This way, everyone can enjoy these tasty bars.
Step-by-Step Instructions
Detailed Cooking Steps
1. Start by placing 1 cup of creamy peanut butter and 1/2 cup of honey (or maple syrup) in a large bowl. Mix these two well using a sturdy spatula. I like to blend until it is smooth and creamy.
2. Next, add 1 cup of rolled oats, 1/2 cup of graham cracker crumbs, 1/4 teaspoon of vanilla extract, and a pinch of salt. Stir everything together. You want it to look like a sticky dough.
3. Now it’s time to fold in 1/4 cup of chocolate chips. Gently mix them into the dough. This way, they stay whole and add nice bites of chocolate.
Preparing the Pan
1. Grab an 8×8 inch square baking pan. Line it with parchment paper. Make sure to leave some paper hanging over the sides. This will help you lift the bars out later.
2. Pour the peanut butter mixture into the pan. Use the back of your spatula to press it down. You want a compact layer that holds together well.
Chilling and Cutting
1. Put the pan in the fridge. Let it chill for at least 1 hour. This helps the bars set up nicely.
2. When they are ready, take the pan out of the fridge. Use the parchment paper to lift the whole block out. Place it on a cutting board and slice it into squares or rectangles.
For a great treat, store any leftovers in an airtight container. They stay fresh in the fridge for up to a week. Enjoy your no-bake peanut butter bars!
Tips & Tricks
Perfecting the Texture
To get the best no-bake peanut butter bars, start with a compact mixture. A firm mix helps the bars hold their shape well. Press the mixture firmly into the pan. This step makes a big difference. For optimal results, chill the bars in the fridge for at least an hour. This helps them set properly and enhances their texture.
Presentation Ideas
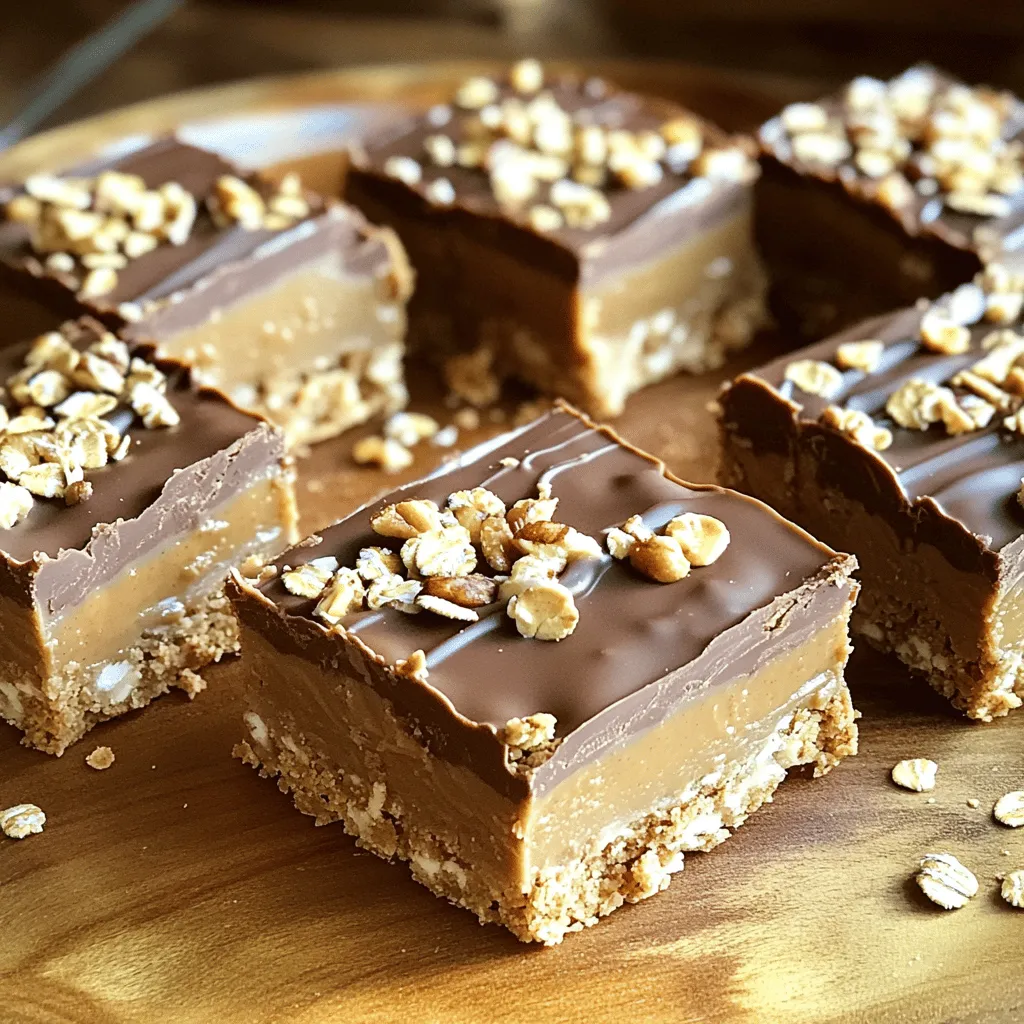
Make your bars look great by drizzling melted chocolate on top. This adds a rich flavor and a nice finish. You can also add toppings like chopped nuts, shredded coconut, or a sprinkle of sea salt. These extras not only make your bars pretty but also add a fun crunch.
Common Mistakes to Avoid
One mistake is overmixing the ingredients. This can make the bars too soft. Mix just enough to combine everything. Another common error is not chilling the bars long enough. If you don’t chill them enough, they might not hold together when you cut them. Make sure to allow the full chilling time for the best results.
Variations
Flavor Infusions
You can easily change the taste of your no-bake peanut butter bars. Adding spices like cinnamon or nutmeg can give a warm flavor. Just a pinch can brighten the taste. You can also try using extracts like almond or coconut. A few drops will add a nice twist to the bars. Get creative with these flavors to make them your own!
Dietary Variants
If you want vegan no-bake peanut butter bars, swap honey for maple syrup. This keeps the bars plant-based and still tasty. You can also add protein powder for a boost. This option is great if you need more energy or want to refuel after a workout. Just mix in your favorite protein powder with the other ingredients.
Seasonal Variations
Seasonal flavors can make your bars special for holidays. In fall, add pumpkin spice for a cozy taste. In winter, a hint of peppermint can make the bars festive. Adjust your mix-ins to match the season. These small changes can bring new life to your no-bake peanut butter bars and make them fun for any occasion!
Storage Info
Best Storage Practices
To keep your no-bake peanut butter bars fresh, store them in an airtight container. This helps prevent moisture and keeps them tasty. I recommend placing a piece of parchment paper between layers to avoid sticking. You should refrigerate them for best results. The cool air helps maintain their texture and flavor.
Freezing Options
If you want to save some bars for later, freezing is a great choice. First, cut the bars into squares. Then, wrap each one in plastic wrap. Place them in a freezer bag or container. This method will help keep them fresh for up to three months. When you’re ready to eat a bar, take it out and let it thaw at room temperature for about 15 to 30 minutes. You can also thaw them overnight in the fridge.
Shelf Life
These bars can last about one week in the fridge. Look for signs of spoilage. If you see any mold or if they smell off, it’s best to throw them away. Fresh bars should have a nice peanut butter aroma and a firm texture. Enjoy your delicious no-bake peanut butter bars while they are at their best!
FAQs
How to Make No-Bake Peanut Butter Bars?
To make no-bake peanut butter bars, you start by mixing peanut butter and honey in a bowl. Next, stir in rolled oats, graham cracker crumbs, and a pinch of salt. Mix until it forms a sticky dough. Then, fold in chocolate chips for sweetness. Press the mixture into a lined pan and chill it in the fridge for one hour. After chilling, cut into bars and enjoy!
Can I use natural peanut butter?
Yes, you can use natural peanut butter. It has a different texture and taste. Natural peanut butter is thicker and may need more mixing. It can also make the bars a bit crumbly. If you prefer a creamier texture, stick with creamy peanut butter. The flavor will be rich and delicious either way!
How long do these bars need to chill?
These bars need to chill for at least one hour. This cooling time helps them set properly. If you chill them longer, they will hold their shape even better. If you want them firmer, leave them in the fridge for two hours. Just make sure to slice them after chilling, so they stay fresh.
What can I add to customize my bars?
You can add many fun mix-ins to customize your bars! Try adding chopped nuts for crunch. Dried fruit like raisins or cranberries adds sweetness. You can even include seeds like chia or sunflower seeds for extra nutrition. For a chocolate boost, add cocoa powder or more chocolate chips. The options are endless!
These no-bake peanut butter bars are tasty and easy to make. You learned about key ingredients and step-by-step instructions. We also explored substitutions to fit your needs, tips for the best texture, and ways to make the bars unique for any season or diet. Remember to store your bars properly for freshness. With these simple guidelines, you can enjoy delicious bars anytime. Get creative, have fun, and enjoy your tasty treat!


