Mango Lassi Tres Leches Cake Flavorful and Simple Treat

Are you ready to elevate your dessert game with a fun twist? This Mango Lassi Tres Leches Cake combines the creamy goodness of traditional tres leches with the refreshing charm of mango lassi. It’s flavorful, simple to make, and will impress your friends and family. In this post, I’ll guide you through each step, from gathering your ingredients to serving tips. Let’s make dessert unforgettable together!
Ingredients
Here’s what you will need for the Mango Lassi Tres Leches Cake:
– 1 cup all-purpose flour
– 1 teaspoon baking powder
– 1/2 teaspoon baking soda
– 1/4 teaspoon salt
– 1/2 cup unsalted butter, softened
– 1 cup granulated sugar
– 3 large eggs, at room temperature
– 1 teaspoon pure vanilla extract
– 1/2 cup whole milk
– 1/2 cup fresh or canned mango puree
– 1 can (14 oz) sweetened condensed milk
– 1 can (12 oz) evaporated milk
– 1 cup heavy cream, cold
– 2 tablespoons powdered sugar
– Fresh mango slices, for garnish
– Ground cardamom, for garnish (optional)
These ingredients create a rich, moist cake that blends the flavors of mango lassi and tres leches. Using whole milk and mango puree gives this cake a unique twist. The sweetened condensed and evaporated milk add that classic tres leches touch.
Make sure to use ripe mangoes for a better taste. The heavy cream will whip nicely if it’s cold. This helps create a fluffy topping. Each element plays a big role in shaping the final flavor.
Step-by-Step Instructions
Preparation Steps
1. Preheat the Oven: Start by preheating your oven to 350°F (175°C). Grease a 9×13-inch baking dish with butter or cooking spray. This helps the cake come out easily.
2. Whisk Dry Ingredients: In a medium bowl, whisk together 1 cup of all-purpose flour, 1 teaspoon of baking powder, 1/2 teaspoon of baking soda, and 1/4 teaspoon of salt. This mix ensures your cake rises well.
3. Mix Wet Ingredients: In a large bowl, use a hand mixer to beat 1/2 cup of softened unsalted butter and 1 cup of granulated sugar. Mix until it’s light and fluffy, about 3-5 minutes. Next, add 3 large eggs one at a time and 1 teaspoon of pure vanilla extract until well combined.
4. Combine Wet and Dry Ingredients: Gradually add the flour mix to the butter mix, alternating with 1/2 cup of whole milk and 1/2 cup of mango puree. Begin and end with the flour mix. Mix until just combined to keep the cake fluffy.
5. Bake the Cake: Pour the batter into the prepared dish. Spread it evenly with a spatula. Bake for 25-30 minutes. A toothpick should come out clean when inserted in the center. Let it cool completely on a wire rack.
Tres Leches Assembly
1. Prepare the Tres Leches Mixture: In a bowl, mix together 1 can of sweetened condensed milk, 1 can of evaporated milk, and a splash of whole milk. Whisk until smooth.
2. Soak the Cake: Once the cake cools, poke holes all over the top with a fork. Slowly pour the tres leches mixture over the cake. Cover it with plastic wrap and chill in the fridge for at least 2 hours, or overnight for better flavor.
3. Whip the Cream: In a chilled bowl, whip 1 cup of heavy cream with 2 tablespoons of powdered sugar until soft peaks form. Be careful not to overwhip; you want it light.
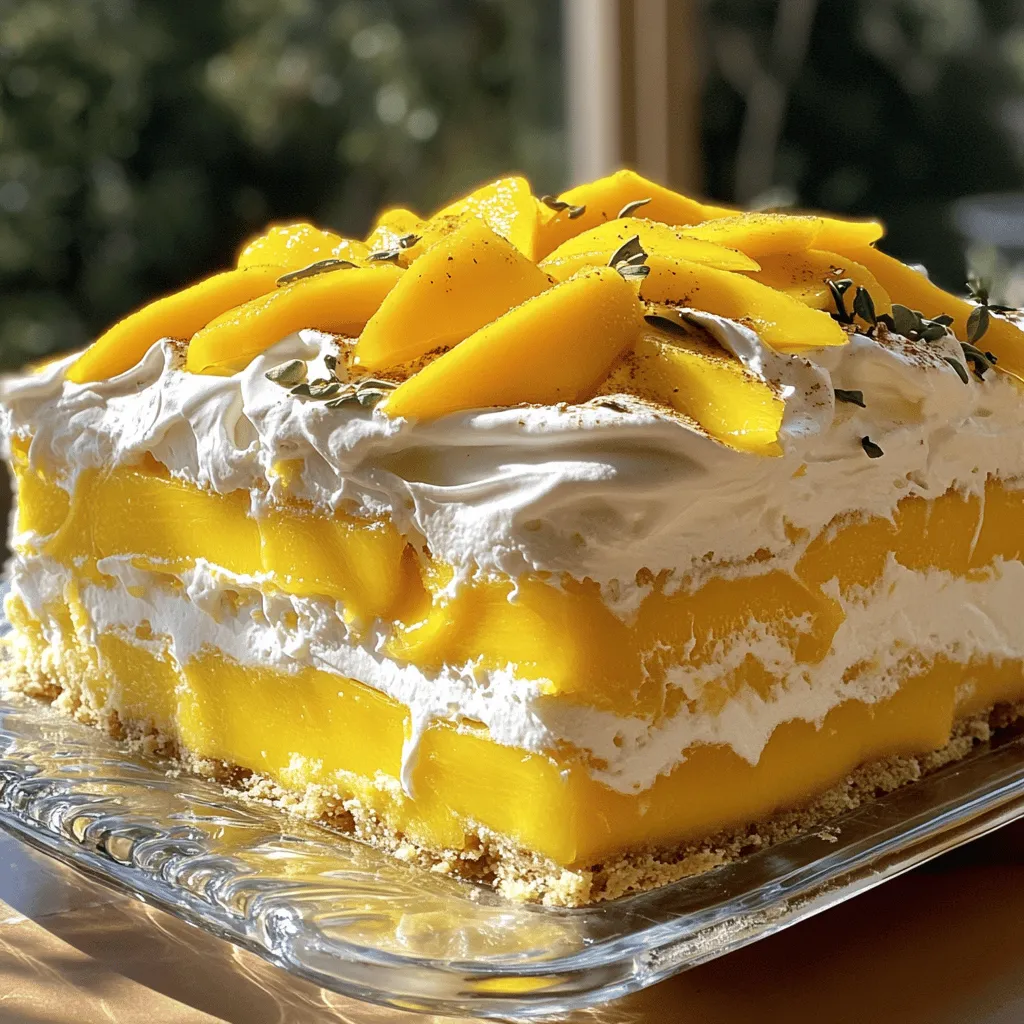
4. Assemble the Cake: After chilling, gently spread the whipped cream over the cake. Top with fresh mango slices and, if you like, a sprinkle of ground cardamom for extra aroma.
Serving Suggestions
– Cut and Serve: Slice the cake into squares. Serve it chilled for the best taste.
– Presentation Tips: For a beautiful look, arrange the mango slices artfully on top. This makes the cake even more appealing.
Enjoy the delicious flavors of mango lassi in every bite of your tres leches cake!
Tips & Tricks
Baking Tips
To ensure your cake rises evenly, follow these tips:
– Use fresh baking powder and baking soda. Old leavening agents may not work well.
– Make sure your ingredients are at room temperature. This helps the cake mix better.
– Beat the butter and sugar until light and fluffy. This adds air to your cake.
Avoid overmixing the batter. Mixing too much makes the cake dense. Mix just until the ingredients are combined. This keeps your cake light and airy.
Soaking Techniques
Soaking the cake properly is key to a moist texture. Here’s how to do it:
– Poke holes all over the cooled cake with a fork or skewer. This helps the tres leches mixture soak in.
– Slowly pour the mixture over the cake. Start from the edges and work toward the center.
– Cover and chill the cake in the fridge. Let it sit for at least two hours or overnight for the best flavor.
Whipping Cream Secrets
To achieve the perfect whipped cream consistency, follow these steps:
– Chill your mixing bowl and beaters before whipping. Cold equipment helps the cream whip up faster.
– Use cold heavy cream and add powdered sugar for sweetness.
– Beat until soft peaks form. Stop when the peaks hold their shape but are still creamy.
These tips will help you make a Mango Lassi Tres Leches Cake that is both flavorful and simple.

Variations
Flavor Enhancements
Adding spices can make this cake even more special. Try using saffron for a rich, floral note. Cardamom also works well. It adds warmth and a unique twist. Just a pinch can transform the flavor.
You can also explore other fruit purees. Consider using peach or pineapple for a fruity kick. Each fruit will change the cake’s taste. This makes it fun to create your own version!
Dietary Adjustments
If you need gluten-free options, you can swap the flour. Use a gluten-free flour blend instead. This allows everyone to enjoy the cake without worry.
For dairy-free options, choose almond or coconut milk. You can also use coconut cream in place of heavy cream. These swaps keep the cake creamy while catering to different diets.
Storage Info
Refrigeration Guidance
To keep your Mango Lassi Tres Leches Cake fresh, store it in the fridge. Use a tight lid or wrap it in plastic wrap. This keeps moisture in and flavors intact. Make sure the cake chills for at least 2 hours after soaking. The longer it sits, the better it tastes!
Freezing Instructions
If you want to save some cake for later, freezing is a great option. First, let the cake soak well in the tres leches mixture. Once soaked, cut it into squares. Wrap each piece in plastic wrap and then foil. This helps prevent freezer burn. You can freeze it for up to 3 months. When ready to enjoy, thaw it overnight in the fridge before serving.
Shelf Life
This cake stays fresh for about 3 to 5 days in the fridge. After that, it may lose its soft texture. If frozen, it can last much longer but for the best taste, enjoy it sooner. You’ll love how the flavors blend and deepen over time!
FAQs
Common Questions
What is the origin of tres leches cake?
Tres leches cake comes from Latin America. It is popular in Mexico, Nicaragua, and other countries. The name means “three milks” in Spanish. The cake absorbs three types of milk: sweetened condensed milk, evaporated milk, and whole milk. This makes it moist and delicious.
Can I make this cake in advance?
Yes, you can make this cake ahead of time. In fact, it tastes better after chilling overnight. Just follow the recipe and let it soak in the fridge. This helps the flavors blend well.
What are the best serving suggestions for mango lassi tres leches cake?
Serve it chilled for the best taste. You can add fresh mango slices on top for color and flavor. A sprinkle of ground cardamom adds a nice touch, too. Pair it with a scoop of vanilla ice cream for an extra treat.
Troubleshooting Tips
What to do if the cake doesn’t soak properly?
If your cake doesn’t soak well, poke more holes in it. Use a fork or skewer to create more openings. Pour the milk mixture slowly to let it absorb. If it still doesn’t soak, let it chill longer.
How to fix if the whipped cream is too runny?
If your whipped cream is too runny, try chilling it more. Cold cream whips better. If it’s still runny, you can add another tablespoon of powdered sugar. This can help thicken it a bit.
Ingredient Substitutions
Can I substitute fresh mango with frozen mango puree?
Yes, you can use frozen mango puree if fresh is not available. Just thaw it before mixing. The flavor will still be good, and it will work well in the cake.
What can I use instead of sweetened condensed milk?
If you need a substitute for sweetened condensed milk, use a mix of milk and sugar. Combine 1 cup of whole milk with 1 cup of sugar. Heat it until the sugar dissolves, then cool it before using it in the recipe.
This blog post covered how to make a delicious mango lassi tres leches cake. We discussed the key ingredients, detailed steps for preparation, and assembly. I shared tips to ensure the cake rises well and absorbs the tres leches mixture. You also learned storage tips and variations for flavor and dietary needs.
With these instructions, you can create a delightful dessert that impresses. Enjoy every sweet bite of your creation!


![To make a Zesty Italian Pasta Salad, you need fresh and colorful ingredients. Here’s the complete list of ingredients you will need: - 2 cups rotini pasta - 1 cup cherry tomatoes, halved - 1 cup cucumber, diced - 1/2 cup black olives, sliced - 1/2 cup red bell pepper, chopped - 1/4 cup red onion, finely chopped - 1/2 cup mozzarella balls, halved - 1/3 cup Italian dressing - 1 tablespoon fresh basil, chopped - 1 teaspoon dried oregano - Salt and pepper to taste Each ingredient brings its own flavor and texture. The rotini pasta is fun and holds dressings well. Cherry tomatoes add sweetness, while cucumbers give a nice crunch. Black olives bring a salty bite, and bell peppers add color and freshness. Red onions add a bit of sharpness, while mozzarella balls provide creaminess. For the dressing, you can use store-bought or make your own. I love using fresh basil and oregano for a burst of flavor. Finally, season with salt and pepper to balance everything. You can find the full recipe [here]. Enjoy your cooking adventure! - Bring salted water to a boil. - Cook rotini pasta until al dente. - Drain and cool under cold water. Cooking the pasta is the first step. Use a large pot and fill it with water. Add a good amount of salt to the water. This step adds flavor to the pasta. Once the water boils, add the rotini pasta. Follow the package directions for cooking time until it is al dente. This means the pasta should be firm but cooked. After cooking, drain the pasta and rinse it under cold water. This stops the cooking process and cools the pasta quickly. - Combine cherry tomatoes, cucumber, olives, bell pepper, and onion. - Stir gently to mix. While the pasta cools, you can prepare the vegetables. Take a large bowl and add the halved cherry tomatoes, diced cucumber, sliced black olives, chopped red bell pepper, and finely chopped red onion. Each vegetable brings its own flavor and texture to the salad. Stir gently to mix them without squishing the tomatoes. This colorful mix will make your salad bright and fun! - Add cooled pasta to the vegetable mix. - Incorporate mozzarella balls. - Drizzle with dressing and seasonings. Once the pasta is cool, add it to the bowl with the mixed vegetables. Next, add halved mozzarella balls. These little cheese bites add creaminess. Now, drizzle the Italian dressing over the pasta and vegetables. Don't forget to sprinkle the fresh basil, dried oregano, salt, and pepper. These seasonings will enhance the flavors. - Toss ingredients to combine. - Refrigerate for at least 30 minutes. Now, it is time to mix everything. Toss all the ingredients together carefully. You want every part to be coated with dressing. Cover the bowl with a lid or plastic wrap. Place it in the fridge for at least 30 minutes. Chilling the salad helps the flavors blend well. Trust me, the wait is worth it! To get the best taste from your Zesty Italian Pasta Salad, choose a good Italian dressing. Brands like Annie's or Ken's work well. Don't use too much dressing at first; you can always add more later. Always taste as you go. A little salt and pepper can boost the flavor. Remember, it's easy to add, but hard to take away. Serving your pasta salad is just as fun as making it! You can use a large bowl for a family-style meal. This makes it easy for everyone to help themselves. For a more stylish look, you can serve it in small bowls. This way, each guest gets their own. A sprinkle of fresh basil on top adds a nice touch. It makes the dish look bright and tasty! One common mistake is overcooking the pasta. Make sure to cook it just until it's al dente. This keeps your pasta from getting mushy. Another mistake is not chilling the salad. Chilling helps the flavors blend well. If you skip this step, your salad may not taste as good. Aim to chill it for at least 30 minutes before serving. For the full recipe, check out the Zesty Italian Pasta Salad section. {{image_4}} You can easily adapt this salad to fit different diets. For a gluten-free option, use gluten-free rotini pasta. It cooks just like regular pasta. Many brands make great options now. For a vegan twist, swap the mozzarella cheese with vegan cheese or even avocado. Both add creaminess and flavor to your dish. Want to make this salad more filling? Add some protein! Grilled chicken works great. Just chop it into bite-sized pieces. Shrimp is another tasty choice. Cook it until pink and toss it in. For a plant-based option, chickpeas are perfect. They add a nice texture. When you add protein, taste your salad again. You may need to adjust the seasoning. Just add a pinch of salt or a dash of dressing. Using seasonal veggies can elevate your pasta salad. In summer, add fresh zucchini or bell peppers. They bring a nice crunch and color. In fall, roasted butternut squash can add sweet notes. You can also switch up the dressing. Try a balsamic vinaigrette for a tangy twist. This keeps your salad exciting and fresh year-round. To store your zesty Italian pasta salad, use airtight containers. Glass or plastic containers work well. Make sure the lid seals tightly to keep air out. This helps maintain freshness. For best results, store the salad in the fridge within two hours of serving. You can freeze pasta salad, but it might change texture. To freeze, place it in a freezer-safe container. Label the container with the date. When ready to eat, thaw it in the fridge overnight. Reheat gently on the stove or in the microwave. Be careful not to overcook it again. In the fridge, your pasta salad lasts about three to five days. Keep an eye out for signs of spoilage. If it has an off smell, or if the vegetables look mushy, it’s best to toss it. Trust your senses; they guide you well in the kitchen. You can make Zesty Italian Pasta Salad a day before serving. Cook the pasta, mix it with the veggies, and add the dressing. Store it in the fridge. Chilling helps the flavors blend well. Just give it a good toss before serving. This makes it a great option for parties. Yes, you can customize the ingredients to fit your taste. Try adding different vegetables like bell peppers or zucchini. You can also swap out mozzarella for feta or add beans for protein. Get creative! Make it your own. Italian Pasta Salad pairs well with grilled meats, like chicken or steak. It also goes nicely with crusty bread or a fresh green salad. For a fun twist, serve it with garlic bread for a complete meal. No, it's not safe to leave pasta salad out for long. The safe time is about two hours. After that, bacteria can grow, making it unsafe to eat. Keep it chilled if you are not serving it right away. Absolutely! Homemade Italian dressing adds a personal touch. You can control the flavors and ingredients. Mix olive oil, vinegar, herbs, and spices to create your blend. This makes the salad even more special. For the full recipe, check out the section above! This Zesty Italian Pasta Salad is a bright and tasty dish. It combines fresh veggies, pasta, and cheese. Each bite is full of flavor. Here’s a quick look at what you need and how to make it. - 2 cups rotini pasta - 1 cup cherry tomatoes, halved - 1 cup cucumber, diced - 1/2 cup black olives, sliced - 1/2 cup red bell pepper, chopped - 1/4 cup red onion, finely chopped - 1/2 cup mozzarella balls, halved - 1/3 cup Italian dressing (store-bought or homemade) - 1 tablespoon fresh basil, chopped - 1 teaspoon dried oregano - Salt and pepper to taste First, cook the rotini pasta in salted boiling water. Follow the package instructions for best results. Drain and cool the pasta under cold water. This stops the cooking and keeps it firm. While the pasta cools, chop the veggies. Use a large bowl for the cherry tomatoes, cucumber, black olives, red bell pepper, and red onion. Stir them gently to mix. Next, add the cooled pasta to the veggies. Toss in the mozzarella balls, making sure they spread evenly. Now, drizzle the Italian dressing over the mix. Add the chopped basil, dried oregano, and a sprinkle of salt and pepper. Toss everything together until well coated. Finally, cover the bowl and chill in the fridge for at least 30 minutes. This step helps all the flavors blend nicely. Serve the pasta salad in a large bowl. You can also use individual bowls for a fun touch. Garnish with extra basil leaves for color. Enjoy this tasty dish at picnics or family meals! This blog post detailed how to make a zesty Italian pasta salad. We reviewed all the ingredients, cooking steps, and tips for the best flavor. You learned how to store leftovers and variations to suit your diet. Remember to chill the salad and avoid overcooking the pasta. With these tips, you can impress friends and family with this easy dish. Enjoy creating your own version of this refreshing salad!](https://fastmealmate.com/wp-content/uploads/2025/06/c8b502a6-31c8-41d1-a3bc-a403a8dd39f3-768x768.webp)
. Enjoy your cooking! To boost flavor, use fresh herbs. Fresh basil adds a bright note. You can also try parsley or thyme. Adding lemon zest brings a nice zing. For a kick, sprinkle in some red pepper flakes. If you want more depth, use vegetable broth instead of water. You can even roast the zucchini and corn first to enhance their sweetness. One common mistake is overcooking the orzo. Keep a close eye on it as it simmers. If you let it cook too long, it can become mushy. Another mistake is not seasoning enough. Taste and adjust with salt and pepper during cooking. Lastly, don’t skip the resting time after cooking. This helps the flavors blend better. To serve, use a large bowl for a family-style look. Spoon the orzo into the center, leaving some space around it. Top with fresh basil leaves for color. You can also add a sprinkle of cheese for richness. Serve with a lemon wedge on the side. This adds a pop of color and lets guests brighten their dish as they like. For the full recipe, be sure to check out the detailed cooking steps. {{image_4}} This dish shines as a vegetarian option. It uses fresh veggies and orzo, making it filling. To make it vegan, simply ensure your vegetable broth is plant-based. You can also add more protein by including chickpeas or tofu. These additions will keep the dish hearty and satisfying. If you need a gluten-free version, swap the orzo for gluten-free pasta. There are many types available, like rice or quinoa pasta. Just check the cooking time, as it may vary from regular orzo. This way, you can enjoy the flavors without worrying about gluten. Feel free to get creative with seasonal veggies! Try adding diced tomatoes, spinach, or bell peppers. You could also include peas or carrots for extra color and nutrition. Just remember to adjust the cooking time, so everything remains tender and vibrant. These changes can make the dish fun and new each time you prepare it. For the complete recipe, check the Full Recipe section. To keep your One Pan Summer Corn Zucchini Orzo fresh, let it cool first. Transfer the dish into an airtight container. Store it in the fridge for up to three days. This helps maintain its flavors and textures. When you are ready to enjoy leftovers, you can reheat them easily. Place the orzo in a skillet over low heat. Add a splash of vegetable broth or water to prevent sticking. Stir occasionally until it is heated through. This should take about 5 to 7 minutes. You can also use a microwave. Heat for one minute, then stir and check if it's warm. Repeat until heated. If you want to save your dish for later, freezing is a great option. Allow the orzo to cool completely. Portion it into freezer-safe bags or containers. Make sure to remove as much air as possible. Label the bags with the date. You can freeze it for up to three months. For best results, thaw it overnight in the fridge before reheating. For the full recipe, check out the detailed instructions above. To cook orzo perfectly, start with plenty of water. Use a ratio of 1 cup of orzo to 2 cups of water or broth. Bring the liquid to a boil, then add the orzo. Stir it gently to prevent sticking. Cook for about 8 to 10 minutes. Taste it a minute or two before the time is up. You want it al dente, firm but not hard. If there’s excess liquid, drain it off. This method keeps your orzo from getting mushy. Yes, you can use frozen vegetables in this dish. They save time and are often just as healthy. For the One Pan Summer Corn Zucchini Orzo, frozen corn works great. Just add it directly to the skillet. You may need to cook it a bit longer. Frozen zucchini can also work, but fresh zucchini gives a nicer texture. If using frozen, make sure to thaw it first if you want even cooking. Many sides go well with this dish. Here are some ideas: - Grilled Chicken: Adds protein and a nice char. - Garlic Bread: Perfect for soaking up extra broth. - Simple Salad: A light salad with lemon dressing complements the dish. - Roasted Vegetables: A mix of seasonal veggies enhances the meal. These sides make your meal more complete and satisfying. For the full recipe, check out the details above! You learned about the key ingredients and how to cook them. I covered steps, tips, and tricks for a great dish. You also found ways to adapt the recipe for special diets. Storing and reheating leftovers will help cut waste. Always aim for flavor and avoid common mistakes. With these insights, you'll create a tasty one-pan summer corn zucchini orzo. Enjoy your cooking journey and impress your guests!](https://fastmealmate.com/wp-content/uploads/2025/07/e3382d29-f029-483c-a1d1-82293022c013-768x768.webp)
![- 1 pound ground beef (80/20 blend) - ½ teaspoon salt - ½ teaspoon black pepper - ½ cup cheddar cheese, shredded - ½ cup mozzarella cheese, shredded - 4 large flour tortillas - 4 tablespoons cream cheese, softened - ¼ cup dill pickles, diced - ¼ cup diced tomatoes - ¼ cup onion, minced - 2 tablespoons ketchup - 2 tablespoons mustard - Olive oil, for cooking Creating Cheeseburger Quesadilla Smash Sliders is a fun way to enjoy flavors. With the right ingredients, your sliders burst with taste. First, let’s start with the beef. I like using an 80/20 blend. This mix gives a juicy bite. Next, season it well with salt and pepper. Don't skip this step; flavor is key. For the cheese, I use both cheddar and mozzarella. The cheddar brings a sharp taste, while mozzarella melts beautifully. You can feel the cheese stretch in every bite. The flour tortillas are the base for these sliders. They hold everything together and crisp up nicely when cooked. I recommend using large tortillas for easier assembly. Cream cheese adds richness. Spread it on the tortillas for a creamy layer. Then, top it off with diced dill pickles, tomatoes, and onions. These toppings add crunch and freshness. Finally, drizzle some ketchup and mustard for that classic burger taste. Use olive oil to cook the quesadillas. It helps create a golden brown crust while keeping everything moist inside. For the full recipe, check the details above. This will guide you step by step to create your own Cheeseburger Quesadilla Smash Sliders. Enjoy the flavor explosion! To start, grab a medium mixing bowl. Add 1 pound of ground beef, ½ teaspoon of salt, ½ teaspoon of black pepper, and 1 teaspoon of garlic powder. Use your hands to mix everything gently. Once mixed, divide the beef into small patties, each about 2-3 ounces. Next, heat a skillet on medium heat. Add a drizzle of olive oil. When the pan is hot, place the patties in the skillet. Cook for 3-4 minutes until they turn brown. Flip them over and cook for another 3-4 minutes. Once done, remove the patties and set them aside on a plate. Now it's time to build your quesadilla! Lower the skillet heat to medium-low. Take 4 large flour tortillas and spread 1 tablespoon of softened cream cheese on one side of each tortilla. Place one tortilla in the skillet with the cream cheese-side facing up. Add a generous amount of cheddar cheese, then stack half of the cooked burger patties on top. Next, sprinkle on the diced pickles, diced tomatoes, and minced onions. Drizzle a bit of ketchup and mustard over this. Finish by adding a layer of shredded mozzarella cheese. Carefully place another tortilla on top, cream cheese-side down. Press it gently with a spatula to hold everything together. Cook the quesadilla for about 2-3 minutes. Look for a golden-brown color on the bottom tortilla and melted cheese. Now, flip the quesadilla gently and cook the other side for another 2-3 minutes. When both sides are browned, take the quesadilla off the heat. Let it cool for a minute, then slice it into quarters or sliders. Repeat this for the rest of your tortillas and filling ingredients. Serve the warm cheeseburger quesadilla sliders on a platter. I like to add extra diced pickles and some ketchup and mustard for dipping on the side. Enjoy this flavor explosion! For the full recipe, check out the [Full Recipe]. To make the best burger texture, use ground beef that is 80/20. This mix provides the right fat content for juicy patties. When you form the patties, handle the meat gently. Overworking it can make the burgers tough. Aim for small patties, about 2-3 ounces, for sliders. For seasoning, keep it simple. A mix of salt, black pepper, and garlic powder works great. These flavors enhance the beef without overpowering it. Be sure to season both sides of each patty before cooking. This will help lock in the taste. To get that perfect cheese melt, use a mix of cheeses. Cheddar and mozzarella are my go-tos. Cheddar adds sharpness, while mozzarella brings stretchiness. Spread cheese evenly, so it melts all the way through. For a fun twist, try pepper jack cheese for a spicy kick. You can also experiment with gouda or fontina. These will add richness and depth. Just remember to slice the cheese thinly for quicker melting. Cooking your quesadillas to a perfect golden brown is key. Use medium-low heat for even cooking. This prevents burning while letting the cheese melt fully. When flipping quesadillas, use a large spatula. Slide it under the quesadilla gently to avoid spills. If you're nervous about flipping, consider using a plate. Simply slide one side onto the plate, then flip it back into the pan. This method keeps your fillings intact. {{image_4}} You can switch up the meat in this dish. Ground turkey or chicken works well. Both have a lighter flavor but still taste great. For a plant-based option, try lentils or black beans. These give you a nice texture and flavor. Using these options can help you cater to different diets. To boost taste, add spices like paprika or cumin. These spices add warmth and depth. You can also mix in sauces, like barbecue or sriracha, for a kick. Experimenting with different cheeses can change the flavor too. Pepper jack adds heat, while gouda brings a smoky taste. Topping with fresh herbs, like cilantro or chives, can brighten each bite. You can serve these quesadilla sliders in many ways. They work as a classic quesadilla or as fun sliders. For parties, cut them into smaller pieces. Arrange them on a colorful platter to impress your guests. You might also serve them with dips, like guacamole or salsa, for extra flavor. Each style can make your meal exciting and unique. To keep your cheeseburger quesadilla sliders fresh, place them in an airtight container. This helps lock in flavor and moisture. Store them in the fridge for up to three days. After that, the taste may decline, and the texture could change. If you want to save them longer, freezing is a good option. Wrap each quesadilla slider tightly in plastic wrap. Then, place them in a freezer-safe bag or container. This keeps them safe from freezer burn. You can freeze them for up to three months. When you're ready to eat, let them thaw overnight in the fridge before reheating. For the best taste, reheat using the oven. Preheat it to 350°F (175°C). Place the quesadilla sliders on a baking sheet. Heat for about 10-15 minutes, until warm and crispy. If you use a microwave, put them on a plate. Heat for 30-60 seconds. This method is faster but may not keep the crunch. To restore crunchiness, consider finishing in a hot pan for a minute. Yes, you can prepare these sliders ahead. Make the patties and cook them. Let them cool. Then, store them in the fridge. When ready to serve, assemble the quesadillas. You can use either fresh tortillas or pre-made ones. If you use pre-made tortillas, spread cream cheese and layer the fillings. Cook them quickly in a hot skillet. This way, they stay crispy and warm. You can serve many tasty sides with these sliders. Consider some crispy fries or sweet potato fries. They pair well with the cheesy sliders. A fresh salad can balance the richness. You might also try dipping sauces like ranch or spicy mayo. These add extra flavor and fun. You could even serve a zesty salsa for a fresh kick. To make these sliders vegetarian, swap out the beef for a meat alternative. You could use black beans or lentils as a base. Another option is to use plant-based burger patties. Just season them like the beef. Add your favorite toppings, like cheese and veggies. You can still enjoy the same great flavors without meat. Just make sure all the other ingredients are vegetarian-friendly. You can make tasty Cheeseburger Quesadilla Smash Sliders easily. Start with classic ingredients and follow straightforward steps for delicious results. Don’t forget to try different proteins and toppings to suit your taste. Storing any leftovers is simple, and reheating them will keep them just as good. With these tips, you can impress guests or enjoy a fun meal at home. Making this dish lets you explore flavors while fitting right into your busy day. Enjoy your cooking adventure!](https://fastmealmate.com/wp-content/uploads/2025/07/3ea5f9d6-0f24-4765-99ee-1beab0673b04-768x768.webp)
