Lemon Garlic Shrimp with Spinach Orzo Delight

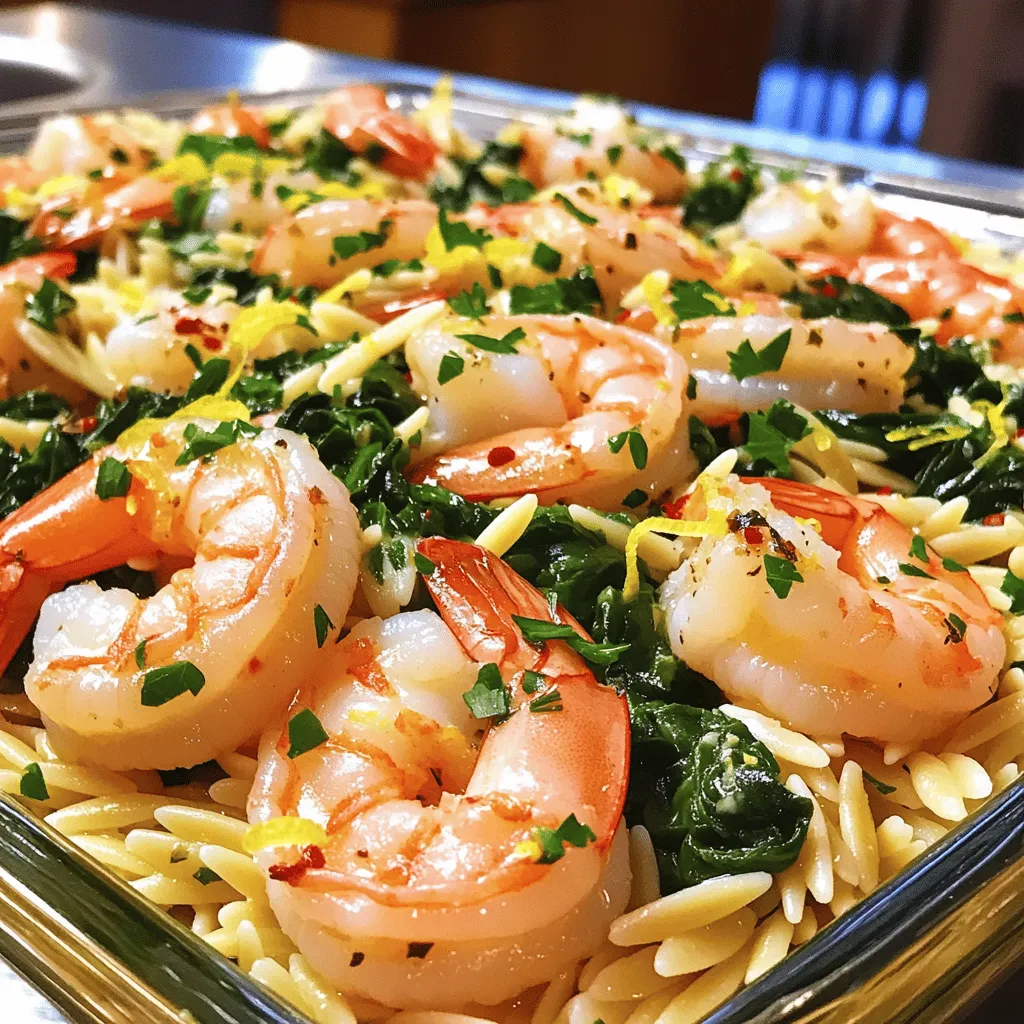
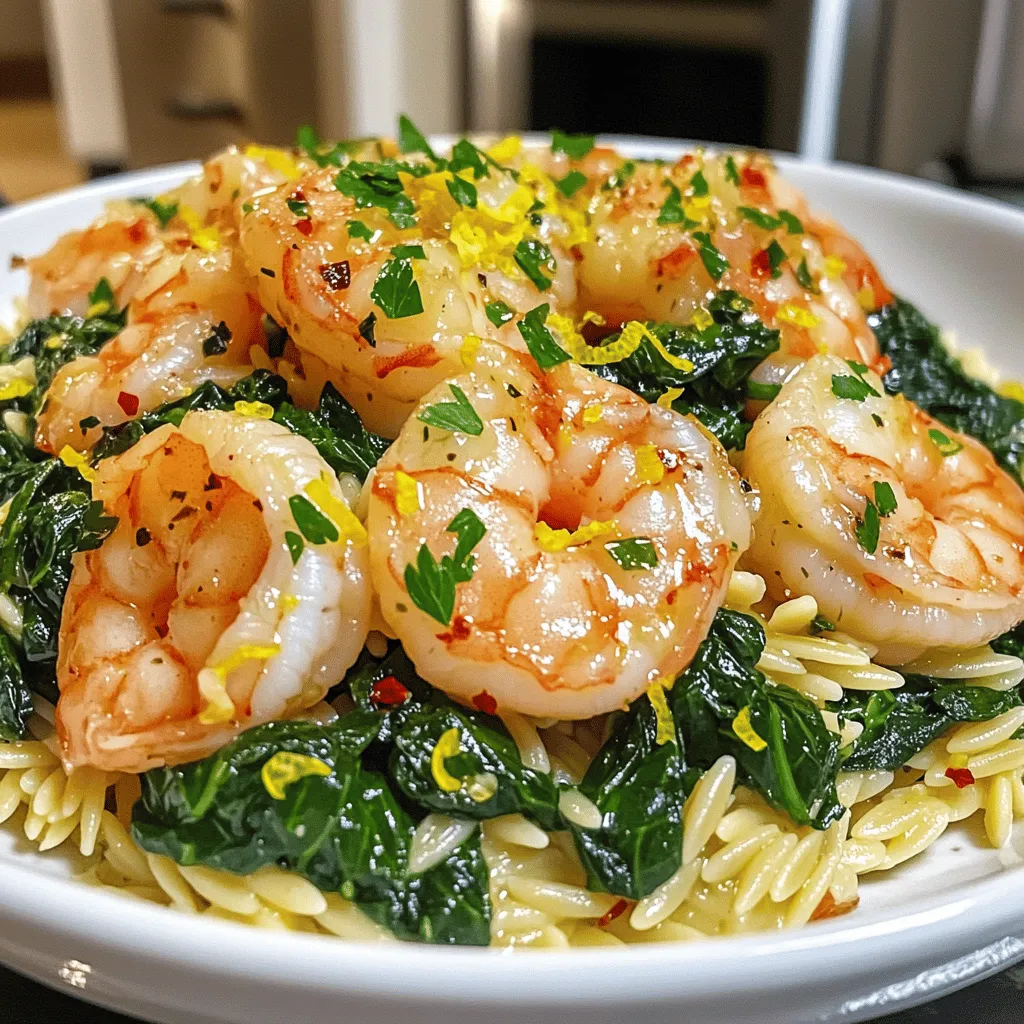
Looking for a fresh and quick meal? My Lemon Garlic Shrimp with Spinach Orzo Delight is a winner! It’s bursting with flavor from the shrimp, garlic, and lemon, while the orzo adds a fun twist. This dish is not just tasty; it’s also easy to make and perfect for any night of the week. Let’s dive into the simple steps and bright flavors that will make your dinner shine!
Ingredients
Main Ingredients for Lemon Garlic Shrimp with Spinach Orzo
– 1 lb large shrimp, peeled and deveined
– 1 cup orzo pasta
– 2 cups fresh spinach, chopped
Seasonings and Oils
– 4 cloves garlic, minced
– 2 tablespoons olive oil
– 1 tablespoon lemon zest
Optional Ingredients
– 3 tablespoons fresh lemon juice
– 1 teaspoon red pepper flakes
– Salt and black pepper to taste
– Fresh parsley for garnish
Getting the right ingredients is key to this dish. First, I love using large shrimp. They are meaty and pack a flavor punch. When you peel and devein them, it makes them ready for cooking. Next up, we have orzo pasta. It’s a short pasta that looks like rice and pairs so well with shrimp.
Fresh spinach adds a lovely green color and nutrition. You can use baby spinach for a milder taste. I always have garlic on hand. It adds a strong flavor that makes each bite better. Olive oil is my go-to for cooking. It gives a rich taste and helps fry the shrimp perfectly.
For a burst of freshness, I add lemon zest and juice. The zest gives a strong lemon flavor without the liquid. If you want a kick, add red pepper flakes. They can spice things up but feel free to skip them. Finally, salt and black pepper season the dish just right. A sprinkle of fresh parsley makes it look fancy.Make sure to gather all these ingredients. They work together to create a dish that is bright, tasty, and satisfying.
Step-by-Step Instructions
Preparing the Orzo
– Bring salted water to a boil.
– Cook orzo according to package instructions. Drain and set aside.
Cooking orzo is easy. You can choose any brand you like. Just remember to use enough salt in the water to enhance the flavor. Cooking time varies, so follow the package instructions closely for best results.
Cooking the Shrimp
– Warm olive oil and sauté garlic.
– Add shrimp and season before cooking.
Start by heating olive oil in a large skillet. Add minced garlic and let it cook for about 30 seconds. You want it fragrant but not burnt. Next, add your shrimp. Season them with salt and black pepper. If you enjoy a kick, toss in some red pepper flakes. Cook the shrimp for about 2-3 minutes per side. They should be pink and opaque when done.
Combining Ingredients
– Stir in lemon zest and juice.
– Add spinach and mix in cooked orzo.
Once the shrimp are ready, stir in lemon zest and fresh lemon juice. This brightens the dish. After that, toss in the spinach. Cook it just until it wilts. Finally, add the cooked orzo to the skillet. Mix everything gently to blend the flavors. Taste and adjust seasoning if needed.
This dish is perfect for a quick weeknight meal.Enjoy your cooking!
Tips & Tricks
Cooking Tips
To make your shrimp shine, ensure they cook evenly. This gives the best flavor. Cook shrimp until they turn pink and opaque. This usually takes 2-3 minutes on each side. If you burn the garlic, it will taste bitter. Sauté it gently for about 30 seconds until fragrant. Keep an eye on it!
Presentation Tips
Presentation is key! Serve your Lemon Garlic Shrimp with Spinach Orzo in shallow bowls. This shows off the colorful mix of shrimp, spinach, and orzo. Add a lemon wedge on the side. It gives a fresh pop and looks great. A sprinkle of parsley on top adds color and flavor.
Flavor Enhancement Tips
Want to take your dish to the next level? Experiment with herbs or spices! Fresh basil or thyme can add a nice twist. You can also try a touch of paprika for warmth. Just remember to keep it balanced, so the lemon and garlic still shine.

Variations
Different Protein Options
If you want a change, you can swap shrimp for chicken or tofu. Chicken works great when cut into small pieces. Cook it the same way as the shrimp. Tofu is a great choice too. Use firm tofu for the best texture. Just make sure to press it first to remove excess water.
Changing the Base
You can change the orzo to quinoa or rice. Quinoa adds a nice nutty flavor and a protein boost. Cook it according to package directions. Rice is another easy option. Use brown rice for more fiber and nutrients. Both swaps will keep the dish filling and delicious.
Adding Vegetables
Adding more veggies is a smart way to boost nutrition. Try greens like kale or Swiss chard for extra vitamins. Bell peppers add a sweet crunch and a pop of color. Just chop them up and toss them in with the spinach. This way, you create a fun mix of flavors and textures.
Storage Info
Storing Leftovers
Allow the dish to cool before putting it in the fridge. Use an airtight container to keep the shrimp and orzo fresh. This way, they will stay tasty for up to three days. If you want to keep it longer, consider freezing.
Reheating Instructions
To reheat, use a skillet over medium heat. This method helps keep the shrimp tender and the orzo nice. Add a splash of water or broth to prevent drying out. Stir often for even heating. Avoid using the microwave, as it can make the shrimp rubbery.
Freezing Options
If you want to freeze, pack the dish tightly in a freezer-safe container. Wrap it well to prevent freezer burn. Thaw overnight in the fridge before reheating. This helps keep the flavors intact. Enjoy your Lemon Garlic Shrimp with Spinach Orzo anytime you crave it!
FAQs
How do I cook the shrimp perfectly?
To cook shrimp perfectly, start with fresh, raw shrimp. Heat olive oil in your skillet. Add minced garlic and stir until fragrant. Then, add shrimp to the pan. Season with salt, pepper, and red pepper flakes. Cook for 2-3 minutes on each side. When shrimp turns pink and opaque, they are done. This ensures tender and juicy shrimp every time.
What can I substitute for orzo?
If you don’t have orzo, you can use several alternatives. Try small pasta shapes like ditalini or couscous. Quinoa also works well for a gluten-free option. Rice is another good choice, though it will change the dish’s texture. Each option brings its own flair to the meal.
Can I make this dish ahead of time?
Yes, you can prepare Lemon Garlic Shrimp with Spinach Orzo ahead of time. Cook the shrimp and orzo separately. Store them in airtight containers in the fridge. You can combine them just before serving. This keeps the shrimp tender and the orzo firm. Reheat gently in a skillet to avoid overcooking.
How spicy is this dish with red pepper flakes?
The spice level depends on how much red pepper flakes you add. A teaspoon gives a mild kick. If you prefer it spicier, add more to taste. For a milder option, leave the flakes out. This dish can easily adjust to your spice level. Enjoy it just the way you like!
Lemon garlic shrimp with spinach orzo combines fresh ingredients and rich flavors. You now know the main ingredients, such as shrimp and orzo, along with steps to cook them perfectly. Remember to follow my tips for great taste and presentation. Feel free to try variations like chicken or extra veggies. This dish is easy to store and reheat, making it perfect for leftovers. Enjoy creating your own version and share it with family or friends!


![- 2 fresh salmon fillets - 1 cup quinoa, thoroughly rinsed - 2 cups vegetable broth or water - 1 cup cherry tomatoes, halved - 1 crisp cucumber, diced - 1/2 cup Kalamata olives, pitted and sliced - 1/2 red onion, delicately thin-sliced - 1/4 cup fresh parsley, finely chopped - 1 lemon, juiced - Salt and freshly cracked pepper, to taste - 1 teaspoon garlic powder - 1 teaspoon dried oregano - Extra-virgin olive oil - Optional toppings (e.g., feta cheese, avocado, arugula) Gather these fresh ingredients for your Healthy Mediterranean Salmon Bowl. The salmon gives protein and a rich flavor. Quinoa adds a nutty taste and is full of fiber. The vegetables bring color, crunch, and nutrients. You can always switch up the ingredients based on what you like or have on hand. If you want to make it even more gourmet, consider our Full Recipe for detailed steps. Enjoy mixing and matching! To start, combine 1 cup of rinsed quinoa with 2 cups of vegetable broth or water in a medium saucepan. Heat the mixture on medium-high until it boils. Once it bubbles, reduce the heat to low. Cover it and let it simmer for about 15 minutes. You’ll know it’s done when all the liquid is soaked up. After that, take it off the heat and fluff it with a fork. Next, preheat your oven to 400°F (200°C). While it warms, line a baking tray with parchment paper. Place the 2 salmon fillets skin-side down. Drizzle them with olive oil and season with garlic powder, dried oregano, salt, and freshly cracked pepper. Bake the salmon for 12 to 15 minutes. It should be opaque and flake easily when it’s done. While the salmon bakes, it’s time to chop the vegetables. In a large mixing bowl, toss together 1 cup of halved cherry tomatoes, 1 diced cucumber, ½ thinly sliced red onion, and ½ cup of pitted Kalamata olives. Drizzle with 1 tablespoon of olive oil and the juice from 1 lemon. Season with salt and pepper to taste. Mix well to spread the flavors evenly. Now, grab your serving bowls. Start with a generous scoop of fluffy quinoa as the base. Place a roasted salmon fillet right on top of the quinoa. Next, add a hearty portion of the vibrant vegetable mixture on one side of the salmon. Garnish with fresh parsley for a lovely finish. You can find the complete recipe [Full Recipe]. Enjoy a fresh and healthy Mediterranean salmon bowl! To know when salmon is done, check its color. It should turn from bright pink to a lighter pink. The fish should also flake easily when you poke it with a fork. For the best results, I recommend two cooking methods. Grilling gives a nice char and smoky flavor. Poaching keeps the fish moist and tender. Marinate your salmon for extra taste. A simple mix of olive oil, lemon juice, and garlic works well. You can let it sit for 30 minutes. For the veggies, add a splash of balsamic vinegar or a sprinkle of feta cheese. This will really boost their flavors. To save time, prep your ingredients in advance. Cook the quinoa and chop the veggies a day before. Store them in airtight containers in the fridge. This way, assembly is quick and easy. For leftovers, keep them in separate containers. This helps keep the salmon and veggies fresh. {{image_4}} You can change the grains in your bowl. Try using rice or farro instead of quinoa. Each grain adds its own flavor and texture. For the salmon, think about different ways to cook it. You can use smoked salmon for a rich taste or grill it for a nice char. Both options can give your dish a new twist. Adding spices can change your bowl's taste. Try paprika for a smoky flavor or cumin for warmth. You can also switch up the dressing. Balsamic dressing adds sweetness, while tahini brings a nutty taste. These small changes can make a big difference in flavor. If you want a plant-based meal, you can swap salmon with tofu or chickpeas. Tofu absorbs flavors well and gives a nice texture. Chickpeas add protein and fiber. For toppings, consider using avocado for creaminess or nuts for crunch. These alternatives keep your bowl tasty and healthy. For the full recipe, check out the Mediterranean Bliss Salmon Bowl. To keep your Healthy Mediterranean Salmon Bowl fresh, place leftovers in airtight containers. This helps lock in flavors and moisture. I recommend glass containers for better heat retention. Let the bowl cool to room temperature before sealing. Store in the fridge for up to three days. You can freeze both quinoa and salmon. For quinoa, allow it to cool, then spread it in a thin layer on a baking sheet. Freeze until firm, then transfer to a freezer-safe bag. For salmon, wrap each fillet tightly in plastic wrap, then place in a freezer bag. To reheat, thaw overnight in the fridge. Warm quinoa in a microwave or on the stove until hot. Bake the salmon at 350°F (175°C) for about 10 minutes until heated through. For the best taste and safety, eat the salmon within three days if stored in the fridge. Quinoa can last about five days. If frozen, consume salmon within three months for the best quality. Enjoy your meal while it's fresh! You can add many tasty sides to your salmon bowl. Here are some ideas: - A simple green salad with mixed greens and vinaigrette. - Whole-grain pita or flatbread for dipping. - Roasted vegetables like zucchini, bell peppers, or asparagus. - Hummus or tzatziki for extra flavor. - Sliced avocado for creaminess. Yes, you can prep this meal in advance. For best results, cook the quinoa and salmon and store them in separate containers. Keep the vegetables fresh by cutting them just before serving. To store: - Quinoa lasts up to 4 days in the fridge. - Cooked salmon stays fresh for 2-3 days. - Store veggies in an airtight container to keep them crisp. You can easily change the spice level in your bowl. To add heat, sprinkle some red pepper flakes or cayenne pepper on the salmon before baking. For less spice, simply skip these ingredients. You can also serve a spicy sauce on the side for those who want it hot. Yes, this recipe is naturally gluten-free. Quinoa is a great gluten-free grain. Just ensure any additional ingredients, like dressings, are gluten-free too. Check labels on store-bought items to be safe. This dish is packed with nutrients. Salmon provides healthy fats and protein. Quinoa is rich in fiber and contains all nine essential amino acids. The fresh veggies add vitamins and antioxidants. Together, these ingredients support heart health, weight management, and overall wellness. Enjoy a bowl full of healthy goodness! This blog post explored a delicious Mediterranean salmon bowl. We discussed fresh ingredients like salmon, quinoa, and vibrant vegetables. Each step, from cooking the quinoa to baking the salmon, ensures a tasty meal. You can adapt flavors to fit your taste and enjoy meal prep tips for easy assembly. Remember, leftovers can be stored or frozen for future meals. Try this recipe, and you'll have a healthy, flavorful dish that satisfies. Eating well can be simple and enjoyable!](https://fastmealmate.com/wp-content/uploads/2025/06/f0df72fe-6851-4768-81fd-7e53aec44a27-768x768.webp)
![- 8 oz spaghetti or fettuccine - 3 large egg yolks - 1 whole egg - 1/2 cup finely grated Parmesan cheese - 1 tablespoon gochujang - 2 cloves garlic, minced - 1 tablespoon olive oil - 4 oz pancetta or diced turkey bacon (optional) - Salt and freshly cracked black pepper - Chopped green onions (for garnish) - Sesame seeds (for garnish) Gather these ingredients before you start cooking. This will make your process smooth and fun. The star of this dish is gochujang. It adds a deep heat and unique flavor. The creamy sauce comes from the eggs and cheese. The garlic and olive oil offer a nice aroma. If you want a meat option, use pancetta or turkey bacon. - Large pot - Medium mixing bowl - Large skillet - Tongs You need a large pot to boil the pasta. A medium mixing bowl helps mix the egg and cheese. The large skillet cooks the garlic and meat. Tongs are key to tossing your pasta with the sauce. Having the right tools makes cooking easier and more enjoyable. - Calories per serving: about 500 - Protein: 20g - Fat: 25g - Carbohydrates: 50g This dish is rich and filling. The calories come from the pasta, eggs, and cheese. It packs a good protein punch from the eggs and cheese. Enjoy it as a main meal or share it with a friend. For more details, check the Full Recipe for serving sizes and more tips. - Bring a large pot of salted water to a boil. - Cook spaghetti or fettuccine until al dente, about 8-10 minutes. First, salt the water. This helps the pasta taste great. When it boils, add the pasta. Stir it often. Before draining, save one cup of pasta water. This water helps make the sauce creamy later. - Whisk together egg yolks, whole egg, Parmesan, gochujang, and seasonings. - Heat olive oil and sauté garlic. In a medium bowl, mix the egg yolks, whole egg, and finely grated Parmesan cheese. Add gochujang and a pinch of salt and pepper. Whisk until it looks smooth. Heat olive oil in a skillet over medium heat. Add minced garlic. Sauté it for about 30 seconds. Watch for it to smell great and turn golden. - Cook pancetta or turkey bacon if using. - Toss drained pasta with garlic oil. - Mix in egg and gochujang mixture off the heat. If you want meat, add pancetta or turkey bacon now. Cook it until it is crispy, about 3-4 minutes. Then, toss the drained pasta into the skillet. Mix it well with the garlic oil. Off the heat, pour the egg and gochujang mixture over the hot pasta. Use tongs to toss it. The heat will cook the eggs gently, making a creamy sauce. Slowly add the reserved pasta water until the sauce is creamy and smooth. Taste and add more salt or pepper if you need to. Plate your Gochujang Carbonara right away. Enjoy the spicy twist! For the full recipe, check out the detailed steps and tips. To achieve a creamy sauce, start with room temperature eggs. Cold eggs can make the sauce clumpy. Whisk the yolks and the whole egg together well. This creates a smooth base. When you combine the egg mixture with the pasta, do it off the heat. The pasta should be hot enough to cook the eggs gently. Toss quickly with tongs. This helps make a rich sauce. If your sauce feels too thick, use reserved pasta water. Add it a little at a time. This water adds starch and helps to loosen the sauce. Keep tossing until you reach your desired creaminess. To boost the flavor, try adding spices. A pinch of red pepper flakes can add heat. Fresh herbs like parsley or basil can bring brightness. These small changes can really lift your dish. You can also experiment with different cheese. Pecorino Romano adds a sharp flavor. A mix of Parmesan and Pecorino can give you a nice depth. Use what you like best for a personal touch. One big mistake is overcooking the pasta. Al dente is best, as it will cook a bit more in the sauce. Always check the package time and taste a strand. Another mistake is scrambling the eggs. Keep the heat low when mixing the egg and pasta. If the skillet is too hot, the eggs will cook too fast. You want a creamy sauce, not scrambled eggs. {{image_4}} You can make a great vegetarian version of gochujang carbonara. Start by replacing the pancetta. Use mushrooms instead. They add a nice umami flavor. You can use shiitake or cremini mushrooms for this. Just sauté them in olive oil until they are golden and tender. Next, add seasonal vegetables. Think spinach, zucchini, or asparagus. They brighten up the dish and add color. Just toss them in the skillet with the garlic. This adds flavor and nutrition. Want more heat? You can increase the gochujang. Adding a little more will make it extra spicy. Just be careful! Start small and taste as you go. If you want to add other spices, try crushed red pepper flakes. They bring another layer of heat and flavor. Do you need a gluten-free option? You can easily swap out regular pasta for gluten-free pasta. There are many good brands available now. They work well in this recipe. You can also explore other noodle types. Try rice noodles or soba noodles. Each option gives a unique twist to the dish. They can bring different textures and flavors, making it fun to try new things. To keep your Gochujang Carbonara fresh, store it in an airtight container. Place the container in the fridge. Make sure to cool the pasta to room temperature before sealing. This helps prevent moisture buildup. Leftovers last about 3 days in the fridge. The best way to reheat carbonara is on the stove. Add a splash of water or broth to a skillet. Heat it over low to medium heat. Stir gently until warm. This keeps the sauce creamy and smooth. Avoid using the microwave, as it can dry out the pasta. You can freeze carbonara, but it may change texture. To freeze, place cooled portions in freezer-safe bags. Remove as much air as possible before sealing. For best taste, eat it within 1 month. When ready to eat, thaw it in the fridge overnight. Reheat gently on the stove with added liquid. This helps restore some of the creaminess. For the full recipe, check out the details above. Gochujang is a Korean chili paste. It has a deep red color. This paste is made from fermented soybeans, glutinous rice, and chili powder. Its flavor is sweet, spicy, and umami-rich. Gochujang adds a unique kick to many dishes. You can find it in Asian markets and some grocery stores. Yes, you can prep this dish ahead of time. Cook the pasta and store it in the fridge. Keep the sauce separate, so it stays creamy. When you are ready to eat, heat the pasta and mix in the sauce. This way, you enjoy fresh, tasty carbonara. If you lack pancetta, try turkey bacon or diced ham. For a vegetarian option, use mushrooms. Sauté them until golden and add them to the dish. You can also use smoked tofu for a plant-based protein. To make it milder, use less gochujang. You can start with half a tablespoon and taste it. If you want more heat, add a little more gochujang or some red pepper flakes. Adjust slowly until it meets your preference. For the complete steps and extra tips for making Gochujang Carbonara, click here: [Full Recipe]. This blog post covered how to make Gochujang Carbonara, from ingredients to storage tips. You learned about choosing the right pasta, creating a creamy sauce, and avoiding common cooking mistakes. No matter your taste, you can try variations like vegetarian options. Always store leftovers correctly to enjoy them later. Remember, cooking is fun, so feel free to experiment with flavors! Enjoy your delicious meal and impress others with your skills!](https://fastmealmate.com/wp-content/uploads/2025/06/8ba01260-66cf-4de4-8766-bae4801448e1-768x768.webp)
![- Ground beef - Flour tortillas - Cheeses: cheddar and mozzarella - Pickles, ketchup, and mustard The heart of my Cheeseburger Quesadilla Smash Sliders lies in the essential ingredients. I always choose high-quality ground beef for flavor. The flour tortillas serve as the base, holding everything together. I love using both cheddar and mozzarella cheese. They melt perfectly and add a creamy texture. Pickles, ketchup, and mustard bring that classic cheeseburger taste. - Garlic powder - Onion powder - Salt and pepper Seasonings are key to great flavor. I add garlic powder and onion powder to the beef. They enhance the taste without being overpowering. Salt and pepper are a must for balance. Adjust them to your liking for the best results. - Fresh lettuce leaves - Sliced tomatoes and onions For extra crunch and freshness, I recommend optional toppings. Fresh lettuce leaves add a nice texture. Sliced tomatoes and onions give a burst of flavor. Feel free to mix and match these toppings to suit your taste. They make the sliders even better! For the full recipe, check out the [Full Recipe]. - Start by mixing the ground beef with garlic powder, onion powder, salt, and pepper. - Use your hands or a spoon to blend the mixture well. - Divide the mixture into 8 equal parts. Shape each part into small patties. - Preheat a large skillet over medium-high heat. - Place the patties in the skillet, making sure not to crowd them. - Cook each patty for 2-3 minutes. Look for a nice golden brown crust before flipping. - Once cooked through, remove the patties and set them aside on a plate. - Lay one flour tortilla flat in the skillet. - Sprinkle half of the shredded cheddar and mozzarella cheese on the tortilla. - Place 2 cooked beef patties on top of the cheese. - Add chopped pickles and drizzle ketchup and mustard over the patties for extra flavor. - Top with the remaining cheese, then place a second tortilla over it. - Cook for about 2-3 minutes until the bottom is golden brown. Flip it carefully to cook the other side until crispy. - Once cooked, let it rest for a minute on a cutting board. Slice into wedges and enjoy. For the full recipe, check the [Full Recipe]. To ensure even cooking of patties, make them all the same size. I like to shape them about the size of a golf ball. This way, they cook evenly in the skillet. Preheat your skillet well before adding the patties. This helps develop a nice crust. For a crispy quesadilla, use medium-high heat while cooking. This allows the tortillas to become golden and crispy. Flip them carefully to keep the fillings intact. You want that delightful crunch with every bite! Adding spices can make a big difference. Try a pinch of smoked paprika or chili powder for a kick. Fresh herbs, like cilantro or parsley, can brighten the flavors too. These small changes can take your sliders to the next level. When it comes to sauces, think beyond ketchup and mustard. Barbecue sauce or spicy mayo can add a new twist. You can even mix them for extra flavor. Don’t be afraid to experiment! For the best sides, consider crispy fries or a fresh salad. Both pair nicely with these sliders. You can also serve them with a side of salsa for a fun dip! Presentation is key. Try stacking the quesadilla slices in a tower. Add fresh lettuce or tomatoes on the side for color. It makes the dish look great and appetizing. For a fun touch, use small skewers to hold the sliders together! You can find the full recipe for these delicious Cheeseburger Quesadilla Smash Sliders to explore more ways to enjoy this amazing dish! {{image_4}} You can change the protein in these sliders. Instead of ground beef, try ground chicken or turkey. Both offer great taste and a leaner option. If you want a plant-based choice, use vegan ground meat. Vegan cheese options are also available. Brands like Daiya or Violife melt well and taste good. Want some spice? Add jalapeños to your sliders for a kick. You can also mix in spices like cumin or chili powder for extra flavor. For a Southwestern twist, top your quesadilla with avocado or pico de gallo. These toppings add freshness and texture, making every bite exciting. You can cook your sliders in different ways. Grilling gives a smoky flavor. If you prefer stovetop cooking, use a skillet for a crispy finish. An air fryer is perfect for a lighter option. Set it to 375°F and cook for about 8-10 minutes. This method makes your quesadilla super crispy without excess oil. For the complete recipe, check out the Full Recipe. To keep your quesadilla sliders fresh, store them in an airtight container. Place parchment paper between layers to avoid sticking. They can last up to three days in the fridge. Make sure to cool them down before sealing. This helps keep them safe and tasty. When reheating, use a skillet over medium heat. This method warms them evenly and keeps them crispy. Add a drop of oil for extra crispness. Avoid the microwave, as it can make them soggy. Heat each slider for about 3-4 minutes per side. You can freeze either assembled or cooked sliders. Wrap each slider tightly in plastic wrap and then in foil. This helps prevent freezer burn. They can last up to two months in the freezer. To enjoy them, thaw in the fridge overnight. Reheat in the skillet as mentioned above for the best results. For the full recipe, check out the earlier sections. To make these sliders, start by mixing ground beef with garlic powder, onion powder, salt, and pepper. Shape the mix into small patties. Next, cook the patties in a skillet until they are brown. Then, place one tortilla in the skillet, add cheese, cooked patties, pickles, ketchup, and mustard. Top with another tortilla. Cook until both tortillas are crispy and the cheese melts. Cut the quesadilla into wedges, and enjoy! I recommend using a blend of cheddar and mozzarella. Cheddar gives a rich flavor, while mozzarella melts beautifully. You can also try pepper jack for a spicy kick or gouda for a smoky taste. Mixing these cheeses will create a creamy, tasty filling that pulls apart nicely. Yes, you can prepare the beef patties and chop the toppings ahead of time. Store them in the fridge for up to a day. When ready to cook, just assemble the quesadillas and grill them. This will save you time and let you enjoy your meal stress-free. For the full recipe, check out the details above. You learned how to make delicious cheeseburger quesadilla smash sliders. We covered essential ingredients, like ground beef and cheeses, and how to cook them perfectly. I shared key tips for flavor and cooking techniques. You also discovered variations and storage tips for these tasty sliders. By trying these recipes, you can impress your family or friends at your next gathering. Happy cooking!](https://fastmealmate.com/wp-content/uploads/2025/07/75d3e756-492b-48dc-99fb-d4828a25c64e-768x768.webp)

