Heirloom Tomato Galette with Basil Feta Crust Delight

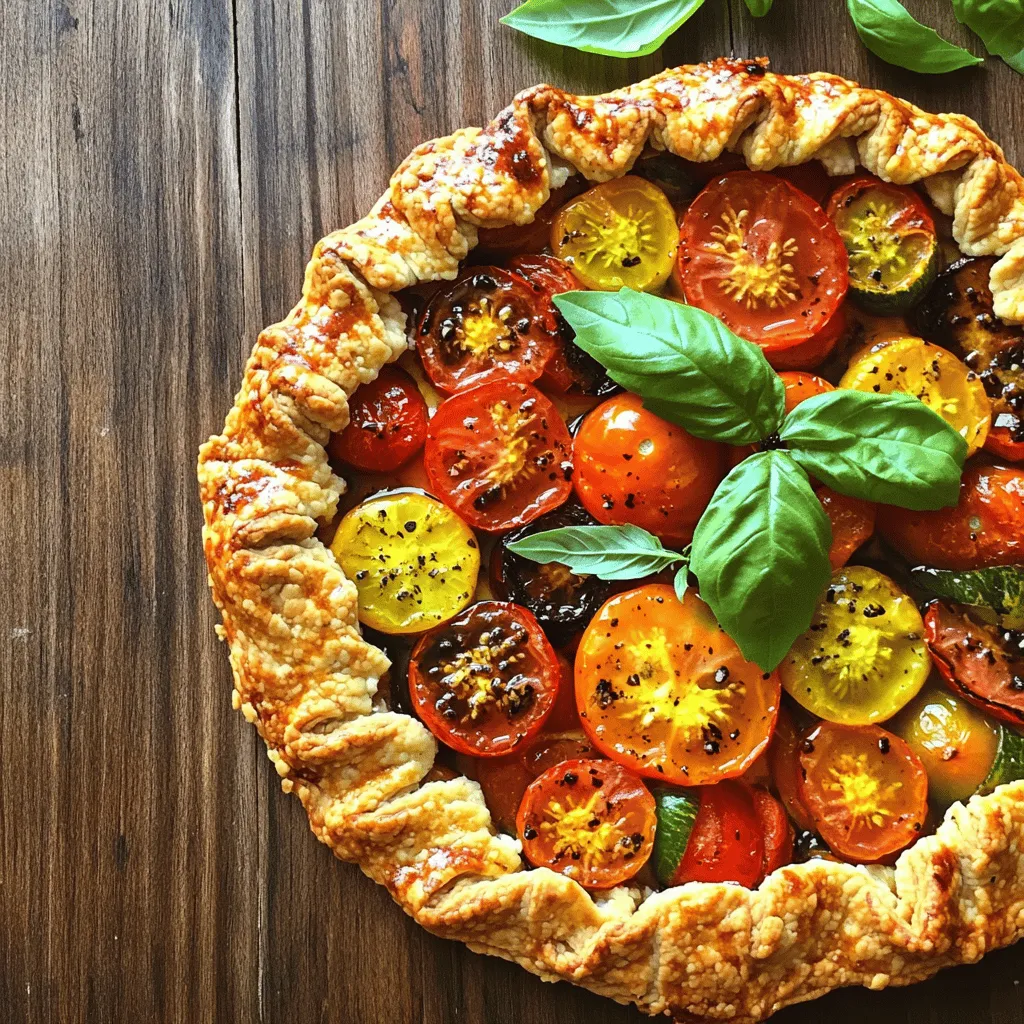
Get ready to wow your taste buds with the Heirloom Tomato Galette with Basil Feta Crust! This easy-to-make dish combines fresh heirloom tomatoes and a flavorful, flaky crust that features crumbled feta and aromatic basil. Perfect for summer gatherings or a cozy night in, this galette is a delightful way to enjoy fresh ingredients. Let’s dive into how to make this mouthwatering treat!
Ingredients
Main Ingredients for the Galette
– 1 and 1/2 cups all-purpose flour
– 1/2 cup crumbled feta cheese
– 1/4 cup fresh basil leaves, finely chopped
– 3 medium heirloom tomatoes, sliced into thick rounds
To create a great galette, we start with the main ingredients. All-purpose flour gives us a sturdy base. Feta cheese adds a salty, creamy flavor. Fresh basil brings a bright taste that matches the tomatoes. Heirloom tomatoes are the stars of this dish, bursting with flavor and vibrant colors.
Additional Ingredients
– 1/2 cup unsalted butter, chilled and cut into small cubes
– 3 to 4 tablespoons ice water
– 1 tablespoon extra virgin olive oil
– 1 teaspoon balsamic vinegar
– Sea salt, to taste
Next, we have additional ingredients that enhance the galette. Unsalted butter makes the crust flaky and rich. Ice water helps bind the dough without making it tough. Extra virgin olive oil and balsamic vinegar elevate the tomato flavor. A pinch of sea salt brings everything together perfectly.
Optional Garnishes
– Additional fresh basil leaves
– Balsamic reduction
While optional, garnishes can add a lovely touch. Fresh basil leaves give a pop of green and flavor. A balsamic reduction can add sweetness and depth. These extras make your galette look and taste even better.
Step-by-Step Instructions
Preparing the Basil Feta Crust
– Mixing dry ingredients: In a large bowl, combine 1 and 1/2 cups of all-purpose flour, 1/2 cup of crumbled feta cheese, 1/4 cup of finely chopped fresh basil, 1/2 teaspoon of salt, and 1/4 teaspoon of black pepper. Mix well until all the dry ingredients blend smoothly.
– Cutting in the butter: Add 1/2 cup of chilled, cubed unsalted butter to the bowl. Use your fingertips or a pastry cutter to break the butter into the flour mix. Aim for a crumbly texture with small butter pieces remaining.
– Incorporating ice water: Slowly add 3 to 4 tablespoons of ice water, one tablespoon at a time. Gently mix until the dough starts to form. Be careful not to over-knead it; you want a tender crust.
Chilling and Preheating
– Shaping and wrapping the dough: Shape the dough into a disc. Wrap it tightly in plastic wrap to keep it fresh.
– Recommended chilling time: Chill the dough in the fridge for at least 30 minutes. This helps the dough hold its shape better when you roll it out.
– Preheating the oven: Preheat your oven to 400°F (200°C). This ensures a nice, even bake when the galette is ready.
Preparing and Assembling the Tomatoes
– Marinating the heirloom tomatoes: Slice 3 medium heirloom tomatoes into thick rounds. In a bowl, toss them with 1 tablespoon of extra virgin olive oil, 1 teaspoon of balsamic vinegar, and a pinch of sea salt. Allow them to marinate for about 10 minutes to enhance their flavor.
– Rolling out the dough: On a floured surface, take your chilled dough and roll it into a 12-inch circle, about 1/8-inch thick. Carefully transfer it onto a parchment-lined baking sheet.
– Arranging tomatoes in the galette: Place the marinated tomato slices in the center of the rolled-out dough, leaving a 2-inch border. Fold the edges of the dough over the tomatoes, overlapping as you go. This creates a rustic look.
Baking the Galette
– Baking duration and temperature: Bake the galette in the preheated oven for 30-35 minutes. Keep an eye on it to ensure the crust turns golden brown.
– Checking the doneness: Look for the tomatoes to be tender and aromatic. A perfect galette has a crisp crust and soft, juicy tomatoes.
Tips & Tricks
Perfecting the Crust
Chilling the dough is key for a flaky crust. When you chill the dough, the butter firms up. This helps create layers when baking. Aim for at least 30 minutes in the fridge. If you skip this step, your crust may be tough.
To avoid over-kneading, mix gently. Once you add the ice water, combine it just until it holds together. Overworking the dough makes it tough. Remember, a little crumbly is fine.
Enhancing Tomato Flavor
Timing is important for marinating heirloom tomatoes. Let them soak in olive oil and balsamic vinegar for about 10 minutes. This boosts their flavor and brings out sweetness.
Try using different tomato varieties for more taste. Each type offers unique flavors and colors. You can mix cherry, beefsteak, and heirloom tomatoes for a fun twist.
Serving Suggestions
For the best accompaniments, serve your galette with a light salad. A mix of arugula and mixed greens works well. You can also add a squeeze of lemon for brightness.
Presentation is key. Slice the galette into wedges and arrange them on a rustic board. Drizzle a bit of balsamic reduction over the top before serving. This adds a gourmet touch.

Variations
Different Cheese Options
You can switch up the cheese in your galette. Try using ricotta for a creamy texture. Goat cheese adds a tangy taste, while Parmesan gives a rich flavor. Each cheese brings its own flair. You can mix and match these cheeses too. Just remember to adjust your seasonings. For example, goat cheese may need less salt.
Alternative Herbs
Basil is great, but you can explore other herbs. Thyme adds a warm, earthy taste. Oregano gives a nice Italian twist. Dill can bring a fresh note. These herbs infuse the crust with new flavors. You can use a mix of these herbs for even more depth.
Vegetable Additions
Want to make it a garden vegetable galette? You can add zucchini, bell peppers, or eggplant. Slice them thinly and layer them with the tomatoes. Seasonal veggies add color and flavor. Don’t be afraid to experiment! You can create a unique dish with your favorite garden finds.
Storage Info
Storing Leftovers
To keep your Heirloom Tomato Galette fresh, store leftovers in the fridge. First, let it cool to room temperature. Then, wrap it tightly in plastic wrap or place it in an airtight container. This helps avoid drying out. The galette stays good for up to three days in the fridge.
Reheating Tips
When it comes to reheating, the oven is best. Preheat your oven to 350°F (175°C). Place the galette on a baking sheet and cover it with foil. Heat for about 15-20 minutes, until warm. If you use the microwave, heat it for 1 minute at a time. This may make the crust soggy, so use it as a last resort.
Freezing the Galette
You can freeze both uncooked and cooked galette. For uncooked, wrap it tightly in plastic wrap and then in foil. It can stay frozen for up to three months. To cook from frozen, bake for about 10 minutes longer than the recipe states. For cooked galette, let it cool completely, then wrap and freeze. Thaw it overnight in the fridge before reheating.
By following these steps, you can enjoy your delicious galette longer!
FAQs
What is a galette?
A galette is a free-form pastry. It has a rustic look and is easy to make. You can fill it with sweet or savory items. The dough folds over the filling to create a beautiful, open tart. Galettes are great for showcasing seasonal ingredients. They can be made with various dough types, including pie crust and puff pastry.
Can I use store-bought dough?
Yes, you can use store-bought dough. It saves time and effort. Homemade dough has a fresh taste and can be tailored to your liking. But store-bought options are convenient. Look for a high-quality pie crust or puff pastry. These will work well for your galette.
How do I know when the galette is done?
Check for a golden-brown crust. The tomatoes should be tender and aromatic. If the crust looks crisp and the filling bubbles a bit, it is ready. The edges should have a nice color. Let it cool for a few minutes before slicing.
What can I pair with the galette?
Pair your galette with a simple green salad. A mix of greens, cucumbers, and a light dressing works well. You can also serve it with roasted veggies. For drinks, a chilled white wine or sparkling water complements the flavors. Enjoying this dish with friends makes it even better!
Making a galette can be simple and rewarding. We explored the main ingredients, including feta cheese and heirloom tomatoes. You learned how to prepare the crust, assemble the ingredients, and bake to perfection. Remember to chill your dough for the best crust. Try different cheeses and herbs to mix things up. Store any leftovers properly to enjoy later. With these tips and ideas, you can create a delightful dish that impresses. Enjoy your galette, and happy cooking!


![- 1 cup pumpkin puree - 1/2 cup unsalted butter, softened - 1 cup brown sugar and 1/2 cup granulated sugar These ingredients form the base of your chewy pumpkin spice cookies. Pumpkin puree provides moisture and flavor. Softened butter helps create that melt-in-your-mouth texture. Mixing brown and granulated sugar gives sweetness and a lovely depth. - 1/2 cup chocolate chips - 1/2 cup chopped pecans or walnuts If you want to elevate your cookies, consider adding chocolate chips. They bring a rich sweetness that pairs well with pumpkin spice. Chopped pecans or walnuts add a nice crunch and nutty flavor. Feel free to mix and match based on your taste. - 2 cups all-purpose flour - 1 teaspoon baking soda, baking powder, pumpkin spice, and sea salt All-purpose flour is your main structure builder. Baking soda and baking powder help the cookies rise and stay soft. Pumpkin spice adds warmth and that classic fall flavor. Sea salt enhances the sweetness and balances the spices. For the full recipe, check out the details above. Each ingredient plays a key role in creating these irresistibly soft treats! - Preheat your oven to 350°F (175°C). This step ensures even baking. - Line a baking sheet with parchment paper. This helps the cookies not stick. - In a large bowl, cream together softened butter and both sugars. - Use an electric mixer for the best results. Mix until light and fluffy. - Next, add the pumpkin puree, egg, and vanilla extract. - Beat well until everything is smooth and combined. - In a separate bowl, whisk together the flour, baking soda, baking powder, pumpkin spice, and salt. - Gradually add this dry mix to the wet ingredients. Stir gently and avoid overmixing. - Use a tablespoon or cookie scoop to portion the dough onto the lined baking sheet. - Leave enough space between each cookie to allow for spreading. - Bake in the preheated oven for 10-12 minutes. The edges should be golden brown. - The centers might look a bit soft but will set as they cool. For the full recipe, refer to the earlier sections. Enjoy the process! To make your cookies chewy, do not overmix the dough. Mix just until the flour disappears. Overmixing makes cookies tough. The right baking time and temperature are key. Bake at 350°F (175°C) for 10-12 minutes. Watch for golden edges and soft centers. They will harden as they cool. You can use homemade pumpkin puree or canned. Homemade puree adds a fresh taste. Canned options are quick and easy. Also, try different spices. While pumpkin spice is great, adding a pinch of cardamom or allspice can elevate the flavor. Experiment until you find your favorite blend. For a stunning display, stack your cookies on a rustic platter. This adds charm to your table. To make them look even nicer, dust with powdered sugar. Add some cinnamon sticks beside the cookies for a cozy touch. These small details impress guests and enhance enjoyment. For the full recipe, check the complete instructions above. {{image_4}} You can make fun swaps for your chewy pumpkin spice cookies. One easy change is to use coconut oil instead of butter. This makes the cookies dairy-free and adds a light coconut flavor. If you want a vegan option, replace the egg with flax eggs. To make a flax egg, mix one tablespoon of ground flaxseed with three tablespoons of water. Let it sit for five minutes to thicken. This keeps your cookies soft and chewy, just like the original recipe. Want to add more flavor? Try adding dried fruits like cranberries or raisins. They bring a sweet chewiness that pairs well with pumpkin spice. For a fresh twist, you can also add a hint of citrus zest. A little orange or lemon zest brightens the cookies and gives them a fun taste. These small changes can make your cookies stand out during the fall season. Frosting can take your cookies to another level. Cream cheese frosting pairs perfectly with the warm spices in these cookies. To make it, mix cream cheese with powdered sugar and a splash of vanilla. If you want something lighter, consider a simple glaze. Just mix powdered sugar with a bit of milk until smooth. Drizzle it over the cookies for added sweetness. These frosting options make each bite even more delightful. To keep your chewy pumpkin spice cookies fresh, use an airtight container. This helps lock in moisture. Store them at room temperature, away from sunlight. A cool, dry place works best. To maintain their soft and chewy texture, place a slice of bread in the container. The cookies absorb moisture from the bread, keeping them soft. You can also wrap each cookie in plastic wrap for extra protection. Freezing cookies is easy and a great way to save them for later. First, let the cookies cool completely. Then, arrange them in a single layer on a baking sheet. Freeze them for about one hour. This step prevents them from sticking together. After freezing, transfer the cookies to a freezer-safe bag. Remove as much air as possible before sealing. They can last for up to three months in the freezer. When you're ready to eat them, thaw cookies at room temperature. For a warm treat, pop them in the microwave for about 10-15 seconds. Chewy pumpkin spice cookies last about a week at room temperature. Store them in an airtight container to keep them fresh. Look out for signs of spoilage. If they become hard or dry, they may be past their prime. Also, check for any off smells or mold. If you see or smell anything unusual, it’s best to throw them away. These tips will help you enjoy your chewy pumpkin spice cookies even longer! For the full recipe, check out the [Full Recipe]. You can use pumpkin pie filling, but it is not the same. Pumpkin puree is pure pumpkin with no added sugar or spices. Pumpkin pie filling has sugar and spices mixed in. If you use it, cut back on the sugar in your recipe. It may make your cookies sweeter than you want. To reduce sweetness, cut down on the sugar. You can use 3/4 cup of brown sugar instead of 1 cup. You can also skip the granulated sugar. Another option is to add more pumpkin puree. This can balance the sweetness while keeping the texture. To reheat your cookies, use the oven for the best results. Preheat your oven to 350°F (175°C). Place the cookies on a baking sheet. Heat them for about 5 minutes. This keeps them soft and chewy. You can also use the microwave. Heat them for 10-15 seconds. This works, but they may not be as chewy. Enjoy your chewy pumpkin spice cookies warm! These chewy pumpkin spice cookies are simple to make with the right ingredients. Start with pumpkin puree, butter, and sugars for the best taste. Follow the steps to create a delightful treat and use my tips for the perfect chewy texture. Experiment with flavors to make your cookies unique. Store them well to keep that freshness. Enjoy sharing these cookies, as they are sure to impress!](https://fastmealmate.com/wp-content/uploads/2025/07/8de16806-55b5-45ec-964c-13b68a3ec1a0-768x768.webp)


![- 1 cup brewed Earl Grey tea (cooled) - 1 cup frozen blueberries - 1 ripe banana - 1 tablespoon honey or maple syrup (to taste) - 1/2 cup almond milk (or milk of choice) - 1 cup ice cubes - 1/2 teaspoon vanilla extract - A small pinch of salt The Blueberry Earl Grey Frappe is a treat. Each ingredient plays a key role in flavor and health. Benefits of Earl Grey tea: Earl Grey tea comes from black tea mixed with bergamot oil. This blend gives it a lovely flavor. It also offers health perks like antioxidants. These can help protect your cells. Nutritional value of blueberries: Blueberries are tiny superfoods. They are low in calories yet high in vitamins. They also have fiber, which helps digestion. Their antioxidants may support heart health too. Advantages of using bananas: Bananas add natural sweetness to your frappe. They provide potassium, which is good for your heart. Plus, they help create a creamy texture when blended. Alternatives for almond milk: If you don't have almond milk, try oat or soy milk. These options work well and keep the frappe creamy. Sweetener options: You can swap honey for agave or stevia. Each sweetener adds a unique taste. Adjust the amount based on your liking. Using fresh vs. frozen blueberries: Frozen blueberries keep the frappe cold and thick. Fresh blueberries can be used, but they will change the texture. If using fresh, add more ice to keep it cool. For the full recipe, check the above details. Enjoy creating this refreshing drink! Start by brewing a strong cup of Earl Grey tea. Choose high-quality loose leaf or bagged tea. Use boiling water for the best flavor. Once brewed, let it cool to room temperature. This takes about 10 to 15 minutes. For faster cooling, pour the tea into a wide bowl. You can also prepare the tea ahead of time. Just refrigerate it for at least one hour. Once your tea is cool, gather your ingredients for the frappe. Add the cooled tea to a blender. Include one cup of frozen blueberries, one ripe banana, and one tablespoon of honey or maple syrup. Pour in half a cup of almond milk and one cup of ice cubes. Don’t forget half a teaspoon of vanilla extract and a small pinch of salt. Blend everything on high speed. Aim for a smooth and creamy texture. If you find it too thick, add more almond milk. Blend again until well mixed. Now it’s time to serve your Blueberry Earl Grey Frappe. Pour the frappe into chilled glasses. For a nice touch, garnish with fresh blueberries on top. You can also sprinkle some lemon or orange zest for added brightness. This will enhance the flavor and make it look beautiful. Enjoy your refreshing drink! Check the [Full Recipe] for all details. To get the best texture in your Blueberry Earl Grey Frappe, blend well. I recommend mixing until smooth and creamy. If the drink feels too thick, add a splash more almond milk. If it's too thin, add a few more ice cubes. Sweetness is key to balance. Start with one tablespoon of honey or maple syrup. Taste it after blending. If you want it sweeter, add more syrup and blend again. Adjust to your taste! You can brew Earl Grey tea in advance. Store it in the fridge for up to three days. This way, your frappe is quick to make. Just remember to cool it down first. For freezing blueberries, spread them in a single layer on a baking sheet. Freeze for a couple of hours. Once frozen, transfer them to a bag. This keeps them fresh and ready for your frappe. This frappe pairs well with light snacks. Think of yogurt, granola, or even a slice of lemon cake. The flavors mix well together! To boost the taste, add a little citrus zest. A sprinkle of lemon or orange zest adds a bright twist. It enhances the drink’s flavor and makes it even more refreshing. For more tips, check out the Full Recipe. {{image_4}} You can play with your Blueberry Earl Grey Frappe! Try adding other fruits. Strawberries add a sweet punch. Mango gives a tropical flair. Both will mix well with the blueberry flavor. Next, think about spices. A dash of cinnamon adds warmth. Nutmeg gives a nice twist too. Just a pinch is enough to elevate your drink. Be bold and experiment to find your favorite mix! Making this frappe dairy-free is easy. Use almond milk, oat milk, or coconut milk. They all work great. If you want it sweeter, try agave syrup or coconut sugar. These are great vegan substitutes for honey. For a vegan drink, ensure all your ingredients are plant-based. Double-check your sweetener. Always look for options that suit your diet. This way, you can enjoy your treat without worry. Want a different take? Try making a cold brew version! Start by steeping your Earl Grey tea in cold water. Let it sit in the fridge for 6 to 12 hours. This method brings out a smoother flavor. Once you’re ready, blend the cold brew with your ingredients. You can add some extra fruit for a fun twist. The cold brew style will give your frappe a unique taste. It’s perfect for hot summer days! You can find the full recipe for this refreshing drink to get started. To keep your brewed Earl Grey tea fresh, store it in an airtight container. Place it in the fridge. It stays good for about three days. If you want to keep its flavor strong, don’t add any sweeteners yet. They might make the tea taste off after a day. For frozen blueberries, keep them in their original bag. Seal it tightly to avoid freezer burn. Use them within six months for the best taste. If you buy fresh blueberries, wash and dry them first. Then, freeze them in a single layer on a baking sheet. Once frozen, transfer them to a sealed bag. If you have leftover frappe, store it in the fridge. Use a tightly sealed jar or container. It stays fresh for about one day. The frappe might separate a bit, but that’s okay. Just give it a good shake before drinking. For longer storage, you can freeze the leftover frappe. Pour it into ice cube trays or freezer-safe containers. This way, it can last for up to a month. When you want a quick drink, blend a few cubes with some almond milk, and enjoy. You can reblend any leftover frappe. Just pour it back into the blender. Add a splash of milk to help it blend smoothly again. This makes it creamy and delicious once more. If you stored the frappe in the fridge, drink it cold. For a refreshing treat, consider adding fresh fruit or a dollop of yogurt. You can also mix in a bit of honey or maple syrup for added sweetness. Enjoy your Blueberry Earl Grey Frappe! For the full recipe, check the details above. To make your Blueberry Earl Grey Frappe vegan, you can easily swap a few ingredients. Use plant-based milk, like almond or oat milk, in place of dairy milk. For sweetening, choose maple syrup instead of honey. This keeps the flavor vibrant while ensuring it's plant-friendly. Yes, you can use fresh blueberries! However, the texture may change. Frozen blueberries give a thicker, frostier drink. Fresh blueberries will make the frappe lighter but may not chill it as well. You might want to add extra ice to cool it down. The flavor will still be delicious, though! You can often find this refreshing drink at specialty coffee shops or tea cafes. Look for places that focus on creative beverages. Chains like Starbucks may offer seasonal versions. Always ask if they can make it with Earl Grey and blueberries. It's a great way to try this unique flavor combo before making your own. For the full recipe, check the detailed ingredients and instructions in the earlier section! In this article, we explored how to make a Blueberry Earl Grey Frappe. We covered the key ingredients, from brewed tea to blueberries and bananas, and highlighted their health benefits. You learned simple steps to blend and serve your frappe, along with helpful tips for perfecting it. Lastly, we shared variations and storage tips to keep it fresh. Try this recipe at home, and enjoy a tasty and healthy drink that refreshes and energizes! Your taste buds will thank you!](https://fastmealmate.com/wp-content/uploads/2025/06/c77c6fd4-2277-427b-99cf-97ef587db48b-768x768.webp)
![- 8 oz chorizo sausage, casing removed and crumbled - 1 can (14 oz) diced tomatoes with green chilies - 4 cups chicken broth - Avocado slices - Fresh cilantro - 1 teaspoon ground cumin - 1 teaspoon smoked paprika - Salt and pepper to taste Gathering the right ingredients is key to making your soup flavorful. Chorizo sausage gives this dish its rich, spicy taste. I love using diced tomatoes with green chilies for added depth. Chicken broth serves as the base, making the soup hearty and satisfying. You can add avocado slices for creaminess and fresh cilantro for a bright flavor. These optional ingredients really elevate the dish. For spices, ground cumin and smoked paprika enhance the chorizo's flavor. Don’t forget to season with salt and pepper. Taste as you go to find the right balance. Check out the Full Recipe for all the detailed steps and tips! To start, I heat a large pot over medium heat. I add one tablespoon of olive oil and let it warm. Next, I add 8 ounces of crumbled chorizo. I cook it for about 5 to 7 minutes. The goal is to get it browned and crispy. Once it’s ready, I use a slotted spoon to move the chorizo to a plate. I leave the tasty fat in the pot for flavor. Now it's time for the veggies. I recommend using a medium onion, three cloves of minced garlic, and one diced bell pepper. I like to mix colors for fun. I add the onion, garlic, and bell pepper to the pot. I sauté them for about 5 minutes. I stir often until they become soft and fragrant. This step builds a great base for the soup. I now mix the cooked chorizo back into the pot. I add one can of diced tomatoes with green chilies, four cups of chicken broth, one can of drained black beans, and one cup of corn. I stir in one teaspoon each of ground cumin and smoked paprika. I mix everything well to combine. This step is key for flavor. Next, I bring the soup to a gentle boil. Once boiling, I reduce the heat to low. I let it simmer uncovered for about 15 to 20 minutes. I stir occasionally to keep it from sticking. Letting it simmer allows all the flavors to meld nicely. After simmering, I taste the soup. I adjust the seasoning with salt and pepper to my liking. This final step is important. It ensures that every bowl bursts with flavor right before serving. For a great presentation, I ladle the soup into bowls. I sprinkle fresh chopped cilantro on top. This adds color and freshness. I also like to serve warm crusty bread or tortilla chips on the side. It makes for a perfect dip! For extra creaminess, I add avocado slices on top for those who enjoy it. You can find the full recipe for this spicy delight above. To make your Spicy Chorizo Soup milder, remove the seeds from the bell pepper. You can also omit the diced tomatoes with green chilies. Instead, use plain diced tomatoes. If you want more heat, add sliced jalapeños or a dash of cayenne pepper. For spice reduction, try adding a dollop of sour cream or yogurt. This will cool down the heat and add creaminess. You can boost the soup’s flavor by adding herbs like fresh cilantro or parsley. A squeeze of lime juice at the end brightens the taste. You can also mix in spices like oregano or thyme. If you want more protein, consider adding cooked chicken or shrimp. For extra veggies, toss in some spinach or zucchini. These additions make the soup more colorful and nutritious. You can use a Dutch oven for even heat distribution. A slow cooker is great for making the soup in advance. Just let it simmer on low for hours. If you prefer a quicker method, an Instant Pot works wonders too. It cuts down on cooking time while still infusing flavors. For best results, let the soup sit for a bit. This allows the flavors to meld beautifully before serving. {{image_4}} You can make a tasty vegetarian version of this soup. Instead of chorizo, use a plant-based sausage or mushrooms. Both options add great flavor and texture. For added depth, mix in smoked paprika, chipotle powder, or even a dash of liquid smoke. These spices will give your soup that smoky taste without meat. Fresh herbs like cilantro or parsley can also enhance the flavors. If you want to change up the beans, you can use pinto beans or chickpeas. They both work well and add protein. For corn, fresh corn is the best, but frozen or canned works too. Seasonal veggies, like zucchini or bell peppers, can also add freshness. Just chop them and toss them in when cooking the onions. To make sure your soup is gluten-free, check all labels on your ingredients. Some broths may contain gluten. You can use gluten-free chicken broth instead. If your soup needs thickening, try using cornstarch or a gluten-free flour. This way, your soup stays hearty and delicious without any gluten. To keep your Spicy Chorizo Soup fresh, use airtight containers. Glass or plastic containers work well. Let the soup cool before sealing. Store it in the fridge for up to three days. After that, the flavors may fade. When it’s time to enjoy your soup again, reheat it gently. You can use the stove or microwave. If using the stove, heat it over medium heat, stirring often. For the microwave, heat in short bursts, stirring in between. If the soup thickens, add a splash of broth to loosen it up. To freeze the soup, let it cool completely first. Use freezer-safe containers or bags. Leave some room for expansion as it freezes. The soup can last up to three months in the freezer. When ready to eat, thaw it overnight in the fridge. Reheat on the stove or in the microwave, just like before. You can store Spicy Chorizo Soup in the fridge for about 3 to 4 days. Use an airtight container to keep it fresh. If you want to keep it longer, consider freezing it. In the freezer, it can last for about 2 to 3 months. Just remember to let it cool before you store it. Yes, you can prepare this soup a day or two ahead. To do this, make the soup as usual, then cool it down. Store it in the fridge in a sealed container. When you are ready to eat, just reheat it on the stove or in the microwave. This soup often tastes even better after the flavors have had time to meld. You can serve Spicy Chorizo Soup with warm crusty bread or tortilla chips. A side salad also pairs well. If you want something extra, try avocado slices or fresh cilantro on top. These add freshness and flavor. Yes, you can use other types of sausage. Italian sausage or turkey sausage are great alternatives. They will change the flavor a bit but still make a tasty soup. Just choose a sausage you enjoy. Spicy Chorizo Soup can be healthy if you make smart choices. It has protein from the chorizo and fiber from the beans and corn. To make it even healthier, you can add more veggies. Just watch the amount of salt and oil you use. Overall, it is a filling and nutritious meal. For the full recipe, check the [Full Recipe]. This blog post explored making a tasty Spicy Chorizo Soup. We covered the key ingredients, like chorizo and tomatoes, and the optional toppings. Each cooking step helps build great flavor. I shared tips for adjusting spice levels and even variations for different diets. You can store and freeze leftovers easily too. Give this recipe a try. It’s simple and packed with flavor! You can enjoy it any time. Follow the steps, and you will create a great dish that everyone loves.](https://fastmealmate.com/wp-content/uploads/2025/06/b127f9eb-a221-480e-915b-a87f661d3241-768x768.webp)