Grilled Shrimp Caesar Wraps Tasty and Easy Recipe

If you’re looking for a quick, tasty meal, Grilled Shrimp Caesar Wraps are perfect for you! This easy recipe blends fresh shrimp, creamy Caesar dressing, and crisp romaine into a delightful wrap. I’ll guide you through every step, from choosing the right ingredients to grilling the shrimp to perfection. You won’t just save time; you’ll impress everyone with your culinary skills. Let’s get started on this delicious journey!
Ingredients
List of Ingredients for Grilled Shrimp Caesar Wraps
– 1 lb large shrimp, peeled and deveined
– 2 tablespoons extra virgin olive oil
– 1 teaspoon garlic powder
– 1 teaspoon smoked paprika
– Salt and freshly ground black pepper to taste
– 4 large flour tortillas (10-inch)
– 2 cups Romaine lettuce, roughly chopped
– ½ cup creamy Caesar dressing
– ½ cup finely grated Parmesan cheese
– ¼ cup seasoned croutons, crushed (optional for added crunch)
– Lemon wedges, for serving
Important Notes on Ingredient Quality
Using fresh shrimp is key for this dish. Frozen shrimp work too, just thaw them first. Always choose high-quality olive oil for better flavor. Fresh Romaine lettuce adds a nice crunch. For the Caesar dressing, a homemade version can elevate your wraps. Aged Parmesan gives a stronger taste, so look for that if you can.
Suggested Substitutions for Allergies
If you have a shellfish allergy, try grilled chicken or tofu. For a gluten-free option, use gluten-free tortillas. If you’re lactose intolerant, swap Parmesan with nutritional yeast or a dairy-free alternative. Always check labels for hidden allergens in dressings and croutons.
Step-by-Step Instructions
Preparation Steps for the Shrimp
Start by preheating your grill to medium-high heat. This way, the shrimp gets a nice sear. In a mixing bowl, add 1 pound of peeled and deveined shrimp. Pour in 2 tablespoons of olive oil, then add 1 teaspoon of garlic powder and 1 teaspoon of smoked paprika. Add salt and black pepper to taste. Toss everything together until the shrimp are well coated. This blend gives great flavor to the shrimp.
How to Assemble the Wraps
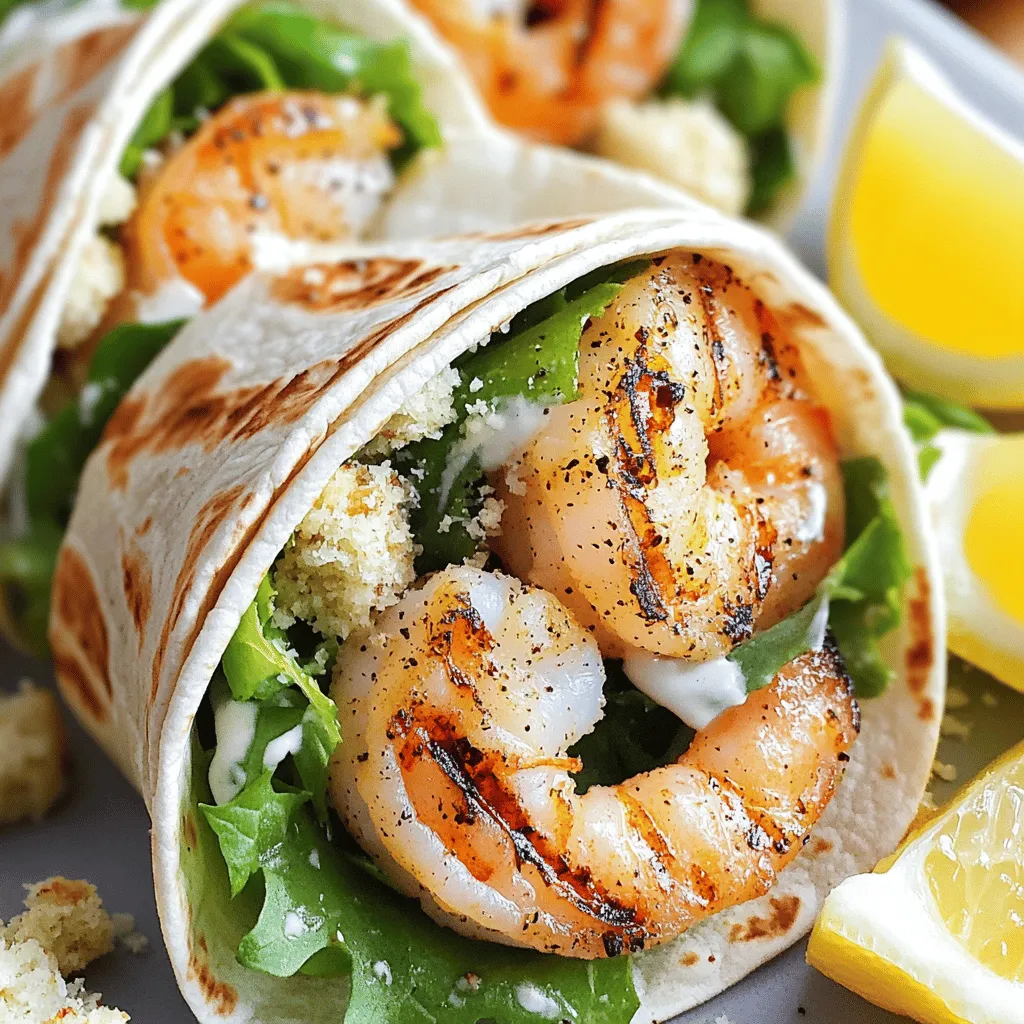
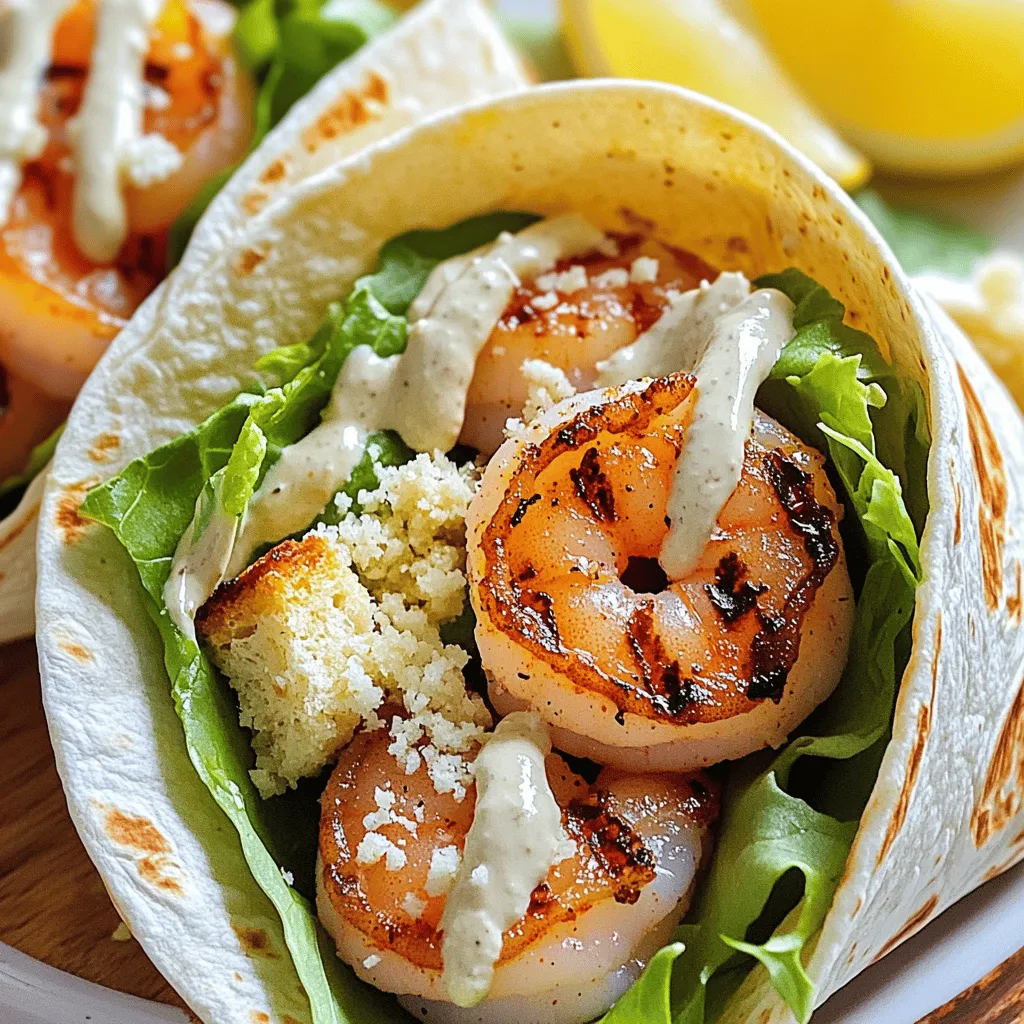
Take a large flour tortilla and lay it flat. Spoon a generous amount of the Caesar salad mix into the center. This mix includes 2 cups of chopped Romaine lettuce and ½ cup of creamy Caesar dressing. Sprinkle in ½ cup of finely grated Parmesan cheese for some extra zing. Place a few grilled shrimp on top. If you want some crunch, add crushed croutons now. Fold the sides of the tortilla in, then roll it up tightly from the bottom. Repeat this with all the tortillas until you have yummy wraps ready to go.
Grilling Techniques for Perfectly Cooked Shrimp
When your shrimp are on the grill, cook them for about 2-3 minutes on one side. Then flip them over and grill for another 2-3 minutes. The shrimp should turn pink and opaque. This means they are cooked just right. After grilling, let the shrimp cool slightly before adding them to the wraps. For a finishing touch, grill the wrapped tortillas seam-side down for 1-2 minutes. This helps crisp them up and keeps the fillings secure.
Tips & Tricks
Best Practices for Wrapping the Tortilla
To wrap your tortilla well, start with a large tortilla. This gives you space for filling. Lay the tortilla flat on a clean surface. Spoon your Caesar salad mixture in the center. Leave about two inches on the sides. Place the grilled shrimp on top. Then, fold the sides in first. Next, roll the bottom up tightly. This keeps everything inside. Make sure the seam is down when you serve.
How to Enhance the Flavor Profile
To boost flavor, use fresh herbs like basil or parsley. Add a squeeze of lemon juice for brightness. You can also try different spices. A pinch of cayenne adds heat. If you like creaminess, add more Caesar dressing. For a crunchy texture, sprinkle extra croutons inside. Each tweak makes the dish unique.
Cooking Time Adjustments for Different Grills
Grilling times may vary by grill type. Gas grills heat quickly. Cook shrimp for about 2-3 minutes per side. Charcoal grills need a bit longer. Check the shrimp for doneness. They should be pink and opaque. If you have a grill with hot spots, move the shrimp around. This ensures even cooking.

Variations
Alternative Proteins for the Wraps
You can swap shrimp for other proteins. Grilled chicken works well. It adds a nice, juicy flavor. You can also use salmon for a richer taste. For a lighter option, try turkey. Each choice gives a unique twist to your wraps.
Lightening Up the Recipe: Lower-Calorie Options
To cut calories, consider using less dressing. You can also use yogurt instead of creamy Caesar dressing. Whole wheat tortillas are a great choice. They add fiber and taste without many extra calories. You can still enjoy the same great flavors while keeping it lighter.
Vegetarian and Vegan Modifications
For a vegetarian wrap, skip the shrimp and add grilled veggies. Bell peppers, zucchini, and mushrooms taste great. You can also use chickpeas for protein. If you want a vegan wrap, use a plant-based Caesar dressing. There are many good options in stores. This way, you keep the wrap fun and flavorful for everyone.
Storage Info
Best Ways to Store Leftovers
To keep your Grilled Shrimp Caesar Wraps fresh, follow these steps:
– Wrap each individual wrap in plastic wrap or aluminum foil.
– Place the wrapped wraps in an airtight container.
– You can also use a resealable plastic bag.
This method helps keep moisture out and preserves flavor.
How Long Do Grilled Shrimp Caesar Wraps Last?
If stored properly, these wraps last for about 2-3 days in the fridge.
Make sure to check for any signs of spoilage before eating. If the shrimp smells off, toss it.
Recommended Reheating Methods
To reheat your wraps, avoid sogginess. Try these methods:
– Oven: Preheat to 350°F (175°C). Wrap in foil and heat for about 10 minutes.
– Skillet: Heat in a non-stick skillet over medium heat. Cook for 2-3 minutes on each side.
– Microwave: Place on a plate and cover with a damp paper towel. Heat for 30-45 seconds, but this may make them soggy.
For the best taste, I suggest using the oven or skillet method. Enjoy your delicious leftovers!
FAQs
Can I make Grilled Shrimp Caesar Wraps ahead of time?
Yes, you can make these wraps ahead of time. Prepare the shrimp and salad mix first. Store them separately in the fridge. When you’re ready to eat, just assemble the wraps. This keeps the tortillas fresh and avoids sogginess.
What sides pair well with Grilled Shrimp Caesar Wraps?
These wraps go great with light sides. Here are a few ideas:
– Fresh fruit salad
– Crispy sweet potato fries
– A side of steamed broccoli
– A simple green salad
These options balance the meal and add nutrition.
How do I prevent my wraps from becoming soggy?
To keep your wraps crisp, follow these tips:
– Use freshly made tortillas.
– Add the Caesar dressing just before serving.
– Avoid overloading the wraps with fillings.
These steps help maintain texture and flavor.
In this guide, we’ve covered how to make Grilled Shrimp Caesar Wraps. You learned about key ingredients, preparation steps, and grilling tips. We explored substitutions and variations for different diets, too. Always choose fresh ingredients for the best taste. Store any leftovers properly to keep them tasty. These wraps are a great meal option for gatherings or a quick lunch. Enjoy making them your own with different flavors and styles. Happy grilling!


![To make Greek chicken bowls, gather these key items: - 2 large chicken breasts - 2 tablespoons extra virgin olive oil - 1 teaspoon dried oregano - 1 teaspoon garlic powder - 1 teaspoon smoked paprika - Salt and freshly ground black pepper to taste - 1 cup quinoa, rinsed under cold water - 2 cups vegetable broth (or water) - 1 cup cherry tomatoes, halved - 1 cucumber, diced into bite-sized pieces - ½ red onion, thinly sliced - 1 cup kalamata olives, pitted and halved - ½ cup crumbled feta cheese - ½ cup tzatziki sauce - Fresh parsley, finely chopped for garnish Feel free to add more flavor and texture with these extras: - Avocado slices - Roasted red peppers - Spinach or mixed greens - Artichoke hearts For the best results, consider these brands: - Olive Oil: Colavita or Pompeian - Quinoa: TruRoots or Ancient Harvest - Feta Cheese: Athenos or Dodoni - Tzatziki Sauce: Oikos or Fage These ingredients come together to create a healthy, delicious meal. You can find the full recipe for a complete guide on how to prepare these tasty bowls. First, let's marinate the chicken. In a medium bowl, mix together the olive oil, oregano, garlic powder, smoked paprika, salt, and black pepper. Use a whisk to blend them well. Add the chicken breasts and coat them completely with this marinade. Cover the bowl and place it in the fridge. Let the chicken sit for at least 30 minutes or up to 2 hours. This step adds great flavor. While the chicken marinates, it's time to cook the quinoa. In a medium saucepan, combine the rinsed quinoa and vegetable broth. Bring the mixture to a rolling boil. Then, reduce the heat to low and cover the pot. Let it simmer for about 15 minutes. The quinoa should absorb all the liquid and become fluffy. Once done, remove it from heat and let it sit for 5 more minutes while covered. Now, we grill the chicken. Preheat your grill or skillet over medium-high heat. Place the marinated chicken on the grill or skillet. Cook each side for about 6-7 minutes. You want the chicken to reach an internal temperature of 165°F (75°C). Once it’s done, move the chicken to a cutting board. Let it rest for a few minutes before slicing it thin. While the chicken cooks, prepare the veggies. Start by halving the cherry tomatoes. Next, dice the cucumber into bite-sized pieces. Then, thinly slice the red onion. Once done, set the veggies aside. This step adds freshness and crunch to your bowls. Grab four serving bowls to assemble your meal. Begin by spooning a generous scoop of fluffy quinoa into each bowl. Next, layer on the sliced chicken. Follow this with the halved cherry tomatoes, diced cucumber, red onion, and halved kalamata olives. Finally, sprinkle crumbled feta cheese on top for a creamy touch. To finish your bowls, drizzle a good amount of tzatziki sauce over each one. This sauce adds a cool and refreshing flavor. For the final touch, sprinkle finely chopped parsley on top. This adds color and freshness. Now you have a delightful Greek chicken bowl! For the full recipe, check [Full Recipe]. To make Greek chicken bowls shine, focus on marinating the chicken well. A good marinade adds flavor, so let it sit for at least 30 minutes. You can use a grill or skillet for cooking. Both methods yield juicy chicken. For grilling, preheat the grill to medium-high heat. Cook the chicken for about 6-7 minutes on each side. If using a skillet, add a splash of olive oil to keep the chicken moist. You can enhance flavors easily. Try adding lemon zest to the marinade for a fresh twist. Fresh herbs like dill or mint can boost your vegetables. For a spicy kick, sprinkle some red pepper flakes on the chicken. If you love garlic, use fresh minced garlic instead of powder. This small change adds depth to the dish. Presentation matters! Use colorful bowls to make your meal pop. Layer the ingredients nicely. Start with a base of fluffy quinoa. Arrange the sliced chicken and veggies in a circular pattern on top. Add crumbled feta and a drizzle of tzatziki sauce for a beautiful finish. Don’t forget to add a lemon wedge on the side. It makes the dish look fresh and inviting. For more detail, check the Full Recipe. {{image_4}} You can easily swap chicken for other proteins. Try grilled shrimp for a seafood twist. It cooks quickly and adds a nice flavor. Lamb is another great choice for those who want something richer. If you enjoy beef, use thinly sliced steak. Each protein brings its unique taste and texture. If you prefer a plant-based meal, consider chickpeas or lentils. Both are high in protein and very filling. You can roast chickpeas with spices for extra crunch. Another option is marinated tofu. It soaks up flavors well and works perfectly in bowls. While tzatziki is classic, you can mix things up with other sauces. A tahini dressing adds a nutty flavor that complements the veggies. Or, try a lemon herb vinaigrette for bright freshness. You could even drizzle some spicy harissa for a kick. Each option changes the flavor profile and keeps your meals exciting. For a complete recipe, check out the Full Recipe for Mediterranean Bliss Greek Chicken Bowls. To store leftovers, place your Greek chicken bowls in airtight containers. Make sure to separate the chicken, quinoa, and veggies if you can. This keeps everything fresh and tasty. You can store them in the fridge for up to three days. When you’re ready to eat, reheat your bowl in the microwave. Just cover the bowl with a microwave-safe lid or wrap. Heat it in short bursts, about one minute at a time. Stir in between to ensure even warming. You can also reheat everything in a skillet over low heat. If you want to freeze your Greek chicken bowls, do so before adding tzatziki or feta cheese. Freeze the chicken, quinoa, and veggies in airtight bags. They can last for up to three months in the freezer. When ready to eat, thaw overnight in the fridge. Then, reheat and add fresh toppings. This way, you keep the flavors bright! To make Greek chicken bowls, start by marinating the chicken. Mix olive oil, oregano, garlic powder, smoked paprika, salt, and pepper. Coat the chicken breasts and let them sit for at least 30 minutes. Next, cook the quinoa in vegetable broth until fluffy. While it cooks, grill or pan-cook the chicken until it reaches 165°F. Prepare your veggies by chopping cherry tomatoes, cucumber, and red onion. Assemble the bowls with quinoa, chicken, veggies, olives, feta cheese, and tzatziki sauce. For the full recipe, check out the detailed steps above. Yes, using store-bought tzatziki sauce is a great time saver. It can add a nice flavor without extra work. Just make sure to choose a brand you like. Look for fresh options in the refrigerated section for the best taste. If you want to change it up, try brown rice or farro as substitutes for quinoa. Both have great textures and flavors. You can also use couscous or bulgur wheat for a different twist. Just adjust the cooking times based on what you choose. Greek chicken bowls will stay fresh in the fridge for up to four days. Store them in airtight containers to keep them tasty. Always check for any signs of spoilage before eating leftovers. Absolutely! You can marinate the chicken and cook the quinoa a day ahead. Chop your veggies in advance and store them in the fridge. This way, you can assemble and enjoy bowls quickly when you're ready to eat. Greek chicken bowls are simple to make and tasty. We covered ingredients, cooking steps, and clever tips. You can try different proteins or sauces to mix things up. Keep leftovers fresh and reheat them easily. In closing, making these bowls is fun and healthy. You can enjoy cooking while creating delicious meals. Follow these steps, and you’ll impress anyone who eats your food!](https://fastmealmate.com/wp-content/uploads/2025/06/353123fa-fb97-4087-931a-2db7911ed322-768x768.webp)

. To reheat grilled chicken sliders, I suggest using an oven. Preheat your oven to 350°F. Place the sliders on a baking sheet. Cover them with foil to keep moisture in. Heat for about 10-15 minutes. This keeps the chicken juicy and the buns soft. You can also use a microwave, but they might get soggy. If you choose the microwave, cover the sliders with a damp paper towel. Heat in short bursts of 30 seconds. Check often to avoid overcooking. Yes, you can prep these sliders in advance. First, cook the chicken and let it cool. Then, store it in the fridge for up to two days. To save time, you can also bread the chicken and freeze it. When you're ready to cook, just thaw and grill. This way, you’ll have tasty sliders ready in no time. Assemble them just before serving for the best flavor and texture. Definitely! You can use eggplant or portobello mushrooms instead of chicken. Slice the eggplant or mushrooms thickly. Bread and grill them just like the chicken. Use the same marinara and cheese for that classic taste. You can also try store-bought veggie patties as a quick option. This way, everyone can enjoy delicious sliders, no matter their diet. You now know how to make delicious grilled chicken Parmesan sliders. We covered the ingredients, cooking steps, and tips to ensure success. Remember to use fresh ingredients and monitor the grill for perfect results. These sliders can impress at any meal or gathering. Feel free to experiment with variations to suit your taste. When stored properly, leftovers taste great, too. Enjoy trying this recipe and make it your own. Happy cooking!](https://fastmealmate.com/wp-content/uploads/2025/06/2b1da996-745c-44b5-a796-c9c3c581ce53-768x768.webp)


![- Salmon fillets - Sweet chili sauce - Jasmine rice - Mixed vegetables - Soy sauce - Sesame oil - Avocado - Green onions - Sesame seeds - Fresh cilantro (optional) - Baking sheet - Mixing bowl - Medium pot - Non-stick skillet In this Sweet Chili Salmon Bowl, you need fresh salmon fillets as the star. The sweet chili sauce adds a rich flavor that pairs well with the fish. Jasmine rice provides a soft base. Mixed vegetables add color and crunch to the bowl. For added flavor, include soy sauce and sesame oil. Sliced avocado gives a creamy touch. Green onions and sesame seeds serve as tasty garnishes. If you want, sprinkle fresh cilantro for a pop of freshness. To prepare this dish, you will need a few kitchen tools. Use a baking sheet to cook the salmon. A mixing bowl helps combine the marinade. Cook the rice in a medium pot. Lastly, a non-stick skillet is perfect for sautéing the vegetables. You can find the [Full Recipe] to follow these steps easily! With these ingredients and tools, you are set for a delicious meal. - Combine sweet chili sauce, soy sauce, and sesame oil in a bowl. - Place salmon fillets in the bowl and marinate for 15 minutes. Marinating the salmon gives it a rich flavor. The sweet chili sauce adds a nice sweetness. The soy sauce brings some saltiness, while sesame oil adds a nutty taste. This step is key for a tasty salmon bowl. - Bring vegetable broth or water to a boil in a pot. - Add jasmine rice and let it simmer until fluffy. Using vegetable broth adds extra flavor to the rice. Jasmine rice is fragrant and pairs well with the salmon. Once cooked, it should be light and fluffy. - Sauté mixed vegetables in a non-stick skillet. - Cook until they are tender yet crisp. I like to use bell peppers, snap peas, and carrots. These veggies add color and crunch. Sautéing keeps them bright and fresh, which balances the dish. - Preheat the oven to 400°F (200°C). - Bake marinated salmon for 12-15 minutes. Baking the salmon helps it stay moist. It should flake easily with a fork when done. This cooking method keeps the flavors intact. - Fluff the cooked rice and distribute it into bowls. - Top with vegetables, salmon, and avocado slices. Assembling the bowl is fun and creative. You can layer the ingredients however you prefer. The avocado adds creaminess, making every bite delicious. - Sprinkle green onions and sesame seeds on top. - Drizzle remaining marinade if desired. Adding garnishes makes the dish look pretty. Green onions bring a mild onion flavor, while sesame seeds add crunch. The extra marinade enhances the taste, so don’t skip this step! For the complete recipe, check out the Full Recipe. To get the best salmon, focus on the cooking temperature. Aim for 400°F (200°C) when baking. This heat cooks the fish evenly. It keeps the salmon moist and tender. Use a thermometer to check the internal temperature. It should reach 145°F (63°C) for safe eating. Next, look for flakiness to know when it is done. Gently press the salmon with a fork. If it flakes easily, it is ready. Don't overcook it, as this can make the salmon dry. To boost the taste, try different sauces. You can use teriyaki or garlic sauce instead of sweet chili. Each sauce adds a new twist to the dish. Also, add spices to the vegetables before sautéing. A pinch of garlic powder or ginger can elevate the flavor. This simple step makes your veggies pop. Pair your bowl with side salads or crispy wontons for crunch. This adds a nice texture balance. You can also serve it with extra avocado for creaminess. The creamy avocado complements the salmon well. It makes each bite even better. Feel free to explore the [Full Recipe] for more tips and ideas! {{image_4}} You can swap the salmon for chicken or tofu. Chicken works well with the sweet chili sauce. Marinate it just like you do the salmon. Tofu absorbs flavors nicely, making it a great option, too. You can also try different fish like trout or tilapia. Each fish will give your bowl a unique taste. Seasonal vegetables can really change your bowl. Think fresh corn in summer or pumpkin in fall. You can also add leafy greens like spinach or kale. Broccoli offers a nice crunch and pairs well with the sauce. Mix and match to keep it exciting! Want more kick? Try a spicy chili sauce instead of sweet chili sauce. This will give your bowl a bold flavor. You can also add citrus zest, like lime or lemon, for a fresh twist. These small changes can make a big difference in taste. For the full recipe, check out the details above! After you enjoy your Sweet Chili Salmon Bowl, store any leftovers in airtight containers. This keeps the food fresh and tasty. Place the containers in the fridge. Your meal will stay good for 2-3 days. Make sure to cool the food first before sealing it up. If you want to save your meal for longer, freezing is a great option. Freeze the cooked salmon separately to keep its quality. Salmon can lose its texture if frozen with rice and veggies. Store your rice and mixed vegetables in separate containers. This way, they stay fresh and tasty when you thaw them. When you're ready to eat, reheating is easy. You can use the microwave or stovetop for quick reheating. Just be careful not to overcook the salmon. Overcooking can make it dry and tough. Heat it gently to keep the flavor and texture intact. Enjoy your delicious meal again! Yes, you can prepare the ingredients in advance. Store each item separately in the fridge. This way, you save time when you are ready to cook. Just mix and heat everything when you want to eat. If you want a change, you can substitute jasmine rice with brown rice or quinoa. Both options are healthy and add a nice flavor. Quinoa is a great choice if you want extra protein. Absolutely! You can make this bowl spicy by adding fresh chili peppers or a dash of hot sauce. Adjust the heat to your liking. This adds a fun kick to the dish. To make the Sweet Chili Salmon Bowl healthier, reduce the amount of sauce you use. You can also add more veggies, like leafy greens or broccoli. This boosts nutrition and flavor. Yes, this bowl can be enjoyed cold too! It makes a refreshing salad dish. Just let it cool before serving. Enjoy it as a light meal on a warm day. For the full recipe, check out the detailed steps above. This guide showed how to make a tasty salmon bowl using sweet chili sauce and veggies. You learned about the key ingredients, tools, and steps. Remember, marinating the salmon and choosing the right veggies can boost flavor. Feel free to experiment with proteins and spices. Finally, you can store leftovers for quick meals later. Enjoy making this dish your own!](https://fastmealmate.com/wp-content/uploads/2025/07/c95c4cfe-a415-4c4e-8f12-f828502a92fe-768x768.webp)