Garden Fresh Summer Salad Flavorful and Easy Recipe
. To make your salad shine, use bright bowls. Serve it in individual portions for a fancy touch. Add a sprinkle of extra feta on top. A few fresh basil leaves also make a great garnish. For a special look, drizzle balsamic reduction over each serving. This adds both flavor and visual appeal. You can boost the flavor in many ways. Try adding nuts like walnuts or almonds for crunch. You might also include fruits, such as sliced strawberries or juicy peaches. Fresh herbs like cilantro or mint can add a new twist. For a bit of spice, sprinkle in some red pepper flakes. Just remember, balance is key! One common mistake is over-dressing the salad. Too much dressing can drown the fresh flavors. Start with a little, and add more if needed. Another mistake is cutting veggies too small. Larger pieces keep the crunch and texture. Finally, don’t forget to taste before serving. Adjust seasoning to suit your taste buds. {{image_4}} You can easily adjust this salad for special diets. For a vegan version, skip the feta cheese. Instead, use tofu or nuts for a protein boost. If you want a gluten-free option, all ingredients are already safe. Just be sure to check any packaged items for hidden gluten. You can swap ingredients based on the season. In summer, use ripe peaches instead of tomatoes. In fall, try roasted squash in place of corn. These swaps keep the salad fresh and exciting all year. Feel free to mix and match what’s in your garden or local market. Want to make your salad more fun? Add sliced radishes for a peppery crunch. Nuts like almonds or walnuts add a great texture. You could also toss in herbs like dill or cilantro for a different flavor. Don't shy away from experimenting. Each add-on can change the taste and feel of your dish. Check out the Full Recipe for more ideas and inspiration! To keep your garden fresh summer salad tasty, store it right. Use an airtight container. This helps avoid moisture loss. You can keep it in the fridge for up to three days. If you plan to enjoy it later, store the dressing separately. This keeps the greens crisp and fresh. Wash your vegetables before storage. After washing, dry them well to avoid sogginess. You can wrap herbs like basil in a damp paper towel. This helps keep them fresh for longer. For tomatoes, store them at room temperature. This keeps their taste and texture just right. This salad is best enjoyed cold. If you want to warm it up, just use a quick microwave blast. Heat for only a few seconds to avoid mushy greens. When serving, toss the salad gently to mix the flavors. You can add more feta or basil for a fresh touch. For the full recipe, check out the detailed steps above. The best summer vegetables for salad include tomatoes, cucumbers, and bell peppers. You can also use zucchini, radishes, and corn. They add color and crunch. Fresh herbs like basil and cilantro enhance the flavor. Choose veggies that are in season for the best taste. Yes, you can make this salad ahead of time. Prepare the salad without the dressing. Store it in the fridge for up to a day. When you are ready to eat, add the dressing. This keeps the salad fresh and crisp. A light vinaigrette works well with summer salad. You can use olive oil and balsamic vinegar. Lemon juice also adds a nice touch. For a creamier option, try a yogurt-based dressing. These dressings bring out the flavors of the fresh vegetables. For the full recipe, check out the Garden Fresh Summer Salad Delight. In this blog post, we explored how to make a fresh summer salad. We started with the best ingredients and optional add-ins. Then, we covered easy steps to prepare the base and mix in tasty veggies. I shared tips for great presentation and flavor boosts. We also discussed how to adapt this salad for diets and seasons. Lastly, we highlighted storage tips to keep everything fresh. Enjoy experimenting with your salad to make it your own. You have all the tools for success!](https://fastmealmate.com/wp-content/uploads/2025/07/1438f769-be73-4858-be33-2952a8dc2b24.webp)
Summer is a time for fresh, vibrant flavors, and there’s nothing better than a garden fresh summer salad! This easy recipe brings together crisp veggies, creamy avocado, and tangy feta to create a dish that’s both delicious and simple to make. Whether you’re hosting a cookout or enjoying a quiet lunch, this salad will be a hit. Let’s dive into the ingredients and steps to craft this refreshing meal!
Ingredients
Fresh Produce Overview
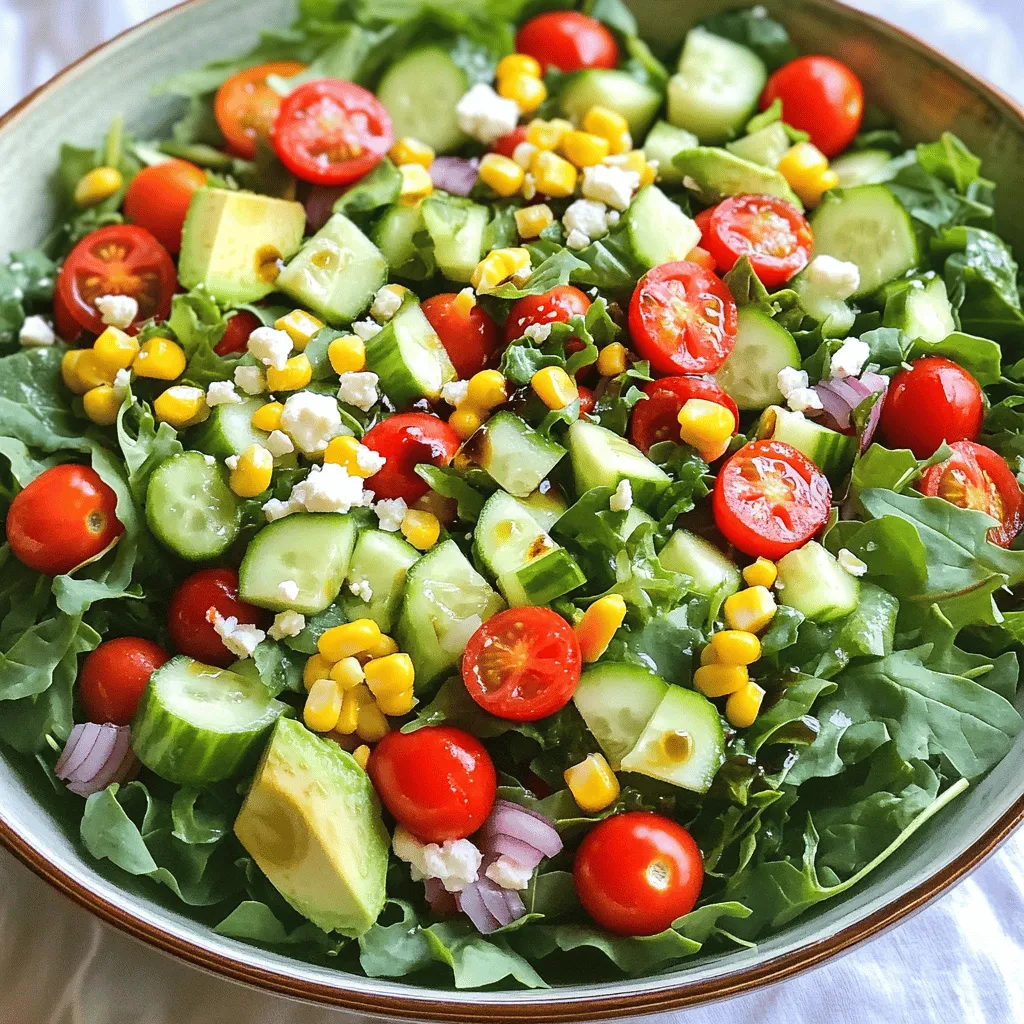
For a truly garden-fresh summer salad, start with vibrant ingredients. Here’s what you’ll need:
– 2 cups mixed baby greens (a blend of arugula, spinach, and kale)
– 1 cup cherry tomatoes, halved
– 1 cucumber, peeled and diced
– 1 bell pepper (either red or yellow), chopped into bite-sized pieces
– 1 cup corn kernels (freshly cooked or canned)
– 1 ripe avocado, diced
– ¼ red onion, finely sliced
– ¼ cup feta cheese, crumbled
– 2 tablespoons fresh basil, finely chopped
Using fresh produce gives your salad a crisp taste. Each item adds color and nutrients. The greens serve as a base. The tomatoes and peppers add sweetness. The corn brings crunch. You’ll love the creamy avocado and salty feta!
Optional Add-ins
You can personalize your salad easily. Here are some tasty add-ins:
– Grilled chicken or shrimp for protein
– Quinoa for extra fiber and texture
– Sliced olives for a briny kick
– Nuts or seeds for crunch
These add-ins make your salad more filling. Choose what you like best! You can mix and match based on your mood or what you have at home.
Dressing Ingredients
A great dressing ties everything together. For this salad, you need:
– 2 tablespoons extra virgin olive oil
– 1 tablespoon balsamic vinegar
– Sea salt and freshly cracked black pepper, to taste
This simple dressing is light and bright. The olive oil adds richness. The balsamic vinegar gives it a tangy kick. Adjust the salt and pepper to make it just right for you.
Step-by-Step Instructions
Preparing the Base
First, wash your mixed baby greens. Make sure to dry them gently. This helps keep the salad crisp. Once dry, place them in a large salad bowl. This creates a great base for your salad.
Adding Vegetables
Next, layer the halved cherry tomatoes on top of the greens. Then, add the diced cucumber and chopped bell pepper. These veggies bring color and crunch to the dish. Don’t forget the sweet corn kernels! They add a nice texture and a touch of sweetness.
Incorporating Avocado and Feta
Now, it’s time to add the creamy avocado. Dice it and gently fold it into the salad. This keeps the avocado intact. Then, add the thinly sliced red onion for a bit of bite. Sprinkle crumbled feta cheese over the top for a salty flavor. The fresh basil adds a lovely aroma.
For the dressing, mix olive oil and balsamic vinegar in a small bowl. Season it with salt and pepper. Whisk until well combined. Drizzle this dressing over your salad. Toss everything gently to coat. Finally, taste it. Adjust salt and pepper for your perfect flavor. Enjoy your fresh salad!
Tips & Tricks
Presentation Ideas
To make your salad shine, use bright bowls. Serve it in individual portions for a fancy touch. Add a sprinkle of extra feta on top. A few fresh basil leaves also make a great garnish. For a special look, drizzle balsamic reduction over each serving. This adds both flavor and visual appeal.
Flavor Enhancements
You can boost the flavor in many ways. Try adding nuts like walnuts or almonds for crunch. You might also include fruits, such as sliced strawberries or juicy peaches. Fresh herbs like cilantro or mint can add a new twist. For a bit of spice, sprinkle in some red pepper flakes. Just remember, balance is key!
Common Mistakes to Avoid
One common mistake is over-dressing the salad. Too much dressing can drown the fresh flavors. Start with a little, and add more if needed. Another mistake is cutting veggies too small. Larger pieces keep the crunch and texture. Finally, don’t forget to taste before serving. Adjust seasoning to suit your taste buds.

Variations
Dietary Adaptations
You can easily adjust this salad for special diets. For a vegan version, skip the feta cheese. Instead, use tofu or nuts for a protein boost. If you want a gluten-free option, all ingredients are already safe. Just be sure to check any packaged items for hidden gluten.
Seasonal Ingredient Swaps
You can swap ingredients based on the season. In summer, use ripe peaches instead of tomatoes. In fall, try roasted squash in place of corn. These swaps keep the salad fresh and exciting all year. Feel free to mix and match what’s in your garden or local market.
Creative Add-Ons
Want to make your salad more fun? Add sliced radishes for a peppery crunch. Nuts like almonds or walnuts add a great texture. You could also toss in herbs like dill or cilantro for a different flavor. Don’t shy away from experimenting. Each add-on can change the taste and feel of your dish.
Storage Info
Best Storage Practices
To keep your garden fresh summer salad tasty, store it right. Use an airtight container. This helps avoid moisture loss. You can keep it in the fridge for up to three days. If you plan to enjoy it later, store the dressing separately. This keeps the greens crisp and fresh.
How to Keep Ingredients Fresh
Wash your vegetables before storage. After washing, dry them well to avoid sogginess. You can wrap herbs like basil in a damp paper towel. This helps keep them fresh for longer. For tomatoes, store them at room temperature. This keeps their taste and texture just right.
Reheating and Serving Tips
This salad is best enjoyed cold. If you want to warm it up, just use a quick microwave blast. Heat for only a few seconds to avoid mushy greens. When serving, toss the salad gently to mix the flavors. You can add more feta or basil for a fresh touch.
FAQs
What are the best summer vegetables for salad?
The best summer vegetables for salad include tomatoes, cucumbers, and bell peppers. You can also use zucchini, radishes, and corn. They add color and crunch. Fresh herbs like basil and cilantro enhance the flavor. Choose veggies that are in season for the best taste.
Can I make this salad ahead of time?
Yes, you can make this salad ahead of time. Prepare the salad without the dressing. Store it in the fridge for up to a day. When you are ready to eat, add the dressing. This keeps the salad fresh and crisp.
What dressing pairs well with a summer salad?
A light vinaigrette works well with summer salad. You can use olive oil and balsamic vinegar. Lemon juice also adds a nice touch. For a creamier option, try a yogurt-based dressing. These dressings bring out the flavors of the fresh vegetables.
In this blog post, we explored how to make a fresh summer salad. We started with the best ingredients and optional add-ins. Then, we covered easy steps to prepare the base and mix in tasty veggies. I shared tips for great presentation and flavor boosts. We also discussed how to adapt this salad for diets and seasons. Lastly, we highlighted storage tips to keep everything fresh.
Enjoy experimenting with your salad to make it your own. You have all the tools for success!
. To make your salad shine, use bright bowls. Serve it in individual portions for a fancy touch. Add a sprinkle of extra feta on top. A few fresh basil leaves also make a great garnish. For a special look, drizzle balsamic reduction over each serving. This adds both flavor and visual appeal. You can boost the flavor in many ways. Try adding nuts like walnuts or almonds for crunch. You might also include fruits, such as sliced strawberries or juicy peaches. Fresh herbs like cilantro or mint can add a new twist. For a bit of spice, sprinkle in some red pepper flakes. Just remember, balance is key! One common mistake is over-dressing the salad. Too much dressing can drown the fresh flavors. Start with a little, and add more if needed. Another mistake is cutting veggies too small. Larger pieces keep the crunch and texture. Finally, don’t forget to taste before serving. Adjust seasoning to suit your taste buds. {{image_4}} You can easily adjust this salad for special diets. For a vegan version, skip the feta cheese. Instead, use tofu or nuts for a protein boost. If you want a gluten-free option, all ingredients are already safe. Just be sure to check any packaged items for hidden gluten. You can swap ingredients based on the season. In summer, use ripe peaches instead of tomatoes. In fall, try roasted squash in place of corn. These swaps keep the salad fresh and exciting all year. Feel free to mix and match what’s in your garden or local market. Want to make your salad more fun? Add sliced radishes for a peppery crunch. Nuts like almonds or walnuts add a great texture. You could also toss in herbs like dill or cilantro for a different flavor. Don't shy away from experimenting. Each add-on can change the taste and feel of your dish. Check out the Full Recipe for more ideas and inspiration! To keep your garden fresh summer salad tasty, store it right. Use an airtight container. This helps avoid moisture loss. You can keep it in the fridge for up to three days. If you plan to enjoy it later, store the dressing separately. This keeps the greens crisp and fresh. Wash your vegetables before storage. After washing, dry them well to avoid sogginess. You can wrap herbs like basil in a damp paper towel. This helps keep them fresh for longer. For tomatoes, store them at room temperature. This keeps their taste and texture just right. This salad is best enjoyed cold. If you want to warm it up, just use a quick microwave blast. Heat for only a few seconds to avoid mushy greens. When serving, toss the salad gently to mix the flavors. You can add more feta or basil for a fresh touch. For the full recipe, check out the detailed steps above. The best summer vegetables for salad include tomatoes, cucumbers, and bell peppers. You can also use zucchini, radishes, and corn. They add color and crunch. Fresh herbs like basil and cilantro enhance the flavor. Choose veggies that are in season for the best taste. Yes, you can make this salad ahead of time. Prepare the salad without the dressing. Store it in the fridge for up to a day. When you are ready to eat, add the dressing. This keeps the salad fresh and crisp. A light vinaigrette works well with summer salad. You can use olive oil and balsamic vinegar. Lemon juice also adds a nice touch. For a creamier option, try a yogurt-based dressing. These dressings bring out the flavors of the fresh vegetables. For the full recipe, check out the Garden Fresh Summer Salad Delight. In this blog post, we explored how to make a fresh summer salad. We started with the best ingredients and optional add-ins. Then, we covered easy steps to prepare the base and mix in tasty veggies. I shared tips for great presentation and flavor boosts. We also discussed how to adapt this salad for diets and seasons. Lastly, we highlighted storage tips to keep everything fresh. Enjoy experimenting with your salad to make it your own. You have all the tools for success!](https://fastmealmate.com/wp-content/uploads/2025/07/1438f769-be73-4858-be33-2952a8dc2b24-300x300.webp)


![- 1 cup fresh raspberries (plus extra for garnish) - 1 cup mascarpone cheese - 1 cup heavy whipping cream - 1/2 cup powdered sugar - 1 teaspoon vanilla extract - 1 cup strong brewed coffee, cooled to room temperature - 1 package ladyfinger cookies (savoiardi) - 1 tablespoon cocoa powder - Zest of 1 lemon - Fresh mint leaves for garnish Gather these ingredients to create a delightful Raspberry Tiramisu. Fresh raspberries add a bright taste and color. Mascarpone cheese makes the dessert creamy and rich. Heavy whipping cream gives a light texture. Powdered sugar adds sweetness, while vanilla extract enhances the flavor. You will need strong brewed coffee to soak the ladyfingers. Use ladyfinger cookies for the classic base. Cocoa powder adds a nice touch on top. A bit of lemon zest brings brightness to the dish. Finally, fresh mint leaves will add a pop of color and flavor. For the full recipe, follow the steps provided. Enjoy making this beautiful and tasty dessert! In a large bowl, add the mascarpone cheese, powdered sugar, and vanilla extract. Use a whisk or an electric mixer to blend these until smooth. This will create a creamy base. Make sure there are no lumps. In another bowl, pour in the heavy cream. Whip it until stiff peaks form. The cream should be light and airy, which adds volume to our dessert. Gently fold the whipped cream into the mascarpone mixture. Use a spatula for this step. Be careful not to deflate the whipped cream. Mix until it is fully combined and creamy. Brew a strong cup of coffee and let it cool to room temperature. Take each ladyfinger and quickly dip it into the coffee. Be careful not to soak them too long; you want them to absorb flavor without getting mushy. In a 9x9-inch dish, arrange half of the dipped ladyfingers in a single layer. Make sure they cover the bottom evenly. Spoon half of the mascarpone mixture over the ladyfingers. Spread it out evenly with a spatula. Next, scatter half of the fresh raspberries over the mascarpone layer. This adds a burst of flavor to each bite. Repeat the layers with the remaining ladyfingers, mascarpone mixture, and the rest of the raspberries. Dust the top layer lightly with cocoa powder. Then, sprinkle fresh lemon zest for a bright touch. This zest enhances the dessert wonderfully. Cover the dish with plastic wrap and refrigerate for at least four hours. For best results, let it chill overnight. Before serving, add extra fresh raspberries and mint leaves for a beautiful finish. For the complete recipe, check the [Full Recipe]. Whipping cream to stiff peaks is key. This helps create a light and airy dessert. Stiff peaks mean the cream holds its shape well. If you skip this step, your Tiramisu can turn out too dense. To avoid sogginess in ladyfingers, dip them quickly into coffee. Just a quick dip is enough. If you soak them too long, they will become mushy. You want them soft but firm enough to hold their shape. You can swap raspberries for strawberries or blueberries. Each fruit brings its own unique taste. Adding a splash of coffee liqueur can also enhance the flavor. Just a little can make a big difference. For extra toppings, consider dark chocolate shavings. They add a rich flavor and nice texture. Fresh mint leaves can also brighten the dish. They give a pop of color and taste. Serve individual portions in clear dessert cups. This shows off the layers and makes for a pretty display. You can also cut neat squares from the main dish for serving. For garnishing, add more fresh raspberries on top. A sprinkle of lemon zest adds color and a burst of flavor. A sprig of mint can elevate the look and taste. These simple touches can make your Tiramisu shine. For the full recipe, check out the details above! {{image_4}} You can switch up the fruit in your tiramisu. Strawberries are a great choice. Their sweetness adds a nice touch. Blueberries can work too. They bring a vibrant color and a tangy flavor. You can mix different berries for a colorful dessert. This way, you get a burst of flavors in each bite. Want a twist? Try adding coffee liqueur. It gives a rich, deep flavor. You can also add chocolate elements. Chocolate shavings or cocoa powder can make it even more special. This adds a nice contrast to the tart raspberries. If you need gluten-free options, use gluten-free ladyfingers. They are just as tasty! For vegan versions, use plant-based mascarpone and whipped cream. This way, everyone can enjoy your delicious treat. Check out the Full Recipe for more ideas. How long can Raspberry Tiramisu be stored? You can keep your Raspberry Tiramisu in the fridge for up to 3 days. This time frame allows the flavors to meld beautifully. Covering and sealing the dessert is key. Use plastic wrap or a lid to keep it fresh. This helps prevent it from absorbing other smells in the fridge. Can you freeze Raspberry Tiramisu? Yes, you can freeze it! Wrap the dessert tightly in plastic wrap and then place it in an airtight container. This keeps the dessert safe from freezer burn. Tips for successful thawing and serving include letting it thaw in the fridge overnight. This method keeps the texture smooth and creamy. Recommended consumption timeline is about 3 days in the fridge or up to 2 months in the freezer. Signs of spoilage include an off smell or a watery texture. If you notice these signs, it’s best to discard it. Always trust your senses when it comes to food safety. Raspberry Tiramisu is a twist on the classic Italian dessert. Traditionally, tiramisu uses coffee and cocoa. In this version, we add fresh raspberries for a fruity touch. The layers consist of ladyfingers dipped in coffee, creamy mascarpone, and ripe raspberries. The dessert is rich, yet it feels light because of the whipped cream. It is perfect for summer or any time you crave something sweet. Making Raspberry Tiramisu takes about 20 minutes for prep. After that, you need to chill it for at least 4 hours. For the best taste, let it chill overnight. This allows the flavors to blend well. So, in total, you’re looking at about 4 hours and 20 minutes before serving. Yes, you can make Raspberry Tiramisu ahead of time! This dessert keeps well in the fridge. Prepare it the day before you plan to serve it. The longer it sits, the better the flavors meld. Serve it cold right from the fridge for a refreshing treat. If you can't find mascarpone cheese, you have options. Cream cheese works, but mix it with sour cream or heavy cream for a smoother texture. Use a 1:1 ratio for cream cheese. This will keep the balance of flavors. Another option is ricotta cheese, blended until smooth. Raspberry Tiramisu can fit into many diets with tweaks. A serving has about 300 calories, but this varies based on your ingredients. For a lighter version, use low-fat cream or sugar substitutes. If you need gluten-free, look for gluten-free ladyfingers. Always adjust ingredients to match dietary needs. Enjoy this dessert without worry! For the full recipe, visit the recipe section. Raspberry tiramisu is a simple yet delightful dessert. It combines fresh raspberries, creamy mascarpone, and strong coffee. With our step-by-step guide, you can make this treat easily. Remember to pay attention to the texture of your whipped cream and avoid soggy ladyfingers. Feel free to explore variations and substitutions to suit your taste. This dessert is perfect for any occasion. Enjoy your creation, and don’t forget to share it with friends and family!](https://fastmealmate.com/wp-content/uploads/2025/06/e92d9679-76f1-46ea-8457-1368e269da4c-768x768.webp)
![- 3 medium-sized beets, thoroughly scrubbed to remove dirt - 4 cups of mixed salad greens (a blend of arugula, spinach, and romaine for texture) - 1/2 cup goat cheese, crumbled into small pieces - 1/4 cup walnuts, toasted and roughly chopped for a crunchy contrast - 1/4 cup dried cranberries for a sweet burst of flavor - 2 tablespoons extra virgin olive oil - 1 tablespoon aged balsamic vinegar for depth - 1 teaspoon Dijon mustard to add tang - Salt and freshly ground black pepper to taste - Fresh herbs for garnish (such as chopped parsley or finely sliced chives) When measuring, use a dry measuring cup for solid ingredients like walnuts and cranberries. For liquids, a liquid measuring cup works best. Make sure to level off dry ingredients for accuracy. This helps you get the right taste and texture. Choose fresh, firm beets. Look for greens that are vibrant and crisp. For goat cheese, select a soft, creamy variety. Fresh herbs should be fragrant and bright. High-quality olive oil and balsamic vinegar make a big difference in flavor. This salad shines when you use the best ingredients. For the full recipe, check out the details above. To start, preheat your oven to 400°F (200°C). This heat helps the beets cook well. Take 3 medium-sized beets and scrub them clean to remove dirt. Wrap each beet in aluminum foil. This keeps them moist while roasting. Place the wrapped beets on a baking sheet. Roast them for 45 to 60 minutes. They are done when a fork can pierce them easily. After roasting, let them cool for a few minutes. Unwrap, peel off the skin, and cut them into wedges. In a large bowl, mix the roasted beet wedges with 4 cups of mixed salad greens. I love using arugula, spinach, and romaine for varied texture. Next, add 1/2 cup of crumbled goat cheese for creaminess. For crunch, toss in 1/4 cup of toasted walnuts. Finally, sprinkle in 1/4 cup of dried cranberries for a sweet touch. This mixture looks colorful and inviting. In a small bowl, whisk together 2 tablespoons of extra virgin olive oil and 1 tablespoon of aged balsamic vinegar. Add 1 teaspoon of Dijon mustard to give it a nice tang. Season it with salt and freshly ground black pepper to taste. Mix until all ingredients blend well. Drizzle the dressing over the salad. Toss gently so that the beets and cheese stay intact. Taste and adjust the seasoning if needed. Serve on a platter or individual plates, and garnish with fresh herbs for a beautiful finish. Enjoy this delicious and healthy dish! For the complete recipe, refer to the Full Recipe. Roasting beets is easy. Start by preheating your oven to 400°F. Wrap each beet in foil. This helps them cook evenly. Roast for 45 to 60 minutes until they’re soft. A fork should slide in with ease. Let them cool before peeling. The skin comes off easily when they are warm. This salad is great as a meal or a side. Serve it with grilled chicken or fish for protein. You can even add chickpeas for a plant-based option. Pair it with crusty bread for a complete meal. This dish shines at dinner parties or casual lunches. Presentation matters in cooking. Use a shallow bowl or a large platter for a stunning look. Start with greens, then add beet wedges. Sprinkle goat cheese and walnuts on top. Add a few dried cranberries for color. Finish with fresh herbs, like parsley or chives. This creates a bright and inviting dish that everyone will love. Check out the Full Recipe for more details on making this delightful salad! {{image_4}} To make your roasted beet goat cheese salad even more filling, you can add protein. Grilled chicken is an easy choice. It adds flavor and heartiness. You can also use chickpeas for a plant-based option. They add great texture and nutrition. If you like seafood, try adding shrimp or smoked salmon. Each protein brings a new twist to your dish. While the balsamic dressing is delicious, you can mix things up. A honey mustard dressing pairs well with the sweet beets. For a creamier option, try a yogurt-based dressing. You could even use a simple lemon vinaigrette for a fresh taste. Each dressing will change the flavor profile and keep things exciting. This salad is versatile! In spring, you might add fresh peas or asparagus. In summer, ripe tomatoes or cucumbers can brighten the dish. Fall brings apples or pears, adding sweetness and crunch. In winter, consider using roasted squash or pomegranate seeds for color and flavor. These swaps keep your salad fresh and aligned with the season. To keep your roasted beet goat cheese salad fresh, store it in an airtight container. Make sure to separate the dressing from the salad to prevent sogginess. You can keep the salad in the fridge for up to three days. If you want to enjoy it later, store the leftovers without the dressing. This way, the flavors stay bright and fresh. Understanding how long your ingredients last can help prevent waste. Here’s a quick guide: - Roasted Beets: Last about 5 days in the fridge when stored properly. - Mixed Greens: Usually stay fresh for 3 to 5 days if kept cool and dry. - Goat Cheese: Can last up to a week after opening, but check for any signs of spoilage. - Walnuts: Store in an airtight container. They stay fresh for about 1 month. - Dried Cranberries: These can last up to a year if kept in a cool, dry place. Typically, you won’t need to reheat this salad. It tastes best cold. If you do want to warm it slightly, use a microwave. Heat on low for about 10-15 seconds. Be careful not to overdo it, as it may change the texture and flavor. Enjoy your salad fresh for the best experience! For the full recipe, check out the section above. Yes, you can use canned beets. They save time and are easy to find. However, fresh roasted beets give a better taste and texture. Canned beets may be softer and less vibrant. If you choose canned beets, rinse them under cold water to remove excess brine. Slice them into wedges and add them directly to your salad. If you need a substitute for goat cheese, try feta or ricotta cheese. Feta has a similar tangy flavor. Ricotta is creamier and milder. You can also use dairy-free cheese for a different taste. Cream cheese can work too, but it is denser. Choose based on your flavor preference and dietary needs. To make this salad vegan, skip the goat cheese. Replace it with vegan cheese or avocado for creaminess. Use maple syrup or agave in the dressing instead of honey. Check that your balsamic vinegar is vegan, as some brands may add honey. This way, you keep all the flavors while making it plant-based. You can find the full recipe here: [Full Recipe]. In this post, I covered how to create a delicious beet salad. We explored the best ingredients, measuring tips, and quality recommendations. You learned step-by-step instructions for prepping beets, assembling the salad, and making the dressing. I shared tips for perfect roasting, serving, and presentation. We also discussed variations like protein options and seasonal swaps. Lastly, I provided storage info and answered common questions. Enjoy crafting your own unique beet salad, and let your creativity shine!](https://fastmealmate.com/wp-content/uploads/2025/06/466f3db8-9be5-4235-af51-29d034f8c92e-768x768.webp)
![When making zucchini brownies, you need simple and quality ingredients. Here’s what you will need: - 1 cup shredded zucchini - 1/2 cup unsweetened applesauce - 1/3 cup pure maple syrup or agave nectar - 1/4 cup vegetable oil or melted coconut oil - 1 teaspoon pure vanilla extract - 1/2 cup all-purpose flour or gluten-free flour - 1/4 cup unsweetened cocoa powder - 1/2 teaspoon baking soda - 1/2 teaspoon baking powder - 1/4 teaspoon fine sea salt - 1/2 cup chocolate chips These ingredients come together to create a rich and moist brownie. The zucchini adds moisture without a strong taste. Applesauce keeps the brownies soft. The maple syrup or agave nectar sweetens them naturally. You can use vegetable oil or coconut oil, depending on your preference. Using high-quality cocoa powder makes a big difference in flavor. The baking soda and baking powder help the brownies rise. Finally, the chocolate chips give a delightful chocolate burst in every bite. For the full recipe, check out the [Full Recipe]. - Set temperature to 350°F (175°C). - Prepare your baking pan by greasing it or lining it with parchment paper. - In a large bowl, combine shredded zucchini, applesauce, maple syrup, oil, and vanilla. - Mix until the mixture is smooth and well blended. - In a separate bowl, whisk together flour, cocoa powder, baking soda, baking powder, and salt until mixed well. - Gradually add the dry ingredients to the wet mixture. - Mix gently to avoid overmixing, which can make the brownies dense. - Fold in the chocolate chips. - Make sure they are evenly spread throughout the batter for a rich flavor. - Pour the batter into the prepared pan. - Bake for 25-30 minutes. - After baking, cool in the pan for at least 15 minutes before cutting. Enjoy the delightfully unexpected zucchini boost hidden in every bite with this full recipe! To make your brownies moist, avoid overmixing the batter. Overmixing adds air, which can make them dry. Mix until just combined for a fudgy treat. Using ripe zucchini is key too. Ripe zucchini has more water, which adds moisture and flavor. Shred the zucchini and squeeze out excess water. This keeps your brownies rich and tasty. You can add nuts or spices to boost flavor. Chopped walnuts or pecans add crunch. A sprinkle of cinnamon or nutmeg makes them warm and cozy. You could also mix in chocolate chunks for extra gooeyness. For toppings, serve with ice cream or whipped cream. A scoop of vanilla ice cream on warm brownies is heavenly! Check your brownies for doneness by inserting a toothpick in the center. It should come out with a few moist crumbs. If you live at a high altitude, bake for less time. High altitude can change how baked goods rise and cook. Start checking at the lower end of baking time, around 25 minutes. Adjust as needed. {{image_4}} You can make these brownies gluten-free. Just swap the all-purpose flour for a gluten-free flour blend. Many blends work well. Look for ones that contain rice flour or almond flour. These blends give the brownies a nice texture. Make sure to check the package for the right measurements. This way, you still get that rich, fudgy taste. For a vegan version, you can replace the eggs. Use a flaxseed or chia seed mixture instead. To make this, mix one tablespoon of ground flaxseed or chia seeds with three tablespoons of water. Let it sit for five minutes until it thickens. This works great in the recipe. Your brownies will still be moist and delicious without eggs. If you want a healthier treat, try different sweeteners. You can use stevia or coconut sugar instead of maple syrup. Both options lower the sugar content. Stevia is quite sweet, so use less. Coconut sugar adds a nice caramel flavor. These substitutes keep your brownies tasty while making them a bit healthier. For the full recipe, check out the main article. To keep your zucchini brownies fresh, use an airtight container. This helps seal in moisture and flavor. You can store them at room temperature for up to two days. If you want to keep them longer, refrigerate them for up to a week. If you want to save some for later, freezing is a great option. First, cut the brownies into squares. Wrap each square in plastic wrap, and then place them in a freezer-safe bag. This way, they won’t stick together. You can freeze them for up to three months. When you’re ready to enjoy, take them out and thaw at room temperature. For the best texture, you can also warm them in the microwave for a few seconds. These tips will help you enjoy your zucchini brownies at their best! For the complete recipe, check out the [Full Recipe]. Yes, you can use yellow squash. The texture will be similar, but the flavor differs. Yellow squash has a slightly sweeter taste. Zucchini tends to have a more neutral flavor. This can change how the brownies taste. If you like sweetness, yellow squash is a great choice. To check if brownies are done, insert a toothpick into the center. If it comes out with a few moist crumbs, they are ready. If it comes out wet with batter, they need more time. Brownies should look set but still soft. These brownies can be made ahead of time. Bake them, let them cool, then store them. Wrap them in plastic wrap or place them in an airtight container. They keep well for about three days at room temperature. You can also refrigerate them for up to a week. If your brownies are dense, try a few tips. First, check your mixing. Overmixing can cause density. Mix until just combined. You can also add a bit more liquid. Adding an extra tablespoon of applesauce can help. Lastly, ensure your baking powder is fresh for proper rise. These zucchini brownies are easy to make and taste great. We covered the ingredients, step-by-step instructions, and tips to boost flavor and texture. You learned how to store them and gave answers to common questions. Experiment with different flours or sweeteners to fit your needs. Enjoy these tasty treats that offer a fun twist on the classic brownie! Happy baking!](https://fastmealmate.com/wp-content/uploads/2025/06/384a547d-f08a-42f3-b5f4-9a38b6c4e0e7-768x768.webp)