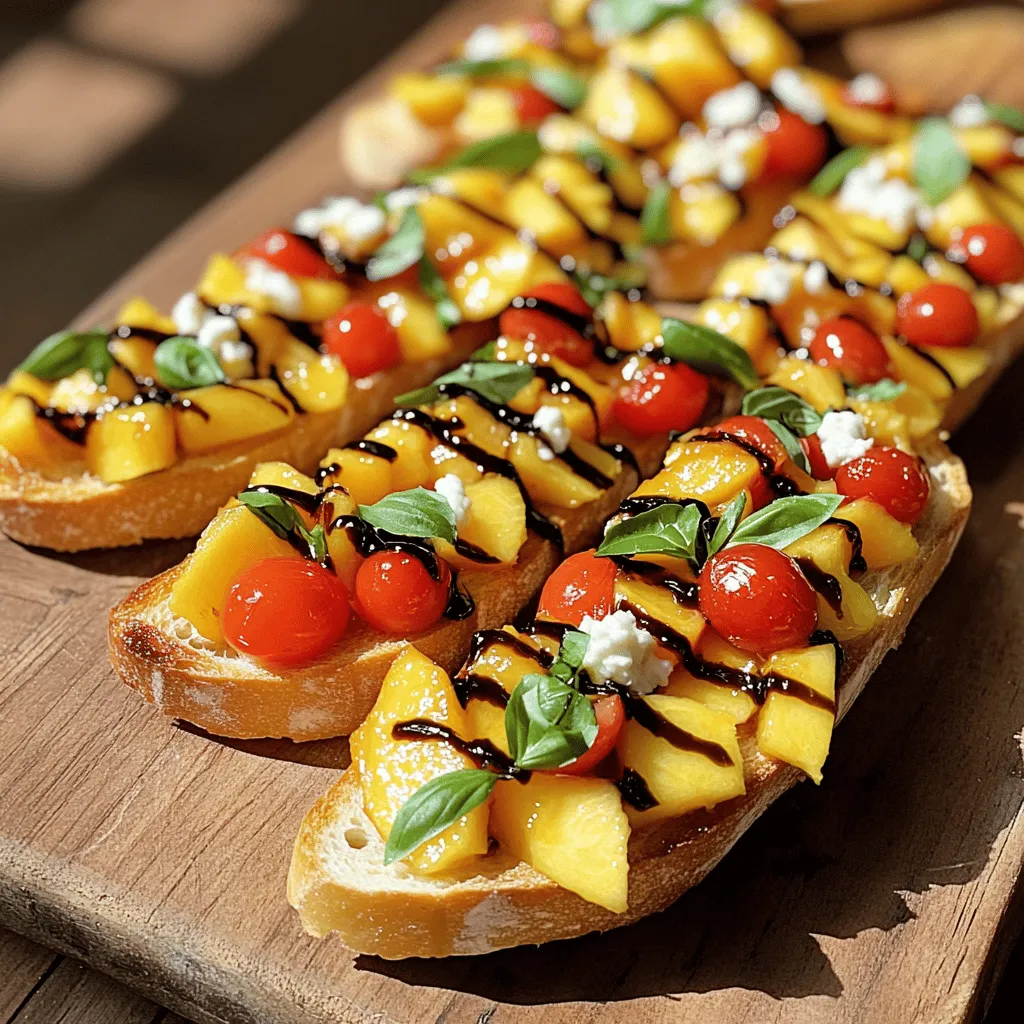
Are you ready to savor summer? Fresh Peach Bruschetta is a delicious way to highlight juicy peaches and vibrant flavors. This simple yet elegant dish combines fresh fruits, herbs, and a hint of balsamic glaze on crispy bread. Whether you’re hosting a picnic or enjoying a quiet night in, this recipe is perfect for any occasion. Let’s dive into the ingredients and create a flavorful summer delight that’ll impress everyone!
Ingredients
Main Ingredients
– Fresh peaches
– Cherry tomatoes
– Fresh basil
– Balsamic glaze
– Olive oil
– Garlic
– French baguette
– Salt and pepper
– Optional: Goat cheese or ricotta
Measurement Details
For this recipe, you will need:
– 4 ripe peaches, diced
– 1 cup cherry tomatoes, diced
– 1/4 cup fresh basil, chopped
– 1 tablespoon balsamic glaze
– 1 tablespoon olive oil (plus extra for drizzling)
– 1 clove garlic, minced
– 1 French baguette, sliced into 1/2-inch pieces
– Salt and pepper to taste
– Optional: Goat cheese or ricotta for a creamy topping
When choosing peaches, look for ones that are firm but yield slightly when pressed. The color should be rich and vibrant, indicating ripeness. Smell the fruit; ripe peaches have a sweet aroma.
Alternative Ingredients
If you want to switch things up, try using mint or cilantro instead of basil. You can also swap the goat cheese for feta or even a creamy ricotta. This adds a fun twist while keeping the dish light and fresh!
Step-by-Step Instructions
Preparation Steps
1. First, preheat your oven to 400°F (200°C). This helps the bread toast perfectly.
2. In a medium bowl, mix together the diced peaches, cherry tomatoes, chopped basil, minced garlic, balsamic glaze, and olive oil. Toss gently to coat without bruising the peaches. Add salt and pepper to taste for extra flavor.
Toasting the Bread
1. Take your sliced baguette and place the pieces flat on a baking sheet.
2. Drizzle a little olive oil over each slice. This will help them crisp up nicely.
3. Place the baking sheet in the oven and toast for about 5-7 minutes. Watch closely until the bread is golden brown and crisp.
Assembling the Bruschetta
1. Once the bread is toasted, let it cool for a minute. This makes it easier to handle.
2. Use a spoon to add the peach and tomato mixture on top of each slice. Make sure each piece gets a good amount of topping.
3. For a creamy touch, add goat cheese or ricotta on top. This makes the flavors blend beautifully. Enjoy your fresh peach bruschetta right away!
Tips & Tricks
Perfecting Peach Bruschetta
How to choose the best peaches
To pick ripe peaches, look for ones that are firm but slightly soft. Their skin should glow with a bright yellow or golden hue. Avoid peaches with bruises or dark spots. Smell the peach; a sweet aroma means it is ready to eat.
Recommended seasoning enhancements
To elevate the flavor, try adding a pinch of cinnamon or nutmeg. A squeeze of fresh lemon juice brightens the dish. If you like spice, a dash of red pepper flakes adds a nice kick. Fresh herbs like mint or thyme can also bring new flavors to your bruschetta.
Kitchen Tools
Essential tools for preparation
You will need a sharp knife for dicing. A cutting board helps keep your kitchen tidy. Use a medium mixing bowl for your peach mixture. A baking sheet is essential for toasting your baguette slices.
Options for serving and presentation
Choose a colorful platter to make your bruschetta pop. Small serving spoons can help with topping. You can arrange fresh basil leaves on the platter for a vibrant look.
Presentation Tips
Creative plating ideas
Stack the bruschetta in a pyramid for height. Place them in a circle around a bowl of balsamic glaze for dipping. You can also layer them with different toppings for variety.
Garnishing techniques for visual appeal
Sprinkle chopped basil or microgreens on top. A light drizzle of balsamic glaze adds shine. You can even add edible flowers for a stunning finish.

Variations
Different Toppings
You can change up the toppings for your Fresh Peach Bruschetta. Here are some fun ideas:
– Feta cheese: Crumble it on top for a salty kick.
– Avocado: Spread it on the bread for creaminess.
– Arugula: Add a handful for a peppery flavor.
For seasonal changes, consider using:
– Strawberries in spring for a sweet twist.
– Roasted corn in summer for a crunchy texture.
– Pumpkin in fall for a cozy flavor.
Dietary Adjustments
To make this dish vegan, skip the cheese or use a plant-based option. You can also make it gluten-free by using gluten-free bread. Here are some lower-calorie ideas:
– Use less olive oil when toasting the bread.
– Swap in low-fat cheese if you want a creamy touch.
Flavor Additions
Spices and herbs can really boost the flavor. Here are some options:
– Cinnamon: A pinch can add warmth to your peaches.
– Chili flakes: Add these for a spicy kick.
– Mint: Swap basil for mint for a fresh twist.
You can mix and match these ideas. Get creative and make your Fresh Peach Bruschetta unique!
Storage Info
Storing Leftovers
To keep your bruschetta fresh, store it in an airtight container. This prevents moisture loss and keeps the flavors intact. You can keep the bruschetta in the fridge for up to two days. If you have any leftover toppings, store them separately from the bread. This way, the bread stays crispy.
Reheating Tips
When reheating toasted bread, use the oven instead of the microwave. Preheat the oven to 350°F (175°C). Place the bread on a baking sheet and heat for about 5 minutes. This keeps the bread crunchy. Always store the toppings in the fridge and add them after reheating the bread. This helps maintain the fresh taste.
Serving After Storage
For the best taste, serve leftover bruschetta quickly. You can add fresh basil or a drizzle of balsamic glaze to enhance the flavor. If you want to repurpose the ingredients, try mixing them into a salad or topping grilled chicken. This adds a delightful twist and avoids waste.
FAQs
How to make Fresh Peach Bruschetta at home?
To make Fresh Peach Bruschetta, start by gathering your ingredients. You need ripe peaches, cherry tomatoes, fresh basil, balsamic glaze, olive oil, garlic, and a French baguette.
1. Preheat your oven to 400°F (200°C).
2. Dice the peaches and cherry tomatoes. Chop the basil and mince the garlic.
3. In a bowl, mix peaches, tomatoes, basil, garlic, balsamic glaze, and olive oil. Add salt and pepper to taste.
4. Slice the baguette and lay the pieces on a baking sheet. Drizzle olive oil on top.
5. Toast the bread for 5-7 minutes until golden brown.
6. Spoon the peach mixture onto the toasted bread.
7. Top with goat cheese or ricotta if you like.
This method makes a delicious and fresh appetizer.
Can I use canned peaches instead of fresh?
Yes, you can use canned peaches. However, fresh peaches bring a better taste and texture. Canned peaches often have added sugar and syrup, which can make the bruschetta too sweet. Fresh peaches are crunchy and juicy, adding vibrant flavor. If you use canned peaches, rinse them to reduce sweetness.
What to serve with peach bruschetta?
Peach bruschetta pairs well with many dishes. Try serving it with a light salad or grilled chicken for a complete meal. You can also enjoy it with a glass of white wine or sparkling water. The light flavors of bruschetta blend nicely with these options.
How long does Fresh Peach Bruschetta last?
Fresh Peach Bruschetta is best enjoyed right away. If you need to store it, keep the topping and bread separate. The topping lasts about 2 days in the fridge. Toasted bread can stay fresh for up to 3 days. To keep the bread crispy, store it in a paper bag, not plastic.
In this blog post, I covered how to make delicious fresh peach bruschetta. We discussed key ingredients like ripe peaches, cherry tomatoes, and fresh basil. I shared step-by-step instructions for preparation, toasting, and assembly. You now have tips for perfecting your dish and ideas for variations, storage, and serving.
Fresh peach bruschetta is easy and fun to prepare. Experiment with your favorite flavors and enjoy!


