Cucumber Salad Fresh and Easy Summer Delight
 to explore more about making this dish. For dressings, try balsamic vinaigrette or yogurt-based dressings. Pair this salad with grilled chicken or fish for a complete meal. Cucumber salads are easy to make and fun to enjoy. We covered the key ingredients, preparation steps, and tips to make your salad shine. From classic recipes to global twists, there are many ways to enjoy cucumbers. They offer great health benefits, too, and fit into various diets. Remember to choose fresh cucumbers for the best taste. With helpful serving ideas, you can impress at any meal. Explore, experiment, and taste, and soon you'll make a salad everyone loves.](https://fastmealmate.com/wp-content/uploads/2025/07/f486dd4d-c258-4f41-b39b-ef28058aa0c9.webp)
Get ready to refresh your summer meals with a simple and tasty cucumber salad! In this guide, I’ll show you how to pick the best cucumbers and create a zesty dressing. You’ll learn about fun variations and ways to serve this vibrant dish alongside your favorites. With just a few fresh ingredients, you can whip up this delicious summer delight that everyone will love. Let’s get started!
Ingredients
List of Ingredients
– Cucumber and Vegetable Choices
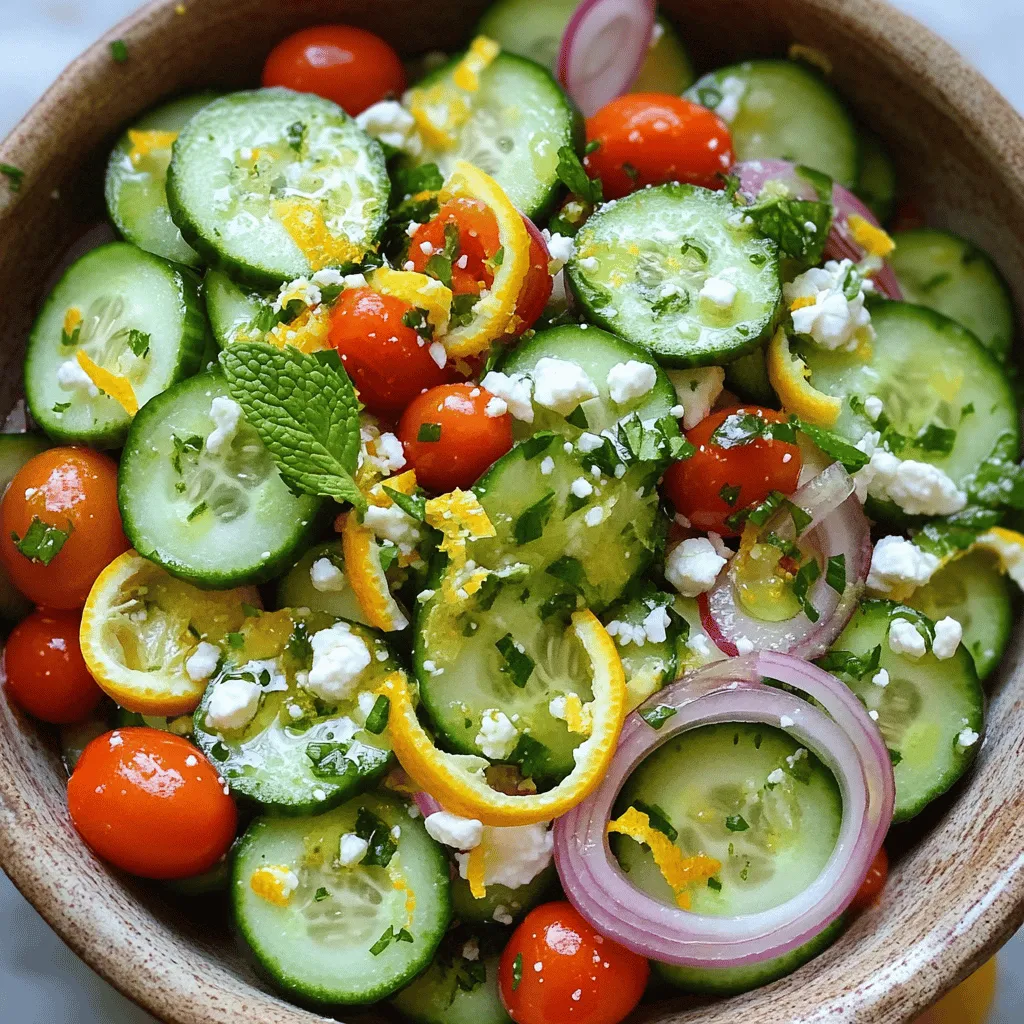
– 2 large cucumbers, thinly sliced into rounds
– 1 cup cherry tomatoes, halved
– 1/2 medium red onion, paper-thin sliced
Cucumbers are the star here. They add crunch and freshness. Choose firm cucumbers without soft spots. Cherry tomatoes give a pop of color. Their sweetness contrasts well with the cucumbers. Red onion adds a bit of bite. Slice them thin for a milder taste.
– Optional Garnishes
– 1/4 cup fresh mint leaves, finely chopped
– 1/4 cup feta cheese, crumbled into small pieces
Mint leaves brighten the salad. They bring a cool touch. Feta cheese adds creamy richness. It also gives a salty kick. Both are optional but elevate the dish.
– Dressing Components
– Zest of 1 lemon
– Juice of 1 lemon (approximately 2 tablespoons)
– Zest of 1 orange
– Juice of 1 orange (approximately 2 tablespoons)
– 1 tablespoon honey (preferably liquid)
– 2 tablespoons extra-virgin olive oil
– Salt and black pepper, to taste
The dressing is bright and zesty. Lemon and orange zest give depth. Their juices add tartness. Honey balances the flavors with sweetness. Olive oil ties everything together. Season with salt and pepper to make it perfect.
This combination creates a refreshing summer salad. You can easily adjust the ingredients to fit your taste.
Step-by-Step Instructions
Preparation Steps
Base Salad Assembly
Start by slicing the cucumbers into thin rounds. Use a sharp knife for clean cuts. Place the sliced cucumbers in a large bowl. Next, halve the cherry tomatoes and add them to the bowl. Now, slice the red onion very thin. This helps keep its flavor mild. Mix all these ingredients together gently.
Making the Citrus Dressing
Grab a small bowl for the dressing. First, zest the lemon and orange. Use a microplane for fine zest. Next, squeeze the juice from both fruits into the bowl. Add the honey and olive oil. Whisk this mixture until it blends well. You want it to be smooth and shiny.
Combining Salad Ingredients
Pour the citrus dressing over the salad base. Use a spatula to fold the ingredients together gently. Make sure every piece gets some dressing. Now, add the chopped mint leaves and crumbled feta. Be careful not to break the feta too much. Lastly, sprinkle salt and black pepper to taste. Let the salad rest for about 10 minutes. This helps the flavors come together.
Serving Suggestions
Presentation Ideas
Serve your salad in a large, shallow bowl. This allows the colors to shine. For a special touch, add extra mint leaves and feta on top. It looks great and tastes even better. You can enjoy it chilled or at room temperature.
Pairing with Other Dishes
This salad pairs well with grilled chicken or fish. It also goes nicely with a light pasta dish. Try it alongside a simple sandwich for a perfect lunch. The bright flavors will complement many meals beautifully.
Tips & Tricks
Selecting Fresh Cucumbers
Signs of Freshness
To find the best cucumbers, look for ones that are firm. They should feel heavy for their size. The skin should be smooth and bright green. Avoid cucumbers with soft spots or wrinkles. These signs mean the cucumber may be old or bad.
Best Varieties for Salads
For salads, I love using English cucumbers. They have fewer seeds and a thin skin. Persian cucumbers are another good choice. They are smaller and sweeter. Both varieties add great crunch and flavor to your salad.
Perfecting the Salad
Flavor Enhancements
To make your cucumber salad pop, try adding herbs. I often use fresh mint or dill. They bring a burst of flavor. You can also add a pinch of red pepper flakes for some heat. A sprinkle of lemon zest gives it a bright touch, too.
Ideal Resting Time
Let the salad rest for about 10 minutes before serving. This time helps the flavors mix. The salt draws out moisture from the cucumbers, making the salad juicy. It’s a simple step, but it really boosts the taste.

Variations
Classic Cucumber Salad
For a classic cucumber salad, I stick to simple ingredients. You need:
– 2 large cucumbers
– 1 cup cherry tomatoes
– 1/2 medium red onion
– Fresh herbs like dill or parsley
The dressing can be basic, too. A mix of vinegar, oil, and a pinch of salt works well. I often use white wine vinegar for a nice kick. Just whisk together:
– 1/4 cup olive oil
– 2 tablespoons vinegar
– Salt and pepper to taste
Toss it all together for a fresh taste that never disappoints.
International Twists
To make it exciting, I love adding international flavors. For a Mediterranean twist, consider adding olives and feta cheese. This gives a salty, rich taste that pairs perfectly with cucumbers.
In an Asian-inspired version, I use rice vinegar and sesame oil. You can add chopped peanuts for crunch. Fresh cilantro or mint can also add a nice flavor.
These variations keep your cucumber salad interesting and full of flavor. Each twist brings a new experience to this refreshing dish.
Nutritional Information
Health Benefits of Cucumbers
Cucumbers are mostly water, which helps keep you hydrated. This makes them a great snack for hot days. They are low in calories, so they are good for weight loss. One medium cucumber has only about 16 calories. Eating cucumbers can help you feel full without adding a lot of calories to your diet.
Cucumbers are rich in vitamins and nutrients. They have vitamin K, which helps with blood clotting and bone health. They also contain vitamin C, which boosts your immune system. Additionally, cucumbers have potassium, which helps control your blood pressure. The skin of cucumbers has fiber, which is good for digestion.
Dietary Considerations
Cucumber salad fits many diets. It is vegan and gluten-free. You can enjoy it if you avoid animal products or gluten. This makes it a great choice for gatherings with different diets.
If you have allergies, you can adjust the recipe. You can skip the feta cheese to make it dairy-free. You can also leave out the honey for a vegan option. Always check labels for other ingredients to ensure they are safe for your needs.
This salad is not only tasty but also packed with nutrition. Enjoy it as a refreshing side dish or a light meal.
FAQs
Common Questions
How to store leftover cucumber salad?
Store leftover cucumber salad in an airtight container. Keep it in the fridge. It stays fresh for up to two days. If the salad gets soggy, drain excess liquid before serving.
Can I make cucumber salad ahead of time?
Yes, you can make cucumber salad ahead. However, it is best to add the dressing just before serving. This keeps the cucumbers crisp. You can prepare the veggies and dressing separately.
What other ingredients can I add to cucumber salad?
You can add many tasty ingredients to cucumber salad. Try adding bell peppers, avocados, or radishes. Fresh herbs like dill or cilantro work well too. You can also mix in nuts or seeds for crunch.For dressings, try balsamic vinaigrette or yogurt-based dressings. Pair this salad with grilled chicken or fish for a complete meal.
Cucumber salads are easy to make and fun to enjoy. We covered the key ingredients, preparation steps, and tips to make your salad shine. From classic recipes to global twists, there are many ways to enjoy cucumbers. They offer great health benefits, too, and fit into various diets. Remember to choose fresh cucumbers for the best taste. With helpful serving ideas, you can impress at any meal. Explore, experiment, and taste, and soon you’ll make a salad everyone loves.
 to explore more about making this dish. For dressings, try balsamic vinaigrette or yogurt-based dressings. Pair this salad with grilled chicken or fish for a complete meal. Cucumber salads are easy to make and fun to enjoy. We covered the key ingredients, preparation steps, and tips to make your salad shine. From classic recipes to global twists, there are many ways to enjoy cucumbers. They offer great health benefits, too, and fit into various diets. Remember to choose fresh cucumbers for the best taste. With helpful serving ideas, you can impress at any meal. Explore, experiment, and taste, and soon you'll make a salad everyone loves.](https://fastmealmate.com/wp-content/uploads/2025/07/f486dd4d-c258-4f41-b39b-ef28058aa0c9-300x300.webp)

![To make Tie Dye Funfetti Cake Pops, you need a few simple ingredients. Here’s what you’ll need: - 1 box Funfetti cake mix - 3 large eggs - 1 cup water - 1/2 cup vegetable oil - 1 cup icing (store-bought or homemade) - 1 cup white chocolate or candy melts - Food coloring (red, blue, yellow, green) - Sprinkles (for decoration) - Lollipop sticks These ingredients come together to create a fun, colorful treat. The Funfetti cake mix adds a sweet flavor and a joyful look. Eggs and water help bind the cake mix for a soft texture. Icing brings sweetness and moisture, while white chocolate adds a smooth coat. You can customize your colors with food coloring. This makes each pop look unique! Finally, sprinkles add that extra sparkle. To see the full process, check out the Full Recipe. Baking the Funfetti Cake First, preheat your oven to 350°F (175°C). In a large bowl, mix the Funfetti cake mix with three eggs, one cup of water, and half a cup of vegetable oil. Stir until the batter is smooth. Pour the batter into a greased 9x13 inch baking pan and bake for 25 to 30 minutes. Check with a toothpick; it should come out clean. Once done, let the cake cool completely in the pan. Crumbling the Cake After the cake is cool, break it apart into a large bowl. Use your hands to crumble the cake into fine pieces. Make sure there are no large chunks left. This step is key for good texture. Incorporating Icing Next, add half a cup of icing to your crumbled cake. Use your hands or a spatula to mix it all together. The cake crumbs should be moist and hold together when squeezed. If it feels dry, add a bit more icing. Dividing and Coloring the Mixture Now, split the moist cake mixture into four bowls. Add a few drops of food coloring to each one—red, blue, yellow, and green. Mix well until the colors are bright and even. This is where the fun begins! Rolling Cake Balls Take a tablespoon of each colored mixture and roll it into a ball. Alternate the colors to create a tie-dye look. Place the cake balls on a baking sheet lined with parchment paper. Make sure they look fun and colorful. Chilling the Cake Pops Put the baking sheet with the cake balls in the fridge for at least 30 minutes. This helps them firm up and hold their shape. While they chill, you can prepare the chocolate for coating. For the complete instructions, check the Full Recipe. Mixing Techniques To get that fun tie-dye look, I recommend using a swirling method. Take small amounts of each color and gently mix without fully blending. This keeps the colors distinct. Use a spoon or your hands, and be gentle. If you mix too hard, you lose the fun swirls. Color Combination Ideas For vibrant pops, try red, blue, yellow, and green. These colors stand out well together. You can also experiment with pastel shades for a softer look. Imagine a light pink, mint green, and baby blue blend. The key is to choose colors that excite you. Best Practices for Melting When melting chocolate or candy melts, use a microwave-safe bowl. Heat in short bursts of 20 seconds, stirring in between. This prevents burning. If the chocolate is too thick, add a small amount of coconut oil. This will help it coat the pops smoothly. Alternate Coating Options If you want a twist, try using dark or milk chocolate instead of white. You can also use colored candy melts for a fun effect. Each option adds a unique flavor and look. Don't forget to sprinkle on some fun toppings right after dipping while the chocolate is still wet! For the full recipe, check out the instructions above. {{image_4}} You can switch up the flavor of your Tie Dye Funfetti Cake Pops. Here are some ideas: - Different Cake Mixes: Try other cake mixes like vanilla or chocolate. Each mix gives a unique taste. You can even find gluten-free options to suit different diets. Experiment with flavors that you love. - Alternative Icing Flavors: Use different icing flavors for fun twists. Chocolate, cream cheese, or even peanut butter can add a delightful kick. Choose flavors that match your cake mix for the best taste. Making your cake pops look great is just as fun as eating them. Here are some ways to jazz them up: - Themed Sprinkles: Choose sprinkles that match your event. Use holiday-themed sprinkles for parties or bright colors for birthdays. You can mix and match to create a fun look. - Decorative Wrapping Options: Wrap each cake pop in colorful cellophane. Tie with a ribbon for a nice touch. You can also use clear bags for a simple, yet stylish look. These make great gifts or party favors. For the full recipe, check out the [Full Recipe]. You want your tie-dye funfetti cake pops to stay fresh and tasty. Here’s how to store them properly: - Room Temperature vs. Refrigeration: You can keep cake pops at room temperature for up to two days. Just place them in an airtight container. If it’s warm outside, it’s best to keep them in the fridge. They can last in the fridge for up to a week. - Freezing Cake Pops for Later: If you want to save some for later, freezing is a great option. Wrap each cake pop in plastic wrap or foil. Then, place them in a freezer-safe bag. They can stay in the freezer for up to three months. When you’re ready to eat them, let them thaw in the fridge overnight. - How Long They Last: Tie-dye funfetti cake pops can last about 5 to 7 days in the fridge. If you freeze them, they can last up to three months. - Signs of Spoilage: Check for any changes in smell or appearance. If they smell off or have a strange texture, it’s time to toss them. Mold is a clear sign they should not be eaten. Always trust your senses! To keep your cake pops moist, add more icing. Start with half a cup and mix until the crumbs hold together. If the mix feels dry, add more icing, a little at a time. Baking time also matters. Bake the cake for 25 to 30 minutes. Check with a toothpick; it should come out clean. Overbaking can dry out your cake, so keep an eye on it. Yes! You can use any colors you like. I recommend gel food coloring. It gives bright and bold colors without making the batter too runny. To create unique palettes, mix colors. For example, mix blue and yellow for green. Let your imagination run wild! If you want alternatives to icing, consider cream cheese or whipped cream. Both add flavor and moisture. For healthier options, try yogurt or a fruit puree. They can keep your cake pops moist while reducing sugar content. You now know how to make fun Tie-Dye Funfetti Cake Pops. We discussed the simple ingredients needed, from cake mix to chocolate. I shared step-by-step instructions to guide you through baking and shaping. You learned tips for a great tie-dye effect and how to melt chocolate properly. We explored fun variations, storage tips, and answered common questions. Now, get creative and enjoy making these tasty treats for any occasion. Let your imagination run wild with flavors and colors!](https://fastmealmate.com/wp-content/uploads/2025/07/83373fa8-848b-4df7-80a1-d15ce22469bd-768x768.webp)


![Caramel apple cookies blend sweet apples and rich caramel in a soft cookie. This recipe makes about 24 cookies. You will love the warm flavors of fall in every bite. - 1 cup unsalted butter, softened to room temperature - 1 cup packed brown sugar - 1/2 cup granulated sugar - 2 large eggs - 1 teaspoon pure vanilla extract - 2 1/4 cups all-purpose flour - 1 teaspoon baking soda - 1/2 teaspoon fine sea salt - 1 teaspoon ground cinnamon - 1 cup fresh apples, diced (peeled and cored) - 1/2 cup caramel sauce (plus extra for drizzling) - 1/2 cup chopped walnuts or pecans (optional) - A pinch of sea salt for garnish You can customize your cookies! Try adding chocolate chips for extra sweetness. Use almond flour for a gluten-free option. If you want a nut-free treat, skip the walnuts or pecans. You can even swap the apples for pears for a unique twist. Enjoy experimenting! Start by preheating your oven to 350°F (175°C). This helps the cookies bake evenly. Next, line a baking sheet with parchment paper. This step prevents the cookies from sticking. In a large bowl, cream together one cup of softened butter, one cup of packed brown sugar, and half a cup of granulated sugar. Use an electric mixer on medium speed until the mix is light and fluffy. Next, add two large eggs. Beat them in one at a time. After that, stir in one teaspoon of pure vanilla extract until it blends in well. In another bowl, whisk together two and a quarter cups of all-purpose flour, one teaspoon of baking soda, half a teaspoon of fine sea salt, and one teaspoon of ground cinnamon. Gradually sift the dry mix into the wet mix. Stir gently until just combined. Be careful not to overmix; this keeps the cookies soft. Now, fold in one cup of diced apples and half a cup of caramel sauce. If you like, add half a cup of chopped walnuts or pecans too. Using a tablespoon or a cookie scoop, drop rounded portions of dough onto the prepared baking sheet. Leave about two inches between each cookie to allow for spreading. Place the baking sheet in the preheated oven. Bake the cookies for 10 to 12 minutes. Keep an eye on them. The edges should turn lightly golden, while the centers may look slightly underbaked. They will set as they cool. Once baked, remove the cookies from the oven. Let them cool on the baking sheet for about five minutes. After that, transfer the cookies to a wire rack to cool completely. For a delightful finish, drizzle extra caramel sauce over the cookies. Sprinkle a tiny pinch of sea salt on top of each one to enhance the flavor. This recipe makes about 24 cookies. Enjoy every bite of your caramel apple cookies! For a full recipe, check out the [Full Recipe]. To get the best texture in your caramel apple cookies, use softened butter. This helps create a nice, soft dough. Mix well but don’t overdo it. Overmixing can lead to tough cookies. When you add the apples, make sure they are diced small, so they blend into the dough. Avoid adding too much caramel sauce; it can make the dough too wet. For making these cookies, you need a few simple tools: - Mixing bowls - Electric mixer - Baking sheets - Parchment paper - Cookie scoop or tablespoon - Wire rack for cooling Using the right tools will make the process easier and more fun. One common mistake is not measuring ingredients correctly. Use proper measuring cups and spoons. Another mistake is baking cookies at the wrong temperature. Always preheat your oven before baking. Watch the cookies closely in the oven. If you take them out too soon, they may fall apart. If you leave them too long, they can get hard. Follow the Full Recipe carefully for the best results. {{image_4}} You can switch up the flavors in your caramel apple cookies. Try adding: - 1/2 cup of chocolate chips for a sweet touch. - 1 teaspoon of nutmeg for a warm spice flavor. - A splash of maple syrup for a unique twist. Experimenting helps you discover new favorites! Want to make these cookies fit your needs? Here are simple swaps: - For gluten-free cookies, use a 1:1 gluten-free flour blend. - To make them vegan, replace the butter with coconut oil and the eggs with flax eggs. - Substitute the caramel sauce with homemade date caramel for a healthy option. These swaps keep the taste delicious while catering to different diets. Make your cookies shine each fall! Add these seasonal spices: - A teaspoon of pumpkin spice for a cozy flavor. - A hint of ginger for a warm, zesty kick. - Chopped pecans or walnuts for a crunch that complements the apples. These twists make your caramel apple cookies perfect for any autumn gathering. For the full recipe, check out the earlier section! To keep your caramel apple cookies fresh, store them properly. Use an airtight container to keep out air and moisture. Place parchment paper between layers to prevent sticking. Store them at room temperature for up to one week. If you want to enjoy them longer, consider freezing them. Freezing your cookies is simple. Wait until they cool completely. Then, wrap them tightly in plastic wrap or foil. Place them in a freezer-safe bag. You can freeze them for up to three months. When you're ready to eat, just thaw them at room temperature. To regain that fresh-baked taste, reheat your cookies. Preheat your oven to 350°F (175°C). Place the cookies on a baking sheet. Heat for about 5 to 7 minutes. Check to avoid overbaking. The cookies should feel warm and soft again. Enjoy them warm with a drizzle of caramel sauce for a delightful touch! To make your caramel apple cookies chewy, focus on a few key steps. First, use brown sugar in your dough. Brown sugar has molasses, which adds moisture. Second, do not overmix the dough. Overmixing can make cookies tough. Third, underbake them slightly. When you take them out, they should look set but soft in the middle. They will continue to cook as they cool. This will give you that perfect chewy texture that you crave. Yes, you can make the dough ahead of time! Just prepare the dough as you normally would. After mixing, cover it tightly with plastic wrap or place it in an airtight container. You can store it in the fridge for up to 2 days. When ready to bake, let it sit at room temperature for about 10-15 minutes before scooping and baking. This makes it easy to enjoy fresh cookies whenever you want. Caramel apple cookies pair well with several treats. A scoop of vanilla ice cream adds creaminess and balances the sweet flavors. You can also serve them with warm caramel sauce for dipping. For a cozy touch, try them with a cup of hot apple cider. This drink brings out the fall flavors and makes for a delightful combination. You can get the full recipe for these tasty cookies to impress your friends and family. This post covered how to make delicious caramel apple cookies. We went through essential ingredients, preparation, and baking. I shared tips to avoid common mistakes and variations for your tastes. You learned how to store and reheat these cookies for the best flavor. With simple steps, you can bake a treat that impresses everyone. Enjoy experimenting with different flavors and adjustments. Happy baking!](https://fastmealmate.com/wp-content/uploads/2025/07/9c1a808e-f093-4e89-97b6-472e42d8d3a6-768x768.webp)

